Novation Launchpad Pro User manual

08
Fall$
Programmer’s Reference Guide
Document number: FFFA001331-01
Written by John Wilson and Lottie Thomas
© Focusrite Audio Engineering LTD

© Focusrite Audio Engineering LTD
2
Table of Contents
About this Guide 3!
Number Systems and MIDI conventions 3!
Bootloader 3!
Basic Features 4!
Basic Layouts 4!
Basic Communication 4!
Set-up Screen 5!
Colours 6!
Note Layout 6!
Drum Layout 8!
Fader Layout 10!
Programmer Layout 17!
Device Inquiry 18!
Advanced Features 20!
Lighting LEDs Using SysEx Messages 20!
Flashing 21!
Pulsing 22!
RGB Mode 22!
MIDI Clock 23!
Text scrolling 23!
System Exclusive Messages 25!
Other SysEx Messages 28!

© Focusrite Audio Engineering LTD
3
About this Guide
Launchpad Pro communicates using MIDI over USB and MIDI jack, operating in both directions.
This manual, describing the MIDI communication format, is all the information you need to be
able to write software that is customised for Launchpad Pro.
This is not an exhaustive document. Certain extra System Exclusive messages are used for
authentication, and for remote firmware upgrade. These are beyond the scope of this document,
however, it is worth knowing that they exist in case you encounter them while you are playing
with Launchpad Pro.
!
Number Systems and MIDI conventions
$
There are three ways of expressing MIDI data in this manual. The first, where appropriate, is a
plain English description of the message. When we describe a musical note, middle C is deemed
to be ‘C3’ or note 60. MIDI channel 1 is considered to be the lowest-numbered MIDI channel and
channels range from 1 - 16.
MIDI messages are also expressed in plain data, with decimal and hexadecimal equivalents. The
hexadecimal number will always be followed by an ‘h’ and the decimal equivalent given in
brackets. For example a Note On message on channel 1 is signified by the status byte 90h (144).
Bootloader
!
Launchpad Pro has a bootloader mode that allows the user to configure and save certain
settings. The bootloader is accessed by holding the Setup button whilst switching the device on.
The top two rows of square buttons can be used to set the device USB ID of Launchpad Pro. The
device ID ranges from 1 – 16 and the selected ID is represented by an orange button. This also
sets the USB identity, which ranges from 51h to 60h. The default ID from the factory is 1. If more
Figure$1:$Bootloader$display$

© Focusrite Audio Engineering LTD
4
than one Launchpad Pro is to be used on USB, then each device must have a different USB ID
selected.
The blue button refers to layout text, enabling the scrolling text messages when the layouts are
changed. By default the button is bright blue and the scrolling text within the main firmware is
enabled. Once the user is familiar with the use of the main firmware setup and layout selection,
turning the layout text off in the bootloader can give more rapid layout changes in the firmware.
The light green button displays the bootloader version number, and the dark green button
shows the firmware version number.
!
The main firmware can be started by pressing the Setup button again.
Basic Features
Basic Layouts
The User Guide gives a detailed description of the various layouts available in Launchpad Pro and
how to select them. The Live layout is automatically selected by Ableton Live, indicated by the
green side LED. There are four additional layouts available, allowing the Launchpad Pro to be
used as a ‘Standalone’ MIDI controller without Ableton. They are Note, Drum, Fader and
Programmer layout. Further detail on each layout can be found later in this document.
The different layouts may be manually selected on the Setup page, by pressing one of the five
coloured square pads on the top row. (See later.) The layouts may also be selected automatically
using the following message:
Host >> Launchpad Pro: F0h 00h 20h 29h 02h 10h 2Ch <Layout> F7h
(240, 0, 32, 41, 2, 16, 44, <Layout>, 247)
Where the <Layout> byte is: 00h – Note
01h – Drum
02h – Fader
03h – Programmer
The layout determines the MIDI note numbers that the buttons send and receive. Layout 0 is best
for writing software that uses Launchpad Pro as an instrument. Layout 3 is best for
programming light shows, as the grid is a blank canvas and is easy to navigate by adding and
subtracting. Adding 1 moves to the right 1 button, adding 10 moves up one button.
Basic Communication
!
The communications behaviour of Launchpad Pro varies depending upon the layout. All of the
Standalone layouts can be used to detect button presses and control LED colour, but the actual
data values and results vary. Please refer to the following sections for specific details of each
layout.
Launchpad Pro is provided with a USB interface and MIDI input/output jacks. It is usual for
Launchpad Pro to connect to an Apple Mac or Windows PC using the USB lead. Once connected,
the class-compliant USB driver will automatically provide communication ports to Launchpad Pro
for sending and receiving note messages. These MIDI ports should be considered separately to
the conventional MIDI hardware (the MIDI input/output jacks.)

© Focusrite Audio Engineering LTD
5
There are 3 MIDI input ports and also 3 MIDI output ports. The first port pair (first input port and
first output port) is usually used for communication with Ableton. (These first ports will
communicate with the Live layout of Launchpad Pro.) The second port pair is used for Stand
Alone mode of Launchpad Pro. Note, Drum, Fader and Programmer layouts all share these ports.
The third port pair is used by the hardware MIDI interface. The output is routed from the USB,
through the Launchpad Pro and out to the MIDI output jack. Similarly, the MIDI input jack is
routed through the Launchpad Pro and into the third USB input port.
Set-up Screen
Each layout also has a set-up screen to give configuration options for that layout. Pressing and
holding the set-up button allows the set-up screen to be viewed on Launchpad Pro.Releasing
the set-up button returns the Launchpad Pro to the previous display.
Pressing one of the top coloured square pads manually changes to a different layout. These pads
can be used during play to rapidly switch layouts.
Pad velocity control, after-touch mode and threshold change the instrument playing style.
Pad lighting changes whether the pads are lit automatically by pressing them, or when receiving
MIDI notes.
MIDI out enables the sending of notes to the MIDI output jack.
MIDI channel selects which of the standard 16 MIDI channels is to be used for communications.
It is useful when using multiple Launchpad Pros, allowing notes to be routed to and from a
specific device. Each layout can have a different MIDI channel selection, allowing the different
Figure$2:$Typical$layout$setup$display$

© Focusrite Audio Engineering LTD
6
layouts to target specific synthesisers or settings. Any MIDI channels shown in red are not
available for use and cannot be selected. Ableton reserves a number of MIDI channels for Live
mode, but all MIDI channels are available in Stand Alone mode.
Currently selected options are shown in a brighter colour.
The configuration options are remembered for each layout, allowing different options to be
selected and each layout to be customised. When changed the selected options are stored away
and automatically recalled again when the Launchpad Pro powers up.
For more detail on the set-up screen please refer to the Launchpad Pro User Manual.
Colours
$
Launchpad Pro has a colour palette of 128 colours shown in figure 3.Colour 0 turns the LED off.
!
!
Note Layout
The Note layout shows a chromatic scale with the black notes unlit (shown white in the example
shown in figures 4 and 5) and the white notes lit blue. The C notes are highlighted in pink.
!
The central grid of 64 square buttons send Note On/Note Off messages to the host and the 32
round buttons send Control Change messages to the host. Pressing a square pad will send a Note
On message with a velocity in the range 1 to 7fh (127). The actual velocity will depend upon the
layout configuration and how hard the pad is pressed. Releasing the pad sends a Note Off
message, with velocity 0.
In this layout, when a MIDI Note On is received by Launchpad Pro the associated square pad
lights up green, returning back to the original colour when the Note Off message is received. As
there is an overlap of notes in this layout, it is possible that a single Note On can light up two
pads simultaneously. Pressing the pad also results in the pad lighting up green, then returning to
its original colour when released.
Pressing a round button gives a MIDI Control Change message with maximum value 7fh (127),
and a minimum value of 0 when released. In this layout, the round button will also light green.
However, the round button can light with a different colour when a CC message is received. (The
controller value determining the colour of the LED.)
The self-illumination of pads and buttons can be enabled or disabled on the set-up page.
Figure$3:$Launchpad$Pro$colour$table,$in$decimal$

© Focusrite Audio Engineering LTD
7
The Up, Down, Left, Right cursor buttons are special, and used for shifting the chromatic scale
display. These buttons cannot be controlled by a CC message.
Figure$4:$Note$layout$MIDI$values,$in$decimal$

© Focusrite Audio Engineering LTD
8
!Example: Trigger the top left grid light, in Note layout
$
Host >> Launchpad Pro: Channel 1: Note On B4/47h (71), velocity 2Dh (45)
90h 47h 2Dh (144, 71, 45)
!Example: Make the round Session button light pink, in Note layout
$
Host >> Launchpad Pro: Channel 1: set controller 5Fh (95) to 35h (53)
B0h 5Fh 35h (176, 95, 53)
Drum Layout
This layout is intended to provide a grid suitable for playing a drum rack within Ableton Live.
(See figures 6 and 7.)
Rather like the Note layout, the square pads send Note On and Note Off messages. The round
buttons send MIDI CCs. They self-illuminate when pressed, unless disabled in the set-up page.
When a MIDI Note On is received the associated pad lights up green, returning back to the
original colour when the Note Off message is received.
MIDI Note C1 = 36 (24h), which is the starting point for the Ableton drum rack.
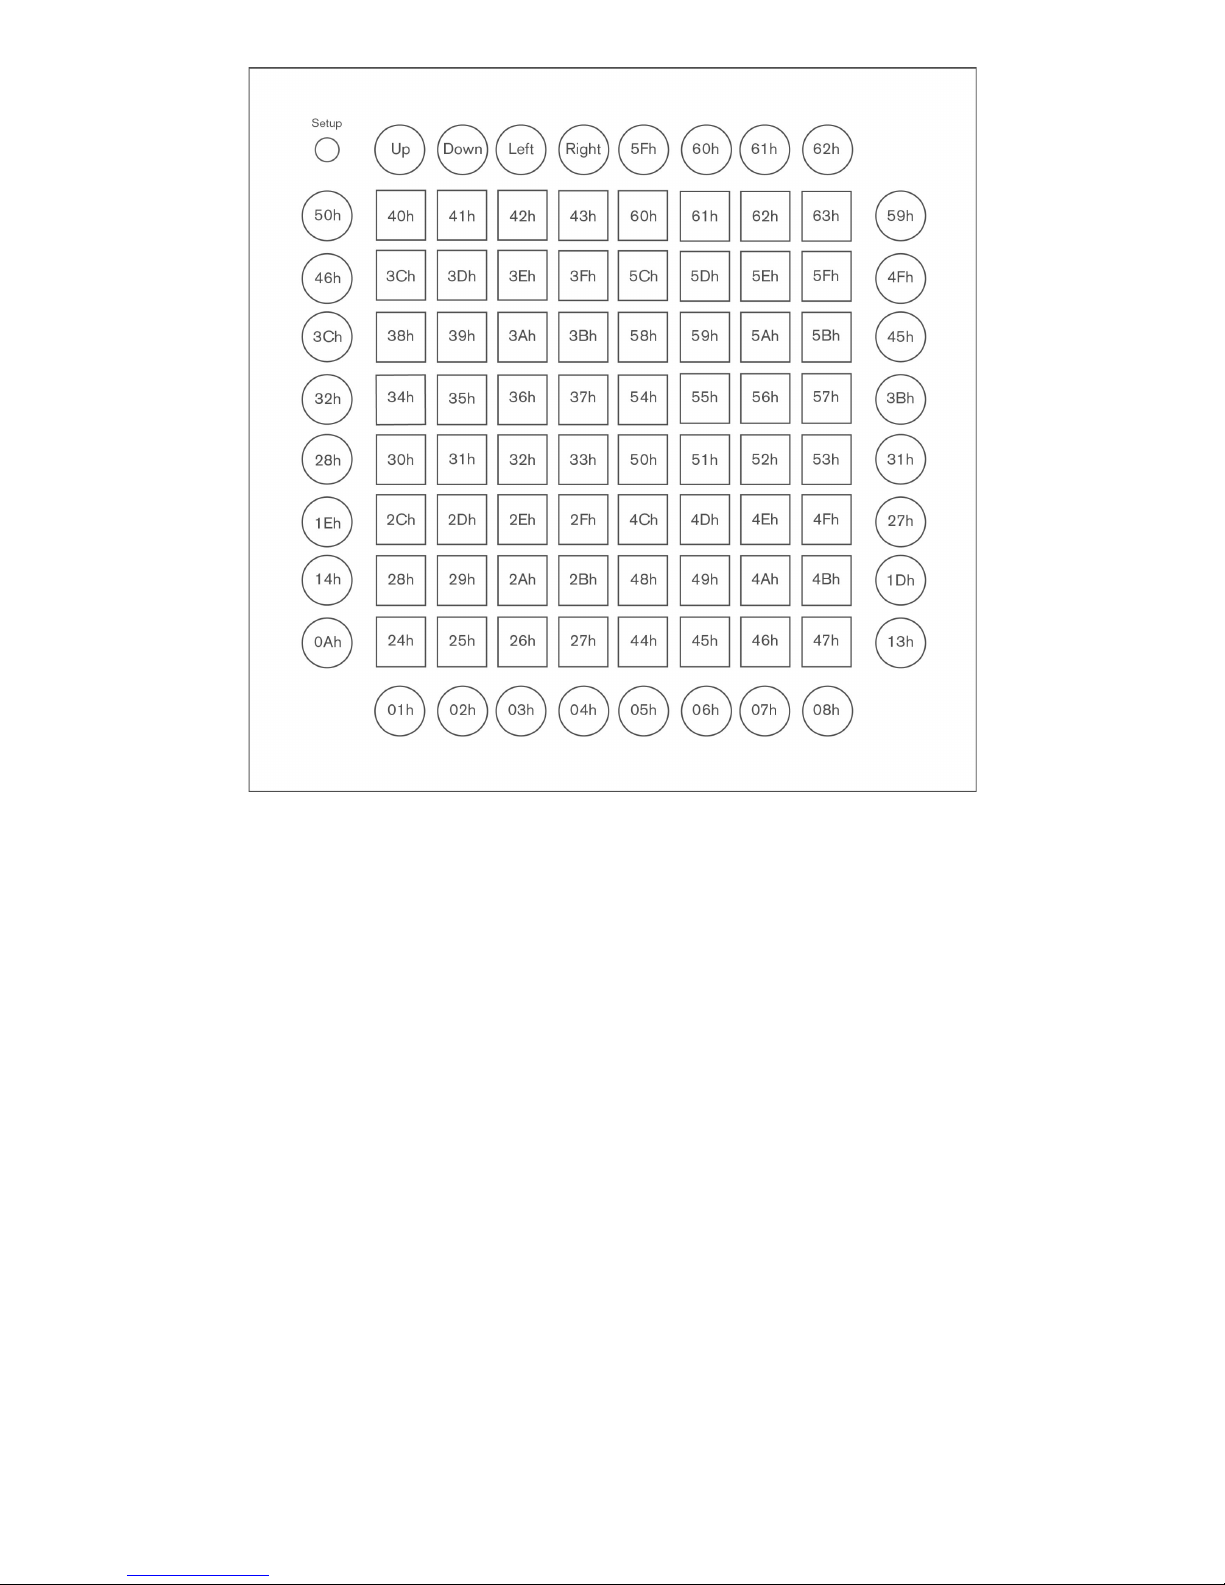
Figure$5:$Note$layout$MIDI$values,$in$hexadecimal$

© Focusrite Audio Engineering LTD
9
Note the round buttons send MIDI CCs.
Figure$6:$Drum$layout$MIDI$values,$in$decimal$
© Focusrite Audio Engineering LTD
10
!Example: Trigger the bottom left grid light, in Drum layout
$
Host >> Launchpad Pro: Channel 1: Note On C1/24h (36), velocity 0Fh (15)
90h 24h 0Fh (144, 36, 15)
!Example: Make the round Sends button purple, in Drum layout
$
Host >> Launchpad Pro: Channel 1: set controller 07h (7) to 33h (51)
B0h 07h 33h (176, 7, 51)
Fader Layout
!Virtual Fader Controls
Each column outputs a MIDI CC with the number shown in the bottom row and the value as
shown in the grid. (See figures 8 and 9.) Essentially this creates 8 faders with static values that
can then be used in any way you might use a standard MIDI fader.
Note that the top 4 values of the fader table correspond to specific positions on Ableton Live's
volume faders.
Figure$7:$Drum$layout$MIDI$values,$in$hexadecimal$
Other manuals for Launchpad Pro
2
Table of contents
Other Novation Musical Instrument manuals


