Nikon COOLPIX L18 User manual

School District of Manatee County
Instructional Technology Department 1
CoolPix L18
Digital Camera Quick Guide
Batteries and Memory Card
The memory card is housed in the battery compartment located on the bottom of the camera.
Slide the memory card in until it clicks into place.
The CoolPix L18 digital camera takes 2 AA Batteries. To improve battery performance, set
battery type in the setup menu to match camera batteries.
See page 12 & 13 of your manual for more battery details.
Turning On The Camera
Press and hold the ON/OFF Button until
the camera turns on. The monitor will turn
on.
The Different Modes
Memory card !
2 AA Batteries !
CoolPix has 4 modes available.
Easy Auto: automatic point and shoot.
Movie: record short video clips.
Scene: preset settings for specific
situations or scenes. Example: Sports,
Night landscape, Backlight etc.
Auto: more options than easy auto.
Recommended for ePortfolio use.

School District of Manatee County
Instructional Technology Department 2
CoolPix L18
Mode Selection
Turn camera on and press the shooting
mode button to select a mode.
The monitor will display the shooting-mode selection menu. Use the multi selector
located to the right of the monitor to select the shooting mode desired.
Monitor Multi Selector
Easy auto mode features Face Priority. Point toward a face and the camera
will automatically focus. When a face is recognized in this mode you will see a
double yellow border surrounding the subject. Center of the frame is the focus
area so if no face is in the frame center main subject.
Movie mode records short video clips with sound recorded using a built-in
microphone. The maximum length of the movie that can be recorded and
movie options will be displayed on the screen.
Scene mode has preset settings based on the different scene choices.
Portrait
Use when the main subject stands
out clearly.
Party/
indoor
Capture the effect of
candlelight and other indoor
lighting.
Landscape
Good for vivid landscapes and
cityscapes.
Beach/
snow
Captures the brightness of
subjects in these scenes.
Sports
This setting will freeze the action
in high-speed activities.
Sunset
Setting will preserve deep
hues in sunsets & sunrises.
Night
portrait
Night portrait will balance the
natural light between the main
subject and the background.
Dusk/
dawn
Use to preserve colors in low
natural light situation at
sunrise or after sunset.
Night
landscapes
A slow shutter speed to produce
stunning night landscapes.
Close-up
Macro mode for shooting
flowers, insects and artifacts.
Museum
Indoor use when flash is not
permitted.
Copy
Good choice for text, drawings
or paper artifacts.
Backlight
Use when light is coming from
behind your subject.
Panorama
Take a series of pictures joined
to form a single panorama
photograph.
Press up or down on
the top and bottom of multi
selector wheel to highlight the
desired mode. Press OK in
center of wheel to make your
selection. The shooting-mode selection menu will remain on the screen until a
selection is made.
!

School District of Manatee County
Instructional Technology Department 3
CoolPix L18
Mode Selection (Continued)
Auto mode is recommended for first time users. To select this
mode press the shooting mode selection button on top of camera,
the mode selection menu will display on screen, press up or
down on the multi selector wheel and choose Auto mode.
Press OK in center of wheel to make selection.
Next press the menu button and select Image Mode.
We recommend “TV Screen (640) for ePortfolio use.
The Multi Selector
This button enables you to select modes, select menu options and to apply selections. To
utilize as a selector press the top to move up, bottom to scroll down, left and right by
clicking on the sides of the multi Selector button. To apply your selection click OK in the
center.
Press to
Scroll
Down
!
Press to
Scroll Up
!
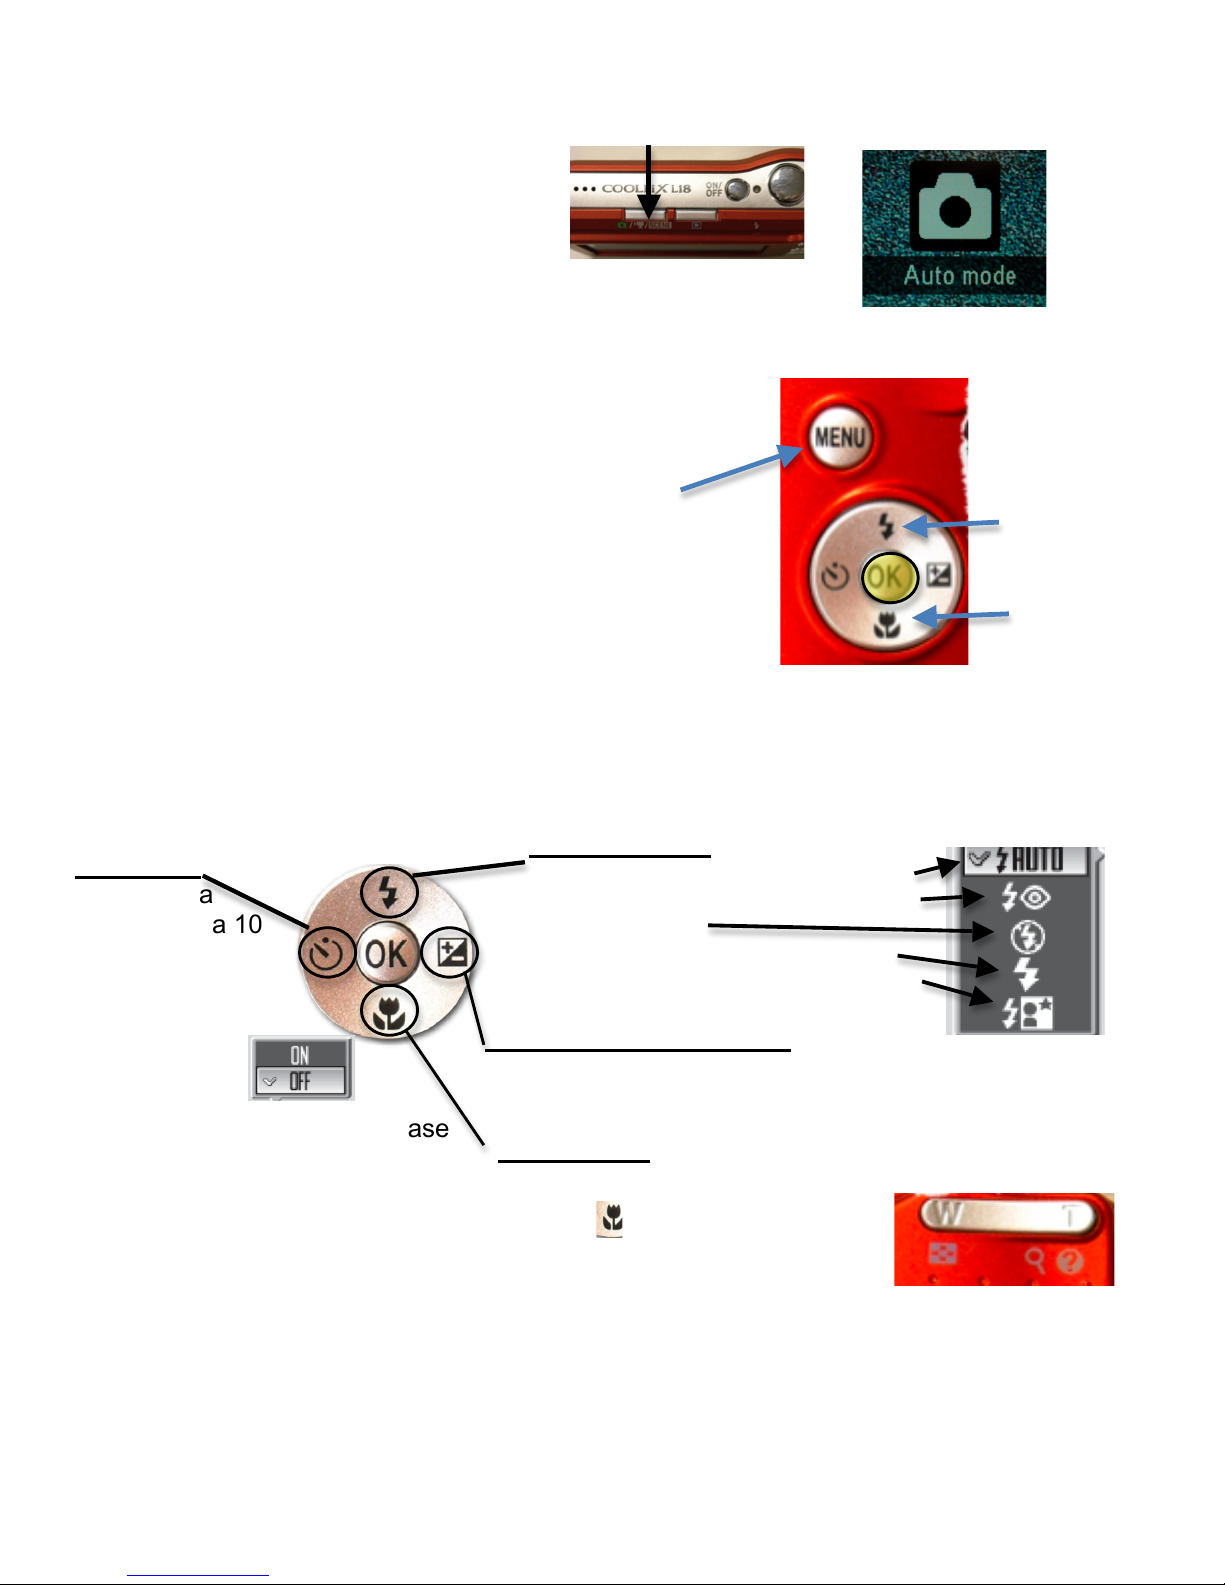
Self Timer
The camera
comes with a 10
second timer for
self-portraits.
1. Press Timer
2. Scroll to On
3. Press OK
4. Frame photo,
!
Flash options
1. Auto - Flash fires on it’s own
2. Auto with red eye reduction
3. Off
4. Fill flash- fills in back light
5. Slow sync- use in low light
press shutter halfway, release
to focus and set exposure. To
start timer press shutter fully.
Light on front of camera will
flash and stop blinking one
second before picture is taken.!
Exposure Compensation
An advanced feature; refer to your
manual page 30 for details.
Macro Mode
This is for taking pictures of objects at close
range.
1. Press (macro mode)
2. Scroll to On
3. Press OK
4. Press Tor W to frame the picture. The camera
focuses continuously in macro mode. Turning the
camera off will restore default settings.
!

School District of Manatee County
Instructional Technology Department 4
CoolPix L18
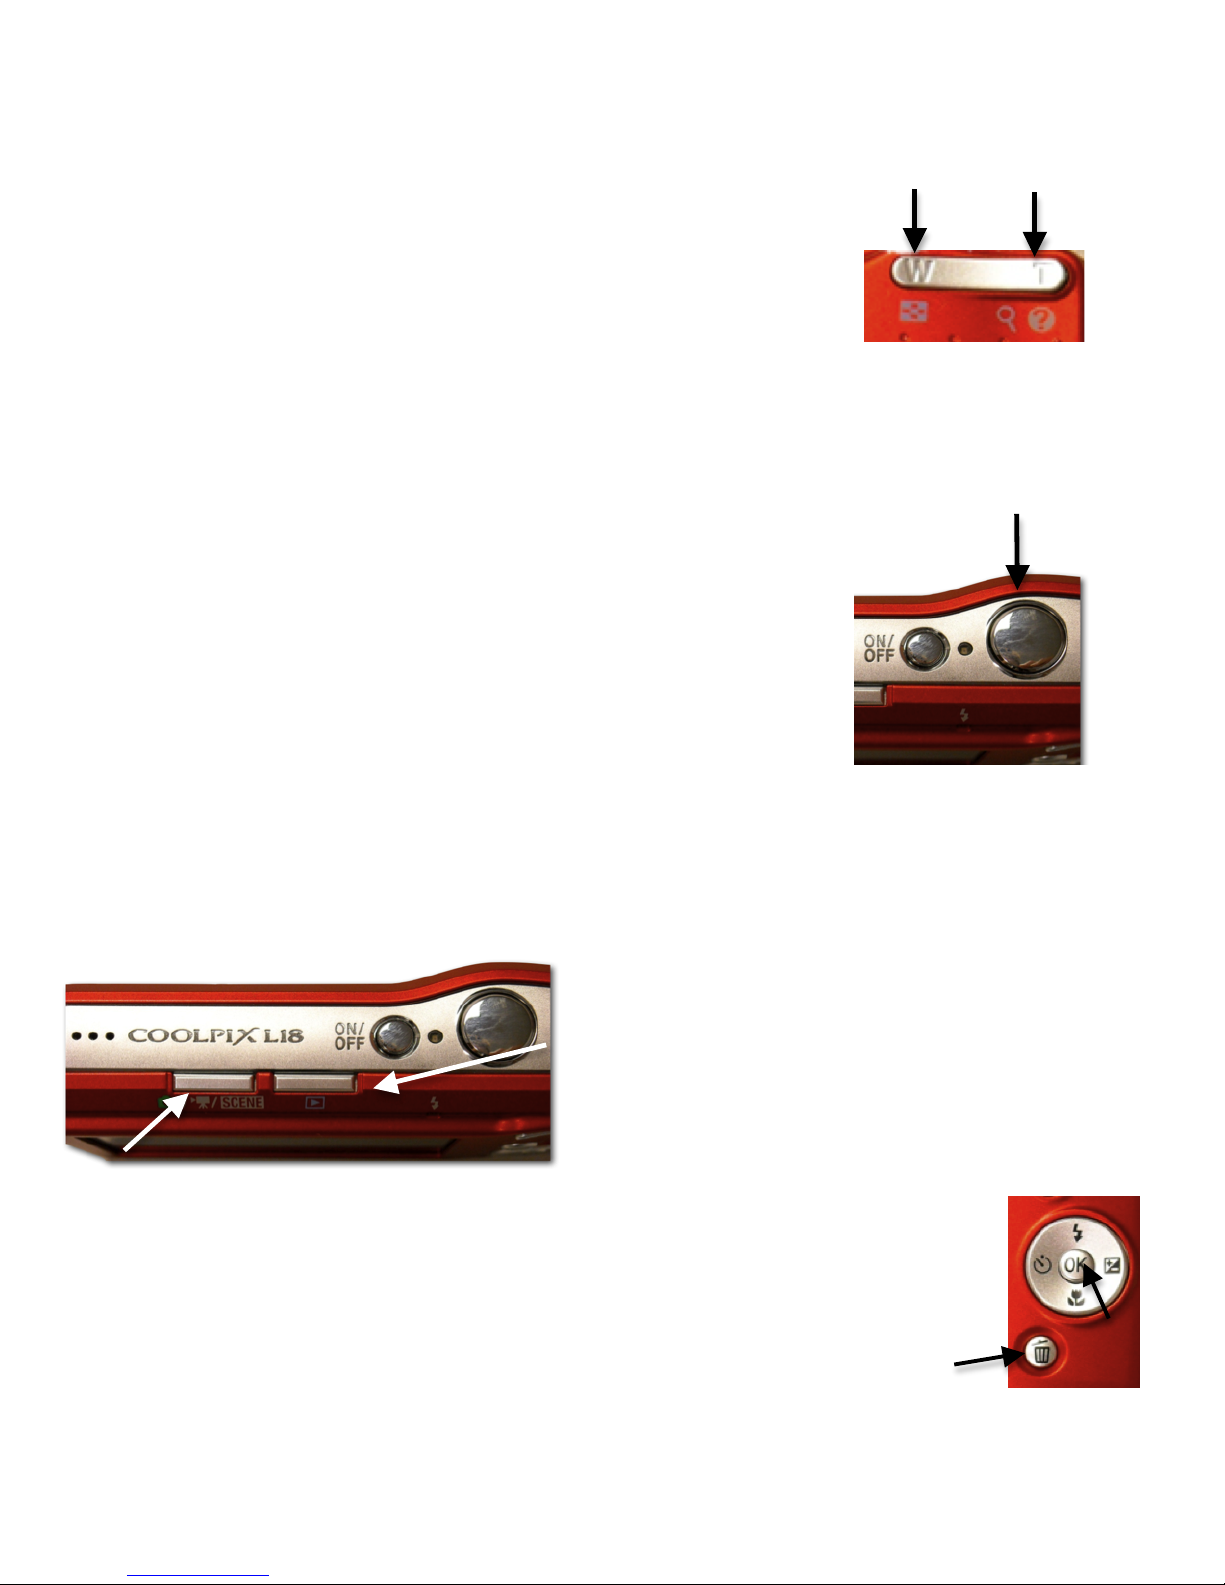
Using the Zoom
The camera has optical zoom and digital zoom features. Press
the T or W to engage zoom. The image will grow larger as you
zoom using optical zoom mode. The camera zooms in to the
maximum optical zoom (3X) then digital zoom will be triggered.
The focus area is not displayed on the monitor in digital zoom.
Shutter and Focus
The shutter is used to take pictures as well as to focus the
camera. Press the shutter half way and hold to set the focus. If
a face is the main subject camera will focus on the face and a
double line border will appear. Subject is in focus when the
border glows green. If there is no human subject the focus area
is located in the center of the frame and this area will glow green
when camera is focused. Press the shutter all the way down to
snap the photo. The image will be recorded to the memory card.
To View Photos
Camera has playback feature to show photos full frame. This gives you the
opportunity to evaluate image, reshoot if
necessary and delete poor quality images.
To view your photos click the playback
button from shooting mode. The last photo
taken will appear on the monitor. Use the
multi selector button to scroll forward and
backward through your images.
Press mode selection button to continue taking photos. To delete an image,
scroll to display the image and click the delete button located under the multi
selector button. You will be prompted to verify your desire to delete the photo
being displayed. Use the multi selector button to highlight Yes and click OK for
image to be permanently deleted. You can only delete one photo at a time
using this process.

T!
W!
Zoom Out Zoom In!
You will not see a close up view of your subject in the display. A square will be visible
in the center of the frame, keep subject in that box. Digital zoom uses a digital process
giving a grainy appearance to pictures.!

School District of Manatee County
Instructional Technology Department 5
CoolPix L18
Transfer Pictures to Computer
Camera should be turned off. Connect
camera to the computer with the USB cord
that comes with camera. The small end of the
cord connects to the camera as shown and the
USB end connects to the USB input of your
computer. Turn the camera on.
The computer should automatically recognize a camera is attached and ask what you
would like to do. If nothing happens you may need to install the Nikon Transfer software
that comes with the camera.
Mac OSX
iPhoto will open and switch to import mode.
The number of photos available to import will
be displayed. To import all photos click
Import. You will be asked if you would like to
have images deleted from the camera as you
import them into iPhoto. You may wish to
verify the photos have been imported before
you delete photos from the camera. Once
images are imported, turn camera off and
disconnect camera from the computer.
Windows XP
Windows will recognize the connection and a menu will
open, choose Microsoft Scanner and Camera Wizard
then click OK.
Photos will appear in the Wizard window. By
default all images are selected for
downloading. You can remove the check to
deselect that image for download.
Pictures can be rotated.
Once all images are chosen and checked
click Next.

School District of Manatee County
Instructional Technology Department 6
CoolPix L18
Transfer Pictures to Computer (Continued)
Picture Name and Destination window will open.
Name group of pictures, select a location to save
the photos and decide if you wish to have them
deleted from the camera after import. Click
Next.
If you are finished working with the photos click
Nothing to indicate there are no more changes and
click Next to proceed to next window. The next
window will give you the option to go back and
make changes. When you are done click Finish.
Disconnect your camera by turning if off and removing the wires.
Delete All Photos
All pictures can be deleted from memory card after they are successfully transferred to a
computer by formatting the memory card. Format card option is found in the set up menu.
Press the Menu button to display the setup menu. Use the multi selector tool to scroll
through the setup menu to find Format card. You will see a warning that all images will be
deleted! No, will be highlighted, if you choose to format scroll down to highlight Format and
click OK on the multi selector button.
Memory card will be empty, exit setup menu and start taking more photos.
This manual suits for next models
1
Table of contents
Other Nikon Digital Camera manuals

Nikon
Nikon D2XS User manual

Nikon
Nikon COOLPIX S7000 User manual

Nikon
Nikon Coolpix S3100 User manual

Nikon
Nikon D200 User manual

Nikon
Nikon CoolPix 3200 User manual

Nikon
Nikon Digital Camera User manual

Nikon
Nikon J3 User manual

Nikon
Nikon Coolpix S1 User manual

Nikon
Nikon Coolpix S52 User guide

Nikon
Nikon 1J5 User manual

Nikon
Nikon D3000 User manual

Nikon
Nikon Coolpix AW130 User manual

Nikon
Nikon Fun >Touch 4 User manual

Nikon
Nikon CoolPix P7100 User manual

Nikon
Nikon 1 AW1 User manual

Nikon
Nikon COOLPIX 5700 User manual

Nikon
Nikon Coolpix S3600 User manual

Nikon
Nikon KEYMISSION 360 User manual

Nikon
Nikon D80 User manual

Nikon
Nikon COOLPIX S205 User manual