Nexus STANDARD MP V3 User manual

1

Table of contents
General description: Pg. 1
Assembly and preparation: Pg. 2 - 3
Control functions: Pg. 3 - 7
General operation and Set-Up: Pg. 7
Full manual set-up: Pg. 7 - 9
Search method: Pg. 9 - 11
Tips: Pg. 11 - 12
Care of the Standard MP: Pg. 12
Technical specifications: Pg. 12
Troubleshooting: Pg. 13 - 14

General Description
The Nexus Standard MP V3 is an Analogue Induction Balance
(IB) metal detector that operates in the very low frequency (VLF)
range and it is designed for use on all Inland Sites, Tidal Salt
Water Beaches. The Nexus Standard MP benefits from our new
Super Damping Technology that gives it the ability to effectively
suppress by means of proper balance any kind of mineral
material that exists on the ground surface.
MP stands for Mineral Power. The Nexus Standard MP V3 may
be the most efficient IB metal detector for use in heavy mineral
ground conditions and strong magnetite. In this regard the MP V3
is the best IB based metal detector from the Nexus product line.
It may be used in any of the two basic modes of operation -
All-Metal or VCO Multi tones.
It is designed to be an All-purpose metal detector, capable of
finding both small and large targets at extreme depths in normal
soil conditions. It is also designed to work with very high
efficiency in all existing types of mineral soils and magnetite
(black sand) surpassing in performance all other IB metal
detectors. To obtain the best results, as with all metal detectors, it
is essential to understand the settings and operation of the
detector. Professional users can enjoy the benefits of the deep
seeking Nexus technology.
As a general rule, the best results will always be obtained when
the detector is properly set in All Metal Mode. Therefore users will
need to practise and experiment in order to obtain the best
possible results on any particular site. All sites and soils are
different and settings that will give good results on one site may
be less successful if used elsewhere.
The Nexus Standard MP is designed to detect the very deepest of
targets and operates near to the limits of what is achievable with
induction balance.
1.
Assembly & Preparation
Assembly & Preparation
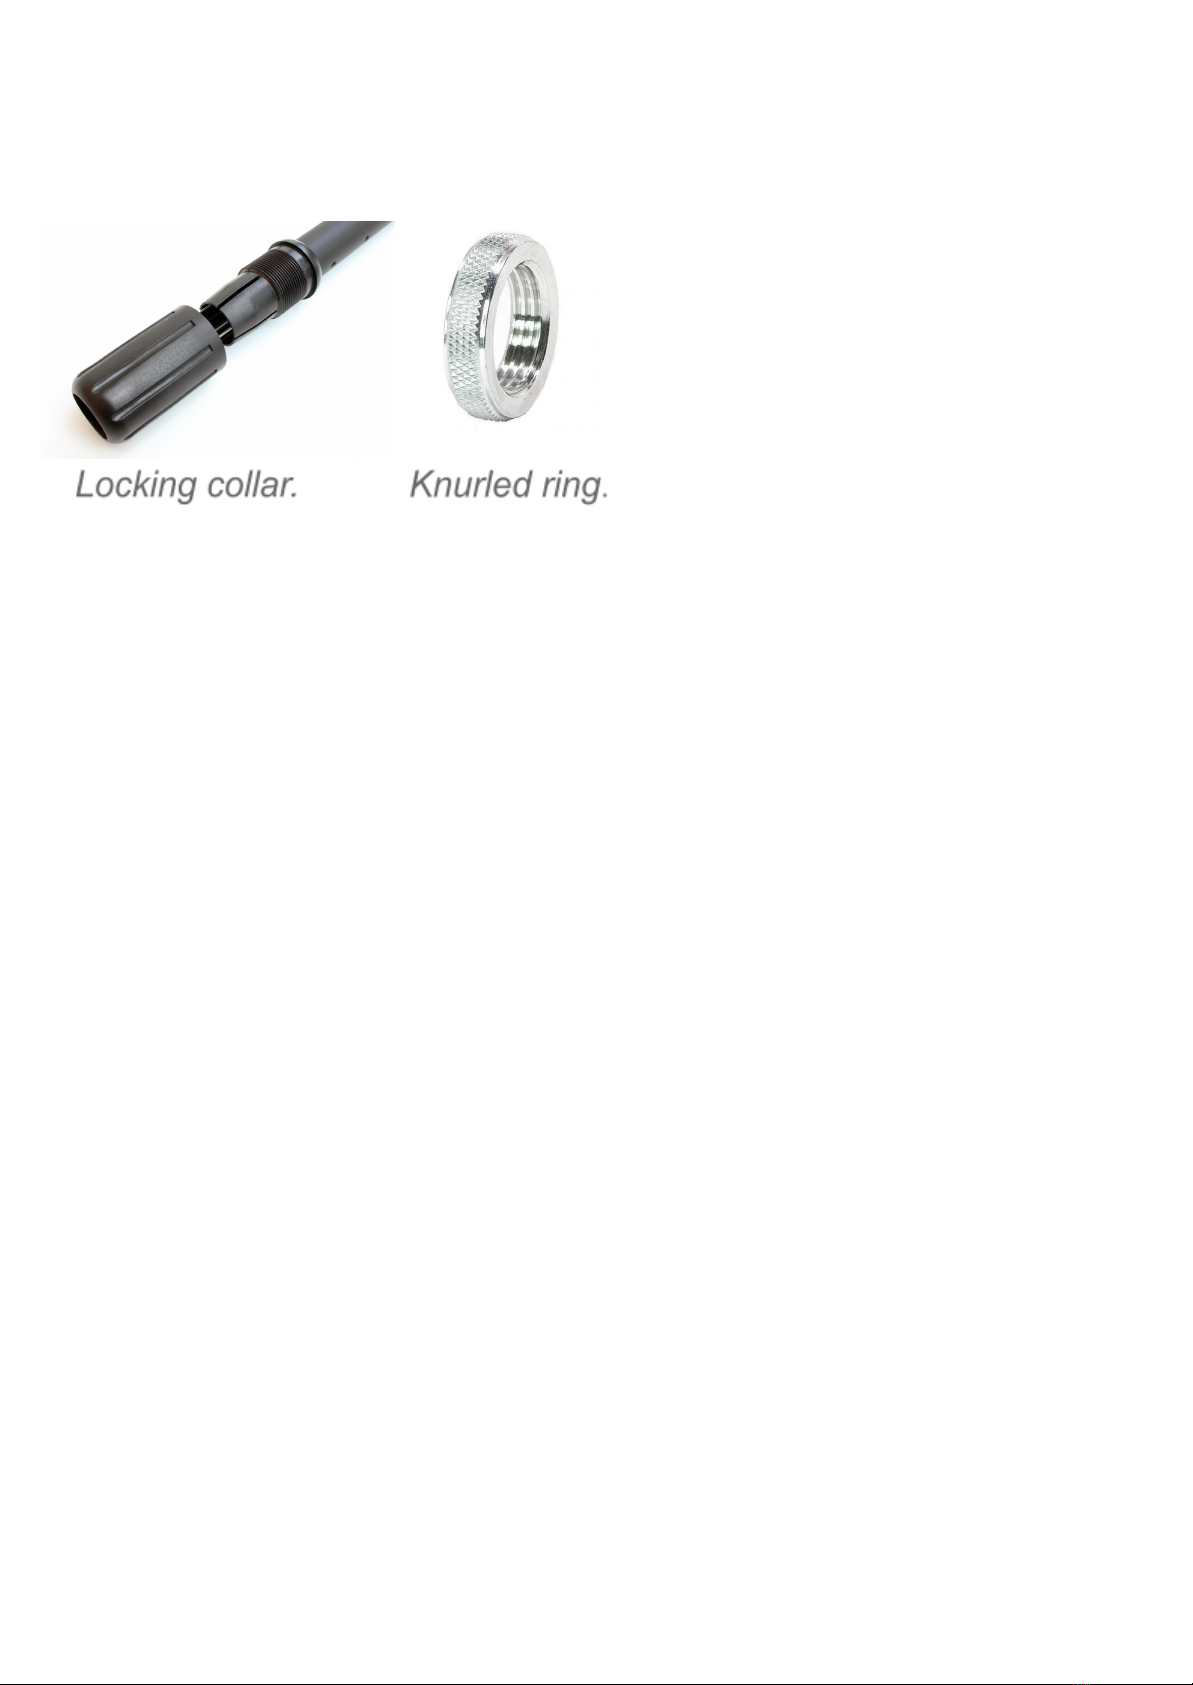
The Nexus Standard MP is supplied boxed and ready for quick
assembly by simply attaching the two lower stem poles to the top
one, tightening the collars and attaching the coil to the lower stem
section, using the plastic 4 bolt and friction washers supplied and
tightened by hand so that coil is held at the correct angle to the
stem; the coil cable plug is inserted into the socket in the control
box and then tighten the knurled ring, taking care when winding
the cable around the stem that the cable is not strained.
The centre stem pole is of the same tube diameter as the top one
and can be left off in circumstances where a short stem is
needed; it is meant for use on steep sites, river banks, caves,
ditches and similar conditions.
The detector is supplied with a drop in 10 AA battery holder that
can be used for all types of AA size batteries, (alkaline or
rechargeable); a charging socket is provided to the battery box
for connecting a charger unit. To insert or change batteries
remove any three of the thumb plastic screws from the base lid of
the battery box (the battery box is below the arm cup at the top of
the detector stem) and loosen the fourth screw. Turn the cover to
2.
the side. Insert the 10 batteries, in their correct alignments, into
the plastic holder and make sure that all the terminals have a
good electrical contact. Locate the battery holder into the
compartment, ensuring the connecting terminals of the battery
holder are in good contact with the two electric spring loaded
terminals behind the recharge socket. Do not over-tighten the
plastic thumb screws when refitting.
If you wish to use headphones (highly recommended) connect
your available set to the 6 mm jack socket on the battery box.
The Nexus Standard MP has an internal loudspeaker so
headphones are not absolutely essential. For any headphones
that have a volume control, ensure that this is set to MAXIMUM
and use the Nexus Standard MP Volume knob on the control box
to set the volume level.
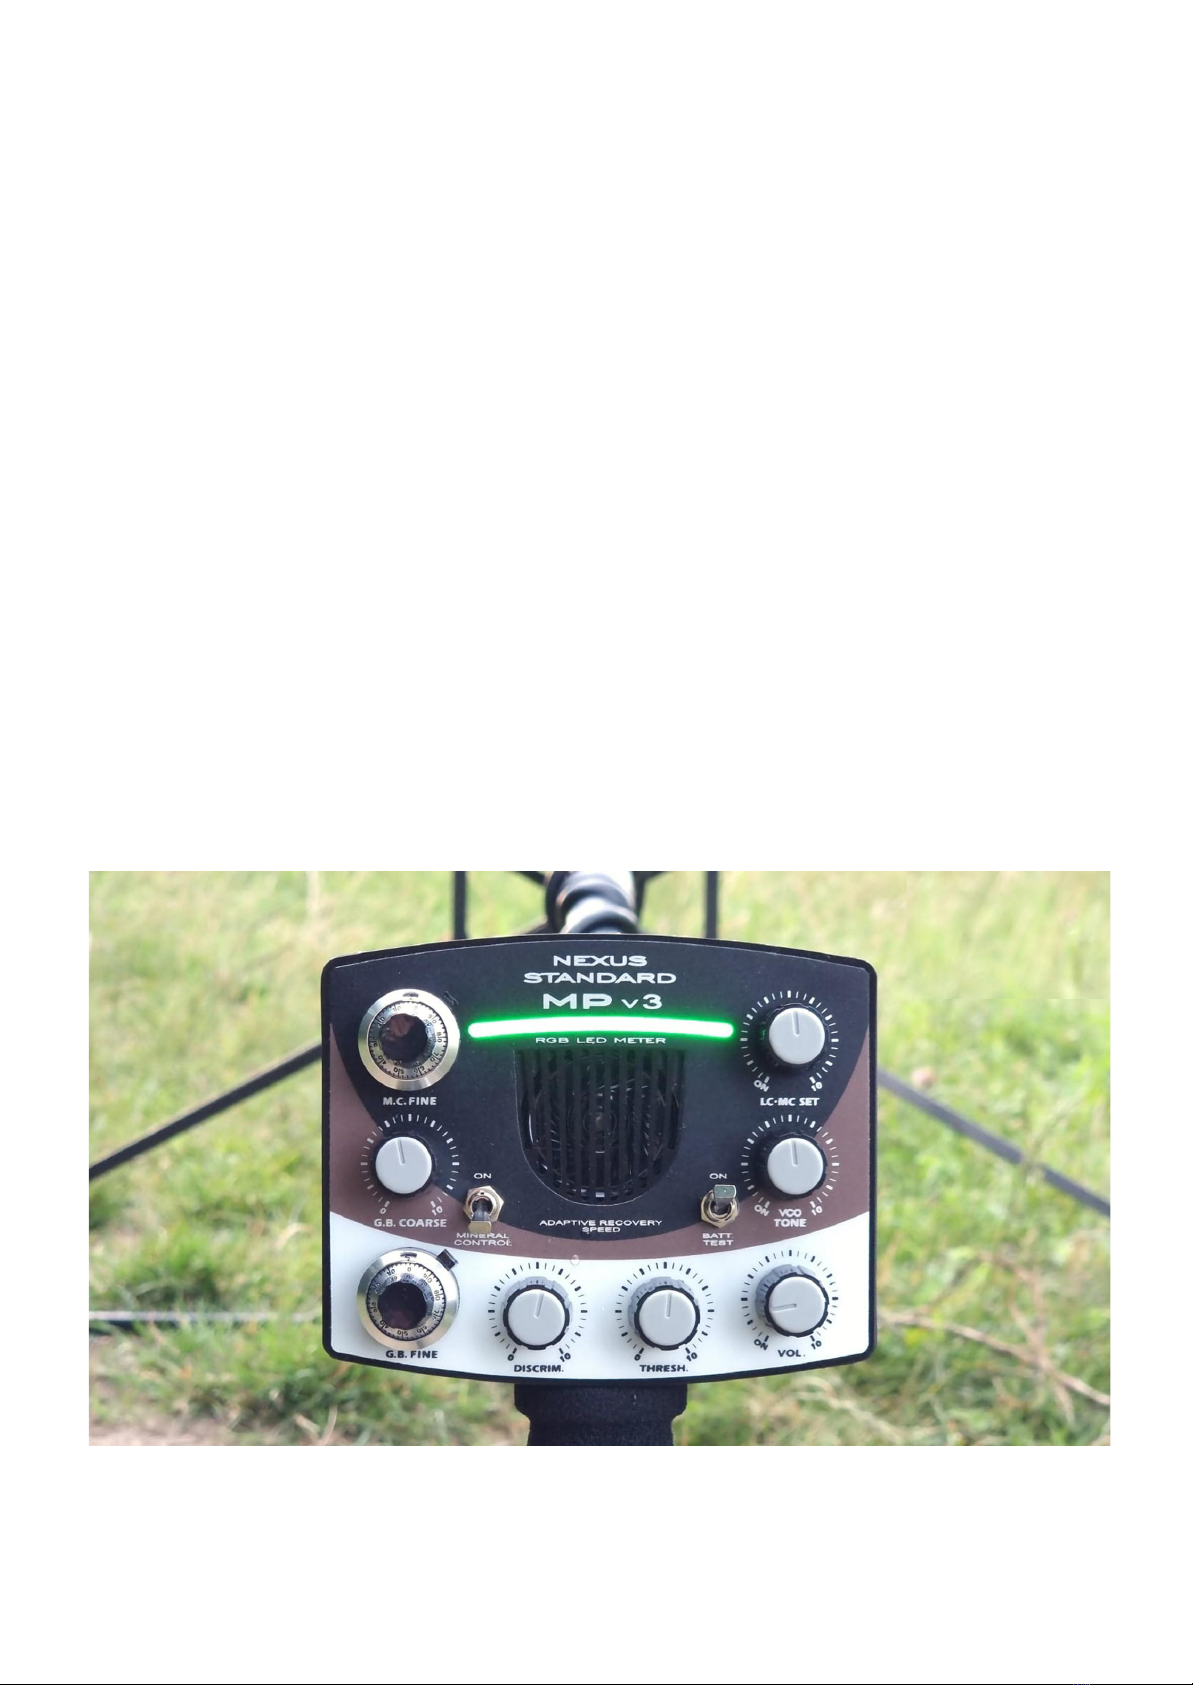
Controls
3.

The Nexus Standard MP V3 has eight rotary control knobs and
two toggle switches.
Battery Test Toggle Switch
It is located on the front panel of the control box. It is used to
check the condition of the batteries by using the DDM.
The Battery Check of the MP V3 will indicate battery Voltage
between 10.5 V and 11.5V.
Full LED meter will indicate battery Voltage 11.5V or higher.
No indication during battery check will mean 10.5V or less in
which case the batteries will need to be put on charge.
Volume and Power On/Off switch.
This knob sets the volume of the tone and responses and it is
used also to turn on/off the Nexus Standard MP V3. This knob
should always be used for setting the volume. Any volume control
on the headphones should be set to MAXIMUM.
VCO Tone
This control enables the VCO multi tones on the MP V3. It is
recommended that the VCO control is set to the middle or where
the first green light on the led meter is almost turned on.
If the VCO knob is set fully anticlockwise this will give preference
to high tones, which can help in soil conditions where deep small
non-ferrous targets are difficult to identify. This setting will also
tend to bring some Iron targets to sound non-ferrous.
If the VCO knob is set fully clockwise (10), then low tones will be
dominant and small non-ferrous targets will sound in high
frequency closer to the search coil. In other words the depth of
4.

discrimination will be reduced and some non-ferrous targets will
be recovered as such at shallower depths.
RGB LED Meter
The RGB meter is based on LED technology and provides a
reliable visual discrimination analysis in All-Metal Mode and VCO
Multi tone mode.
The RGB meter indicates only Non-Ferrous targets in three basic
colours - Green, Orange and White/Purple.
The three colours represent three different non-ferrous
conductivity ranges.
Green colour indicates only the lowest conductors, such as Gold
coins and small Aluminium fragments.
Orange colour indicates everything between Lead, Copper and
Bronze.
Purple / White colour indicates mostly Silver targets, which are
the highest conductivity non-ferrous targets found in most cases.
In this colour very large metal targets will also be displayed as
high conductors.
Discrimination
This knob sets the level of the discrimination. Rotating the
Discrimination knob clockwise (from 0 to 10) will INCREASE the
level so that Iron is increasingly not detected (but high settings
will result in the loss of potentially good targets). Generally, the
discrimination level should be set as low as possible; to avoid
masking the smallest and deepest desired targets.
Unlike the Discrimination settings in MP V2 and MP V1, this
control in MP V3 needs to be set so that Iron is removed from the
RGB meter readings. Setting the Discrimination level control to
5.

zero will result in Iron targets being indicated as low conductors
and indicated with green colour.
Ground Balance
The Ground Balance of Nexus Standard MP V3 is controlled by
two rotary controls. Coarse and Fine.
The Coarse GB control is a single turn potentiometer. The Fine
control is a 10 turn potentiometer with a multi turn dial
mechanism with locking function.
These two controls are used to set the balance of the Nexus
Standard MP V3 to suit the soil conditions on any given site.
Threshold
This knob sets the level of the threshold tone. The Nexus
Standard MP V3 is meant to operate in audible Threshold level at
all times when All Metal Mode is in use.
If the VCO Multi tones are engaged permanently then it is
recommended that the Threshold level is set to silent.
Mineral Control section
The Mineral Control on Mp V3 is enabled from the Mineral Control
On/Off toggle switch on the front panel. Once this switch is turned
to On position the M.C. Fine control can be used to set the level
of resistance to high minerals of the MP V3. If the Mineral Control
toggle switch in on off position (down) the M.C. Fine control will
be disabled.
LC-MC SET control
This rotary control is used to turn on/off the RGB meter and/or to
6.

set the cut off point between low conductors and medium
conductors. For example in some cases hammered gold coins
may be preferable to be set on the meter as low conductors
(despite that normally they can read as medium-low conductors),
so that all other targets can be ignored without potential loss of
hammered silver and hammered gold coins.
This type of setting will be useful on sites littered with useless
non-ferrous targets with conductivity higher than the desired
small gold and hammered silver coins.
General Operation and Set-Up
Having assembled the Nexus, inserted batteries and connected
the headphones, The Nexus is ready for use. The Nexus
Standard MP V3 is designed exclusively for use by highly
experienced users. No metal detector, however powerful, will
operate at its best unless it is set up properly for the conditions in
which it is to be used. To obtain the best results and maximum
depth and sensitivity to desired targets, the Nexus Standard MP
V3 must be properly tuned to the site and the settings to achieve
this are set out below.
Full Manual Set-Up
Firstly, ensure that no metal is in close proximity to the coil. It is
also advisable to carry out the tuning and setting up of the Nexus
Standard MP V3 away from other metal detectors or potential
sources of electronic interference. Turn the detector on. A tone
will be heard and the RGB meter will flash. The tone will fade and
the meter bar will settle after a couple of seconds. To check the
condition of the batteries, turn on the Battery Check. After the
7.

battery check has been done, turn the toggle switch back down to
allow the RGB to indicate metal targets.
* Keeping the RGB in battery check mode for a long time will
drain the batteries.
Holding the Nexus Standard MP V3 with the coil well above
ground level, adjust the Threshold knob to obtain a faint audible
tone setting. Adjust the Volume knob to set a comfortable level
(remembering to set any adjustable headphone volume control to
MAXIMUM).
Lower the coil to the ground and sweep side to side slowly to
ensure that there are no metal targets in the place you are tuning
the detector. When you are satisfied, proceed as follows. Position
the coil about 3” (subject to coil size) above and parallel to the
ground surface. Raise the coil gently above the ground to 25 cm
(10", subject to coil size) and lower back to 3” (75 mm) above
ground several times. Note whether the threshold tone remains
the same or if it increases or decreases in intensity while raising
and lowering the coil. There should be no residual tone change
left after the GB is done.
* IF THE GROUND BALANCE IS INCORRECTLY SET THE RGB
METER WILL INDICATE STRONG FALSE SIGNALS FROM THE
GROUND MINERALS.
How to set the Ground Balance of MP V3.
At the start turn both GB controls to 0 (fully anti clockwise).
While moving the coil up and down as described above, begin
turning slowly the Coarse GB knob clockwise. Do so until the
detector produces very soft sound downwards. After this fine
adjustment the GB from the Fine GB control until there is no
residual ground signal left or very soft signal in both up and down
directions of coil movement.
8.
Table of contents
Other Nexus Metal Detector manuals


Popular Metal Detector manuals by other brands


Steinberg Systems
Steinberg Systems SBS-MD-12 user manual

GOLDEN MASK
GOLDEN MASK 5 user guide

Grizzly
Grizzly YM 203 manual

Fisher Research Labs
Fisher Research Labs 1280-X Aquanaut operating manual

Treasure Cove
Treasure Cove Vibra-Probe 560 quick guide

Accurate Locators
Accurate Locators XL16 IMAGER user guide