
New Home NH60 Troubleshooting guide

1
SERVICE MANUAL
&
PARTS LIST
MODEL: NH60

2
LOCATE AND IDENTIFY PARTS..................................................................................................3
WIND THE BOBBIN ......................................................................................................................4
PREPARE YOUR TOP THREAD ...................................................................................................5
LCD DISPLAY ...............................................................................................................................6
WHAT TO DO WHEN ................................................................................................................ 7-9
CHANGING EXTERNAL PARTS
FACE COVER..............................................................................................................................10
FREE-ARM COVER ...................................................................................................................11
FRONT COVER .................................................................................................................... 12-13
REAR COVER.............................................................................................................................14
MECHANICAL ADJUSTMENT
PRESSER BAR HEIGHT ............................................................................................................15
NEEDLE DROP POSITION ........................................................................................................16
ADJUSTMENT OF HOOK TIMING .............................................................................................17
REPLACING HOOK ....................................................................................................................18
ADJUSTMENT OF NEEDLE BAR HEIGHT................................................................................19
CLEARANCE BETWEEN NEEDLE AND TIP OF HOOK ROTARY ............................................20
FEED DOG HEIGHT...................................................................................................................21
TOP TENSION ............................................................................................................................22
REPLACING THE ELECTRONIC COMPONENTS
CIRCUIT BOARD-A CONNECTION ...........................................................................................23
SELF-DIAGNOSTIC TEST.................................................................................................... 24-28
CIRCUIT BOARD-A .............................................................................................................. 29-30
DRIVING MOTOR .......................................................................................................................31
SWITCHING REGULATOR UNIT................................................................................................32
ADJUSTING BUTTONHOLE LEVER POSITION........................................................................33
PARTS LIST .......................................................................................................................... 34-47
INDEX

3
LOCATE AND IDENTIFY PARTS
NEEDLE CLAMP
NEEDLE
PRESSER
FOOT HOLDER
PRESSER FOOT
CARRYING HANDLE
HANDWHEEL
POWER SWITCH
MACHINE SOCKET
FREE ARM
PRESSER FOOT LIFTER
THREAD
TENSION DIAL
SPOOL PIN BOBBIN WINDER
SPINDLE
BOBBIN WINDER
STOPPER
VALUE SET BUTTONS
CURSOR BUTTONS
SPEED CONTROL SLIDER
NEEDLE POSITION UP/
DOWN BUTTON
AUTO-LOCK BUTTON
LCD DISPLAY
REVERSE STITCH BUTTON
START/STOP BUTTON
EXTENSION TABLE
NEEDLE PLATE
NEEDLE
THREADER
THREAD
CUTTER
FACE COVER
DROP FEED LEVER
FOOT CONTROL JACK
4
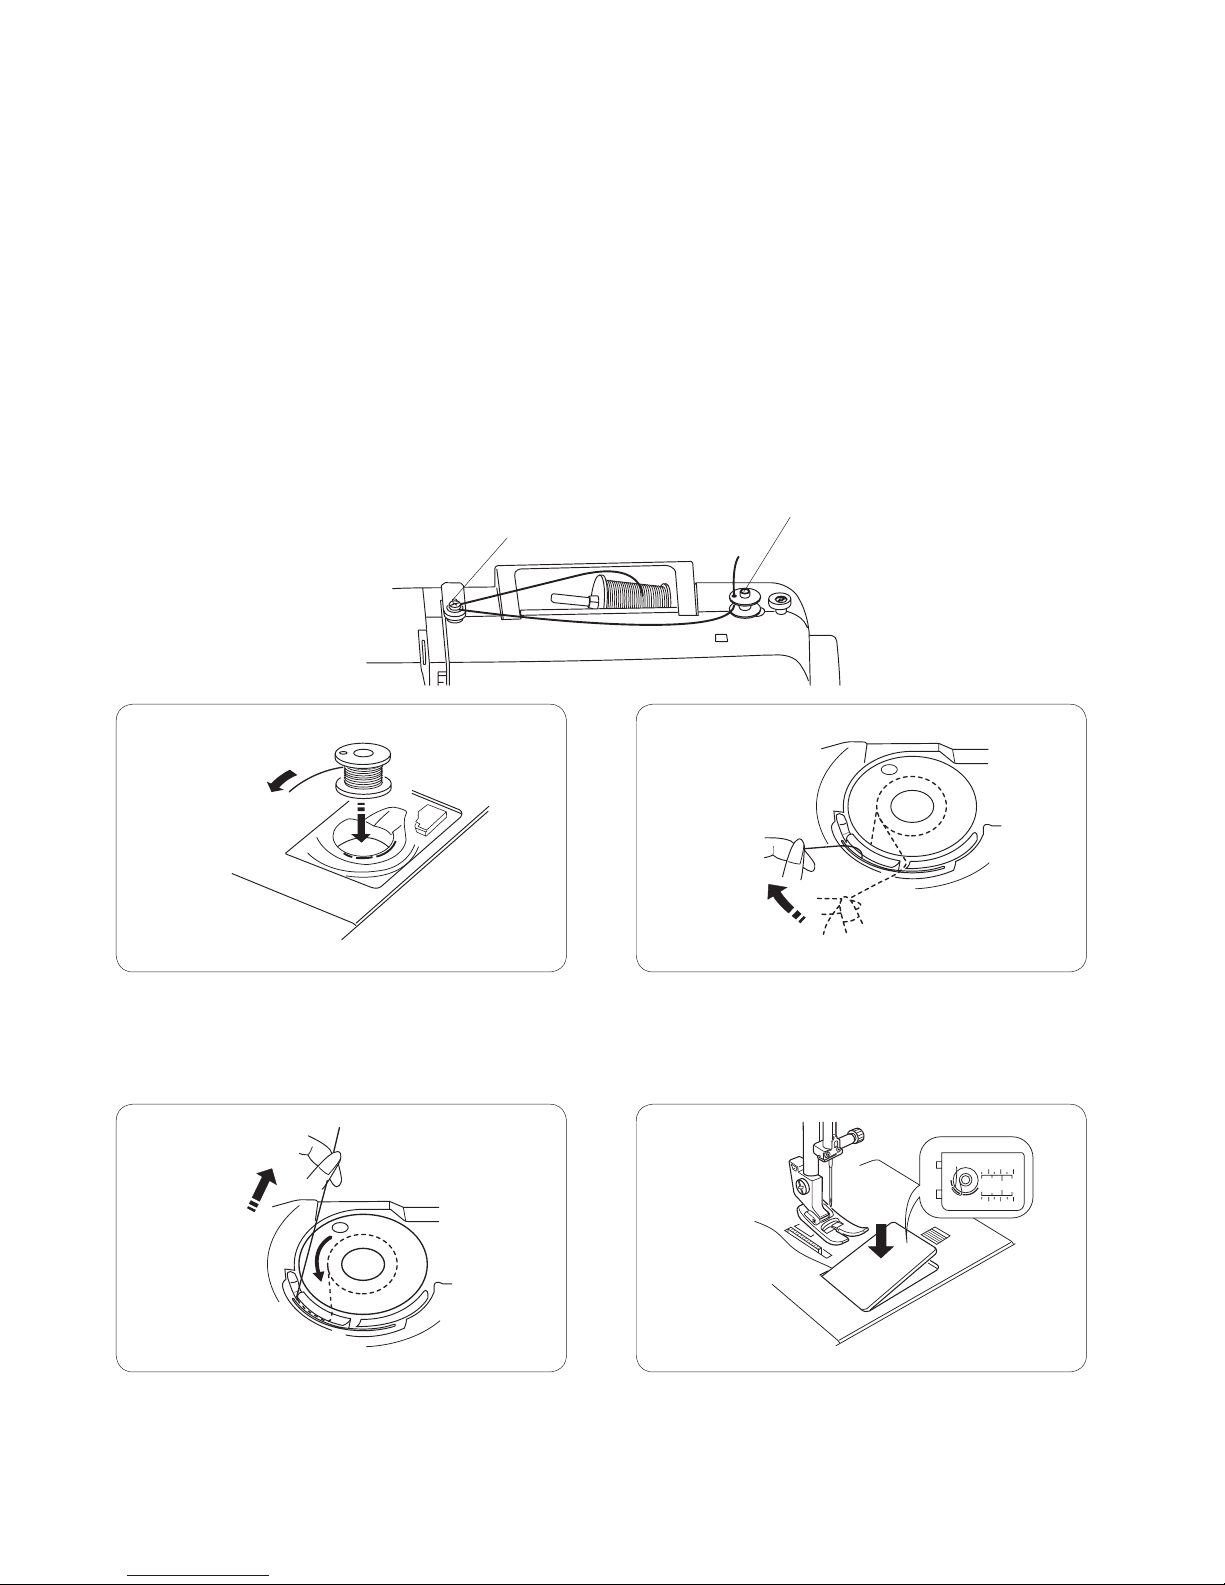
WIND THE BOBBIN
1. Hold the thread with both hands and pass the bobbin winding tension disc (1).
2. Pass the thread through the hole in the bobbin from the inside to the outside. Put the
bobbin on the bobbin winder spindle (2).
3. Push the bobbin winder spindle to the right.
4. Hold the free end of the thread in your hand and start the machine.
Stop the machine when the bobbin has been wound a few layers, and cut the thread close
to the bobbin.
5. Start the machine again. When the bobbin is fully wound, it will stop automatically.
Stop the machine and return the bobbin winder spindle to its original position by moving
it to the left, and cut the thread with a pair of scissors. Remove the bobbin from the
bobbin winder spindle.
10
1/8 3/8 5/8
2. Guide the thread into notch on the front
side of the bobbin holder. Draw the thread
to the left, sliding it between the tension
spring blades.
3. Continue to draw the thread lightly until
the thread slips into notch. Pull out
about 6˝ (15.0 cm) of thread.
1. Place a bobbin in the bobbin holder with
the thread running off counterclockwise.
4. Attach the hook cover plate. Check the
threading by referring to the diagram
shown on the hook cover plate.
(1)
(2)

5
PREPARE YOUR TOP THREAD
* Raise the thread take-up lever to its highest position by turning the handwheel
counterclockwise.
* Raise the presser foot lifter.
* Place a spool on the spool pin, with the thread coming off the back of spool.
1. Draw the end of the thread around the
upper thread guide.
2. While holding the thread near the spool,
draw the end of the thread down around
the check spring holder.
3. Firmly draw the thread up from right to
left over the take-up lever, and down into
the take-up lever eye.
4. Draw the thread through the thread guide.
Slide the thread behind the needle bar thread
guide on the left.
5. Thread the needle from front to back, or use a
needle threader.
1
3
2
5
4

6
LCD DISPLAY
The LCD display shows the following information when the machine is turned on.
q
STITCH PATTERN NUMBER
w CURSORS
e STITCH WIDTH
r STITCH LENGTH
z Press the cursor key to move the cursor under the stitch pattern number.
The cursors appear under both digits when turning the power on.
x Press the value set keys to change the stitch pattern number until the
pattern number of the desired stitch is indicated.
The number will increase or decrease by 1 each time you press the value set key.
c Press the key to move the cursor under the tens digit of the stitch pattern number.
The number will increase or decrease by 10 each time you press the value set key.
q
we r
z
x
c

7
CONDITION CAUSE HOW TO FIX REFERENCE
1. SKIPPING
STITCHES
2.FABRIC
NOT
MOVING
1. Needle is not inserted
properly.
2. Needle is bent or worn.
3. Incorrectly threaded.
4. Needle or thread are
inappropriate for the
fabric being sewn.
5. Sewing on
stretch fabric.
6. Inappropriate needle
bar height.
7. Inappropriate needle to
hook timing.
8. Inappropriate needle to
hook clearance.
9. Hook is damaged or too
worn.
1. Incorrect feed dog
height.
2. Feed dog is in down
position.
3. Thread on bottom side of
fabric is jammed up.
4. Feed dog teeth are worn.
Insert the needle properly.
Change the needle.
Rethread.
Use the recommended sewing
needle and thread.
Use a HA x #11 blue tip needle.
See mechanical adjustment “Needle
bar height”.
See mechanical adjustment
“Adjustment of hook timing”.
See mechanical adjustment
“Clearance between needle and tip
of the rotary hook”.
See mechanical adjustment
“Replacing hook”.
Adjust the presser bar level to make
the pressure stronger.
See mechanical adjustment “Feed
dog height”.
Raise the feed dog.
Make sure to bring both needle and
bobbin threads under the foot when
start sewing.
Change the feed dog.
P. 1 9
P. 1 7
P. 2 0
P.18
P. 2 1
WHAT TO DO WHEN

8
CONDITION CAUSE HOW TO FIX REFERENCE
3. BREAKING
UPPER
THREAD.
4. BREAKING
BOBBIN
THREAD.
5. NEEDLE
BREAKS
1. Initial sewing speed is
too fast.
2. Thread path is incorrect.
3. Needle is bent or dull.
4. Top tension is too strong.
5. Needle size is
inappropriate for fabric.
6. Needle eye is worn.
7. Needle hole in needle
plate is worn or burred.
1. Bobbin holder is
incorrectly threaded.
2. Too much thread is wound
on the bobbin.
3. Lint is stuck inside the
bobbin holder.
4. Thread quality is too low.
5. Thread is jamming around
the bobbin holder.
1. Needle is hitting the
needle plate.
2. Needle is bent or worn.
3. Needle is hitting the hook.
4. Fabric is being pulled
too strongly while sewing.
Start with medium speed.
Use the proper thread path.
Replace with a new needle.
Adjust top tension correctly.
Use appropriate needle for fabric
and thread in use.
Change the needle.
Repair the hole or replace the
needle plate.
See mechanical adjustment
“Needle drop position”.
Change the needle.
See mechanical adjustment
“Clearance between needle and
tip of the rotary hook”.
Guide the fabric gently while
sewing.
P. 1 6
P. 2 0

9
Eliminate the backlash.
Eliminate the looseness.
See part removal and
replacement “Driving motor (DC
motor)”.
Oil all moving parts.
Eliminate the looseness.
See mechanical
adjustment “Replacing hook”.
Adjust the feed balancing screw.
See mechanical adjustment
“Top tension”.
CONDITION CAUSE HOW TO FIX REFERENCE
6. NOISY
OPERATION
7. DEFORMATION
PATTERN
1. Backlash between hook
gear and lower shaft
gear is too great.
2. Lower shaft gear is loose.
3. Inappropriate belt
tension.
4. Not enough oil.
5. Upper shaft gear is loose.
6. Hook is damaged or too
worn.
1. Inappropriate feed
balance.
2. Top tension is too strong.
P. 3 1
P.18
P. 2 2

10
CHANGING EXTERNAL PARTS
FACE COVER
TO REMOVE:
1. Loosen the setscrew (1) and lift the face cover to disengage the rib on the inside.
Remove the face cover (2).
TO ATTACH:
2. Follow the above procedures in reverse.
(1)
(2)
Table of contents
Other New Home Sewing Machine manuals



