
Network Technologies CRYSTALMON CM-DT17 User manual

MAN058 Rev Date 12/5/2008
CM-RK17
CM-WL17
CM-DT17
TFT/LCD MONITOR
Installation and Operation Manual
CRYSTALMONTM Series
NETWORK
TECHNOLOGIES
INCORPORATED
Tel:330-562-7070
Fax:330-562-1999
1275 Danner Dr
Aurora, OH 44202
www.networktechinc.com
NTI R

i MAN058 Rev Date 12/5/2008
TRADEMARK
CRYSTALMON is a trademark of Network Technologies Inc in the U.S. and other countries.
COPYRIGHT
Copyright © 2005, 2008 by Network Technologies Inc. All rights reserved. No part of this publication may be reproduced, stored
in a retrieval system, or transmitted, in any form or by any means, electronic, mechanical, photocopying, recording, or otherwise,
without the prior written consent of Network Technologies Inc, 1275 Danner Drive, Aurora, Ohio 44202.
CHANGES
The material in this guide is for information only and is subject to change without notice. Network Technologies Inc reserves the
right to make changes in the product design without reservation and without notification to its users.
Federal Communications Commission Radio Frequency Interference Statement
This device complies with Part 15 of the FCC rules. Operation is subject to the following two conditions:
(1) This device may not cause harmful interference and
(2) this device must accept any interference received, including interference that might cause undesired operation.
This device complies with Part 15 of the FCC rules. This equipment has been tested and found to comply with the
limits for a Class A digital device, pursuant to Part 15 of the FCC rules. These limits are designed to provide
reasonable protection against harmful interference when the equipment is operated in a commercial environment.
Warning: This equipment generates, uses and can radiate radio frequency energy, and, if not installed and used in
accordance with the instruction manual, may cause harmful interference to radio communications.
CE Compliance Statement
We, Network Technologies Inc, declare under our sole responsibility that the CM-RK17, CM-WL17, and CM-DT17 is in conformity
with European Standard EN55022.

ii MAN058 Rev Date 12/5/2008
TABLE OF CONTENTS
Introduction.................................................................................................................................................................... 1
Overview...................................................................................................................................................................... 1
Features....................................................................................................................................................................... 1
Materials......................................................................................................................................................................... 2
Precautions.................................................................................................................................................................... 3
Cleaning....................................................................................................................................................................... 3
Features and Functions................................................................................................................................................ 4
Installation...................................................................................................................................................................... 6
Mounting ...................................................................................................................................................................... 6
Rack Mount............................................................................................................................................................... 6
Wall Mount- with Arm................................................................................................................................................ 6
Wall Mount- Direct-To-Wall....................................................................................................................................... 7
Desktop Mount.......................................................................................................................................................... 7
Power Supply Bracket .............................................................................................................................................. 8
Cable Connections ...................................................................................................................................................... 8
Connect the CRYSTALMON to a Video Source....................................................................................................... 8
Power Up ..................................................................................................................................................................... 9
Display Functions ....................................................................................................................................................... 10
Standard Controls...................................................................................................................................................... 10
OSD Control Menu .................................................................................................................................................... 11
OSD Main Menu ..................................................................................................................................................... 11
Brightness/Contrast Menu ...................................................................................................................................... 11
Setup Menu............................................................................................................................................................. 12
Specifications .............................................................................................................................................................. 13
LCD............................................................................................................................................................................ 13
Display Controller ...................................................................................................................................................... 13
OSD Control Board.................................................................................................................................................... 13
Enclosure ................................................................................................................................................................... 13
General Specs ........................................................................................................................................................... 13
Compliance Certifications .......................................................................................................................................... 13
Dimensions .................................................................................................................................................................. 14
Troubleshooting .......................................................................................................................................................... 15
Index ............................................................................................................................................................................. 15
Warranty Information .................................................................................................................................................. 16

iii MAN058 Rev Date 12/5/2008
TABLE OF FIGURES
Figure 1- Mount CM-RK17 to a rack ............................................................................................................................... 6
Figure 2- Mount CM-WL17 to an arm or bracket ............................................................................................................ 7
Figure 3- Secure cables to power supply bracket........................................................................................................... 8
Figure 4- Connect VGA and/or DVI video sources ......................................................................................................... 8
Figure 5- Connect the AC adapter .................................................................................................................................. 9
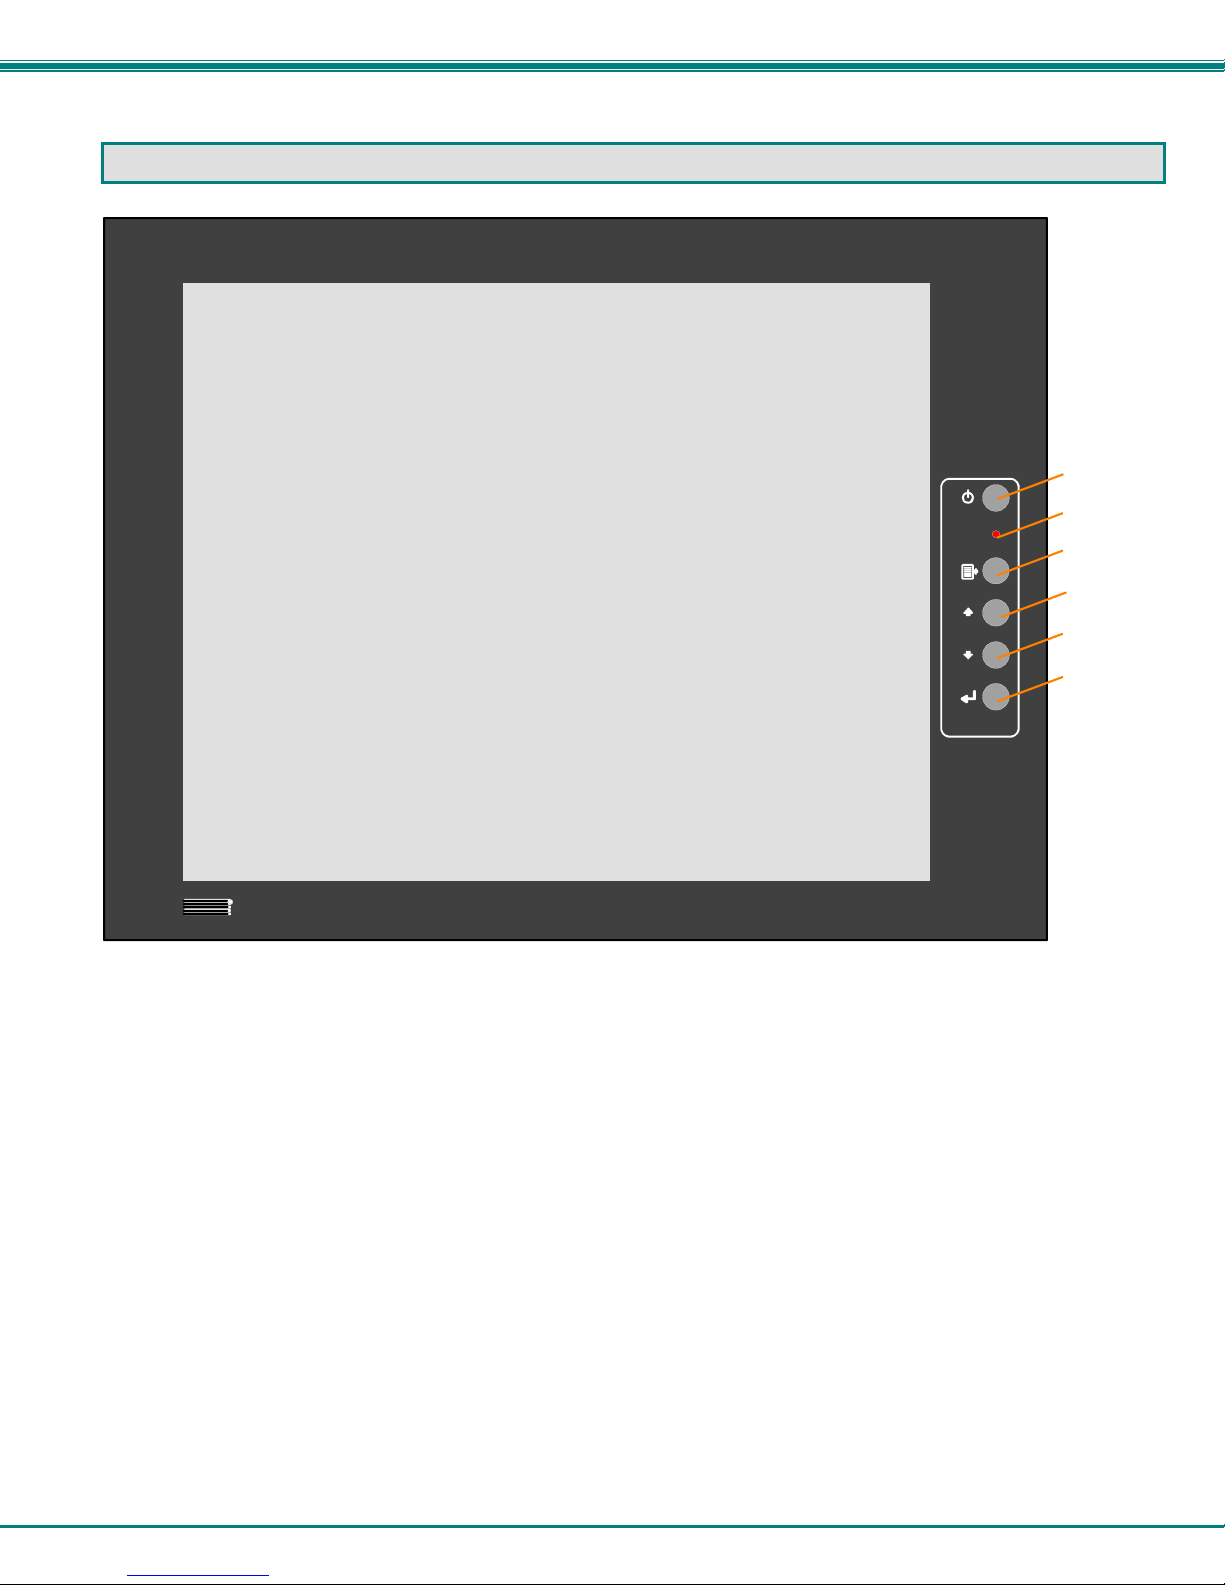
Figure 6- CRYSTALMON Controls ............................................................................................................................... 10

NTI CRYSTALMON TFT/LCD MONITOR
1
INTRODUCTION
Overview
The CRYSTALMON series TFT/LCD monitors provide the industrial or commercial user with superior picture
quality, multiple video formats, and a sturdy industrial enclosure. It also offers several mounting options, as well as
the ability to integrate with existing NTI products. The CRYSTALMON monitor can be ordered with provisions for
rack, wall, or tabletop mounting. They support true plug-and-play functionality and do not require any additional video
drivers or interface adapters.
Models Available:
CM-RK17- Standard 17" TFT/LCD monitor for rack mount
CM-WL17- Standard 17" TFT/LCD monitor for wall or arm mounting
CM-DT17- Standard 17" TFT/LCD monitor with desktop stand
Features
•An industrial 17" TFT/LCD flat panel monitor.
•Support of multiple video formats-VGA,SVGA, and XGA
•On Screen Display (OSD).
•Crisp and clear 1280x1024 video resolution.
•Wall / VESA Mount (CM-WL17)
•Keyholes for mounting to a wall.
•Compliant to VESA 75mm and 100mm mounting hole patterns.
•Compatible with NTI's LCD arms.
•Rack Mount (CM-RK17)
•Designed to fit in a standard 19" rack/cabinet.
•Space-saving. Extra rackmounting space available behind the monitor.
•7RU (12.25") high.
•Tabletop (CM-DT17)
•Adjust height, tilt and rotation of monitor for best viewing position.
•Power Supply Carriage
•Supports multiple languages

NTI CRYSTALMON TFT/LCD MONITOR
2
MATERIALS
Materials supplied with this kit:
9NTI CRYSTALMON TFT/LCD Monitor
9120 or 240VAC at 50 or 60Hz-12VDC/5A via AC Adapter
9Power Supply Holder
92- Cable clamps
94- #4-40 x 3/16” black Phillips-panhead screws
96 foot VGA cable-VEXT-6-MM (15HD male-male connectors)
96.5 foot DVI video cable-DVI-DS-2M-MM (DVI-D single link male-male connectors)
9Desktop stand (provided with CM-DT17 only)
9CD with a pdf file of this owner's manual
Additional materials may need to be ordered, depending upon the configuration :
¾Wall Mount Arm Bracket- for mounting the CRYSTALMON (CM-WL17) to a wall- several configurations are
available. See our website at http://www.networktechinc.com for details.
Contact your nearest NTI distributor or NTI directly for all of your KVM needs at 800-742-8324 (800-RGB-TECH) in
US & Canada or 330-562-7070 (Worldwide) or at our website at http://www.networktechinc.com and we will be happy
to be of assistance.

NTI CRYSTALMON TFT/LCD MONITOR
3
PRECAUTIONS
•Do not apply pressure to the display portion of the CRYSTALMON because the LCD panel and backlight can be
easily damaged.
•Do not cover or block the vent holes in the case.
•Be sure to turn OFF the power supply before connecting and disconnecting video source cable(s).
•Be careful not to drop the CRYSTALMON. Handle it carefully.
•Do not store or install the CRYSTALMON where it can come in contact with moisture as moisture may damage
the CRYSTALMON.
•Store the CRYSTALMON in an environment within a temperature range of 0ºC to 40ºC and where humidity will
not exceed 90% relative humidity. Excessive temperature and humidity may reduce the performance of the
CRYSTALMON.
•Install the CRYSTALMON in a clean environment as dust and oil may cause electrical shorts or otherwise
damage the CRYSTALMON.
•FOR INDOOR USE ONLY. DO NOT INSTALL OUTDOORS.
•The CRYSTALMON contains mercury (Hg). Dispose of the CRYSTALMON in accordance with local
ordinances.
Cleaning
•Use a soft cloth (such as microfiber) without chemicals for cleaning. The display surface of the CRYSTALMON
is very soft and easily scratched.
•Do not apply excessive pressure to the display screen surface when cleaning. Excessive pressure may damage
the LCD panel and backlight.
NTI CRYSTALMON TFT/LCD MONITOR
4
FEATURES AND FUNCTIONS
Main Controls
1. Power Button- to turn the LCD and backlight ON and OFF.
2. Power LED- to indicate the power status of the monitor Green= Power On, Video Input OK
Red= Suspend/Standby, or Input Out of Range
3. Menu Button- to open OSD menu (when OSD menu is OFF)
4. Arrow Up Button- to move the selection cursor in the OSD menu up in the list
5. Arrow Down Button- to move the selection cursor in the OSD menu down in the list
6. Select Button- to select a menu item (when OSD menu is ON) or press to auto adjust the video quality (when
OSD menu is OFF)
CRYSTALMON
TM
NTI
2
1
3
4
5
6

NTI CRYSTALMON TFT/LCD MONITOR
5
7. 12VDC Power Jack- for connection of AC adapter
8. DVI Video Port- DVI-D female- for connecting DVI type video source
9. VGA Video Port- 15HD female- for connecting VGA type video source
10. Power Supply Holder - for supporting the power supply (when desktop or rack-mounted)
10
REAR VIEW OF CRYSTALMON
12VD C
5A
-+
NTI NETWORK
TECH NOLOGIES
INCORPORATED
Tel: 330- 562- 707 01275 Danner Dr
Auro ra, OH 44202
www.networktechinc.com
R
Fax: 330- 562 -1999
DVI VGA
78 9

NTI CRYSTALMON TFT/LCD MONITOR
6
INSTALLATION
Mounting
Mount the CRYSTALMON as intended for the application.
Rack Mount
Secure the CRYSTALMON (model CM-RK17) to a rack using appropriate hardware through the holes provided (see
Fig. 1). Mount using at least two screws on each side.
Figure 1- Mount CM-RK17 to a rack
Wall Mount- with Arm
Mount the selected Wall Mount LCD Arm or bracket assembly to the wall. Attach the VESA mounting bracket from
the selected Wall Mount LCD Arm to the four holes located in the back of the CRYSTALMON using the M4 x 10mm
screws (4) provided. A set of holes is provided for either the 100mm bracket, or the 75mm bracket, whichever is
needed (see Fig. 2). (The 75-100mm mounting adaptor that is sometimes provided will not be necessary.) Follow
the instructions that came with the mounting arm or bracket to complete the assembly.
Front View of CM-RK17
This manual suits for next models
2
Table of contents






