NETmc Marine DVR User manual

NETmc Marine DVR Manual-Rev7.2 Dec 2020 1 of 52
© NETmc Marine Ltd 2020
USER GUIDE FOR
NETmc MARINE
DVR
Rev. 7.2 DVR
Firmware 1.6.39
December 2020

NETmc Marine DVR Manual-Rev7.2 Dec 2020 2 of 52
© NETmc Marine Ltd 2020
Contents
1Introduction 3
2Hardware Description and Connections 4
3Setup 8
4Operation 9
5Software Setting 14
6File Save Setup 17
7Full Screen Setup 18
8Overlay 20
9Blackbox 23
10 Multi Channel 25
11 Pipeline Mode 27
12 RTSP Input 28
13 How to Contact NETmc Marine Support 30
Appendix 1: Technical Spec 31
Appendix 2: Overlay Serial Parser 32
Appendix 3: Coabis Interfacing 36
Appendix 4: Nexus Interfacing 42
Appendix 5: Eiva / Pipeline Interfacing 46
Appendix 6: MSDS
NETmc Marine Ltd
New Deer, Turriff
Aberdeenshire
AB53 6TL
TEL. +44 1771 644001
FAX. +44 1771 644005

NETmc Marine DVR Manual-Rev7.2 Dec 2020 3 of 52
© NETmc Marine Ltd 2020
1. Introduction
The NETmc Marine DVR is our latest one size fits all, modular, adaptable digital video recorder.
Bringing together over 20 years of experience and innovative digital video solutions to the offshore
survey and inspection sector, this product consolidates features to replace the DVRi, XOPs, 73fifty,
DVRiHD and Four264.
Supplied in its base configuration as a single channel, simple video recorder, the unit can be
upgraded in the field* to perform other functions as and when desired.
Functions such as – overlay, blackbox, multi video channel, clip recording, remote control, integrity
management control (Coabis etc), pipeline mode (EIVA control and compatibility) are available.
Understanding that some of these features may only be of use on certain projects, the features can
be rented for set durations and activated by a license code emailed out to the field.
*some features may require return to supplier upgrades depending when purchased

NETmc Marine DVR Manual-Rev7.2 Dec 2020 4 of 52
© NETmc Marine Ltd 2020
2. Hardware Description and Connections
2.1 Front of the unit
1U unit
4U unit (behind door)
Hard drive
activity LED Power LED
Network
activity LEDs Power-On
Button
Power-On
Button
Reset Button
Power LED
Hard drive
activity LED
Network
activity LEDs

NETmc Marine DVR Manual-Rev7.2 Dec 2020 5 of 52
© NETmc Marine Ltd 2020
2.2 Back of the unit
1U Unit
LAN
connection
Video input via
adapter cable
supplied
Connections for
monitor – choice of 3
types (HDMI, DVI-D,
analogue VGA)
Blue = audio
recording input
(line in)
Green = audio out
speakers / headphones
Pink = Mic. in
Mains power
cable socket
4x USB 2.0 sockets (2
required for keyboPO
3125ard / mouse
2x USB 3.0
sockets
2 serial
p
o
r
ts
Supplied adapter installed
– yellow BNC is video
input
Supplied RCA
adapter for audio
recording
HD-SDI input (720 & 1080 support)

NETmc Marine DVR Manual-Rev7.2 Dec 2020 6 of 52
© NETmc Marine Ltd 2020
4U Unit
High Definition
inputs (HD-SDI) –
Input 1 at the top
(optional)
Connections for
monitor – VGA or
display port
Blue = audio recording
input (line in)
Green = audio out
speakers / headphones
Pink = Mic. in
Standard Definition
inputs (composite video)
– Input 1 at the top
Mains power
cable socket
4x USB 2.0 sockets (2
required for keyboard /
mouse
LAN
connections
2 serial
p
orts
HDMI input (720 & 1080 support)

NETmc Marine DVR Manual-Rev7.2 Dec 2020 7 of 52
© NETmc Marine Ltd 2020
Pelicase Unit
** as the unit is air-tight, the metal panels will act as heatsinks and will get warm during operation **
Mains input
(110/240)
Power On
Overlay
keyboard
controls
PC audio out
–
headphones
etc
PC I/O
Recording
control
shortcut
keys –
alternative
to using the
trackerball
or mouse –
ideal if
wearing
gloves.
Client specific
I/O panel –
connectors
depend on
ordered
specification /
video type etc

NETmc Marine DVR Manual-Rev7.2 Dec 2020 8 of 52
© NETmc Marine Ltd 2020
3. Set-up
It is important to plug in all video and audio connections before
switching on the DVR.
THIS EQUIPMENT MUST BE EARTHED.
1. Mount the DVR in a suitable rack mount system.
2. Connect the power supply. Note: this unit must be earthed. Note (2): we highly
recommend connection to a UPS (uninterruptible power supply) to prevent data loss.
3. Connect keyboard / mouse / monitor
4. Connect video / audio signals.
5. Power up the unit
6. Launch NETmc software from desktop icon.
7. Live video images should be displayed on screen.
NETmc Marine DVR Manual-Rev7.2 Dec 2020 9 of 52
© NETmc Marine Ltd 2020
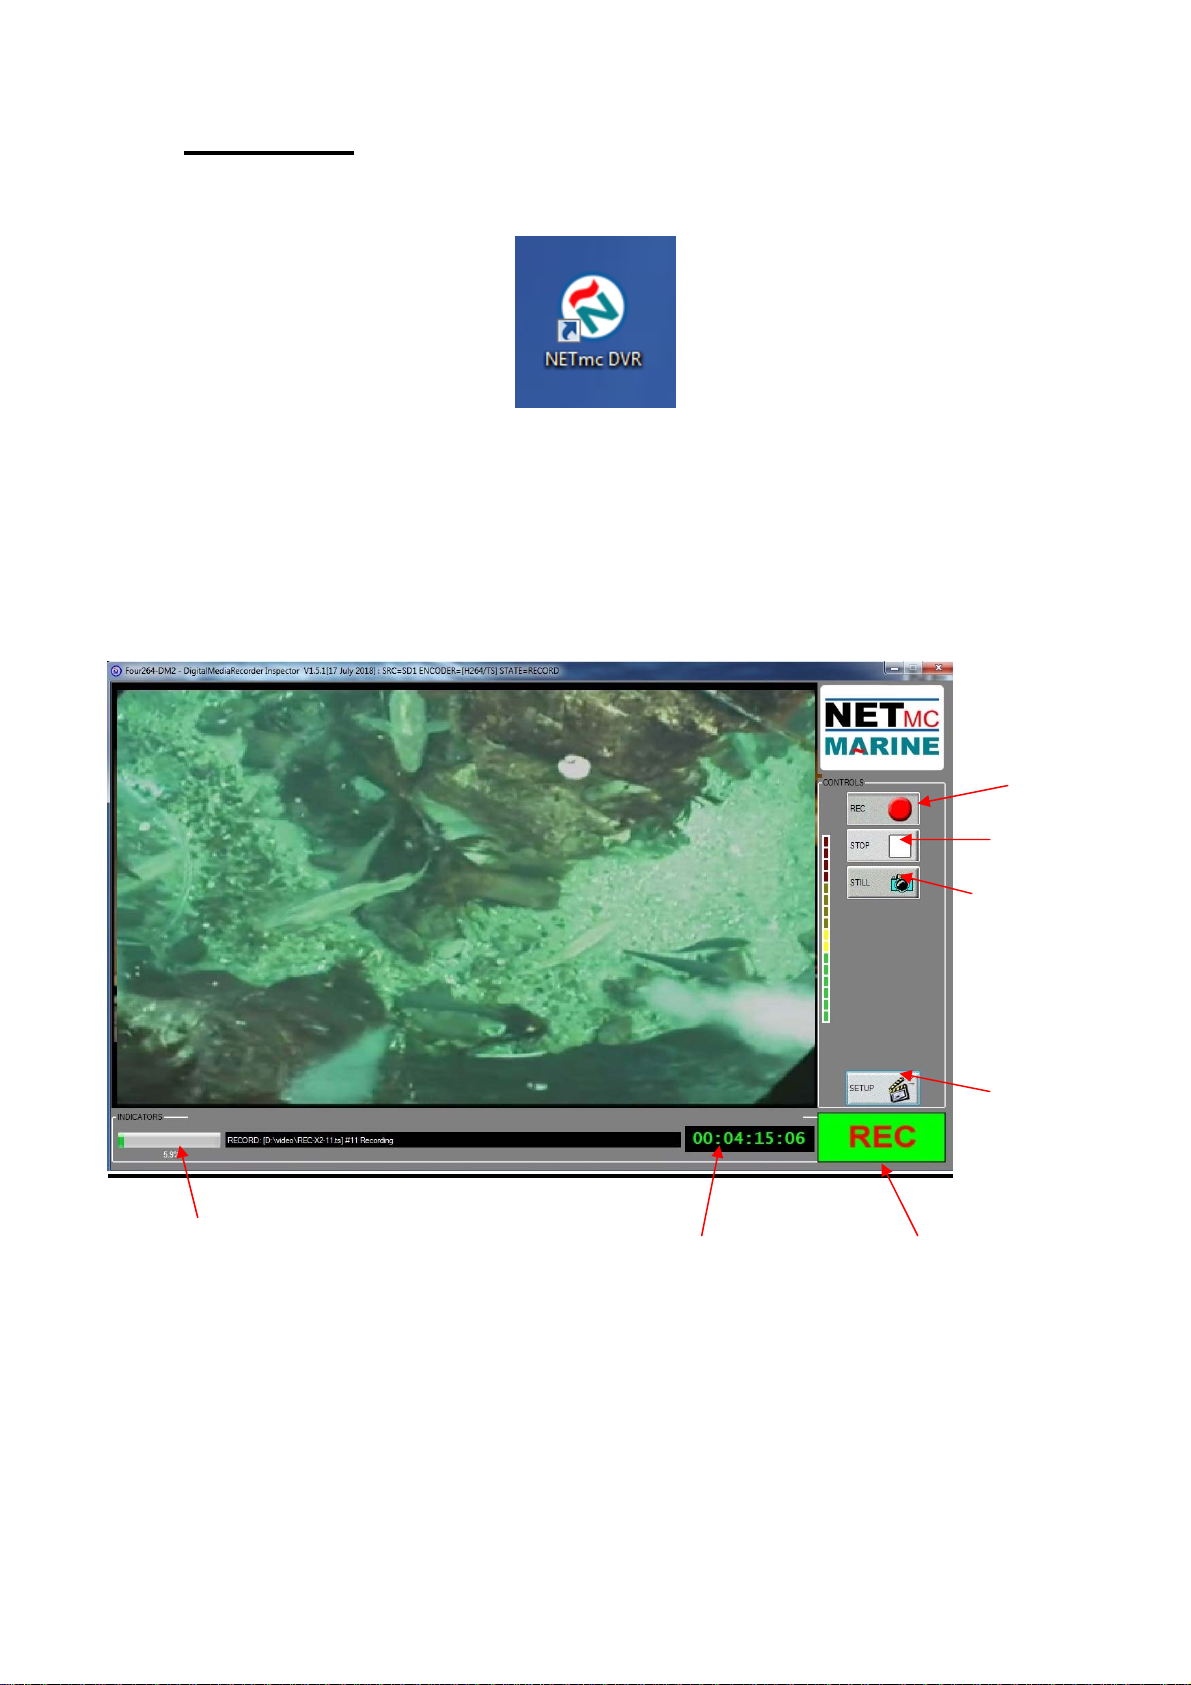
4. Operation
A shortcut on the desktop will launch the software which controls the DVR
Once the program has started, the operation controls are displayed.
From here the user can start and stop recording, take still images (snapshots) and/ or video clips
and enter the set-up screen.
Drive Capacity
Note that this display changes colour according to how much disk space is free:
The display is:
Time Encoded
This Session
Start Recording
Stop Recording
Take Snapshot /
Still Image Grab
Enter Setup
Recording
Status Indicator
Drive Capacity
Indicato
r

NETmc Marine DVR Manual-Rev7.2 Dec 2020 10 of 52
© NETmc Marine Ltd 2020
Green if more than 25% of the disk is free.
Orange if between 10% and 25% of the disk is free
Red if less than 10% of the disk is free.
To start the recording, simply click on the REC button.
When recording has started, the status indicator changes to “REC” instead of “IDLE”, the REC
button will become depressed and the minute counter will start to increment.
The image on the screen shows the video signal that is being input to the DVR.
Once the desired footage has been recorded, simply click on the STOP button to end recording.
At any point during the recording or preview, the image on the screen can be saved as a jpg file by
clicking the STILL button.
To resume logging, simply click the REC button again.
The system will automatically create a new file, automatically named as per the configuration in the
SETUP page.
If audio has been lost or disconnected from the system a warning will appear on screen.
After correcting the problem click on the red warning to re-enable audio and continue. If no audio is
required, no action needed.
Table of contents
Other NETmc Marine Recording Equipment manuals


