Ness M1 Navigator User manual
Ness Document No. 890-421
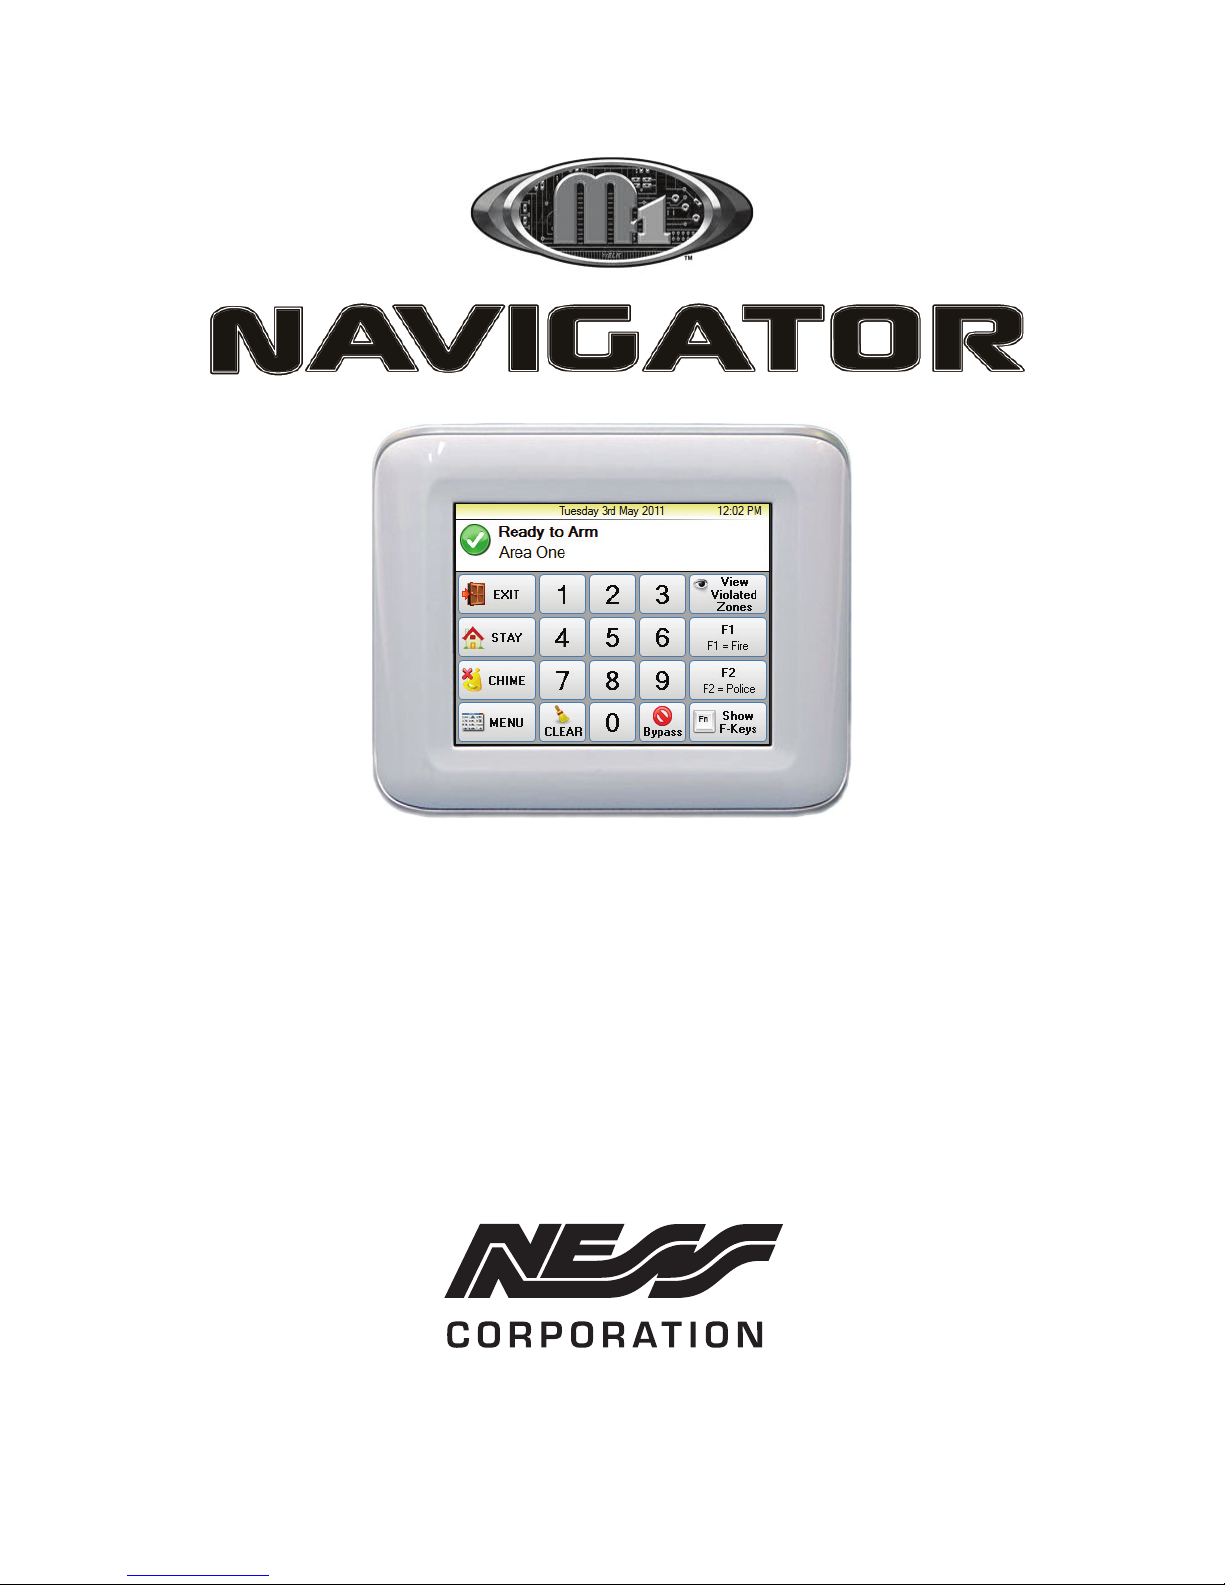
Ness M1 Navigator Touchscreen Keypad
USERS MANUAL
“Australia’s largest designer
and manufacturer of
high quality security products”
Ness Corporation Pty Ltd ABN 28 069 984 372
Private Bag 23 Seven Hills NSW 1730 Australia
Ph +61 2 8825 9222 Fax +61 2 9838 8508
Email: [email protected]
SYDNEY
Ph 02 8825 9222
Fax 02 9674 2520
MELBOURNE
Ph 03 9875 6400
Fax 03 9875 6422
BRISBANE
Ph 07 3399 4910
Fax 07 3217 9711
PERTH
Ph 08 9328 2511
Fax 08 9227 7073
ADELAIDE
Ph 08 8152 0000
Fax 08 8152 0100
M1 Navigator User Manual Rev1
Document Part Number: 890-421
COPYRIGHT NOTICE
All rights reserved. No part of this publication may be reproduced, transmitted or stored in a retrieval system in any form or by any
means, electronic, mechanical, photocopying, recording, or otherwise, without the prior written permission of Ness.
Ness reserves the right to make changes to features and specifications at any time without prior notification in the interest of
ongoing product development and improvement.
© 2011 Ness Security Products Pty Ltd ABN 28 069 984 372
WARNING
Installation and maintenance to be performed by
qualified service personnel only.
CAUTION
Risk of explosion if battery is replaced by an
incorrect type. Dispose of used batteries according
to the instructions on the battery.
ADSL NOTICE
ADSL broadband data can interfere with the
operation of your alarm dialler.
It is recommended that a quality ADSL filter
be installed as per the filter manufacturer's
guidelines in all premises with an alarm
dialler installed.
www.ness.com.au
3
M1NavigatorKeypadUsersManual
2
Introduction
Congratulations on purchasing a Navigator Keypad as part of your featured packed M1
Security and automation controller.
The Ness M1 Navigator is a revolutionary Touch Screen interface for use with the Ness
M1 Gold and M1 EZ8 / EZ16 series Cross Platform Controllers.
The Navigator is the latest world class user interface which leads the industry in providing
a fully featured powerful and simple to use interface. The large touch sensitive 3.5” colour
LCD with easy-to-navigate menus makes it easy to use and operate your Ness M1
Security and Automation system.
This manual aims to show you the many features within the Navigator
Touchscreen keypad and how to navigate and use menus within this keypad.
Full operation of your M1 Security and Automation control panel should be
viewed in conjunction with your User Guide that is supplied with the Ness
M1 Control Panel.
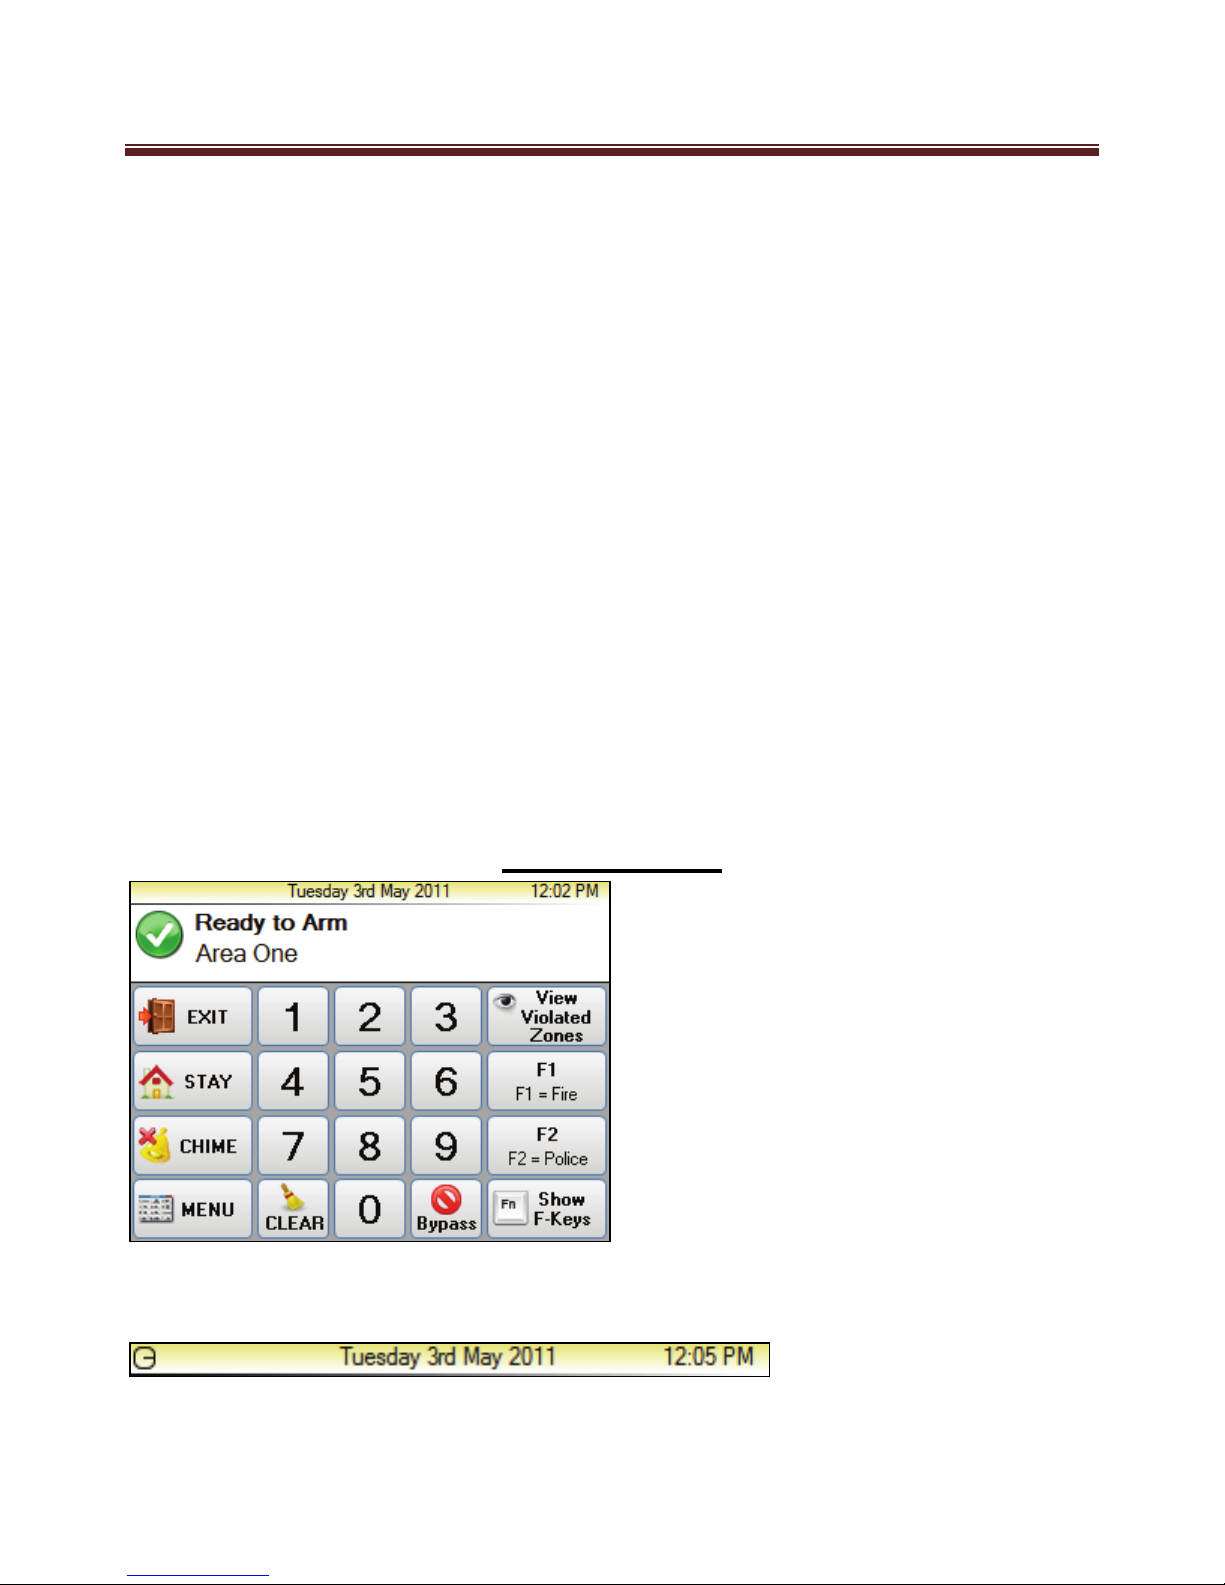
Main Screen
The top strip of the main screen displays the current time and date as programmed in the
M1 Controller.

4
M1NavigatorKeypadUsersManual
3
The display of the date and time may vary slightly to that shown above, based on system
settings with the M1.
Status Window
The status window located below the top display strip shows the current status of the
panel.
The icon on the left of the status window indicates the current arming status or the current
alarm status.
The top line of text of the status window displays the current arming status or the current
alarm status.
The bottom line of text of the status window may switch between displaying keypad area,
current trouble or custom message.
The right hand side of the status window may display number of zones violated.
View Violated Zones
When the View Violated Zones button is pressed the Status Window will display violated
zones. The Up and Down buttons that appear in the Status Window can be used to move
the previous and next violated zones.
To view zones that are “violated” (Unsealed) click on the “Violated Zones” button at the
top right corner of the ‘Main Screen button display’

5
M1NavigatorKeypadUsersManual
4
Main Screen Button
On the main screen is a numeric keypad along with several other buttons.
Along with the “Exit”, “Stay”, “Chime” buttons that function as detailed in the M1 User
Guide, is the following buttons unique to the Navigator Keypad.
“Violated Zones” – When pressed will display (one at a time) any violated (Unsealed)
zones on the M1 Security controller.
“F Keys” - There is 6 “F Keys (shortcut Function Keys) that allows your installer to setup
to operation “quick” function operations of your system. F1 and F2 are displayed on the
main screen. The show F-Keys button is used to display all function key buttons (F1 to
F6) which temporarily replace the other buttons on the right and left side.
“Menu” – The Menu buttons temporarily takes you from the ‘Main Screen’ to alternative
system Menu functions as detailed below.

6
M1NavigatorKeypadUsersManual
5
Keypad Locked
If a wrong code is entered and the “Wrong Code Lock Out number” of Keystrokes is
reached, as set by (Global 12 option), then the Keypad Locked screen will be displayed
and the beeper will beep for 60 seconds before returning to the main screen.
Authorise
7
M1NavigatorKeypadUsersManual
6
If the user tries to enter an option that requires authorisation then the Authorise screen will
be displayed. This allows the user to enter an authorisation code. The operation may be
cancelled by pushing the Cancel button.
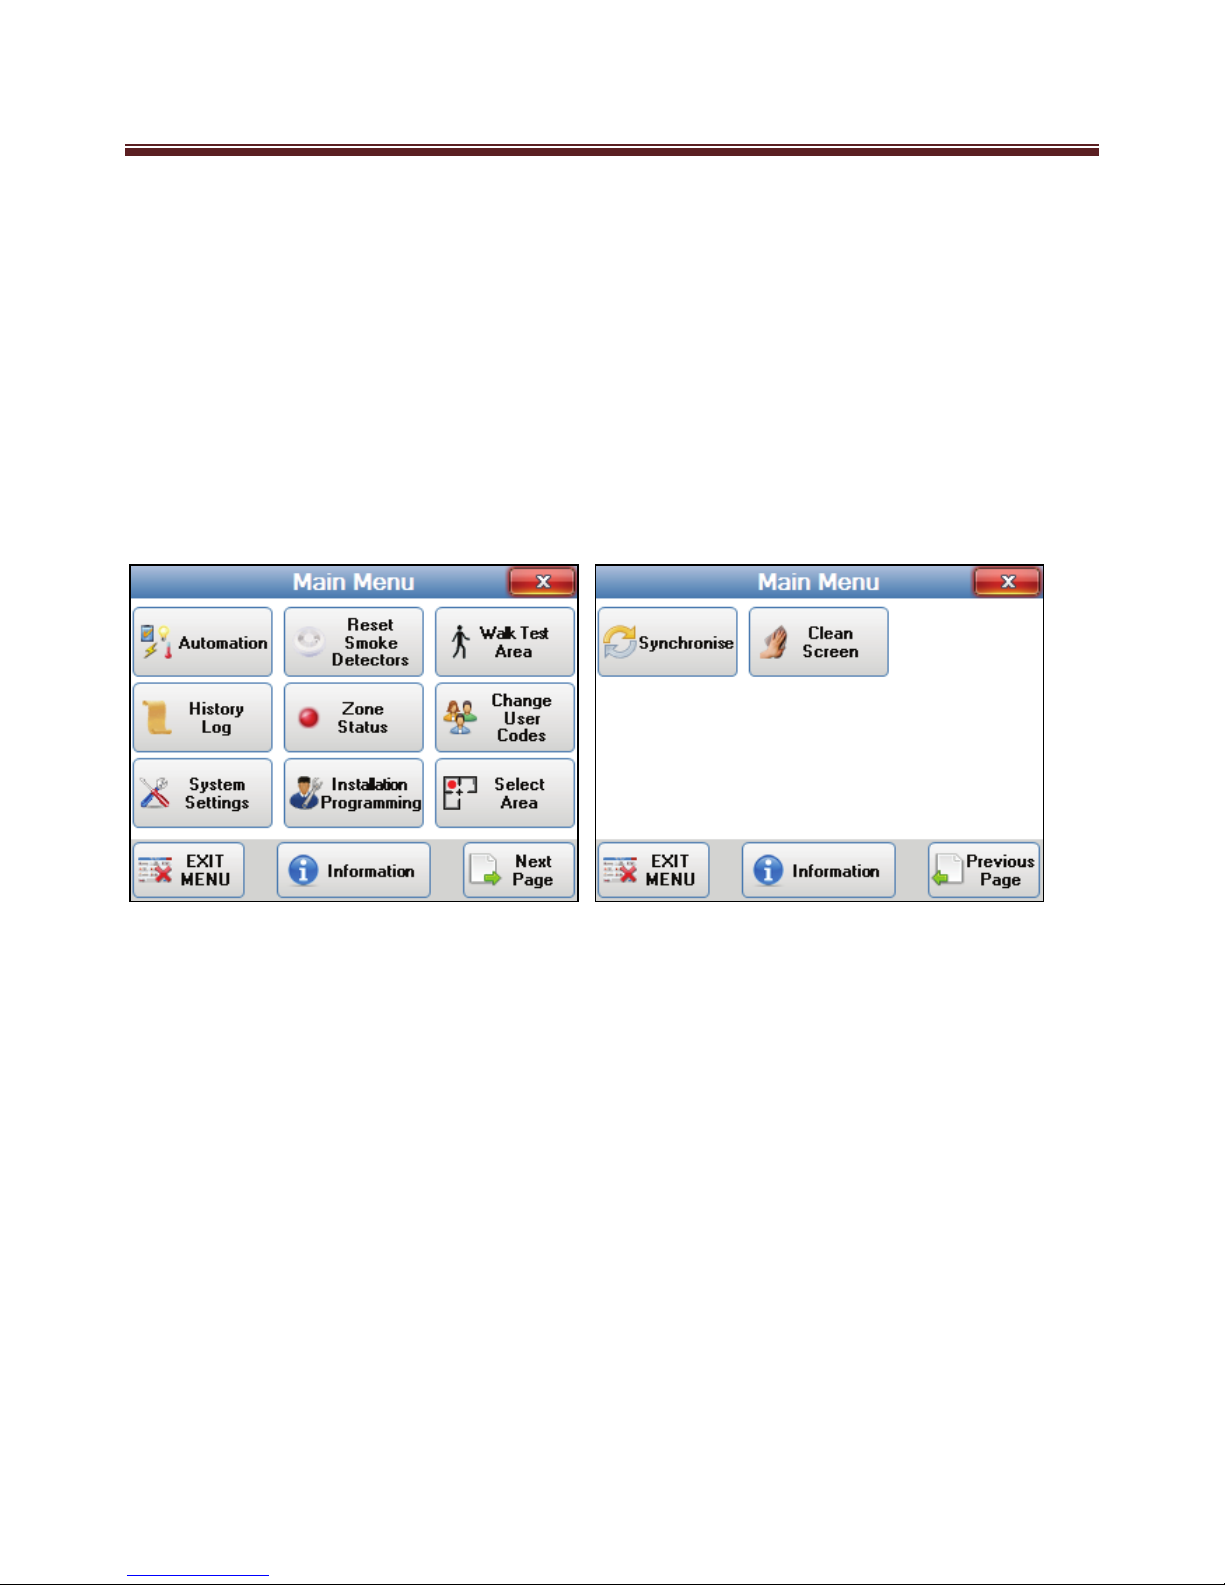
Main Menu
The Main Menu screen will be displayed when the menu button is pressed on the main
screen and the M1 panel allows access to the menu.
The Main Menu is split across 2 pages.
The two pages can be accessed by pressing “Next Page” or “Previous Page”
An Information button is at the bottom of both menu pages which will display the
Installer Information page when pressed.
To return to the main screen press the EXIT MENU button or press the Close button on
the top right of the screen.

8
M1NavigatorKeypadUsersManual
7
Select Area
(Requires User Code)
If your system is programmed into multiple areas (e.g. Office, warehouse, showroom,
House, Garage etc) where part of the system can be Armed while other areas (sections) of
the system are disarmed, the “Change Keypad Area” can allow full control of your system
from the one Navigator Keypad.
A Ness M1 key Pad is programmed to control one Area only. However with this option it
allows the Navigator Keypad to control any of the 8 Areas the M1 controls.
The control of multiple areas can be performed in a couple of different ways.
1. When “Change Keypad Area” option is selected the keypad can be temporally
changed (or mapped) to a different Area to allow you to fully control an alternative
Area. For example if your Navigator Keypad is programmed to control Area 1, and
you select this option it can change the keypad and make it a Area 2 keypad.
Therefore all functions of an Area 2 keypad . This includes full arming and disarming
as well as all other keypad buttons such as F-Keys.
To change the keypad to an alternative area, select the “change Keypad Area” option,
select the Area you wish to change the keypad to and then select “Change Area”
Once the keypad is mapped to alternative area it will now display the status,
including LEDs and the LCD screen of the mapped area for the next 1 minute it will
be possible to arm, disarm, bypass, etc. the mapped area from this keypad. The 1
minute will be extended with each key press. The keypad will return to its primary
assigned area after 1 minute of no key press activity.
9
M1NavigatorKeypadUsersManual
8
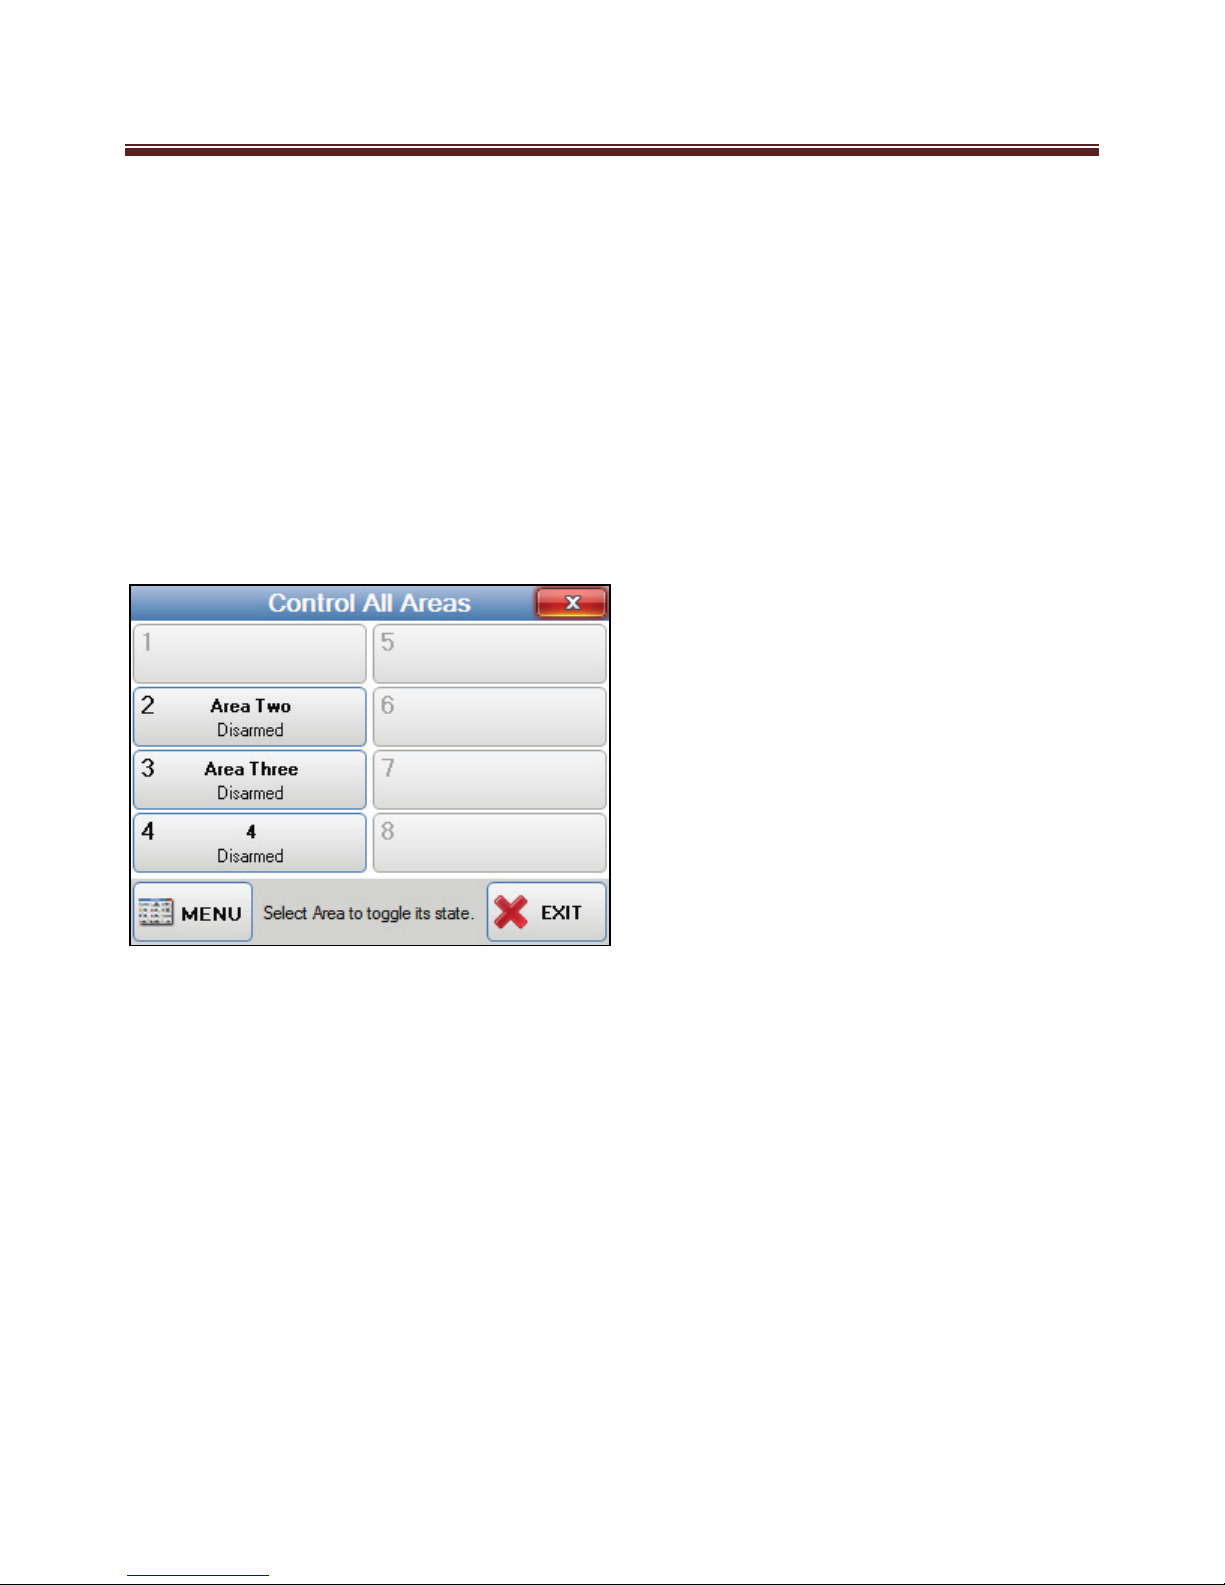
2. The second option this feature allows is the control of ALL areas from this one
screen.
To allow for the control of ALL areas (based on the Access level of the user code
used to access this option) Press the “Control All Areas” button at the bottom of
the screen.
Once selected the screen will change slightly to show the status of all areas the
user has access to control.
To change the status of any Area while in this mode, simply click on the Area
from this screen and the Area will change its state from Arm / Disarm or visa
versa. This also allows for multiple Areas to be selected to be changed from the
one screen.
Once completed press the “Exit” button to exit this screen and go back to the Main screen.
10
M1NavigatorKeypadUsersManual
9
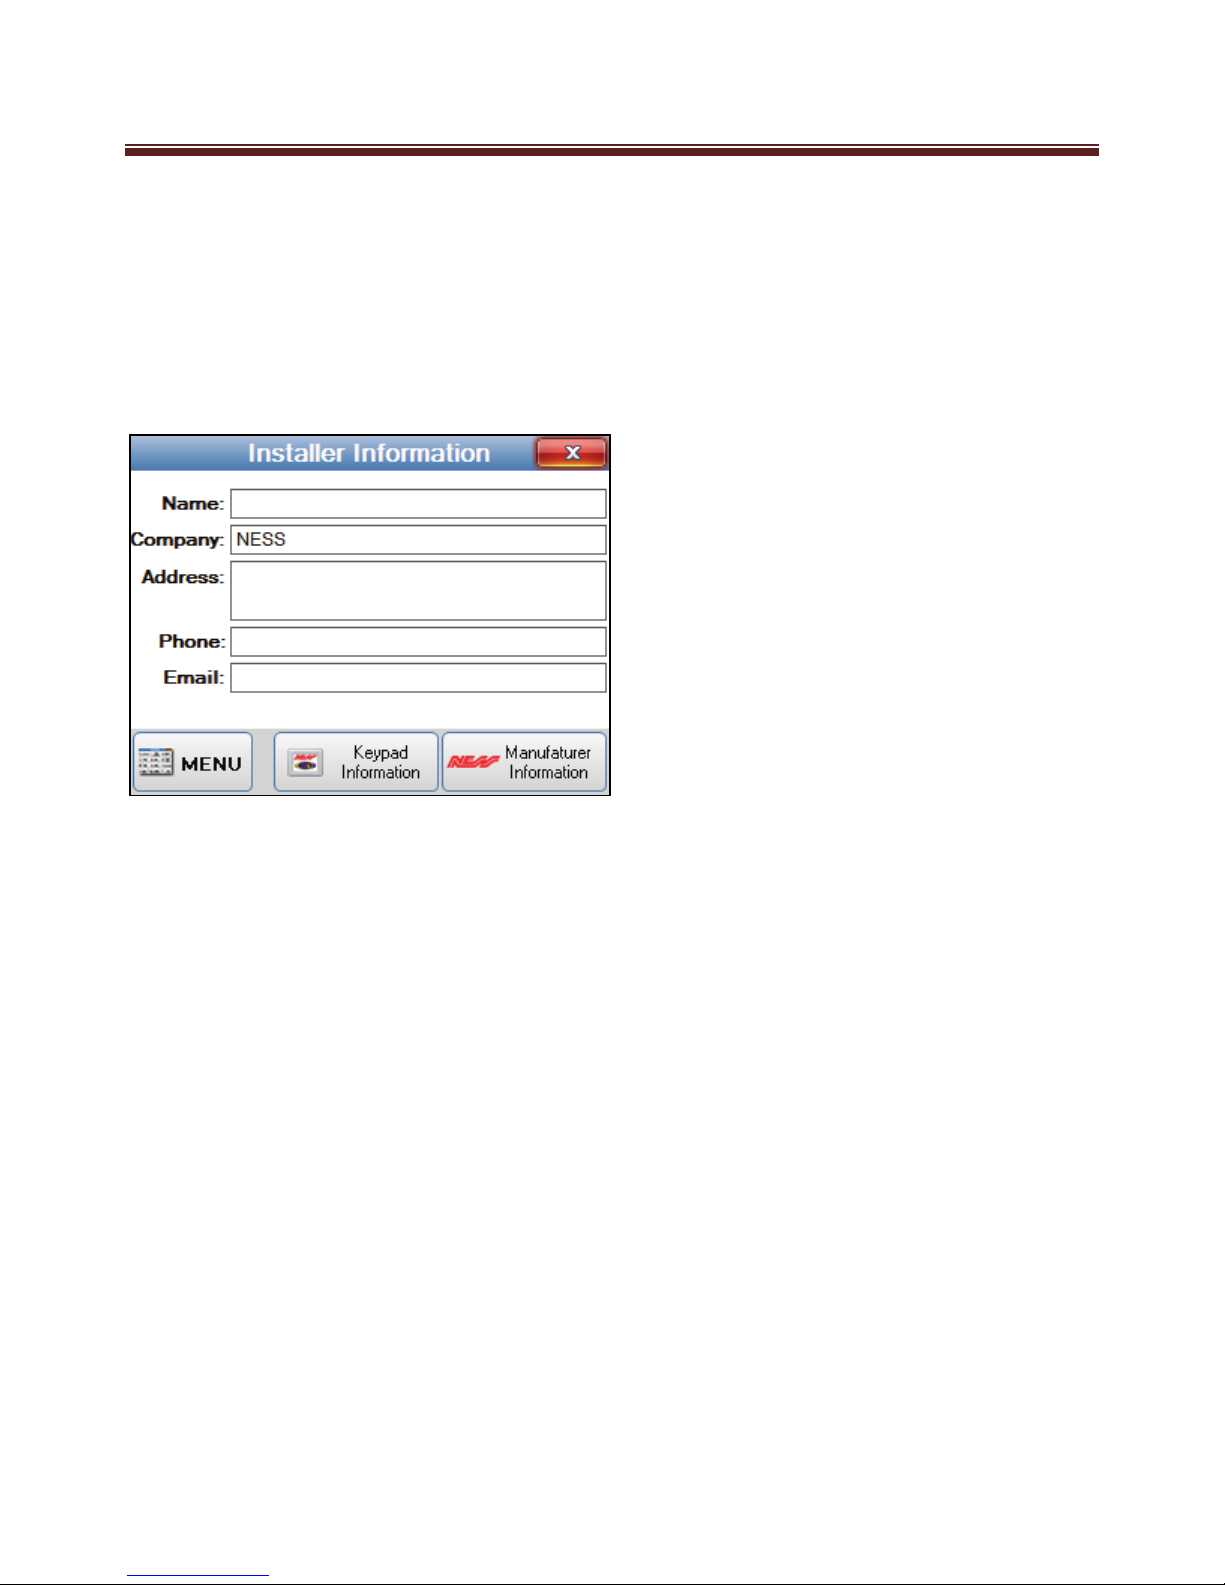
Installer Information
The Installer Information screen is displayed when the Installer Information button is
pressed on the Main Menu.
Once pressed information on the keypad and the Manufacturer can also be viewed by
pressing the “Keypad Information”, or “Manufacturer Information” button.
The screen displays the following installer information:
Name
Company
Address
Phone
Email
To return to the Main Menu screen press the MENU button.
To return to the main screen press the “MENU” button or press the Close button on the
top right of the screen.
Other manuals for M1 Navigator
2
Table of contents
Other Ness Keypad manuals

Ness
Ness Navigator User manual

Ness
Ness D16XCEL User manual

Ness
Ness UltraProx S2B User manual

Ness
Ness RKP User guide

Ness
Ness Navigator D8XCEL4G User manual

Ness
Ness 106-108-WHT Saturn Keypad White Guide

Ness
Ness D16x Deluxe User manual

Ness
Ness W1-B User manual

Ness
Ness D8x Deluxe User manual

Ness
Ness D16 User manual