nedis HPRF200BK User manual

HPRF200BK
MANUAL (p. 2)
Wireless Headphones
MODE D’EMPLOI (p. 10)
Casque sans fil
MANUALE (p. 19)
Cuffie senza fili
BRUKSANVISNING (s. 35)
Trådlösa hörlurar
MANUAL DE UTILIZARE (p. 43)
Căşti wireless
BRUGERVEJLEDNING (p. 51)
Trådløse hovedtelefoner
HASZNÁLATI ÚTMUTATÓ (o. 27.)
Vezeték nélküli fejhallgató
KÄYTTÖOHJE (s. 31)
Langattomat kuulokkeet
GEBRUIKSAANWIJZING (p. 14)
Draadloze Hoofdtelefoon
ANLEITUNG (s. 6)
Kabellose Kopfhörer
MANUAL DE USO (p. 23)
Audífonos inalámbricos
NÁVOD K POUŽITÍ (s. 39)
Bezdrátová sluchátka
ΕΓΧΕΙΡΙΔΙΟ XPHΣHΣ (σελ. 47)
Ασύρματα Ακουστικά
VEILEDNING (p. 55)
Trådløse hodetelefoner

2
ENGLISH
Introduction:
The Nedis wireless headphones are the perfect solution for enjoying music in and around the house.
The closed headphones ensure a great listening experience. Equipped with PLL technology for
optimal reception of the signal. Auto detecting system for automatic power on or off. Integrated
charging circuit for charging the batteries inside the headphone and auto tuning for the audio signal.
Suitable for use with TV, CD, PC, MP3, RADIO, etc.
How to begin:
Before the wireless headphones can be used the following has to be done rst.
Step 1:
Open the battery compartment on the *right
side to insert the rechargeable batteries.
Make sure the positive (+) and negative (-)
poles are correctly aligned.
*Note: the right side of the headphone is
marked with R in the headband and also
recognizable as the shell with the power
button.
Step 2:
Close the battery compartment after inserting
the rechargeable batteries.

3
Step 3:
Insert the antenna into the antenna socket of
the transmitter.
Step 4:
Connect the audio cable of the transmitter, tted with a 3.5 mm jack plug, to the headphones (audio)
output of an audio providing appliance, like TV, audio equipment, PC, etc.
TV AUDIO PC
Step 5:
Connect the plug on the AC/DC mains adapter
cable to the DC IN socket at the back of the
transmitter. Then plug the adapter into a wall
outlet.
Note: the power LED will not light up if the
receiver is not receiving an audio signal.

4
Step 6:
Before using the headphones, the batteries need to be charged. Take the charging cable with the
2.5 mm power jack and plug it into the recharging socket of the right shell of the headphones.
Note: Leave the headphones to charge for 24 hours before rst use. Second and subsequent
charges take about 10 hours.
The red charge LED will light up indicating that charging is in progress.
Operation:
Switch on the audio providing appliance and adjust its volume to roughly a quarter of the maximum
setting. The transmitter will switch on automatically. When the audio appliance is switched off the
transmitter will automatically switch off after 4~5 minutes.
Note: If the volume output is too low the transmitter will switch off or switch to standby mode and
the SIGNAL/POWER LED will not light up. It is not possible to charge and listen at the same time.
Charging has priority.
Step 1:
Switch on the headphones and the POWER LED
will light up.
Do not turn the volume
to maximum when
switching on the
headphones.
5
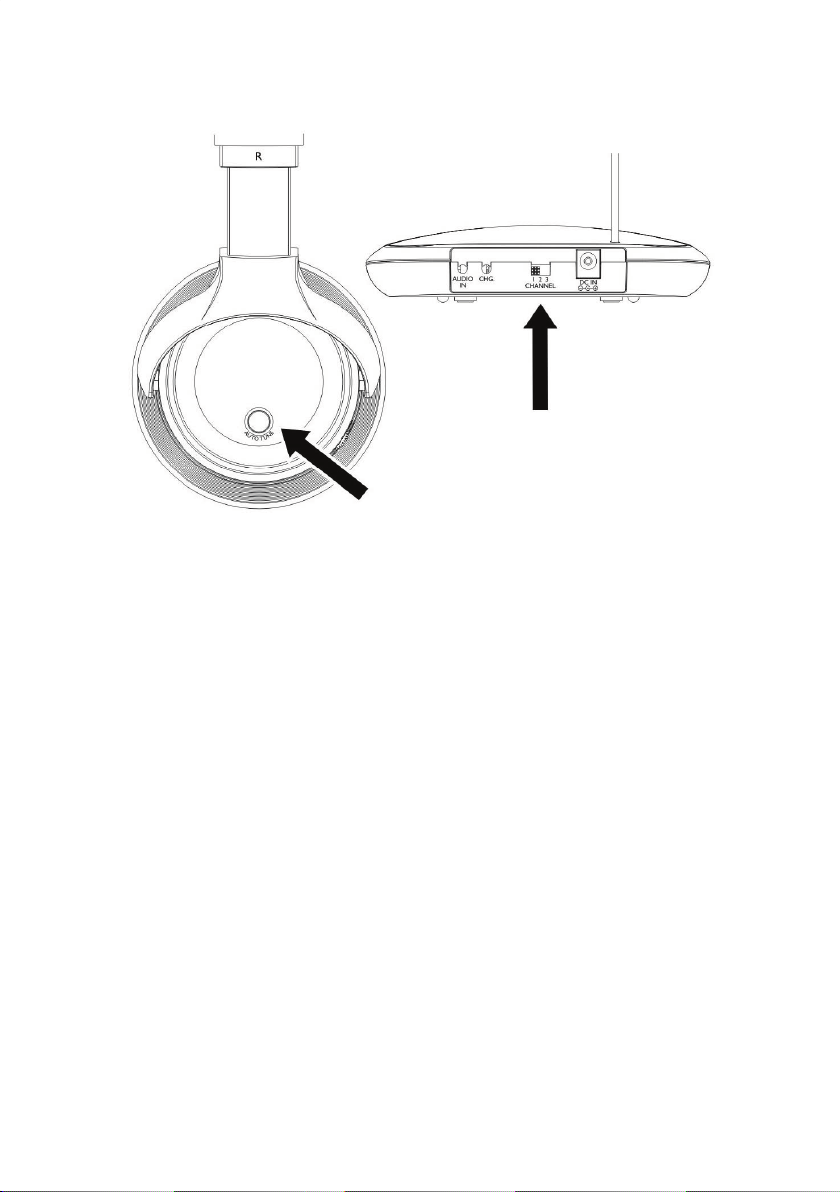
Step 2:
Select a channel with the channel switch at the back of the transmitter. Adjust the headphones
reception by pressing the AUTO TUNE button at the left shell of the headphones.
Note: if the sound is poor, change to a
different channel on the transmitter and
press the AUTO TUNE button once more.
Note: When using the headphones at a maximum volume level, the batteries will run empty in a
shorter time. It will also increase the possibility of hearing noise due to the wireless connection.
Therefore it is recommended to increase the volume level of the audio providing appliance and
decrease the volume level of the headphones. This will improve the performance of the wireless
headphones.
Specications:
Transmission frequency: 863 MHz
Frequency response:
S/N ratio:
Range:
Power supply:
Batteries:
Charging time:
Playing time:
20 - 20.000Hz
54 dB
100 m (open area), 30 m (indoors)
12 V DC, 200 mA
2 x AAA, NiMH, 550 mAh (included)
± 10hrs
± 11hrs
Safety precautions:
To reduce risk of electric shock, this product should ONLY be opened by an authorized technician
when service is required. Disconnect the product from mains and other equipment if a problem should
occur. Do not expose the product to water or moisture.
Maintenance:
Clean only with a dry cloth. Do not use cleaning solvents or abrasives.
Warranty:
No guarantee or liability can be accepted for any changes and modications of the product or damage
caused due to incorrect use of this product.

6
General:
Designs and specications are subject to change without notice.
All logos brands and product names are trademarks or registered trademarks of their respective
holders and are hereby recognized as such.
Keep this manual and packaging for future reference.
Attention:
This product is marked with this symbol. It means that used electrical and electronic products
should not be mixed with general household waste. There is a separate collections system
for these products.
DEUTSCH
Einleitung:
Die kabellosen Kopfhörer von Nedis sind die perfekte Lösung für den Musikgenuss zuhause. Die
geschlossenen Kopfhörer garantieren hervorragenden Musikgenuss. Ausgestattet mit PLL-Technologie
für optimalen Signalempfang, automatischer Erkennung des Betriebsmodus, integriertem Ladeschaltkreis
für die Akkus im Kopfhörer und automatischer Einstellung des Audiosignals. Die Kopfhörer eignen sich
für alle Audioquellen wie Fernseher, CD-Player, PC, MP3-Player, Radio usw.
Erste Schritte:
Vor der Benutzung der kabellosen Kopfhörer folgen Sie zunächst diesen Schritten.
Schritt 1:
Öffnen Sie das Batteriefach auf der *rechten
Seite und setzen Sie die Akkus ein. Achten
Sie auf die Polarität (+/-).
*Hinweis: Der rechte Kopfhörer ist mit R
gekennzeichnet und hat den Ein-/Ausschalter.

7
Schritt 2:
Schließen Sie das Batteriefach wieder.
Schritt 3:
Setzen Sie die Antenne in den
Antennenanschluss des Senders ein.
Schritt 4:
Schließen Sie das Audiokabel des Senders über 3,5-mm-Klinkenstecker am Kopfhörerausgang
(Audio) eines Audiogeräts an, wie Fernseher, Audioplayer, PC usw.
TV AUDIO PC

8
Schritt 5:
Schließen Sie den Netzteilstecker am
Netzteileingang auf der Rückseite des
Senders an. Stecken Sie das Netzteil nun in
die Steckdose.
Bitte beachten Sie: Die Status-LED leuchtet
nicht auf, wenn kein Audiosignal anliegt.
Schritt 6:
Vor der Benutzung der Kopfhörer müssen die Akkus geladen werden. Schließen Sie das Ladekabel
mit 2,5-mm-Klinkenstecker an der Ladebuchse auf der rechten Seite der Kopfhörer an.
Bitte beachten Sie: Laden Sie die Kopfhörer für 24 Stunden vor Erstgebrauch. Nachfolgende
Ladungen dauern etwa 10 Stunden.
Die rote Lade-LED leuchtet während des Ladevorgangs auf.
Bedienungshinweise:
Schalten Sie das angeschlossene Audiogerät mit etwa 1/4 der Lautstärkeeinstellung ein. Der Sender
schaltet sich automatisch ein. Wird das Audiogerät ausgeschaltet, so schaltet sich der Sender nach
4 bis 5 Minuten automatisch aus.
Bitte beachten Sie: Ist der Signalausgang zu gering, so schaltet sich der Sender aus oder in
Stand-by-Modus und die Status-/Signal-LED erlischt. Sie können nicht gleichzeitig Musik hören und
laden. Laden hat Vorrang.

9
Schritt 1:
Schalten Sie die Kopfhörer ein, die Status-LED
leuchtet auf.
Regeln Sie die
Lautstärke nicht ganz
hoch, wenn Sie die
Kopfhörer einschalten.
Schritt 2:
Wählen Sie auf der Rückseite des Senders einen Kanal. Stellen Sie den Empfang der Kopfhörer mit
Tastendruck auf AUTO TUNE auf dem linken Kopfhörer ein.
Bitte beachten Sie: Bei schlechtem
Empfang schalten Sie auf dem Sender auf
einen anderen Kanal um und drücken Sie
dann erneut AUTO TUNE.
Bitte beachten Sie: Bei voller Lautstärke verkürzt sich die Spieldauer der Kopfhörer. Hierdurch
werden auch Störgeräusche aufgrund der Funkübertragung möglich. Aus diesem Grund empfehlen
wir, die Lautstärkeeinstellung auf dem Audiogerät zu erhöhen und auf den Kopfhörern zu verringern.
Dies verbessert die Leistung der kabellosen Kopfhörer.

10
Spezikationen:
Sendefrequenz: 863 MHz
Frequenzgang: 20 Hz - 20.000 Hz
Rauschabstand: 54 dB
Reichweite: 100 m (im Freien), 30 m (im Gebäude)
Spannungsversorgung: 12 V DC, 200 mA
Akkus:
Ladezeit:
Spielzeit:
2 x AAA, NiMH, 550 mAh (mitgeliefert)
± 10 Stunden
± 11 Stunden
Sicherheitsvorkehrungen:
Um das Risiko eines elektrischen Schlags zu verringern, sollte dieses Produkt AUSSCHLIESSLICH
von einem autorisierten Techniker geöffnet werden. Bei Problemen trennen Sie das Gerät bitte von
der Spannungsversorgung und von anderen Geräten ab. Stellen Sie sicher, dass das Gerät nicht mit
Wasser oder Feuchtigkeit in Berührung kommt.
Wartung:
Nur mit einem trockenen Tuch säubern. Keine Reinigungs- oder Scheuermittel verwenden.
Garantie:
Es kann keine Garantie oder Haftung für irgendwelche Änderungen oder Modikationen des Produkts
oder für Schäden übernommen werden, die aufgrund einer nicht ordnungsgemäßen Anwendung des
Produkts entstanden sind.
Allgemeines:
Design und technische Daten können ohne vorherige Ankündigung geändert werden.
Alle Logos, Marken und Produktnamen sind Marken oder eingetragene Marken ihrer jeweiligen
Eigentümer und werden hiermit als solche anerkannt.
Bitte bewahren Sie Bedienungsanleitung und Verpackung für spätere Verwendung auf.
Achtung:
Dieses Produkt ist mit diesem Symbol gekennzeichnet. Es bedeutet, dass die ausgedienten
elektrischen und elektronischen Produkte nicht mit dem allgemeinen Haushaltsmüll
entsorgt werden dürfen. Für diese Produkte stehen gesonderte Sammelsysteme zur
Verfügung.
FRANÇAIS
Introduction :
Le casque sans l de Nedis représente une solution parfaite pour apprécier la musique à la maison,
partout dans la maison. Le casque fermé garantit une qualité d’écoute exceptionnelle. Doté de la
technologie PLL pour une réception optimale du signal. Système de détection automatique pour une
mise en marche et un arrêt automatiques. Circuit de recharge intégré pour la recharge des piles à
l’intérieur du casque et réglage automatique du signal audio. Peut être utilisé avec un téléviseur, un
CD, un ordinateur, un lecteur MP3, une radio, etc.
Table of contents
Languages:
Other nedis Wireless Headphones manuals


