Mitel 6300 Series Wall Mount Kit User manual

6300 Series Wall Mount Kit
INSTALLATION GUIDE
58014968 REV00

NOTICE
The information contained in this document is believed to be accurate in all respects but is not warranted
by Mitel Networks™ Corporation (MITEL®). The information is subject to change without notice and should
not be construed in any way as a commitment by Mitel or any of its affiliates or subsidiaries. Mitel and its
affiliates and subsidiaries assume no responsibility for any errors or omissions in this document. Revisions
of this document or new editions of it may be issued to incorporate such changes.
No part of this document can be reproduced or transmitted in any form or by any means - electronic or
mechanical - for any purpose without written permission from Mitel Networks Corporation.
Trademarks
The trademarks, service marks, logos and graphics (collectively “Trademarks”) appearing on Mitel's
Internet sites or in its publications are registered and unregistered trademarks of Mitel Networks
Corporation (MNC) or its subsidiaries (collectively “Mitel”) or others. Use of the Trademarks is prohibited
without the express consent from Mitel. Please contact our legal department at [email protected] for
additional information. For a list of the worldwide Mitel Networks Corporation registered trademarks, please
refer to the website: http://www.mitel.com/trademarks.
6300 Series Wall Mount Kit Installation Guide
58014968 REV0 - July 2016
®,™ Trademark of Mitel Networks Corporation
© Copyright 2016, Mitel Networks Corporation
All rights reserved

Table of Contents
iii
Welcome . . . . . . . . . . . . . . . . . . . . . . . . . . . . . . . . . . . . . . . . . . . . . . . . . . . . . . . . . . . . . . . . . . . . . . . . . 1
Wall mount kit features . . . . . . . . . . . . . . . . . . . . . . . . . . . . . . . . . . . . . . . . . . . . . . . . . . . . . . . . . . . . 1
About this guide . . . . . . . . . . . . . . . . . . . . . . . . . . . . . . . . . . . . . . . . . . . . . . . . . . . . . . . . . . . . . . . . . 1
Wall mount kit parts . . . . . . . . . . . . . . . . . . . . . . . . . . . . . . . . . . . . . . . . . . . . . . . . . . . . . . . . . . . . . . . . . 2
Hardware features . . . . . . . . . . . . . . . . . . . . . . . . . . . . . . . . . . . . . . . . . . . . . . . . . . . . . . . . . . . . . . . . . . 2
Installation . . . . . . . . . . . . . . . . . . . . . . . . . . . . . . . . . . . . . . . . . . . . . . . . . . . . . . . . . . . . . . . . . . . . . . . . 3
Direct wall mount installation . . . . . . . . . . . . . . . . . . . . . . . . . . . . . . . . . . . . . . . . . . . . . . . . . . . . . . . 3
Telco wall plate installation . . . . . . . . . . . . . . . . . . . . . . . . . . . . . . . . . . . . . . . . . . . . . . . . . . . . . . . . . 8
Dismounting the phone . . . . . . . . . . . . . . . . . . . . . . . . . . . . . . . . . . . . . . . . . . . . . . . . . . . . . . . . . . . . . 13
Limited warranty . . . . . . . . . . . . . . . . . . . . . . . . . . . . . . . . . . . . . . . . . . . . . . . . . . . . . . . . . . . . . . . . . . 14
Exclusions . . . . . . . . . . . . . . . . . . . . . . . . . . . . . . . . . . . . . . . . . . . . . . . . . . . . . . . . . . . . . . . . . . . . . 14
Warranty repair services . . . . . . . . . . . . . . . . . . . . . . . . . . . . . . . . . . . . . . . . . . . . . . . . . . . . . . . . . . 14
After warranty service . . . . . . . . . . . . . . . . . . . . . . . . . . . . . . . . . . . . . . . . . . . . . . . . . . . . . . . . . . . . 14

6300 Series Wall Mount Kit Installation Guide
1
Welcome
Congratulations on your purchase of the 6300 series wall mount kit! The 6300 series wall
mount kit is designed to be used with your 6300 series analog phones allowing you to easily
and securely mount your phone to the wall.
Wall mount kit features
• Single harmonized wall mount kit for the 6300 series of analog phones.
• Two-piece slide and lock design for simple installation.
• Choice of two fixed phone angles (10° and 20°).
• Telco wall plate support.
• Direct wall mounting holes.
• Anti-theft screw lock features.
About this guide
This manual describes how to physically install your 6300 series analog phone to a wall using the
6300 series wall mount kit. Contact your System Administrator if you have any additional questions
with regards to the 6300 series wall mount kit or your analog phone.

Wall mount kit parts
2
Wall mount kit parts
When you unpack the 6300 series wall mount kit package, you should ensure that you have all of
the following items. If any part is missing, contact the supplier of your phone.
Hardware features
Regulatory/
Safety Insert
Wall Mount Base Wall Mount
Screw Set
Short Analog
Phone Cable
and Connector
Handset Hook
Rotating Tool
Direct Wall
Mount Holes
Wall Mount Connector
Telco Wall
Wall Mount Base
Plate
Support
Anti-Theft
Screw Lock
Anti-Theft
Screw Lock
Release
Lever
Hole
Hole
6300 Series Wall Mount Kit Installation Guide
3
Installation
The 6300 series wall mount kit can be used to mount your 6300 series analog phones to the wall in
one of two ways:
• Directly to the wall
• On top of an existing telco wall plate
Direct wall mount installation
To mount your phone directly to the wall:
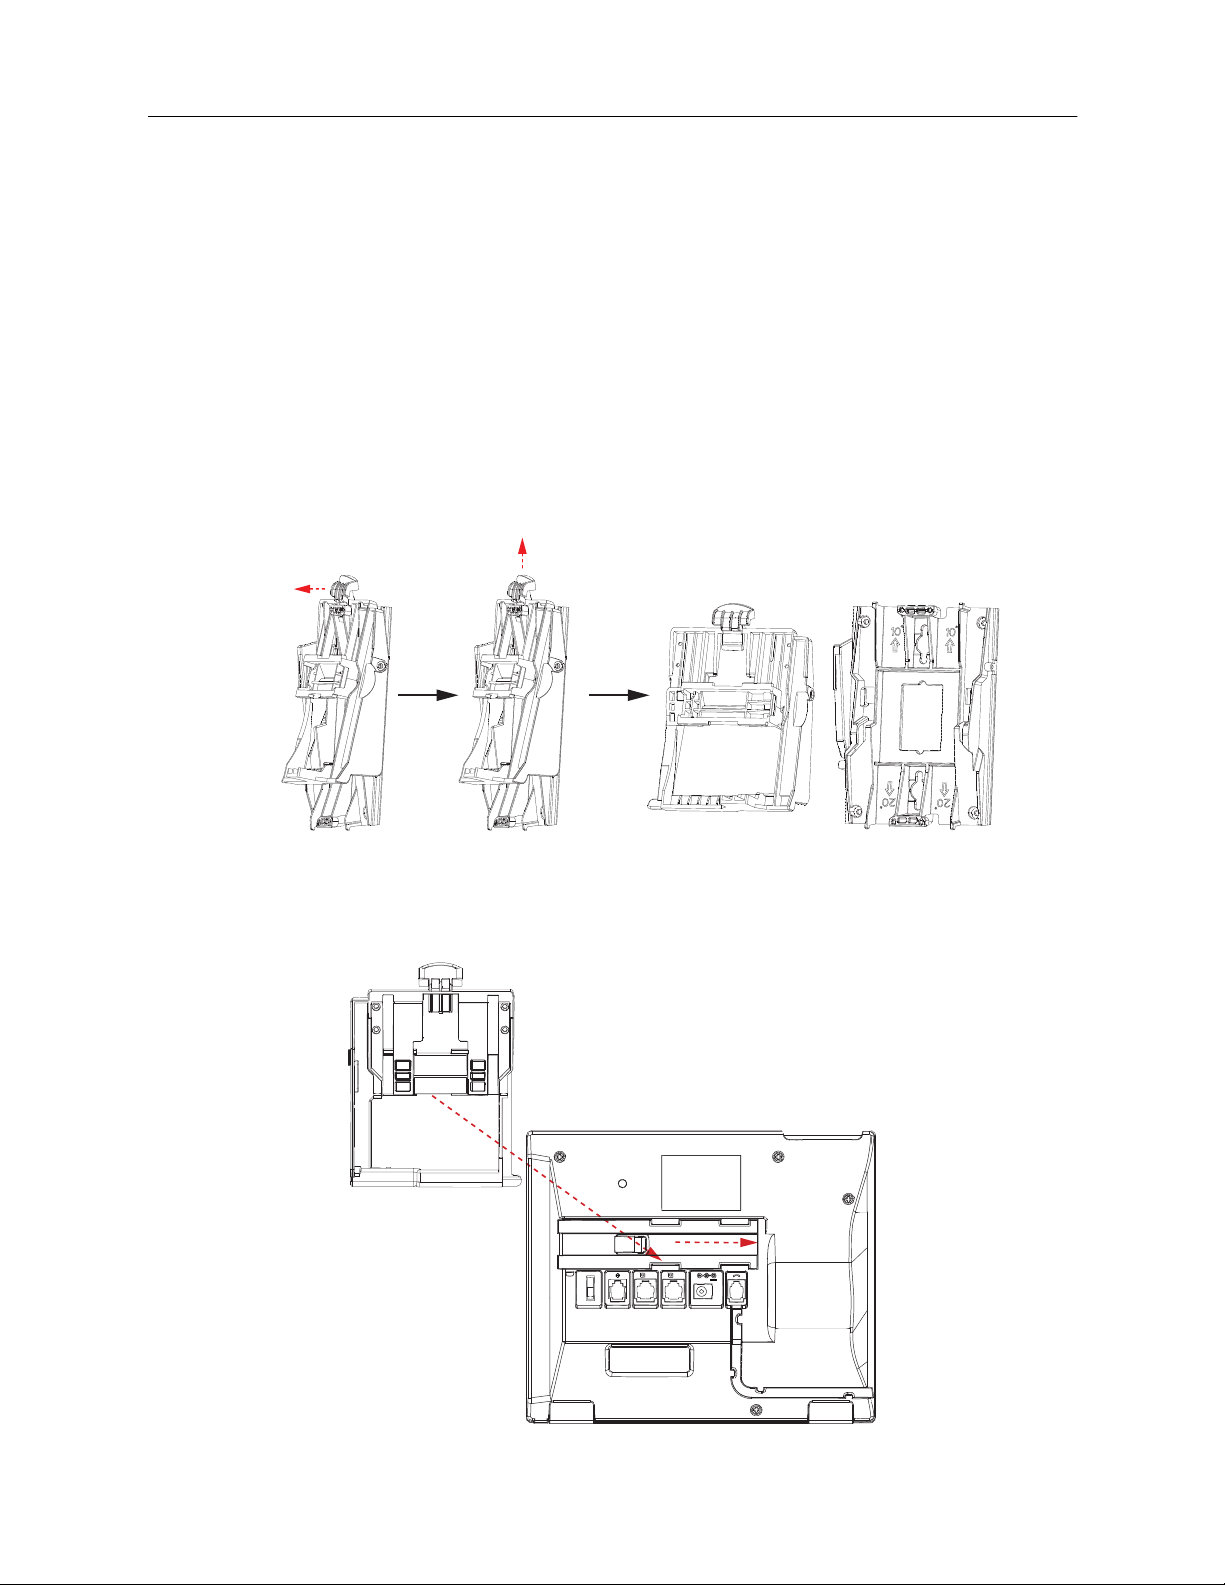
1. Separate the Wall Mount Connector from the Wall Mount Base by pulling the Release Lever
(on the Wall Mount Connector) in and pulling the Wall Mount Connector up.
2. Locate the wall mount insertion area on the back of the phone (above the various jacks).
3. Carefully insert the Wall Mount Connector into the insertion area of your phone and slide the
Wall Mount Connector towards the right until it snaps in place.
PSTN PBX
7.5V
---
12
k

Installation
4
4. Turn over your phone and locate the handset hook found in the handset cradle.
5. Using the handset hook rotating tool, rotate the handset hook 180° as illustrated in the figure
below.
The handset hook is now in the correct position ensuring that your phone’s handset securely
stays on hook when the phone is mounted to the wall.

6300 Series Wall Mount Kit Installation Guide
5
6. The orientation of the Wall Mount Base determines the viewing angle of the phone. Use the
degree markings on the Wall Mount Base to select the viewing angle, position the Wall Mount
Base with the desired angle facing up, and using the provided screws, attach the Wall Mount
Base to the wall.
7. On the back of your phone, connect the provided analog phone cable into the cable jack marked
with l1. Plug the other end of the analog phone cable directly into the analog phone jack on
the wall.
8. On the back of your phone, connect the provided power adapter cord into the power jack marked
with k. Plug the power adapter into a power outlet (surge protector or power bar is
recommended).
Note: Depending on the wall type, you may need to use wall anchors. Wall anchors are
included with your 6300 series wall mount kit.
or

Installation
6
9. Gently slide the Wall Mount Connector attached to your phone into the Wall Mount Base until it
snaps into place. Use the figure below as a guideline (viewed from the right side).
10° Orientation
20° Orientation
Push down
Push down

6300 Series Wall Mount Kit Installation Guide
7
10. (Optional) Insert the locking screw into the Screw Lock Hole located on the right side of the Wall
Mount Connector and gently tighten using a Philips-head screwdriver to secure the Wall Mount
Connector to the Wall Mount Base.
11. Place the handset into your phone’s handset cradle.
WARNING: TIGHTEN THE SCREW UNTIL SNUG BUT DO NOT OVER TIGHTEN.
OVER-TIGHTENING MAY CAUSE DAMAGE TO THE SCREW LOCK HOLE.
Table of contents
Other Mitel Rack & Stand manuals


Popular Rack & Stand manuals by other brands

Salamander
Salamander Acadia AC/W/L400/WH Assembly instructions

Fohhn
Fohhn VAT-09 Mounting instruction
ricoo
ricoo FS0522 quick start guide

AMSOIL
AMSOIL BMK-22 Installation and service instructions
Kargo Master
Kargo Master 48220 installation guide

Milestone AV Technologies
Milestone AV Technologies SIMPLICITY SLF2 installation instructions