Mishio MK-295 User manual

NG DN SDNG
P TP THDC 01 BÁNH XE
ORBITREK BIKE
MODEL: MK-295

Note: The images in this manual are for illustration purposes only, please see the actual
product directly for more details.
Specifications of actual products are subject to slight variation from the illustrations
and are subject to change without notice.
IMPORTANT SAFETY INSTRUCTIONS
MAKE SURE THAT YOU HAVE READ BEFORE
ASSEMBLING AND USING THIS BIKE. PLEASE SPECIAL PAY ATTENTION TO THE
FOLLOWING SAFETY MEASURES:
1. Check all screws and connections before using the orbitrek bike for the first time and make
sure that the bike meets all safety conditions.
2. Improper using or use the bike for in a long time can cause injury. Users should pay
attention to using time and their own health in the first use to be able to give the appropriate
exercise and intensity.
3. This bike is a home exercise equipment, with a maximum load capacity of 125 kg / 275 lbs.
4. Please check the equipment carefully before using it for the first time. Check the bike
according to the installation principle, periodically 1-2 months after use. Please keep the
bike in good working order and use the original supplied accessories.
5. If the equipment does not work properly, please contact the customer service center or
distributor for specific instructions.
6. Only use the equipment for the purposes described in this manual.
7. It is the responsibility of the owner to ensure that all users are fully informed of the
precautions to be taken against possible accidents and instructed for using the equipment
clearly.
8. Wear appropriate clothing while exercising. Do not wear clothes that are too loose, it mays
get caught on the bike. Always wear sport shoes to protect your feet.
9. Only the equipment after it has been installed correctly and tested for safety.
10. Place the bike on a level surface with padding underneath to protect the floor or carpet.
Make sure there is at least 2 ft. of distance (0.6 m) around the bike.
11. Regularly check and tighten all components and screws properly. Replace worn out parts
immediately.
12. Precautions: Before starting any exercise, please consult your doctor. This is extremely
important for peoples aged 35 and over and peoples with health problems.
13. This bike can only be used by one person at a time, others should keep a safe distance of
more than 50cm when the bike is in use.
14. Excessive exercise can lead to serious injury or death. If you feel dizzy or if you have pain
while exercising, stop immediately and let your body rest.
15. This exercise bike is not a tool to support or treat disease, so it has no healing effect.

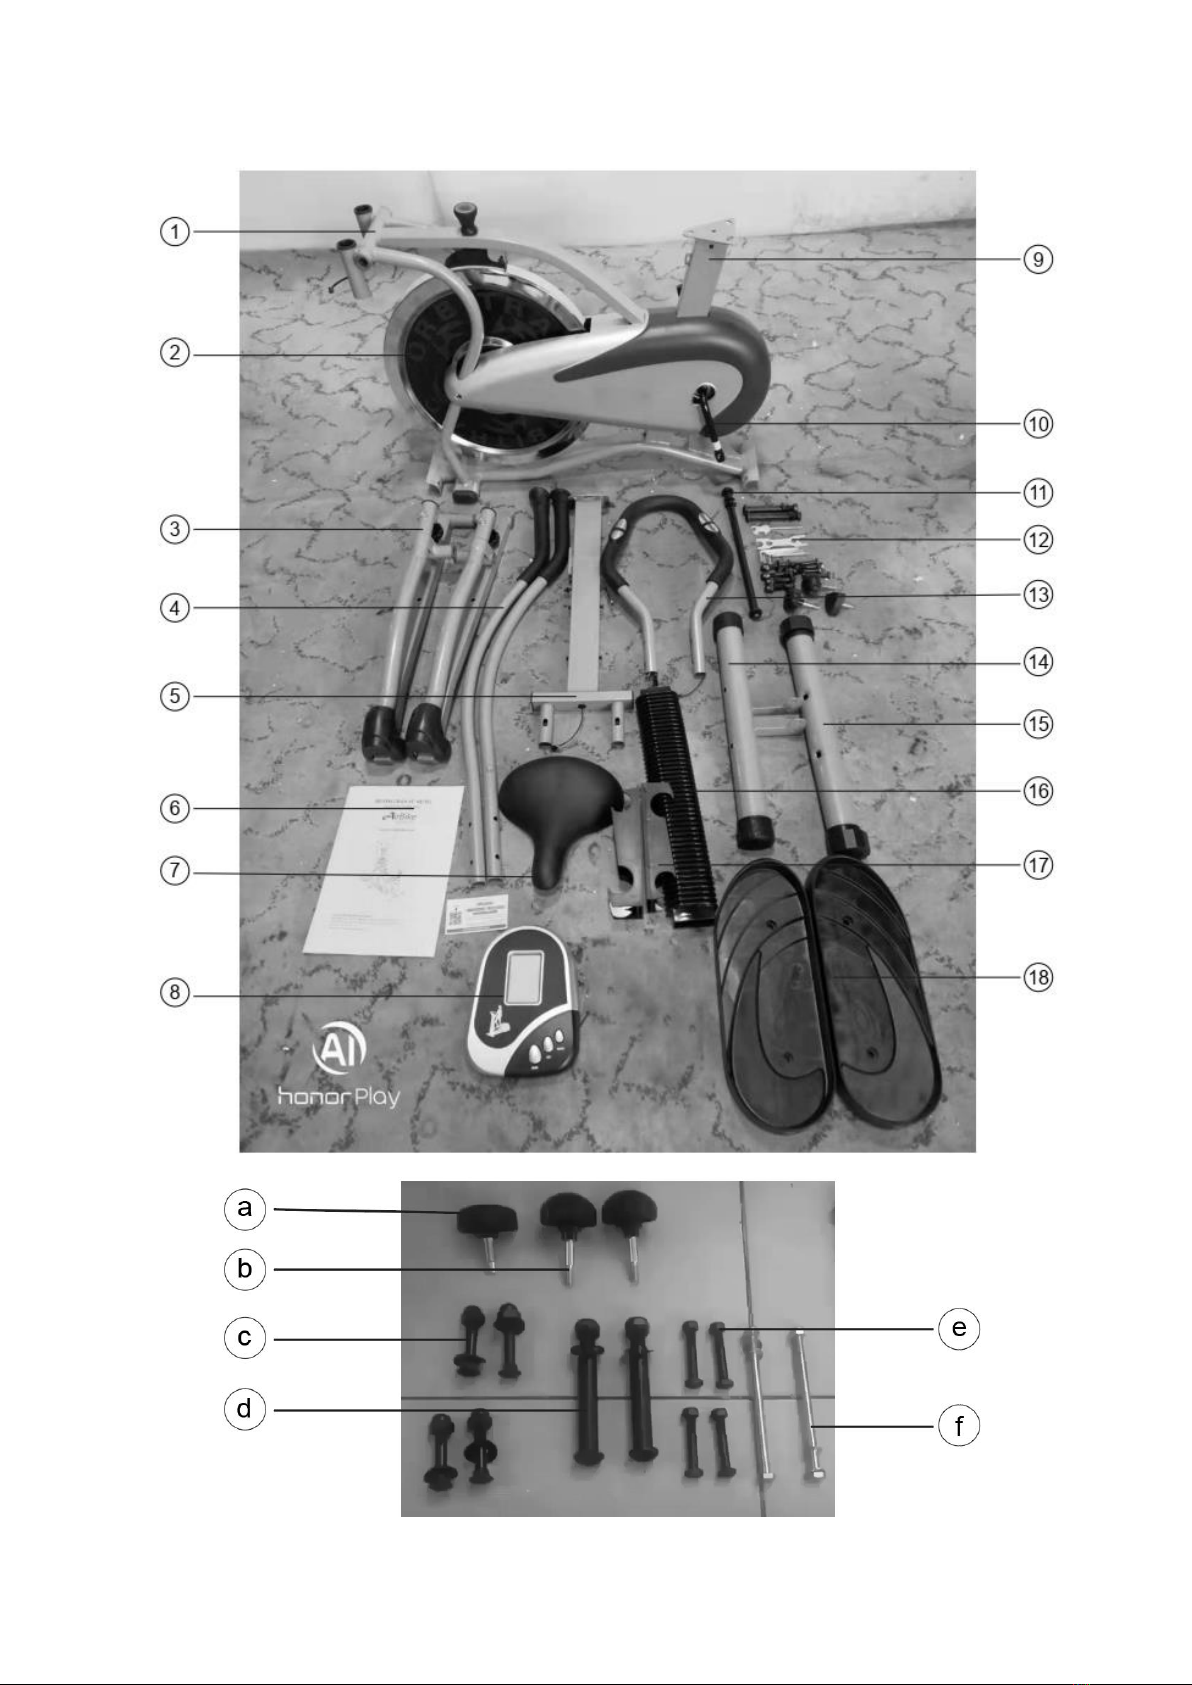
PARTS IDENTIFICATION

LIST OF PARTS AND ACCESSORIES
No.
Part name
Quantity
No.
Part name
Quantity
1
Main frame
1
10
Crank
1
2
Flywheel
1
11
Spindle bar
1
3
Left/Right connecting tube
2
12
Tools and screws
1
4
Left/Right handlebar
2
13
Fixing handlebar
1
5
Upright post
1
14
Front stabilizer
1
6
1
15
Rear stabilizer
1
7
Saddle
1
16
Spring plastic tube
1
8
Computer
1
17
Dumbbell holder
2
9
Saddle post
1
18
Pedals
2
Tools and screw
a
Adjustable knob
1
d
Hinge bolt
2
b
Lock knob 2
2
e
Short hex bolt
4
c
Bolt M8*62
4
f
Long hex bolt
2

ASSEMBLY INSTRUCTIONS
Step 1: Install the front and rear stabilizer
Take the front stabilizer (14) out of the box, place it in front of the main frame (1), under the
flywheel (2). Adjust the holes on the front stabilizer match the holes on the main frame. Take 2
M8*62 bolts (c), then remove the washer and nut from the bolt, thread the bolt into the holes on
the front stablilizer and attach it to the frame. Use a wrench to tighten the washers and nuts to
the bolts to secure the front stabilizer (same installation for the rear stabilizer (15)).
Step 2: Install the left/right connecting tube
Insert the connecting tube to the frame
Thread the spindle bar through the round pipe on the frame, align it so that it is in the center of
the pipe, and install the flat washers (supplied with the spindle bar) to the ends of the bar.

Attach the right connecting tube (marke. Tighten the
nuts and washers to fix the tube to prevent it from falling off. Same installation for the left
connecting tube .
Use a hexagon screwdriver to tighten the screws on both sides.
Insert the connecting tube into the crank
Take 1 hinge bolt (d) and thread it through the lower head of the right connection tube to the
right crank. Use the screwdriver to tighten the bolt. Then tighten the lock nut onto the inside of
the bolt to secure. Same installation for the left crank.

Step 3: Install the pedals
Place the right pedal (marked n the right
connecting tube so that the holes in the pedal match
the holes in the connecting tube. Use short hex bolts
(e) for fixing.
Same installation for the left pedal (marked L).
Step 4: Install the fixing handlebar
Place the upright post (5) into the 2 tubes on the main frame. Fix the upright post by inserting 2
locking knobs 2 (b) and tightening it.
Note: The higher end of the post should be facing outward.
Insert the fixing handlebar into the upright
post so that the 4 holes on the handlebar
match the 4 holes on the post.
Thread the long hex bolts (f) through the holes
and tighten them.

Insert the dumbbell holder under the fixing handlebar.
Connect the heart rate sensor wires on
the upright post to the sensor wires on
the handlebar.
Step 5: Install the left/right handlebar
Remove the 2 locking knobs on the connecting
tube. Then attach the right handlebar (4) to the
right connecting tube and adjust the handle
height appropriately. Insert the locking knob
back into the hole and tighten to secure the
handlebar.
Same installation for the left handlebar.

Step 6: Install the saddle
Install the triangle end of the saddle post (9) to the 3
screws under the saddle (7). Tighten the nuts to fix the
saddle. It helps to keep the saddle from swaying when
exercising.
Thread the spring plastic tube (16) onto the outside of the saddle post, then install them onto
the main frame.
Adjust the seat height accordingly. Attach the adjusting knob (a) and tighten it.
Step 7: Install the computer
Connect the sensor wires inside the upright post to the computer (8), then attach the computer
on the post.

Insert the screws into the bottom of the computer and tighten it to fix the computer to the
upright post.
Finally, check all nuts and connections before use.
Table of contents
Languages:
Other Mishio Exercise Bike manuals