
Mio MiVue 798 User manual

User Manual
MiVue™798 / 798D

1
Revision: R00
(4/2019)
Disclaimer
The screenshots in this manual may differ between different operating systems and
software versions. You can download the latest User Manual of your product from
Mio™ website (www.mio.com).
Specications and documents are subject to change without notice. MiTAC does not
warrant this document is error-free. MiTAC assumes no liability for damage incurred
directly or indirectly from errors, omissions or discrepancies between the device and
the documents.
Note
Not all models are available in all regions.
Depending on the specic model purchased, the colour and look of your device and
accessories may not exactly match the graphics shown in this document.
MiTAC Europe Ltd.
Spectrum House, Beehive Ring Road,
London Gatwick Airport, RH6 0LG,
UNITED KINGDOM

2
Getting to know your dash cam............................................................................ 4
Using your dash cam in a vehicle......................................................................... 5
Precautions and notices.................................................................................. 5
Mounting the dash cam................................................................................... 6
MiVue rear camera.......................................................................................... 7
Using a memory card ........................................................................................... 8
Formatting a card ............................................................................................ 8
Turning the dash cam on...................................................................................... 8
Power button ................................................................................................... 8
Restarting the dash cam ................................................................................. 9
System icons ........................................................................................................ 9
Function keys ..................................................................................................... 10
Switching screens ......................................................................................... 10
Setting the date and time ....................................................................................11
Recording in driving mode...................................................................................11
Continuous recording .....................................................................................11
Event recording ............................................................................................. 12
Parking mode ..................................................................................................... 12
Camera mode..................................................................................................... 13
Playback mode................................................................................................... 14
Safety camera alerts .......................................................................................... 15
Adding a safety camera................................................................................. 15
Updating safety camera data ........................................................................ 16
Table of Contents

3
Getting connected .............................................................................................. 16
MiVue Pro app............................................................................................... 16
Setting up a WIFI connection ........................................................................ 17
System settings .................................................................................................. 18
MiVue Manager .................................................................................................. 23
Installing MiVue Manager.............................................................................. 23
Playing the recording les ............................................................................. 23
For more information .......................................................................................... 26
Caring for your device ................................................................................... 26
Safety precautions......................................................................................... 27
About charging ......................................................................................... 27
About the charger..................................................................................... 27
About the battery...................................................................................... 27
About GPS .................................................................................................... 28
Regulatory information .................................................................................. 28
Declaration of conformity ......................................................................... 29
WEEE............................................................................................................ 29

4
Getting to know your dash cam
Note: The screenshots and other presentations shown in this manual may differ from the ones
generated by the actual product.
1
2
3
5
6
9
4
7
8
10
11
12
13
1Power button
2 Device mount socket
3Mini-USB connector
4Shutdown button
5 LCD screen
6Microphone
7System indicator
8 Event button
9Memory card slot
10
Parking indicator
11
Speaker
12
Camera lens
13
Function keys

5
Using your dash cam in a vehicle
Precautions and notices
lDo not operate the device while driving. Using this product does not change the
requirement for a driver to take full responsibility for his or her behavior. This
responsibility includes observing all trafc rules and regulations in order to avoid
accidents, personal injury or property damage.
lA window mount is needed when using the dash cam in a car. Make sure that
you place the dash cam in an appropriate place, so as not to obstruct the driver’s
view or deployment of airbags.
lMake sure that no object is blocking the camera lens and no reective material is
placed near the lens. Please keep the lens clean.
lIf the car’s windscreen is tinted with a coating, it may impact the recording
quality.
lTo ensure the highest quality recordings, you are advised to place the dash cam
near the rear view mirror.
lSelect an appropriate location for mounting the device in a vehicle. Never place
the device where the driver’s eld of vision is blocked.
lIf the car’s windscreen is tinted with a reective coating, it may be athermic and
impact the GPS reception. In this instance, please mount your device where
there is a “clear area.”
lThe system will automatically calibrate the G sensor of the device during start-
up. To avoid G sensor malfunction, always turn the device on AFTER you mount
it in the vehicle properly.
6
Mounting the dash cam
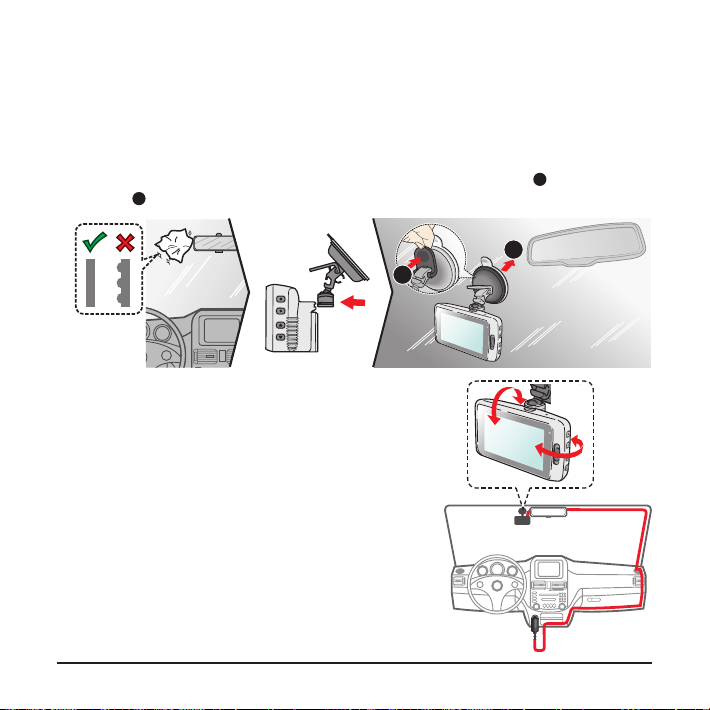
Make sure that your car is parked on level ground. Follow the instructions to mount
your dash cam in a vehicle securely.
1. Before attaching the device mount to the windscreen, it is recommended to clean
the windscreen with rubbing alcohol and make sure that the installation area is
free of dust, oil and grease. Attach the mount to the windscreen ( 1), and press
the tab ( 2) to lock the suction cup in place.
1
2
2. When adjusting the angle of mounting, make
sure that the camera’s view is parallel with the
level ground and the ground/sky ratio is close
to 6/4.
3. Route the cable through the top ceiling and the
A-pillar so that it does not interfere with driving.
Make sure that the cable installation does not
interfere with the vehicle's airbags or other
safety features.

7
Note: The installation illustrations are for your reference only. The placement of the devices and
cables may vary depending on the vehicle model. If you encounter any problems during installation,
contact a skilled installer (such as the service personnel of the vehicle) for assistance.
MiVue rear camera
Depending on your model, your device may support a rear camera (may be sold
separately).
1Mounting pad
2 Camera lens
3 Adjustment bolt
4Micro-USB connector
16
1
2
34
Follow the illustration to connect the rear camera to the dash cam.
Y cable Rear camera cable
Car charger

8
Using a memory card
Note:
lDO NOT apply pressure to the centre of the memory card.
lMiTAC does not guarantee the product’s compatibility with memory cards from all manufacturers.
l Beforeyoustartrecording,pleaseformatthememorycardtoavoidmalfunctioncausedbylesnot
created by the dash cam.
lTurn the device off before removing the memory card.
You must insert a memory card (not supplied) before you can start recording. The
dash cam supports the Class 10 memory cards with 8 GB – 128 GB capacity. You
should use separate MicroSD cards for recording and for regular data storage.
Hold the card (MicroSD) by the edges and gently insert it into
the slot as shown in the illustration.
To remove a card, gently push the top edge of the card inwards
to release it and pull it out of the slot.
Formatting a card
To format a memory card (all data will be erased), press > Format.
Turning the dash cam on
Complete the installation according to the instructions in the “Using your dash cam
in a vehicle” section. Once the vehicle engine is started, the dash cam automatically
turns on. The System indicator glows in green when the dash cam is powered.
Power button
Press and hold the Power button for 2 seconds to manually turn the dash cam on
and off. When the dash cam is turned on, press to switch the LCD screen on and off.
9
Restarting the dash cam
Occasionally, you may need to perform a hardware reset when the dash cam stops
responding or if it appears to be “frozen” or unresponsive. To restart the dash cam,
press and hold the Power button until the system powers off; press the Power button
again to turn the dash cam on.
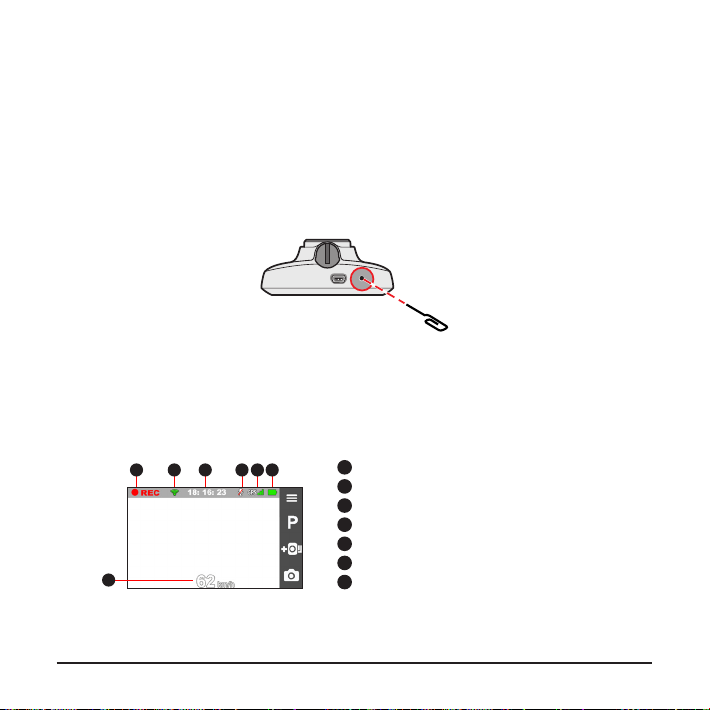
If the system does not shut down by keeping the Power button pressed, you can
force it to shut down by inserting a small rod (such as a straightened paperclip) into
the Shutdown button on the device.
System icons
Various system icons on the status bar at the top of the screen provide the status
information of your device. The icons displayed will vary depending on your device
model and state.
1Recording indicator
2WIFI status
3Time display
4Microphone status
5 GPS signal
6Power status
7 Current GPS car speed
1 2 3 5 64
7
This manual suits for next models
1
Table of contents
Other Mio Dashcam manuals

Mio
Mio MiVue 795 Series User manual

Mio
Mio MiVue M760D User manual

Mio
Mio MiVue C310 User manual

Mio
Mio MiVue C380D Series User manual

Mio
Mio MiVue 5 series User manual

Mio
Mio MiVue C380D Series User manual

Mio
Mio MiVue C560 Series User manual

Mio
Mio MiVue 795 Series User manual

Mio
Mio MiVue 730 Series User manual

Mio
Mio MiVue 338 User manual

Mio
Mio MiVue C312 User manual

Mio
Mio MiVue M760D User manual

Mio
Mio MiVue 82 Series User manual

Mio
Mio MiVue 600 User manual

Mio
Mio MiVue 388 User manual

Mio
Mio N548 User manual

Mio
Mio MiVue M760D User manual

Mio
Mio MiVue M760D User manual

Mio
Mio MiVue M350 User manual

Mio
Mio mivue drive 60 series User manual


