Mini Gadgets OmniInverter User manual

1 Version 1.1
OmniEye Inverter Manual
SKU: OmniInverter

2 Version 1.1
THANK YOU FOR PURCHASING THE
OMNIINVERTER HIDDEN CAMERA
Please read this manual before operating the
camera and keep it handy.
Your purchase should include:
1 x OmniInverter
1 x AC Wall Adapter
1 x Manual
1 x A/V Cable
1 x 3.5mm to USB Cable
1 x Remote
1 x 16GB MicroSD Card
1 x MicroSD Card Reader
3 Version 1.1
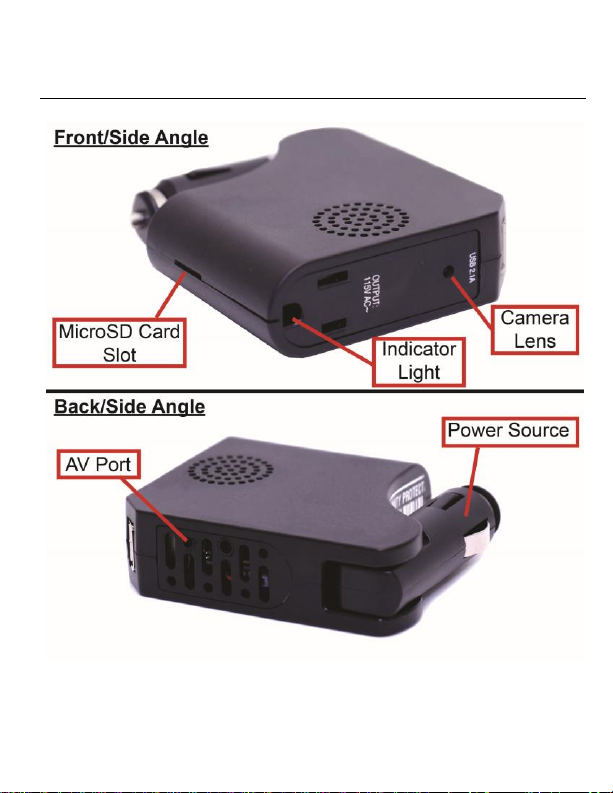
GET FAMILIAR WITH YOUR OMNIINVERTER HIDDEN
CAMERA

4 Version 1.1

5 Version 1.1
OPERATING THE CAMERA
IMPORTANT NOTES:
Due to this camera being powered by your car’s
power socket, you MUST stop recording prior
to turning your car’s engine off. If you do not,
the video file will be corrupted and
unrecoverable.
If you stop your vehicle’s engine, the unit will
power off. You will need to power it on and
initiate recording again the next time you start
your car.
If your car’s power socket is permanently
powered and the camera is recording, your
vehicle’s battery will drain in order to continue
recording.
HOW TO TURN ON THE CAMERA
1. Plug the device into your car’s power socket.
2. Using the provided remote, power on the
device (see page 4).

6 Version 1.1
3. The camera will power on and immediately
enter motion detection recording mode.
4. If you wish to stop recording and enter standby
mode, press the “Motion Detection” button on
the remote (see page 4).
5. The indicator light will turn on indicating the
unit is in standby mode.
HOW TO RECORD VIDEO
1. When the camera is in Standby Mode, press the
“Continuous Recording Mode” button (see
page 4). The Indicator LED will flash two times.
2. Once the Indicator LED turns off, the camera is
now recording video.
HOW TO STOP RECORDING VIDEO
1. While the camera is recording video press the
“Continuous Recording Mode” button once
more. (The Indicator LED will turn on.)
2. The camera has now stopped recording and is
now in Standby Mode.

7 Version 1.1
HOW TO TAKE PICTURES
1. When the camera is in Standby Mode, press the
“Photo Button” (see page 4). The green light
will turn red while the photo is being taken.
2. Once the photo is taken, the light will turn back
to green and once again be in standby mode.
HOW TO RECORD MOTION DETECTION
1. When the camera is in Standby Mode, press the
“Motion Detection Button” (see page 4).
2. If motion is detected, the light will flash 2 times
and turn off.
3. If there is no motion after 1 minute, the device
will return to detection standby mode until
motion is detected again. While waiting, the
Green light will be on.
NOTE: If you activate motion detection and there is no
motion currently in front of the camera, there will be no
indication you have entered into motion mode. The green
light will simply remain on. If you wish to confirm that

8 Version 1.1
you have entered into motion detection mode, wave your
hand in front of the camera lens. The unit will flash the
red light 2 times, then the light will turn off confirming
that the device detected your motion and is now
recording video.
HOW TO STOP RECORDING MOTION DETECTION
1. While the camera is recording motion
detection, press the “Motion Detection Button”
once more. (The Indicator LED will turn on.)
2. The camera has stopped recording motion
detection and is now in Standby Mode.
HOW TO USE PIR SENSOR
Note: The “Motion Detection” mode and “PIR” mode
work similarly in that they detect motion. The “Motion
Detection” mode relies on the camera itself to detect
motion, while the “PIR” mode relies on the PIR sensors
to detect motion. “PIR” represents “passive infrared
sensor”, which relies on measures of infrared light to
detect motion.

9 Version 1.1
Note: Only OmniX products come with a PIR sensor
installed. OmniEye products do not have this feature.
1. While the camera is in Standby Mode, press the
“PIR Sensor” button (see page 4).
2. If motion is detected, the indicator light will
flash, then turn off.
3. The device is now in PIR sensor mode.
4. If you wish to turn it off PIR sensor mode, press
the “PIR Sensor” button once more. The
indicator light will flash, and the camera is now
in standby mode.
CHANGING YOUR DEVICE SETTINGS (INCLUDING THE
DATE/TIME STAMP)
Your OmniInverter comes with an A/V cable that is
used to connect the device to a monitor/TV so that you
can adjust various settings. See page 3 to locate the AV
port on your device.
1. Connect your device to a monitor/TV using the
provided A/V Cable.
2. Power on the device.

10 Version 1.1
3. Press the motion detection button to stop
recording.
4. Press the “MENU” button on the remote.
5. A menu will display on the screen with various
options (Use OK, UP, Down, and Menu on the
remote to navigate the menu system):
a. Resolution –Select from different
resolutions.
b. Time Stamp –Use this option to enable
or disable the date/time stamp on
videos.
c. Loop Record –Choose whether you
want the device to automatically
overwrite the oldest file on the memory
card if the memory becomes full.
d. Video Time –When in continuous
recording mode, this setting determines
how long video files will be before the
current recording is stopped and a new
recording is started.
e. Audio Record (if applicable) –If you
purchased your device with audio
Table of contents


