Midtronics EXP-717 User manual

Expandable Electrical
Diagnostic Platform
For testing 12-volt automotive batteries
INSTRUCTION MANUAL
EXP-717


•3•
Contents
Chapter 1: Before You Begin.......................................................................................7
Safety..............................................................................................................................7
General Precautions ............................................................................................................. 7
Conventions Used in This Manual...................................................................................7
Note: Truck info...............................................................................................................8
Registering Your Analyzer...............................................................................................8
Chapter 2: Description................................................................................................. 9
Test Leads, Connectors, and Data Ports ........................................................................9
Display and Keypad ......................................................................................................10
Data Entry Methods.......................................................................................................11
Menu icons...........................................................................................................................11
Option Buttons .....................................................................................................................11
Scrolling Lists.......................................................................................................................11
Alphanumeric Entry..............................................................................................................11
Menu Maps....................................................................................................................12
Main Menu .......................................................................................................................... 12
Print/View Menu.................................................................................................................. 13
Info Menu ............................................................................................................................ 13
Utilities Menu....................................................................................................................... 14
Chapter 3: Test Preparation.......................................................................................15
Inspecting the Battery....................................................................................................15
Testing Out-of-Vehicle...................................................................................................15
Testing In-Vehicle..........................................................................................................15
Connecting the Battery Test Cable................................................................................15
Setting User Preferences..............................................................................................16
Contents

•4•
Chapter 4: Battery Test .............................................................................................. 17
Additional Test Requirements........................................................................................18
Vehicle Type / Taxi test........................................................................................................ 18
Surface Charge................................................................................................................... 18
Select the Temperature (not always)...................................................................................18
Before / After Charge ..........................................................................................................19
Deep Scan Test................................................................................................................... 19
Battery Test Results ......................................................................................................20
Chapter 5: QC Test ..................................................................................................... 21
Chapter 6: Utilities......................................................................................................22
Config Tester.................................................................................................................22
Display...........................................................................................................................23
Shop..............................................................................................................................24
Coupon..........................................................................................................................25
Edit Coupon...................................................................................................................25
Language ......................................................................................................................25
Format Disk...................................................................................................................25
Update...........................................................................................................................25
Battery Menu (only for the Quality Control Test) ...........................................................26
Contents

•5•
Chapter 7: Info Menu..................................................................................................27
Totals.............................................................................................................................27
Transfer.........................................................................................................................27
Version info....................................................................................................................27
Chapter 8: Print/View .................................................................................................28
View Test.......................................................................................................................28
View QC Test.................................................................................................................28
Chapter 9: Truck info.................................................................................................. 29
Chapter 10: Troubleshooting..................................................................................... 30
The Display Does Not Turn On .....................................................................................30
The STATUS LED Flashes (Midtronics Printer) ............................................................30
Data Will Not Print.........................................................................................................30
Chapter 11: Tester Internal Batteries........................................................................32
Battery Power Indicator.................................................................................................32
Replacing the Tester Batteries ......................................................................................32
Contents

•6•
Contents

•7•
Chapter 1: Before You Begin
!Safety
Because of the possibility of personal injury, always use extreme caution when working with
batteries. Follow all manufacturers’ instructions and BCI (Battery Council International) safety
recommendations.
General Precautions
• DANGER—RISK OF EXPLOSIVE GASES: Batteries can produce a highly explosive mix
of hydrogen gas and oxygen, even when the battery is not in operation. Always work in a
well-ventilated area. Never smoke or allow a spark or flame in the vicinity of a battery.
• WARNING—REQUIRED BY CALIFORNIA PROP. 65: Battery posts, terminals, and
related accessories contain lead and lead compounds, chemicals known to the state of
California to cause cancer and birth defects or other reproductive harm. Wash hands
after handling.
• Batteryacid ishighlycorrosive. Ifacidentersyoureyes, immediatelyflushthem thoroughly
with running cold water for at least 15 minutes and seek medical attention. If battery acid
gets on your skin or clothing, wash immediately with water and baking soda.
• Always wear proper safety glasses or face shield when working with or around
batteries.
• Keep hair, hands, and clothing as well as the analyzer cords and cables away from
moving engine parts.
• Remove any jewelry or watches before you start servicing the battery.
• Use caution when working with metallic tools to prevent sparks or short circuits.
• Never lean over a battery when testing, charging or jump starting it.
Conventions Used in This Manual
To help you learn how to use your analyzer, the manual uses these symbols and typographical
conventions:
The safety symbol followed by the word WARNING or CAUTION indicates
instructions for avoiding hazardous conditions and personal injury.
The word CAUTION without the safety symbol indicates instructions for
avoiding equipment damage.
The wrench symbol indicates procedural notes and helpful information.
The text for keypad buttons and soft-key functions are in bold capital letters.
The text for screen options are in regular capital letters.
!
CAUTION
UP ARROW
POST TYPE
Chapter 1: Before You Start

•8•
Note: Truck info
In the following chapters we will describe the menu structure and functionality of the passenger car
software. In many of the cases this will also serve the Truck tester version. More info can be found
in chapter 9.
Registering Your Analyzer
Before using your tester, we recommend that you register it online
to activate your warranty. Registration will also make it faster and
easier for you to obtain technical support and service, and order
parts and accessories. In addition, you’ll be alerted to any important
information, like product updates and special offers.
To register, log on at www.midtronics.com/warranty.html and have
your serial number ready. The number is at the bottom of the label
on the back of the analyzer (Figure 1).
Figure 1:
Serial Number Location
Chapter 1: Before You Start

•9•
Chapter 2: Description
Chapter 2: Description
Test Leads, Connectors, and Data Ports
For the cable test leads, there are two connectors on the top of the tester (Figure 3).
• For the battery test cable, there is a 6-pin connector with a locking ring.
6-pin
connector
IR data
transmitter
IR temperature
sensor DB-9
connector
for future
expandability
Accessories
port
SD card slot
for future
upgrades
There are two IR data ports on the top of the Tester (Figure 3).
• An IR data transmitter, which transmits test results to the optional IR printer.
• An IR temperature measurement sensor.
The tester also has a DB-9 connector for future expandability and an SD card slot for future soft-
ware upgrades or data logging. (Figure 4).
Figure 3: Top of EXP Figure 4: Bottom of EXP
•10 •
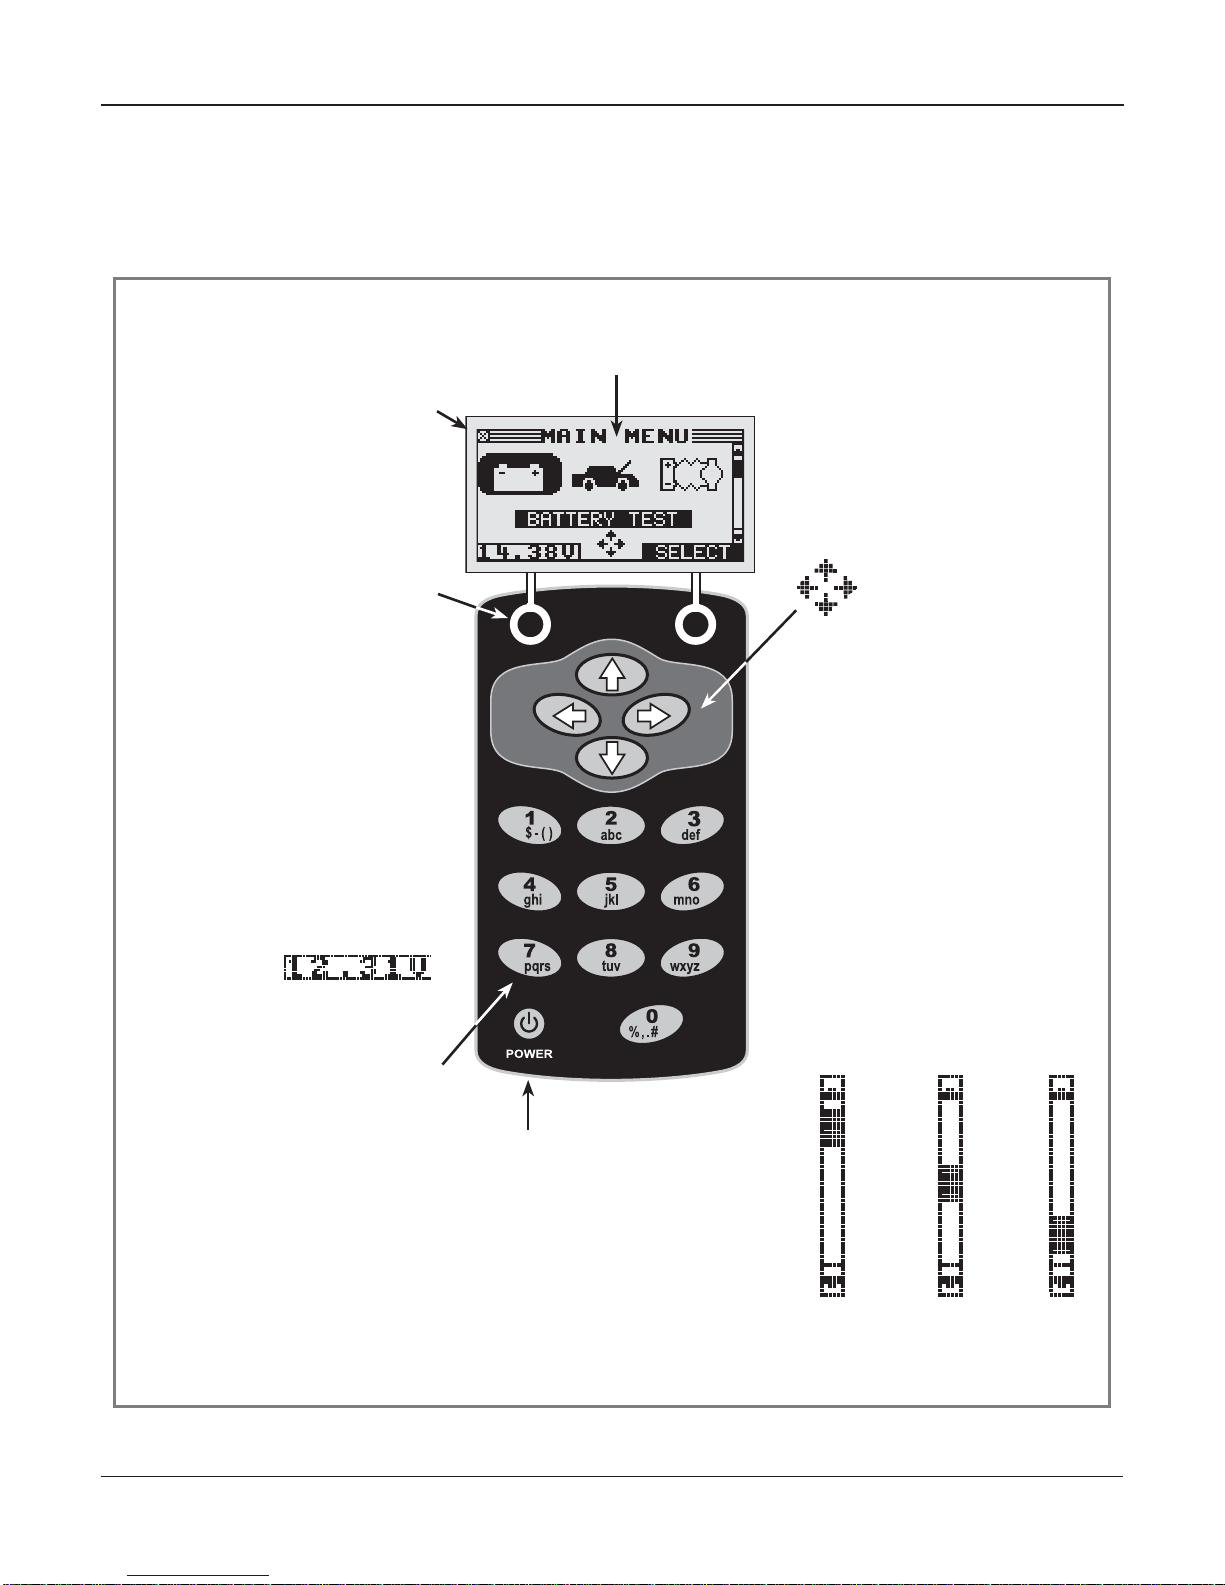
The Internal Batteries
Status Indicator, which ap-
pears in the screen’s top
left corner, lets you know
the status and charge
level of the analyzer’s 6 1.5 V
batteries. The X shown in the
figure shows that the tester is
powered by the battery you’re
testing to conserve the internal
batteries.
Press the two Soft Keys linked
to the bottom of the screen to
perform the functions displayed
above them. The functions
change depending on the menu
or test process. So it may be
helpful to think of the words
appearing above them as part
of the keys. Some of the more
common soft-key functions are
SELECT, BACK, and END.
When you connect the tester
to a battery it functions as a
voltmeter. The
voltage read-
ing appears above the left soft
key until you move to other
menus or functions.
In some cases, you can use
the Alphanumeric Keypad to
enter numerical test parameters
instead of scrolling to them with
the ARROW keys.
You’ll also use the Alphanu-
meric Keys to create and edit
customer coupons. The keypad
includes characters for punctua-
tion. To add a space, press the
RIGHT and LEFT ARROW keys
simultaneously.
The Selection Area below the
Title Bar contains items you se-
lect or into which you enter infor-
mation. The area also displays
instructions and warnings.
The Directional Arrows on the
display show you which Arrow
Keys to press to move to other
icons or screens. The Up
and Down Directional
Arrows,forexample,let
you know to press the
UP and DOWN ARROW
keys to display the screens that
are above and below the current
screen.
The Left and Right Directional
Arrows let you know to use the
LEFT or RIGHT ARROW keys
to highlight an icon for selection.
Another navigational aid is the
Scroll Bar along the right side
of the screen. The position of its
scroll box tells you which menu
screen you’re viewing.
The Title Bar shows you the
name of the current menu, test
tool, utility, or function.
Press the POWER button to turn
the Tester on and off. The Tes-
ter also turns on automatically
when you connect its test leads
to a battery.
Whichever way you turn on the
Tester, it always highlights the
icon and setting you last used
for your convenience.
Top
or only
screen
Middle
screen Last
screen
Scroll Bar
Scroll
Box
Chapter 2: Description
Display and Keypad
The keypad and display work together to help you quickly find and use the right tools at the right time.
The display also keeps you on track with on-screen navigation aids, directions and messages. Figure
6shows how the elements on the screen relate to the keypad.
Figure 6: Main Menu and Keypad
Table of contents
Other Midtronics Medical Equipment manuals


