MFJ MFJ-432 User manual

MFJ-432 Voice Memory Keyer
1
MFJ-432 Voice Memory Keyer
Introduction
The MFJ-432 Voice Memory Keyer will take you to new dimensions in the Contest
world. Do poor band conditions leave you hoarse and frustrated? Not any more! By
storing your own natural voice in the MFJ-432 Voice Memory Keyer, you can repeat the
same message as many times as necessary. You can now operate most of a contest by just
pressing a few buttons and still have your own voice when you're finished.
The MFJ-432 Voice Memory Keyer is capable of storing as many as four natural
sounding messages in a total of 20 seconds. It will also repeat stored messages
continuously. A built in speaker allows you to monitor your stored messages. Internal
jumpers let you customize your it to own rig. Contests have never been easier!
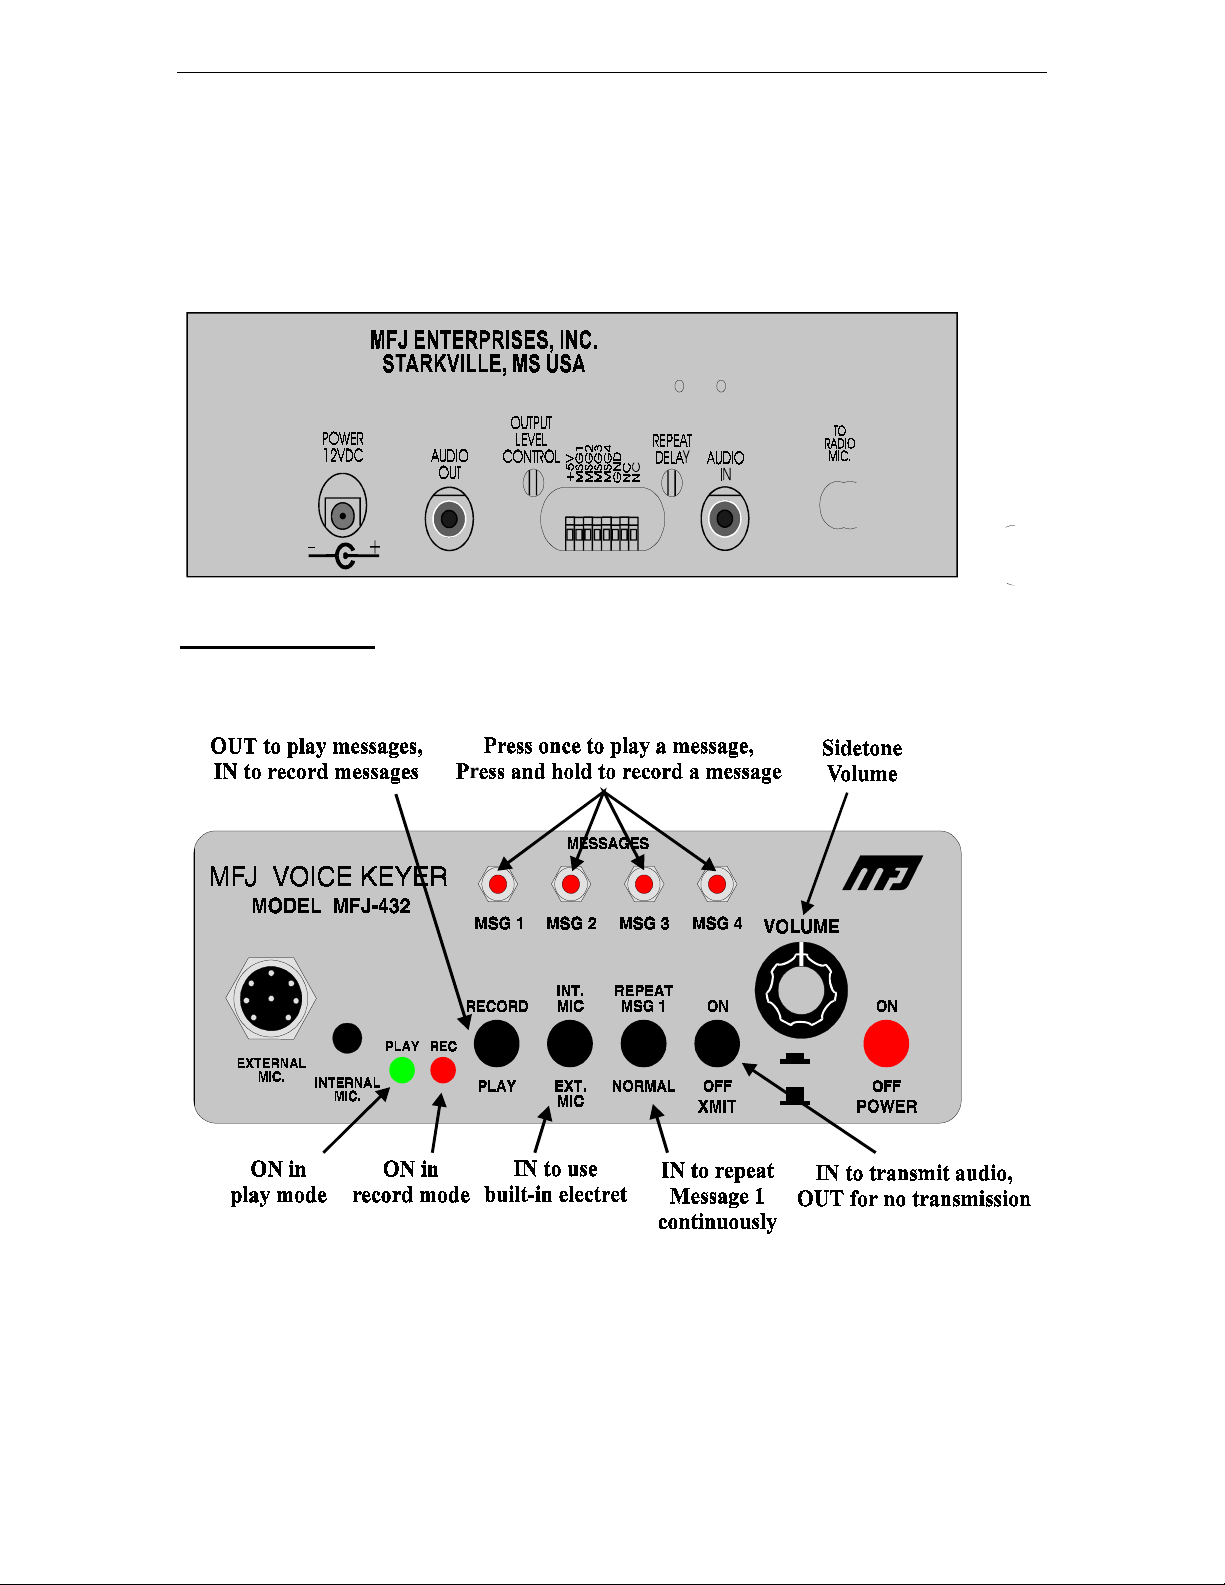
Connections
Power
A 12 Vdc 300 milliamp power supply should be used with the MFJ-432. The power jack
accepts a 2.1mm coaxial plug with the center conductor positive. An optional dc supply,
the MFJ-1312B, is available from MFJ. Connect your MFJ-1312B or compatible dc
supply (coaxial line with shield ground) into the power jack on the MFJ-432.
Radio and Microphone Connections
This unit supports Icom, Kenwood, or Yaesu radios with 8 pin microphone connectors.
Internal jumpers are used to set the unit for each make of radio. The MFJ-432 is set for
Kenwood at the factory. Jumpers can be changed to the appropriate settings for Icom or
Yaesu radios. The unit should simply be open and the jumpers adjusted to the Y settings
for Yaesu or the I settings for Icom. The jumpers should be changed on both HD1 and J4.
Output Level
The audio output level to your radio may be adjusted using the trimpot labeled OUTPUT
LEVEL CONTROL. The control is accesible through a hole in the back panel. A small
slotted screwdriver can be used to adjust the trimpot.
Audio In and Audio Out
The AUDIO IN and AUDIO OUT jacks accept standard mono or stereo 3.5 mm
miniature jacks. The AUDIO OUT jack is driven differentially across the tip and the
shield of the jack. The AUDIO IN jack is used to record audio from your radio or other
external source. The AUDIO IN jack should have the audio on the tip and ground on the
shield of the connector.
MFJ-432 Voice Memory Keyer
2
Accessory Port
Beside the audio in jack is a connector for a IDC plug. Each message line plus 5 volts out
is available on this port. This plug can be used to implement a remote or other accessory
circuits. See the section entitled "Accessory Circuits" for more details.
Basic Operation
The Voice Keyer is simple to operate. The push-button marked PWR controls power to
the unit. After turning the unit on, either the PLAY or the REC LED should light.

MFJ-432 Voice Memory Keyer
3
Recording a message
Push the RECORD PLAY button. The REC LED should light. Press and hold the
appropriate message button while speaking into the microphone. Release the message
button when the message is complete. Pressing the PTT switch is unnecessary if using a
microphone connected in the EXTERNAL MIC jack. The radio will be keyed and the
message will be transmitted over the air if the PTT switch is pressed.
Re-recording the message replaces an existing message. A re-recorded message will
erase any messages that it overruns. See the section entitled Message Memories for more
detailed information.
A feature allowing immediate cancellation of an outgoing message can be installed. This
is accomplished by programming memory 4, and using it as a "cancel" button.
To use memory four as a cancel OGM (out going message) button:
1.) Place the Voice Keyer in the record mode.
2.) Briefly tap memory button four.
3.) Release the record button.
This action records a very short burst of no audio in position 4. If the operator is playing
any other memory, he or she can immediately silence the VK by tapping memory button
four.
Note: Tapping four to cancel will not stop the automatic repeat function of message one.
Memory four will cancel the immediate memory one auto-repeat transmission, but
the auto-repeat button must be released to prevent VK from trying to repeat
message after the normal cycle time elapses.
Playing a message
Push the RECORD/PLAY button until the PLAY LED is lit. Press the correct message
button to play a message. The XMIT button in the outward position allows the user to
listen to a message without transmitting it. Press and lock the REPEAT MSG 1 button to
repeat message 1. The MFJ-432 will play message 1 once and then start transmitting it
over the air until the REPEAT MSG 1 button is released to the "out" position. To change
the delay time, a trimpot, labeled REPEAT DELAY, is accessible through a hole in the
back panel. A small slotted screwdriver can be used to adjust the trimpot.
MFJ-432 Voice Memory Keyer
4
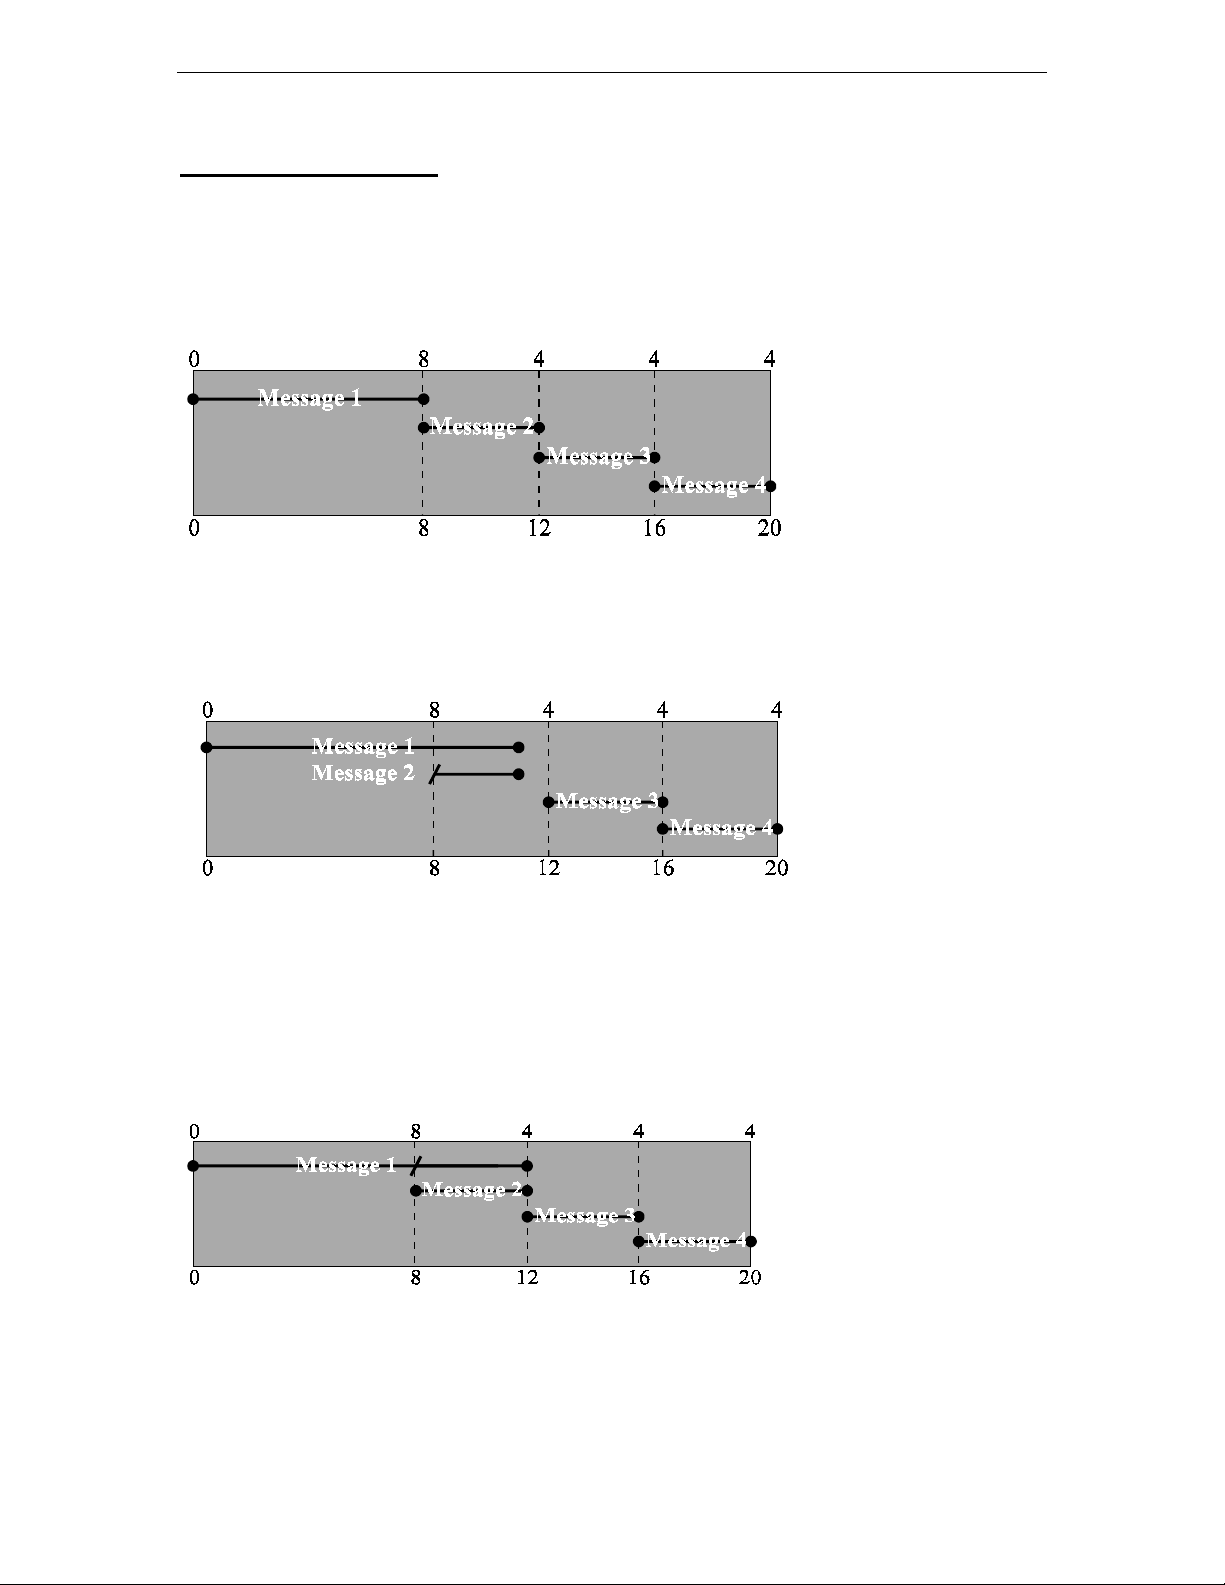
Message Memories
The message space is a continuous block of audio memory. This large block is divided
into 4 message memories. Memory 1 starts at 0 seconds. Memory 2 starts at 8 seconds.
Memory 3 starts at 12 seconds. Memory 4 starts at 16 seconds. Each section of memory
can only contain 1 messages' audio. Messages of 8, 4, 4, and 4 seconds long will
optimize usage of available memory.
Message 1 may be as long as 20 seconds, but because only one message can be in a
memory block, the other messages would contain portions of message 1 if this message
was longer than 8 seconds. If message 4 is recorded longer than 4 seconds, all audio over
4 seconds will be lost.
Suppose a message is saved in message 1 for 11 seconds. Message 2 starts at the 8
second point so it contains a 3-second part of message 1. Message 2 will be unusable
unless the audio saved after 8 seconds is an independent message.
If message 2 is re-recorded, it would write over the portion of message 1 in message 2's
memory area. This new message would also write over the end flag for message 1.
Message 1 would then play for 8 seconds and then play all of message 2. See the diagram
below.
Looping
Message 1 is the only message that will repeat. The length of the pause between loops in
message 1 may be adjusted using the trimpot accessed through the hole labeled REPEAT
DELAY on the back panel. A small slotted screwdriver can be used to adjust the trimpot.

MFJ-432 Voice Memory Keyer
5
Accessory Circuits
Many circuits can be added to the accessory port to implement different functions. Each
message line is available on this port along with +5 Vdc. The message line must be
asserted high, to 5 Vdc, in order to play a message.
Implementing a Remote:
One of the simplest circuits to implement for the Voice keyer
is a remote. A remote requires 4 momentary contact SPST
switches, a length of 5 conductor cable, a 5 pin IDC connector
and a small box to hold the switches.
Battery Installation and Removal
This unit can be used with a 9 volt battery for mobile operation. Remove the cover to
begin battery installation. Slide the plastic battery clip insulator down on the wire and
install the battery. Press the battery into the battery holder and replace the cover.
Technical Assistance
If you have any problem with this unit first check the appropriate section of this manual.
If the manual does not reference your problem or your problem is not solved by reading
the manual, you may call MFJ Technical Service at 601-323-0549 or the MFJ Factory at
601-323-5869. You will be best helped if you have your unit, manual and all information
on your station handy so you can answer any questions the technicians may ask.
You can also send questions by mail to MFJ Enterprises, INC., 300 Industrial Park Road,
Starkville, MS 39759; by FAX to 601-323-6551; through Compuserve at 76206,1763; or
problem, an explanation of exactly how you are using your unit, and a complete
description of your station.

MFJ-432 Voice Memory Keyer
6
Schematic
Table of contents
Other MFJ Radio Communication Code Keyer & Key manuals


Popular Radio Communication Code Keyer & Key manuals by other brands


Vodavi
Vodavi Starplus 616 FLEX General description, installation and maintenance

Simons Voss Technologies
Simons Voss Technologies SmartBridge manual

Four State QRP Group
Four State QRP Group EZKeyer III manual

Iseo
Iseo Zero1 x1R Smart installation guide

Logikit
Logikit CMOS-4 manual

Heathkit
Heathkit HD-10 manual

Data Video
Data Video DVK-200 quick start guide

MFJ Enterprises
MFJ Enterprises MFJ-498 manual
Unified Microsystems
Unified Microsystems XT-4Beacon MK 2 manual

Vectronics
Vectronics VEC-201 KC Assembly manual

Logikit
Logikit CMOS-4 Service bulletin

Unified Microsystems
Unified Microsystems XT-4 MK2 user manual