Maztang MT-988 User manual

Instruction Manual
Model No. MT-988
Electric Snow Thrower
IMPORTANT: Read and understand this manual efore assem ling or
operating this Electric Snow Thrower. Improper use of Snow Thrower can
cause severe injury. Keep this manual for future reference.
TABLE OF CONTENTS
I- Specifications
II- Parts List
III-Safety Instructions
IV-Getting Started
V- Operation
VI-Maintenance and storage
I .Specifications
Rated Voltage: 120v~60Hz
Amperage: 13Amp
Speed: 2100rpm
Clearing Width: 18”
Clearing Height: 10”
Max Spraying Distance: 30 ft.
Weight: 36 l s
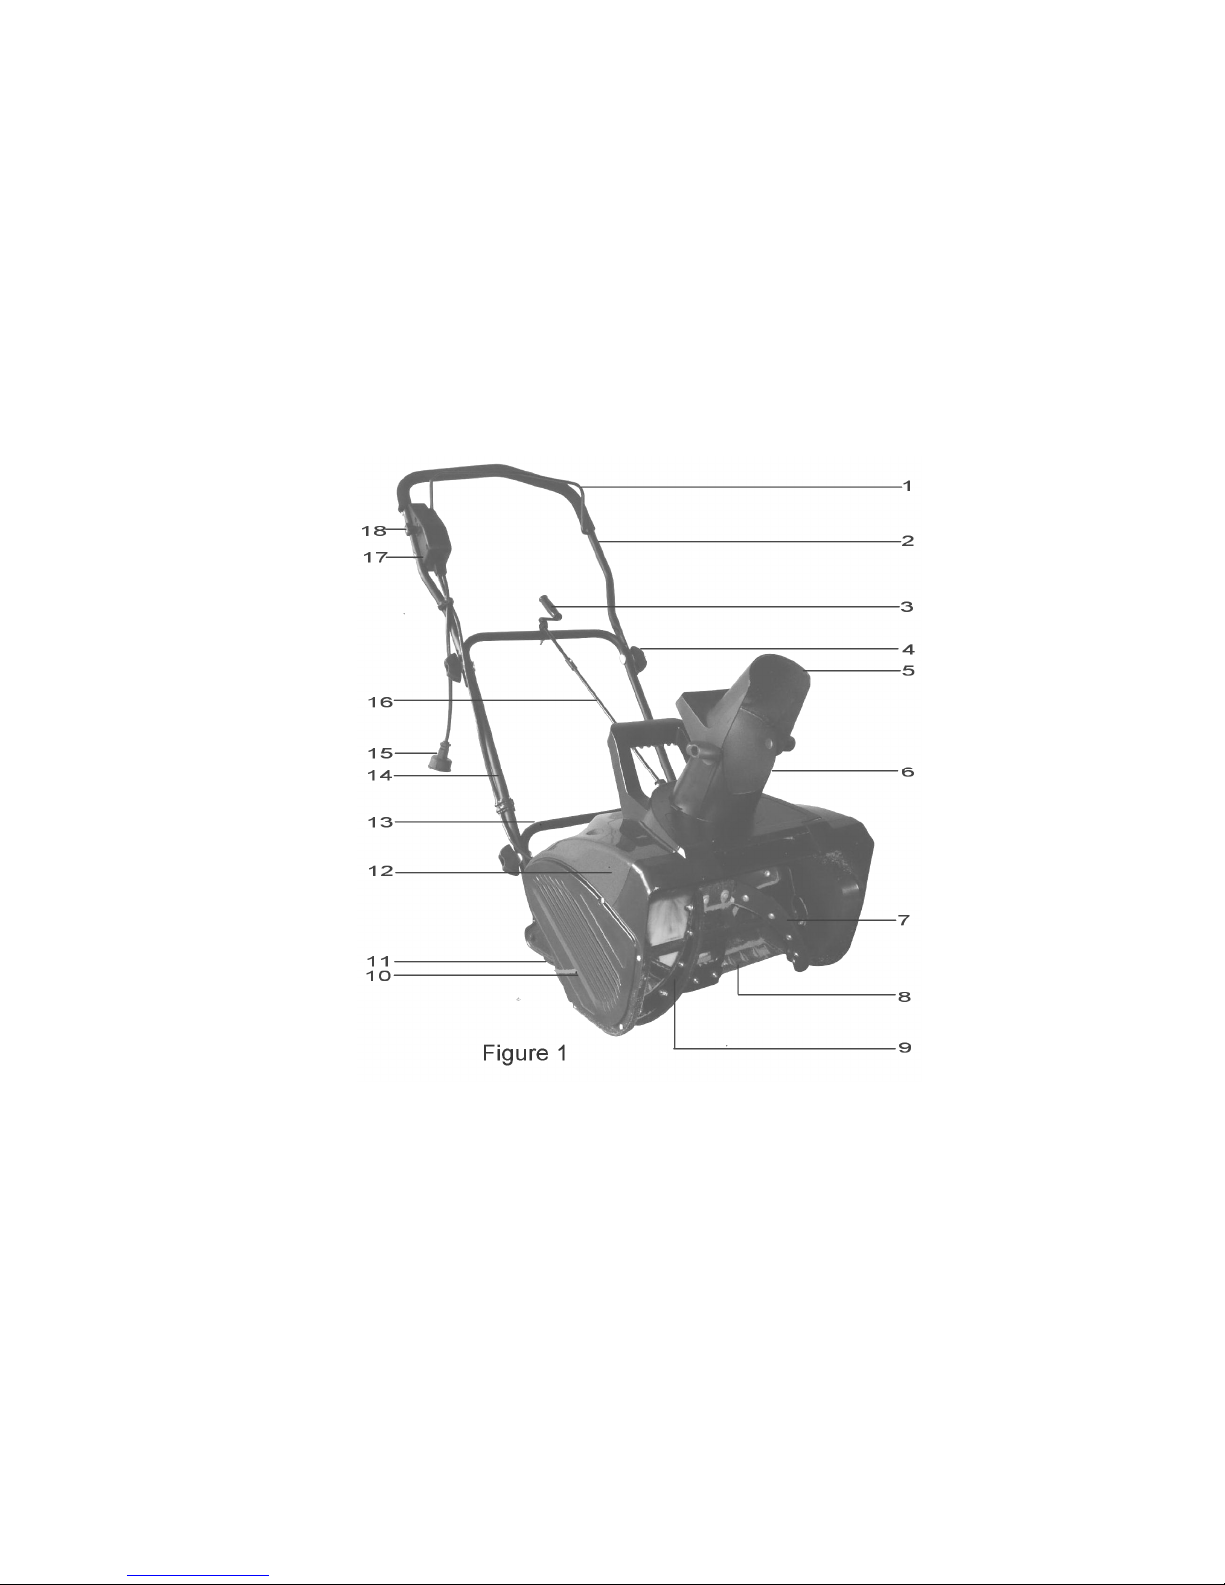
II. Parts List
1. Handle ar
2. Upper frame
3. Upper chute crank
4. Joint fixing T- olt and kno
5. Chute deflector
6. Discharge chute
7. Ru er plate
8. Scraper
9. Auger
10. Side cover
11. Wheels
12. Top cover
13. Lower frame
14. Middle frame
15. Plug

16. Lower chute crank
17. Switch housing
18. Switch key
III-Safety Instructions
GENERAL SAFETY INSTRUCTIONS
Warning: Read all instructions. Failure to follow all instructions listed elow may result in
electric shock, fire and/or serious personal injury. The term “power tool” in all of the
warnings listed elow refers to your mains-operated (corded) power tool or
attery-operated (cordless) power tool.
SAVE THESE INSTRUCTIONS
1) WORK AREA
a) Keep work area clean and well lit. Cluttered and dark areas invite accidents.
) Do not operate power tools in explosive atmosphere, such as in the presence of
flamma le liquids, gases, or dust. Power tools create sparks which may ignite the dust
or fumes.
c) Keep children and ystanders away while operating a power tool. Distractions can
cause you to lose control.
2) ELECTRICAL SAFETY
a) Power tool plugs must match the outlet. Never modify the plug in any way. Do not use
any adapter plugs with earthed (grounded) power tools. Unmodified plugs and
matching outlets will reduce risk of electric shock.
) Avoid ody contact with earthed or grounded surfaces such as pipes, radiators, ranges,
and refrigerators. There is an increased risk of electric shock if your ody is earthed or
grounded.
c) Do not expose power tools to rain or wet conditions. Water entering a power tool will
increase the risk of electric shock.
d) Do not a use the cord. Never use the cord for carrying, pulling or unplugging the power
tool. Keep cord away from heat, oil, sharp edges or moving parts. Damaged or
entangled cords increase the risk of electric shock.
e) When operating a power tool outdoors, use an extension cord suita le for outdoor use.
Use of a cord suita le for outdoor use reduces the risk of electric shock.
3) PERSONAL SAFETY
a) Stay alert, watch what you are doing and use common sense when operating a power
tool. Do not use a power tool while you are tired or under the influence of drugs, alcohol,
or medication. A moment of inattention while operating power tools may result in
serious personal injury.
) Use safety equipment. Always wear eye protection. Safety equipment such as a dust
mask, non-skid safety shoes, hard hat, or hearing protection used for appropriate
conditions will reduce personal injuries.
c) Avoid accidental starting. Ensure the switch is in the off-position efore plugging in.
Carrying power tools with your finger on the switch or plugging in power tools that have
the switch on invites accidents.
d) Remove any adjusting key or wrench efore turning the tool on. A wrench or a key that
is left attached to a rotating part of the power tool may result in personal injury.
e) Do not overreach. Keep proper footing and alance at all times. This ena les etter
control of the power tool in unexpected situations.
f) Dress properly. Do not wear loose clothing or jewelry. Keep your hair, clothing, and
gloves away from moving parts. Loose clothes, jewelry or long hair can e caught in
moving parts.
g) If devices are provided for the connection of dust extraction and collection facilities,

ensure that these are connected and properly used. Use of these devices can reduce
dust-related hazards.
4) POWER TOOLS USE AND CARE
a) Do not force the power tool. Use the correct power tool for your application. The correct
power tool will do the jo etter and safer at the rate from which it was designed.
) Do not use the power tool if the switch does not turn it on and off. Any power tool that can
not e controlled with the switch is dangerous and must e repaired.
c) Disconnect the plug from the power source efore making any adjustments, changing
accessories, or storing power tools. Such preventive safety measures reduce the risk of
starting the power tool accidentally.
d) Store idle power tools out of the reach of children and do not allow persons unfamiliar
with the power tool or these instructions to operate the power tool. Power tools are
dangerous in the hands of untrained users.
e) Maintain power tools. Check for misalignment or inding of moving parts, reakage of
parts, and any other conditions that may affect the power tools operation. If damaged, have
the power tool repaired efore use. Many accidents are caused y poorly maintained
power tools.
f) Keep cutting tools sharp and clean. Properly maintained cutting tools with sharp cutting
edges are less likely to ind and are easier to control.
g) Use the power tool, accessories and tool its etc., in accordance with these instructions
and in the manner intended for the particular type of power tool, taking into account the
working conditions and the work to e performed. Use of the power tool for operations
different from intended could result in a hazardous situation.
5) SERVICE
a) Have your power tools serviced y a qualified repair person using only identical
replacement parts. This will ensure that the safety of the power tools is maintained.
ADDITIONAL SAFETY RULES FOR SNOW THROWER
● Know your tool. Read owner’s manual carefully. Learn its applications and
limitations as well as the specific potential hazards related to this tool.
● Do not operate this unit when tired, ill or under the influence of alcohol, drugs,
or medication.
● All guards and safety attachments must e installed properly efore using the
unit.
● Inspect the unit efore use. Ensure the parts are installed correctly and
secure.
● Clear the area to e plowed efore each use. Remove all o jects such as
rocks, roken glass, nails, wire, or string which can e thrown or ecome
entangled in this tool.
● Keep the area of operation clear of all persons, particularly children and pets.
● Avoid dangerous environment. Don’t use power tools in damp or wet
locations or expose to rain. Keep work area well lit.
● Keep work area clean. Cluttered areas and enches invite accidents.
● Be cautious to avoid electric shock. When using the machine keep your ody
away from different ground terminal of power (e.g. upper and lower water
pipes, outer frame of heating equipment, microwave oven, or in a place that is
locked.
● The machine should e stored carefully and safely in a dry environment when
not used, far from the reach of children, or in a place that is locked.
● Please do not use the machine in any purposes other than it is designed for,
otherwise, it may cause mechanical defaults or serious damage or injuries.
● Special care should e drawn to the following issues when using this machine:
operation methods, procedures, surroundings, and environment states, etc.
● When using this machine, the user should e cautious a out the near y
status or changes: The user should constantly o serve the position and
movement of other people, near y window, vehicles, o stacles, etc. Exercise
caution to find any small piece of rocks or other articles in the snow to avoid

them from flying out and causing personal injury.
● In case of following conditions, please turn off the machine and pull out the
power plug:
When not used, eing repaired, replaced of some parts, eing cleaned and
checked as well as any other conditions in which dangerous factors exist. If cord
is damaged in manner while plugged in, pull extension cord from wall receptacle.
Never carry snow thrower y cord yank it to disconnect from receptacle.
● Do not use hands to unclog chute. Stop motor efore removing De ris. Do not
walk in front of running machine. Do not direct discharge at ystander.
● When using the machine the user must keep correct postures. Heels should
e placed firmly on the ground, while the hands hold the handles firmly.
● Before using the machine, the user should have a careful inspection of the
main machine. Carefully check the different parts of the machine efore
starting, solving any pro lem immediately. If you find any a normal condition,
please don’t use the machine efore repairing.
● If you find the main power ca le or the extension ca le damaged, please pull
out the plug from the socket and disconnect the power immediately. Repair
the ca le for replace it if necessary. When adding the lu ricant or replacing
any parts, you must strictly o serve the instructions and procedures
descri ed in this User Manual.
Special care should e paid to any ru er parts, since these parts may
increase the engine load and decrease its mechanical power if damaged.
● When examining, servicing, and/or cleaning the machine or replace parts,
you must turn off the power switch and disconnect the power ca le. Any such
operation should e performed after revolving part inside the machine stops
completely.
● The first time you use the machine or after replacing some parts, you should
perform a test running and ensure no a normal conditions exist to avoid any
potential damages or incidents.
● Do not move or transport the machine when the plug is connected into the
power socket and the switch is turned on.
● When using the machine you must respect local laws and regulations
regarding noise control and environment protection. To avoid any noise
distur ance to other people, you should carefully decide operation time and
consider the surrounding conditions.
● When the machine is running, e cautious to prevent your hands, feet or head
from moving near to the revolving part or the snow exit of the machine.
● In case you fall or collide with the machine, please check the main machine
and parts for any damages or cracks.
● When stepping ackwards, e cautious a out any o stacles eneath your
feet or ehind you to avoid falling.
● When using the machine, if you notice the machine running in an unsta le
state or hear a normal sound from the engine, please stop the machine and
disconnect the power immediately and contact your original distri utor.
● When operating the machine, while taking care of your safety, you should also
e cautious to avoid any harm to other people. Call near y passengers’
attention to avoid potential personal injury.
● Use for snow removal only.
● Please do not take ack and store the machine while it is still connected to the
power source. It may cause damage and injury.
● Keep the plug clear from water.
● To prevent electric shock use only with an extension cord suita le for outdoor
use.( Does not apply to attery-operated Snow Thrower)
● Keep hands away from moving parts. Shut off engine efore unclogging
discharge chute.
● Dress properly. Do not wear loose clothing or jewelry. They can e caught in
moving parts. Ru er gloves and non-skid footwear are recommended when
working outdoors. The user should wear a protective helmet to avoid your hair

from getting in contact with any revolving part of the machine.
● Keep children and visitors away. Visitors should wear safety glasses and e
kept a safe distance from work area.
● Use right tool. Don’t force small tool or attachment to do the jo of a heavy
duty tool. Don’t use tool for purpose not intended.
● Do not force unit. It will do the jo etter and with less likelihood of injury at a
rate for which it was designed.
● Always wear safety glasses. Everyday eyeglasses have only impact
resistance lenses. They are not safety glasses.
● Keep hands, face and feet at a distance from all moving parts. Do not touch or
try to stop the machine when they are rotating. Do not operate without guards
in place.
Sym ols
The rating plate on your tool may show sym ols. These represent important
information a out the product or instructions on its use.
Read the instruction manual
The following warning sym ols are to remind you of the safety precautions you
should take when operating the snow thrower.
Always keep the children or pets away from the working area.
Always keep away from the working area. The throwing snow may hurt you.
Keep hands away from the moving parts of the snow thrower. The rotating
parts will hurt you.
Keep foot way from the moving parts of the snow thrower. The rotating parts
will hurt you.
WARNING-ELECTRICAL SHOCK
Do not use the electric snow lower in the rain
IV- ETTIN STARTED.
1. Remove the snow thrower and all other items from ox.
2. Check all items for shipping damage. If you find any damage or any parts are
missing, promptly inform the dealer where you ought the Snow Thrower.
The Snow Thrower comes with the following accessories, packed in the parts ag.
Ca le clip 3pcs
Upper chute crank 1pc
Lower chute crank 1pc
Wrench 1pc
Note: Upper chute crank and lower chute crank are packed together.
The snow Thrower is to e assem led efore Operation. To assem le the snow thrower,
follow the instructions elow.

Upper, Middle and Lower Frame Assem ly
1. Loosen and remove the four sets of joint fixing T- olts, washers, and joint
fixing kno s to separate the upper frame from the lower frame.
2. Hold the middle frame so that the screw holes align with the holes on the
lower frame. Insert the T- olt with washer into the holes on each side and use
the joint fixing kno s to secure the connection on oth sides. The joint fixing
olts and washers should e inserted inside the frame of the unit so that the
joint fixing kno s are fastened to the outside of the frame. Note: Do not
over-tighten the kno s.
3. Connect the upper frame with the middle frame in the same way as descri ed
in step 2. Use the joint fixing T- olts, washers and kno s to secure the

connection on oth sides.
4. Locate the ca le clips in the parts ag. Secure the power cord to the frame of
the unit y clipping them onto the frame at evenly spaced intervals.
Discharge Chute and Chute Crank Assem ly
1. Lift the chute deflector so that it snaps and locks securely onto the discharge chute.

2.
Raise or lower the chute deflector to the desired height of the snow stream and tighten the
chute deflector kno s.
Note: Do not over-tighten the chute deflector kno s.
3. Locate the low and upper chute crank in the parts ag. Loosen the screw and
nut located on the upper chute crank with screwdriver and wrench.
Note: You may e a le to unfasten the screw and nut y hand.
4. Slide the upper chute into the lower chute crank, aligning the screw holes.
Tighten the screw into the aligning holes using a screwdriver. Fasten the unit with
Chute deflector
Discharge chute
Chute deflector kno
Chute deflector
kno

wrench.
5. Slide the lower crank into the chute ase hole.
6. Remove the washer and nut from the eye olt with ru er grommet found on
the upper chute crank. Position the chute crank so that the eye ole with ru er
grommet inserts into the center hole of the middle frame. Secure with washer
and nut.
Slide into chute ase hole
Table of contents


