
Master Bilt 20150112 Use Mounting instructions

Manual Code: 9815110001 052112-02SS
Tool needed for assembly: Phillips Head Screwdriver
Approximate assembly time : 60 minutes
WARNINGWARNING
Use only outdoors where it is
well ventilated.
Fuel, such as charcoal briquettes, wood or heat
pellets, are not to be used in the unit.
This manual contains important
information necessary for the proper
and safe use of this unit.
Read and follow all warnings
and instructions before using
grill and during use.
Keep this manual for future reference.
ASSEMBLY, CARE & USE MANUAL
WARNING & SAFETY INFORMATION
ELECTRIC PATIO GRILL
MODELS 20150112, 20150213, 20150513, 20150613, 20150713
THIS PRODUCT IS FOR OUTDOOR USE ONLY
Failure to follow these warnings and instructions properly could result in personal injury or death.

1
GENERAL WARNINGS AND SAFETY INFORMATION
READ ALL INSTRUCTIONS
When using electrical appliances, basic safety precautions should always be followed including
the following:
• Cannot be operated for more than 3 hours.
• Use GFI protected electrical outlet to reduce the risk of electrical shock.
• For outdoor use only. Do not operate in an enclosed area.
• Unit MUST be on the ground. Do not place unit on tables or counters. Do NOT move unit across
uneven surfaces.
• Do not plug in electric grill until fully assembled and ready for use.
• Use only approved grounded electrical outlet.
• Do not use during an electrical storm.
• Do not expose electric grill to rain or water at anytime.
• To protect against electrical shock do not immerse cord, plug or control panel in water or other
liquid.
• Do not operate any appliance with a damaged cord or plug, or after appliance malfunctions or has
been damaged in any manner. Contact Masterbuilt Customer Service for assistance at
1-800-489-1581.
• Keep a fire extinguisher accessible at all times while operating electric smoker.
• Do not let cord hang touch hot surfaces.
• Do not place on or near a hot gas or electric burner, or in a heated oven.
• Keep children and pets away from electric smoker at all times. Do not allow children to use
electric smoker. Close supervision is necessary should children or pets be in area where electric
smoker is being used.
• Fuel, such as charcoal briquettes, wood or heat pellets, are not to be used in electric grill.
• Never use electric grill as a heater (READ CARBON MONOXIDE HAZARD ON FRONT COVER).
• Use electric grill only on a level, stable surface to prevent tipping.
• Electric grill is HOT while in use and will remain HOT for a period of time afterwards. Use
caution.
• Do not touch HOT surfaces.
• Do not allow anyone to conduct activities around electric grill during or following its use until
the unit has cooled. Electric grill is HOT during operation and remains HOT for a period of
time following use.
• The use of alcohol, prescription or non-prescription drugs may impair the user’s ability to
properly assemble or safely operate electric smoker.
• Avoid bumping or impacting electric grill.
• Never move electric grill when in use. Allow electric grill to cool completely before moving
or storing.
WARNINGS & IMPORTANT SAFEGUARDS CONTINUED ON PAGE 2

GENERAL WARNINGS AND SAFETY INFORMATION
• Be careful when removing food from electric grill. All surfaces are HOT and may cause burns.
Use protective gloves or long, sturdy cooking tools.
• Drip tray is only for the bottom of electric grill. Do not put drip tray on cooking grate this may
damage electric grill.
• To disconnect, turn control panel “OFF” then remove plug from outlet.
• Unplug from outlet when not in use and before cleaning. Allow unit to cool completely before
adding/removing grate, or drip tray.
• Dispose of cold ashes by placing them in aluminum foil, soaking with water and discarding in a
non-combustible container.
• Do not store electric grill with HOT ashes inside unit. Store only when all surfaces are cold.
• Accessory attachments not supplied by Masterbuilt Manufacturing, Inc. are not recommended
and may cause injury.
• The use of accessory attachments not recommended by the appliance manufacturer may cause
injuries.
• Never use electric grill for anything other than its intended purpose. This unit is not for
commercial use.
• Always use electric grill in accordance with all applicable local, state and federal fire codes.
• Longer detachable power-supply cords or extension cords are available and may be used if care
is exercised in their use.
• If a longer detachable power-supply cord or extension cord is used: 1. The marked electrical
rating of the cord set or extension cord should be at least as great as the electrical rating of the
appliance; and 2. The cord should be arranged so that it will not drape over the counter top or
tabletop where it can be pulled by children or tripped over intentionally.
• The extension cord must be a grounding -type 3-wire cord.
• Outdoor extension cords must be used with outdoor use products and are marked with suffix
“W” and with the statement “Suitable for Use with Outdoor Appliances.
• CAUTION - To reduce the risk of electric shock, keep extension cord connection dry and off the
ground.
• Do not clean this product with a water sprayer or the like.
• Keep hands, hair and face away from the element. Be careful of loose hair and clothing
during operation, they could catch fire.
• Never use glassware, plastic or ceramic cookware on this grill.
• Preheating grill is not necessary. If preheating is desired, open lid with caution.
• Minimum distance from side and back of appliance to walls or railing is 24 inches.
• Do not use unit near heat sensitive or combustible structures such as vinyl or wood siding.
WARNINGS & IMPORTANT SAFEGUARDS CONTINUED ON PAGE 3
2

3
GENERAL WARNINGS AND SAFETY INFORMATION
• Fatty foods (hamburgers,etc.) can have excess grease and cause flare ups. When cooking fatty
foods use a low setting with lid open.
• Clean internal base pan before each use. This will cut down on build-up and flare-ups.
• Do not expose electric grill to rain. Do not use around water or operate on wet surfaces. This
could cause an electric shock leading to injury and death.
• Be sure drip tray is clean before each use.
SAVE THESE INSTRUCTIONS
COMBUSTION BY-PRODUCT PRODUCED WHEN USING THIS PRODUCT CONTAINS CHEMICALS
KNOWN TO THE STATE OF CALIFORNIA TO CAUSE BIRTH DEFECTS,
OTHER REPRODUCTIVE HARM, OR CANCER.
THE MATERIALS USED IN THIS PRODUCT MAY CONTAIN LEAD A CHEMICAL KNOWN TO THE
STATE OF CALIFORNIA TO CAUSE BIRTH DEFECTS AND OTHER REPRODUCTIVE HARM.
WARNING

4
PARTS LIST
PART NO QTY DESCRIPTION PART NO QTY DESCRIPTION
1 1 Grill Lid 14b 1 Back Panel
2g 1 Temperature Gauge 15 2 Hub Cap
2b 1 Temperature Gauge Base 16 2 Wheel
3 1 Right Side Shelf 17 2 Foot
4 1 Heating Element 18* 2 Leg
5 1 Grill Base 19* 2 Wheel Leg
6 1 Left Side Shelf 20 1 Cooking Grate
7 1 Drip Tray 21 1 Warming Rack
8 1 Drip Tray Bracket 22 2 Seat
91Reflector Plate 23 1 Right Bottom Hinge
10 1 Controller 24 1 Left Bottom Hinge
11a 2 Front right/Back left Support 25 1 Left Lid Hinge
11b 2 Front left/Back right Support 26 1 Right Lid Hinge
12 1 Bottom Shelf 27 1 Handle
13 2 Side Panel 28 1 Logo Base
14f 1 Front Panel
1
7
3
6
4
910
12
16
STOP! DO NOT RETURN TO RETAILER For Assembly Assistance, Missing or Damaged Parts
Call: MASTERBUILT Customer Service at 1-800-489-1581.
Please have Model Number and Serial Number available when calling.
These numbers are located on silver label on back of unit.
21
17
25
11
a11
b
13
14f
2g
2b
14b
15
18
19
24 23
8
26
27
28
5
20
*Legs are marked with stickers (FR-Front Right, FL-Front Left, BR-Back Right, BL-Back Left) to correspond easily with parts 11a and
11b during assembly Steps 3-5.
22

PARTS LIST
5
(B)
M6x35
Phillips Head Screw
Qty: 2
(F)
Bakelite Spacer
Qty: 2
(J)
M4
Flat Washer
Qty: 5
(D)
M4x40
Phillips Head Screw
Qty: 2
(G)
M6x13
Phillips Head Screw
Qty: 40
(L)
M6x8
Phillips Head Screw
Qty: 4
(A)
M5
Thumb Screw
Qty: 2
(H)
M4x12
Phillips Head Screw
Qty: 3
(E)
M8x55
Phillips Head Screw
Qty:2
PART NO REPLACEMENT PART PART NO REPLACEMENT PART
9915110002 Lid Kit - Blue 9915110016 Rear Left Leg Kit
9915110003 Base Kit - Blue 9915110017 Rear Right Leg Kit
9915110004 Lid Handle Kit 9915110018 Front Panel Kit
9915110005 Hinge Kit 9915110019 Back Panel Kit
9915110006 Right Side Shelf Kit 9915110020 Side Panel Kit
9915110007 Left Side Shelf Kit 9915110021 Bottom Shelf Kit
9915110008 Logo Plate Kit 9915110022 Wheel Kit
9915110009 Temperature Gauge Kit 9910090010 Element Kit
9915110010 Drip Tray Kit 9015110002 Foot
9915110011 Grill Seat Kit 9015110003 Warming Rack
9915110012 Front Left/Back Right Leg Kit 9015110004 Cooking Grate
9915110013 Front Right/Back Left Leg Kit 9015110005 Reflector Plate
9915110014 Front Left Leg Kit 9015110001 Grill Cover
9915110015 Front Right Leg Kit 9007090063 Analog Control w/ Power Cord
9015110006 Hub Cap 9915110023 Lid Kit - Red
9915110024 Lid Kit - Black 9915110025 Base Kit - Red
9915110026 Base Kit - Black 9915110001 Hardware Kit
9815110001 Instruction Manual
STOP! DO NOT RETURN TO RETAILER For Assembly Assistance, Missing or Damaged Parts
Call: MASTERBUILT Customer Service at 1-800-489-1581.
Please have Model Number and Serial Number available when calling.
These numbers are located on silver label on back of unit.
(K)
M8
Flat Washer
Qty: 2
(C)
34x25
Flat Washer
Qty: 4
HARDWARE LIST
(I)
M6
Flat Washer
Qty: 8

SHORT SIDE
FRONT
ASSEMBLY
*Note that the front of the grill is actually the shortest width of the bottom storage shelf (12).
• BEFORE ASSEMBLY READ ALL INSTRUCTIONS CAREFULLY.
• ASSEMBLE UNIT ON A CLEAN, FLAT SURFACE.
• TOOL NEEDED: PHILLIPS HEAD SCREWDRIVER
• UNPACK ALL PARTS AND LAY OUT IN FRONT OF YOU. CHECK TO MAKE SURE ALL PARTS
ARE IDENTIFIED AND ACCOUNTED FOR.
STEP 2
Attach wheel (16) to leg (19, “FL”)
using washer (K) and screw (E)
as shown.
Snap hubcap (15) onto wheel.
Repeat step for remaining wheel
and wheel leg (19 “BL”).
STEP 1
Begin assembly by positioning
bottom shelf (12) with the short
side of shelf facing you.
This will actually be the front of
the grill, making the long sides of
shelf the left and right sides.
STEP 3
Align notch on back of foot (17)
with the slot in leg (18,”FR”) and
insert into leg.
Repeat for remaining leg (18,
“BR”) and foot (17).
LABELS
FR – Front Right,
FL – Front Left,
BR – Back Right,
BL – Back Left
16
19
19
15
E
K
12
BR
BL
FL
6
17
18
17
18
18
FR
FR
ALIGN
NOTCH
NOTE: DO NOT FULLY
TIGHTEN ANY SCREWS
UNTIL ALL SCREWS ARE IN
PLACE AND THE GRILL IS
FULLY ASSEMBLED.
SHORT SIDE
FRONT
7
ASSEMBLY
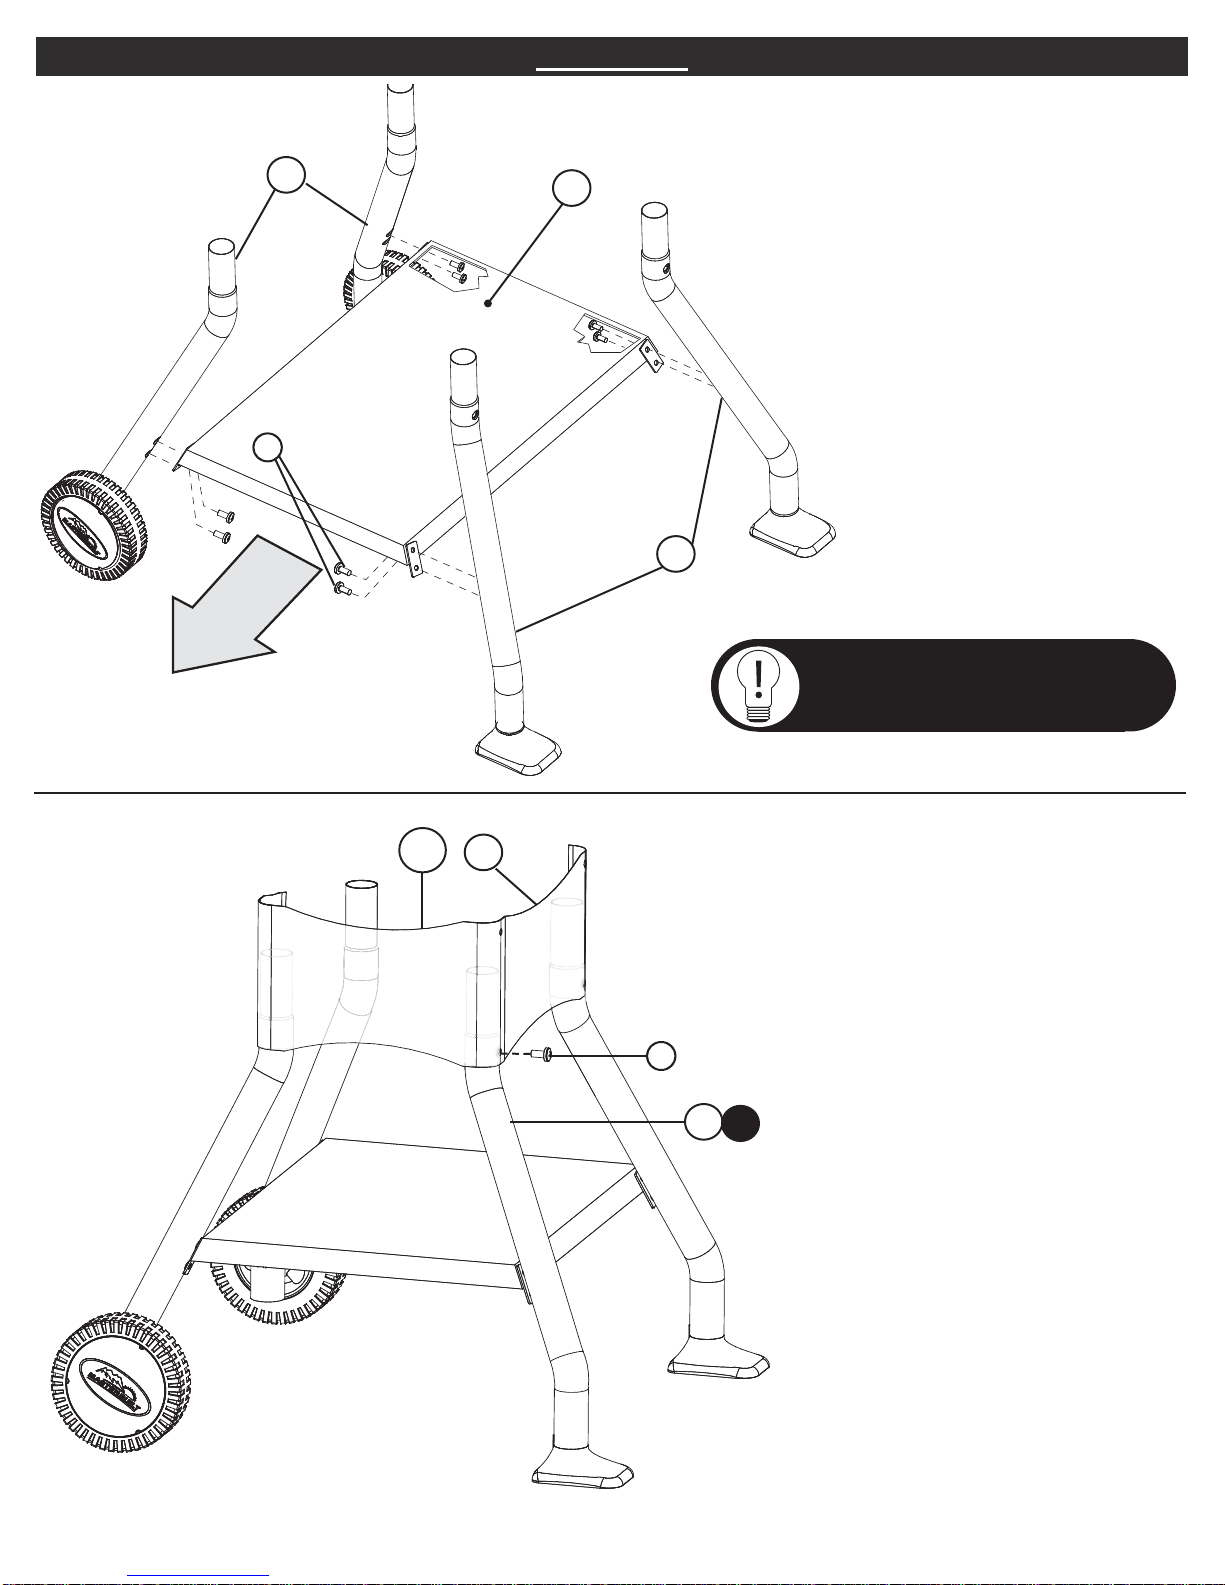
STEP 4
Attach bottom shelf (12) to legs
(18) using screws (G) with the feet
facing away from right side of the
shelf as shown.
Repeat for wheel legs (19) on left
side using screws (G).
STEP 5a
Locate front panel (14f) [This is the
short panel without the serial plate]
and one side panel (13) [This is
one of the longer panels].
Place panel (14f) over (13) while
aligning screw holes. Insert screw
(G) through both panels, securing
panels to front right leg (18, “FR”).
13
18
14f
G
18
19 12
G
FR
REMEMBER!
The short side of bottom
shelf (12) is the front of grill.

8
ASSEMBLY
STEP 5b
Repeat step 4a for leg (19, “FL”).
STEP 5c
Place panel (14b) [the panel with
the serial plate] over panels (13)
and insert screw (G); into bottom
holes.
19
19 18
14f
13
13
G
G
FL
BL BR
14b

ASSEMBLY
STEP 6
Insert support (11b) into front leg
(18, “FR”) with holes facing in-
ward. Insert other (11a) into back
leg (18, “BR”) with holes facing
inward.
Repeat steps for left side.
When all supports are in place
screw holes should be facing each
other as shown in image.
13
18
19
18
G
BR
BL
FR
G
11
a
11
b
STEP 7
Attach seat (22) to supports using
screws (G)
.
Repeat step for remaining seat on
opposite side.
G
22
9
19 FL
This manual suits for next models
4
Table of contents
Popular Grill manuals by other brands


Kenmore
Kenmore 415.16123800 Use and care guide

Camp Chef
Camp Chef PG24CLAU Warning & instruction booklet

Tucker Barbecues
Tucker Barbecues GTR Series Assembly, installation and operating instructions

Monogram
Monogram ZGG540NCP1SS owner's manual

Equipex
Equipex Sodir Savoy Operation manual

Gaggenau
Gaggenau VR 414 610 use and care manual


