M Bass MOSDR011 User manual

www.ministryofsound.com/audio
User Guide
MOSDR011
Personal
DAB Tuner

2
The brief was just a few simple words on a single sheet of paper
- yet the task was enormous: "Create the best sound in the world
regardless".
Two years after delivering the brief to our sound technicians, our
club sound-system was ready. Housed in a specially constructed
room simply referred to as 'The Box', it was the result of intensive
research across the globe, utilising specialists in all areas of
sound and electronics. Bass experts from the USA, high-
frequency boffins from Scandinavia and cabinet builders
previously agonising over Rolls Royce dashboards, all finally
came together with a host of other technicians, boffins and anoraks
to build what has now become a legend to dance music fans
across the globe.
Since then our sound-system's become an obsession - religiously
stripped down each week, the highly tuned system, likened to an
F1 racing car, gets constantly upgraded to retain its state-of-the-
art status. More recently the addition of digital processing means
sound can be thrown around the Box from all angles and tuned
to replicate a garage (well that's where it all started!) or a stadium.
But, above all, we've developed 'M-Bass' - unique digitally
processed algorithms delivering the absolute best, most
awesome low frequencies ever.

3
After 10 years of refinement, tweaking and pampering, and with
the advent of advanced chip technology, we can bring you your
very own 'M-Bass' - the true sound of The Box right in to your very
own home, or the palm of your hand.
So times may have changed, as has technology, but whether it's
for our club or audio products, the brief's as true today as it ever
was - "Create the best sound in the world regardless".

4
Contents
What is digital radio? ............................................................. 6
Getting Started ....................................................................... 7
In the box ................................................................................ 7
Battery installation ................................................................. 7
The screen ............................................................................. 8
Fixed Icons ............................................................................. 8
Switching the radio on ........................................................... 9
Battery level indicator .......................................................... 10
Headphones ......................................................................... 10
Switching the radio off ......................................................... 10
Locking the radio ................................................................. 10
Control buttons .................................................................... 11
Power adaptor ...................................................................... 11
Rechargeable batteries ....................................................... 11
Quick Views - Front .............................................................. 12
- Top and side ...................................................................... 13
- Headphones ...................................................................... 14
- LCD screen ....................................................................... 15

5
Using the Radio .................................................................... 16
Introduction .......................................................................... 16
Control buttons .................................................................... 16
Operation .............................................................................. 18
Additional information .......................................................... 20
Power on and Tuning ............................................................ 21
Tuned and Playing ................................................................ 23
Features ............................................................................... 24
Factory Reset ....................................................................... 32
Station not available ............................................................. 32
Battery Removal .................................................................. 32
Power On/Power off ............................................................. 33
Care & maintenance ............................................................ 34
Cleaning ............................................................................... 34
Help & advice ....................................................................... 35
Safety instructions ............................................................... 36
Guarantee ............................................................................ 37
Technical specifications ...................................................... 38

6
What is digital radio?
DAB (Digital Audio Broadcasting) is the next
generation of radio.
DAB was developed in Europe by a
consortium of broadcasters and
manufacturers.
DAB uses digital compression techniques
to transform the source material, i.e. music
and speech, into digital computer code
before it is transmitted. The computer code
consists of electronic “ones and zeros”
called binary digits or bits. The binary code
is then multiplexed or grouped together to
create a superior signal, when compared
with the older analogue system, with the
following key benefits:
•Near CD quality sound.
Because DAB is binary coded, the
receiving equipment is only expecting
to receive a series of ones and zeros,
so any other interference is ignored,
resulting in very high quality audio.
•Interference free reception.
Analogue systems suffer from an effect
called “multipath distortion”. This is
caused because radio waves do not
behave in an orderly fashion, but
bounce and reflect off buildings and
mountains etc. DAB sees this as an
advantage and uses the direct and
reflected signals to actually reinforce
the end result.
•No need to re-tune.
A single DAB frequency can be used
to cover the whole of the UK, so solving
many of the problems experienced
with the earlier analogue system.
7
Getting Started
Carefully remove your Ministry of Sound
MOSDR011 Digital Radio from the box. You
may wish to store the packaging for future
use.
Read these instructions before operating
the radio.
In the box
Inside the box you should find the following
items:
•The Digital Radio
•A set of DAB headphones
•Two size AA batteries
•The User Guide
If any items are missing call the Helpline
on 0870 010 5676.
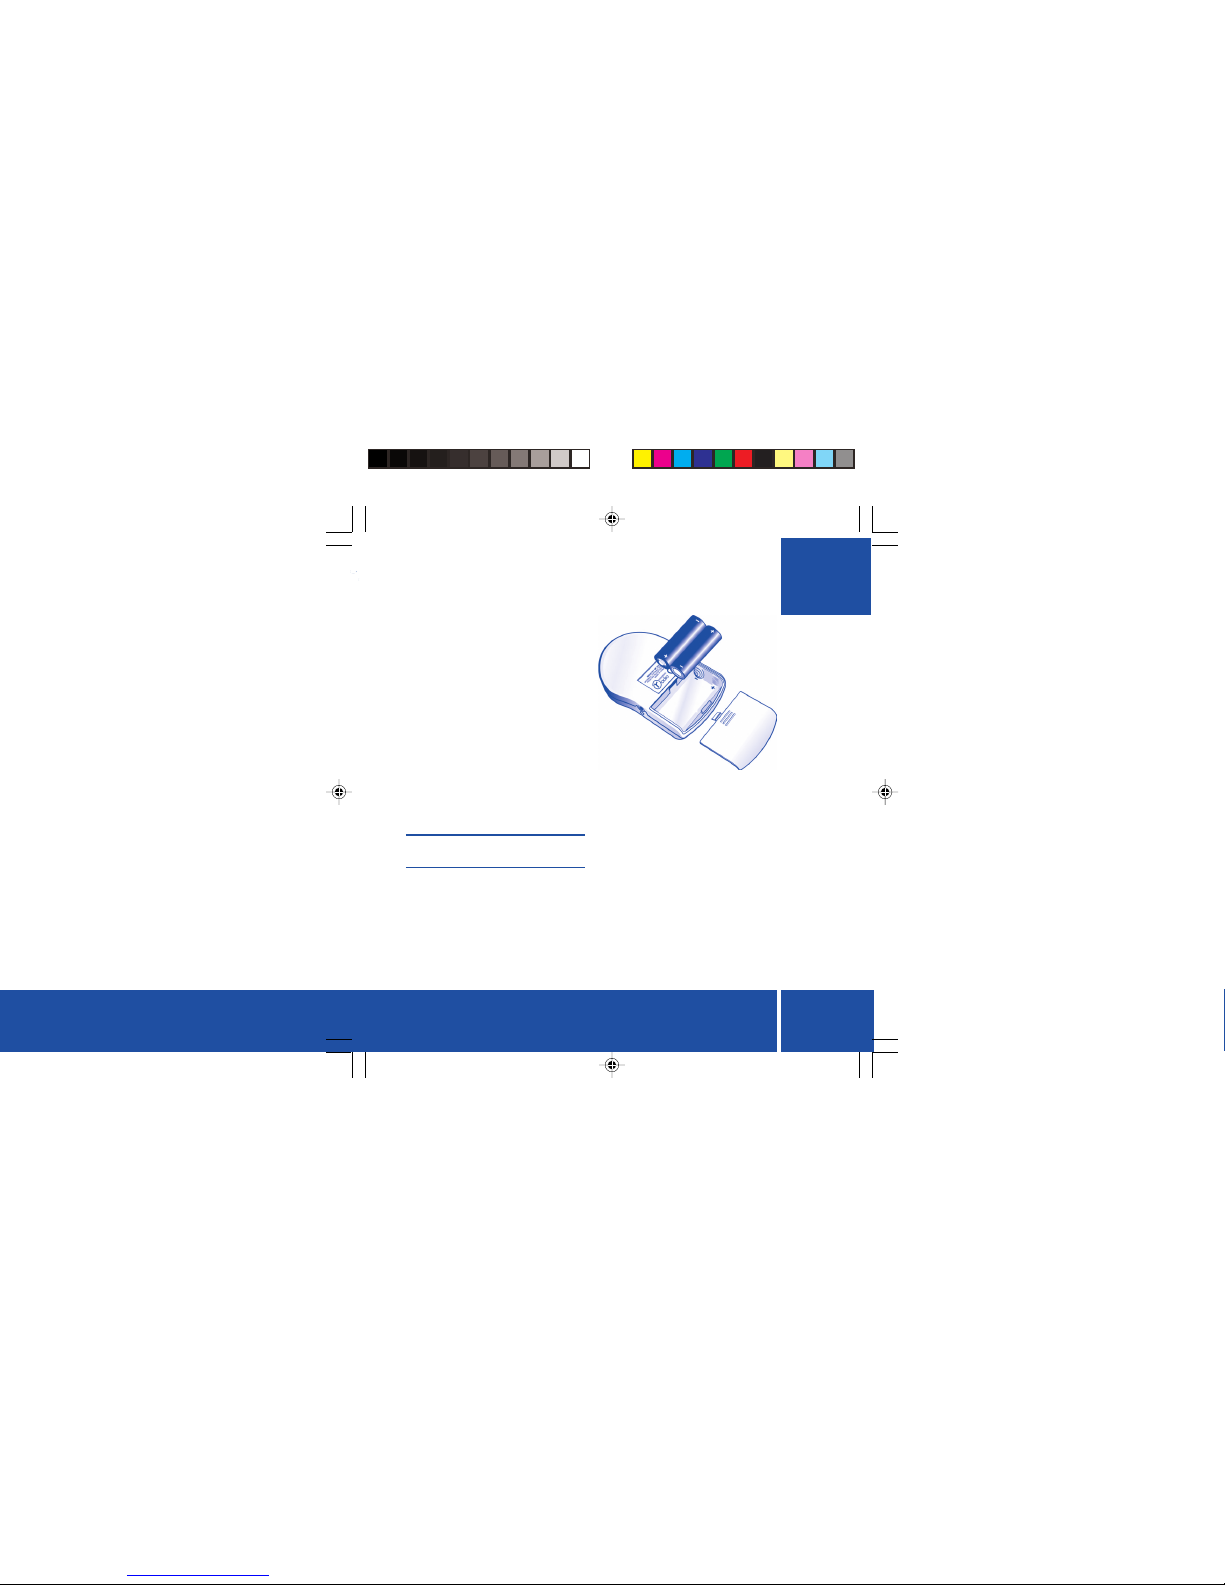
Battery installation
Remove the battery compartment cover
clipped to the rear of the radio by sliding the
cover away from the nameplate using your
finger on the indentations below the
nameplate. The cover will become free
when it is slid back a few millimetres.
Place the two supplied batteries in the
compartment paying attention to the
polarity of the batteries. Orientate the
batteries as shown in the diagram above
noting that the two batteries face in opposite
directions in the compartment. The
negative end of each battery should make
contact with the large spring terminal in the
compartment.
If the batteries are inserted incorrectly, the
radio will not switch on. The design of the
terminals is such that incorrect orientation
of the batteries will result in them not being
connected to the radio, thereby protecting
the radio from damage.

8
The screen
The radio employs an STN transflective blue
backlit LCD screen. It has a row of fixed icons
across the top of the screen that indicate
user settings and provide information to the
user about the status of the radio.
Below the icons there is a two-line
alphanumeric display with sixteen
characters on each line that displays
information about the received stations.
The backlight allows the screen contents
to be easily viewed in dark ambient
conditions. The screen is backlit as follows:
•When the radio is switched on.
Backlighting remains on for 5 seconds.
•When the power key is pressed to turn
off the radio.
•At any key press.
Backlighting remains on for 3 seconds.
•When a suitable external power supply
(4.5V d.c.) is plugged into the power
supply socket on the radio, the
backlight is turned on and remains on
while the radio is powered externally.
Fixed Icons
Volume level indicator
You can set the volume level to any of
fourteen preset levels. The icon displays the
set level by displaying an increasing number
of bars (from 0-7) as the volume level is
increased. The volume level icon seen top
left corner of the LCD display illustrated on
this page shows the radio set to full volume.
The speaker symbol in the icon remains on
at all times.
Battery level indicator
The state of the batteries is indicated by the
battery icon. The number of bars (0 to 3)
indicate the power left in the battery. An
unused (new) battery should indicate three
bars as shown in the LCD screen shown on
this page. If only one bar is displayed, this
means that the power available is low.
No bars indicate that the batteries are very
low. When the power is too low for the radio
to operate, the icon will flash and the unit
will shut down automatically.

9
Time
The time is displayed in a 24-hour digital
format. The clock is only displayed when
DAB is being received. It shows the time
broadcast by the DAB stations.
Favourites/Heart
The heart-shaped ‘favourites’ icon is only
displayed when you have set the received
stations to list in the order of the most played
stations (your favourites).
Graphic Equaliser
The eq icon indicates the type of
equalisation you have chosen to apply to
the station playing. There are six different
settings to choose from. Note that the
equalisation setting can only be altered
when a station has been selected.
Signal strength
The signal strength icon provides an
indication of the signal strength of the
station currently playing. It is dynamic and
it changes as the signal strength changes.
The icon displays as one of four states that
indicate no minimum signal received
through to strong signal strength received.
Switching the radio on
•Check that the batteries have been
installed correctly.
•Ensure that the lock switch on the top
panel is set to the unlock position.
•Plug in the headphones into the jack
on the side of the radio as shown.
WARNING
DO NOT TURN ON THE RADIO WITH
THE HEADPHONES CONNECTED AND
THE EARPIECES INSERTED IN YOUR
EAR. LOUD SOUNDS CAN DAMAGE
YOUR HEARING.
The headphones also act as the aerial, so it
is important that they are plugged in prior
to switching on the radio or you will not be
able to find any stations.
Please note that this radio has only
been designed to operate with the
supplied headphones.

10
Press the power switch on the top panel.
The screen will light up and the line of icon
indicators will be seen, along with a
welcome message. After a short delay, the
message is replaced with other text as
described in the section entitled Using the
Radio. See page 16 for further details.
Battery level indicator
The battery level indicator icon should
appear as illustrated on page 8.
Headphones
Place the earpieces in your ears, checking
as you do so that the volume is not too loud.
Associated components which aid
reception are contained within the
headphone cable. In some instances this
cable will need to be repositioned to improve
the reception quality.
Switching the radio off
Press the power push-button switch on the
top panel and hold for about two seconds.
The screen will be backlit (blue) during this
period. Release the switch as the on screen
information is cleared. The radio is now off.
Locking the radio
The radio may be locked while the radio is
on or off. It is a good idea to lock the radio
while it is off so as to prevent it from being
turned on accidentally and resulting in the
batteries being run down.
The radio may be locked at times when you
are listening to a station so as not to allow
the settings to be accidentally changed,
when carried in a pocket for example.
Move the lock switch on the top of the radio
to the lock position indicated by the arrow
shown on the switch legend. To unlock the
radio at any time, slide this switch to the
unlock position.
Table of contents
Popular Tuner manuals by other brands


MFJ
MFJ MFJ-928 instruction manual

NAD
NAD C 445 owner's manual

Sony
Sony ST-SA5ES operating instructions

Sirius Satellite Radio
Sirius Satellite Radio SC-FM1 user guide

Antique Automobile Radio
Antique Automobile Radio 283501B Installation and operating instructions

Monacor
Monacor PA-1200R instruction manual


