
Linn MAJIK User manual

LINN
SERVICE MANUAL
MAJIK AMPLIFIER
&
WAKONDA PRE-AMPLIFIER

Page 5.602
REVISION 14: MAJIK and WAKONDA Sept 95
Copyright © 1995 by Linn Products Limited. All Rights Reserved.

Page 5.603
REVISION 14: MAJIK and WAKONDASept 95
Copyright © 1995 by Linn Products Limited. All Rights Reserved.
INDEX
Contents: Page:
Introduction
Installation 5.604
Positioning 5.605
Useful Information
Customising (Configuring) options
Expansion 5.606
Remote control problems
Notes
Warning! 5.607
Configuring :
Majik 5.608
Wakonda 5.609
Installing the AKTIV CROSSOVER MODULES 5.610
Installing the KUDOS SNEAKY TUNER 5.616
Installing the KNEKT SNEAKY DRIVER/RECEIVER 5.617
Installing the KNEKT RCU/S CONTROL PANEL 5.618
Specifications
Majik 5.622
Wakonda 5.623
History
Majik and Wakonda 5.624

Page 5.604
REVISION 14: MAJIK and WAKONDA Sept 95
Copyright © 1995 by Linn Products Limited. All Rights Reserved.
INTRODUCTION
INTRODUCTION
Both the Linn MAJIK control amplifier and WAKONDA pre- amplifier use
microprocessor control, Linn’s solid state input switching and volume
controltechnology,andthelatestsurfacemountmanufacturingtechniques
to deliver unprecedented audio performance and ease of use.
They accommodate six input sources, and provide outputs for two tape
decks. You may record any source while listening to the same or any other
source. For the purposes of this manual, the Majik and Wakonda are the
same, unless otherwise stated, except when refering to the POWER- AMP
section, which is only fitted to the MAJIK
Separate pre-amp output and power amp inputs (MAJIK ONLY) provide
exceptional flexibility, and offer the possibility of a neat and economical
upgrade to active systems. Two sets of speaker sockets facilitate bi-wiring.
Optionsincludemulti-roommodulesandatuner whichsimplyplugsintothe
internal expansion port known as the "Sneaky" slot.
Like any electronic product, the MAJIK and WAKONDA will perform at their
best when used with the highest quality source. The better the sound from
your turntable, tuner or CD player, the better the sound you will hear from
the other components in the system.
INSTALLATION
Unpack the product and retain the packing for future transportation.
Check the contents are as follows:
MAJIK or WAKONDA Remote handset
Owner's manual Mains lead
1 spare fuse.
VOLTAGE SELECTION - MAJIK
This is factory set for a 240 Volts mains supply and must not be
connected to a mains supply before it is adjusted for the local
voltage, and fitted with the appropriate fuse.
To set the voltage, rotate the voltage selector on the underside
of the product until the appropriate voltage is aligned with the
white marker.
To fit the fuse, first identify the correct fuse for the local
voltage MAJIK 3.15A anti-surge for 220V and 240V,
6.3A anti-surge for 100V and 120V.
VOLTAGE SELECTION - WAKONDA
As the WAKONDA is fitted with a Brilliant switched mode power supply,
voltage selection is automatic.
Fuse: WAKONDA T500 mA for all input voltages (90-264 V AC)
Pull open the fuse-drawer at the left-hand side of the mains inlet, insert
the fuse in the rear compartment and close the drawer.
IMPORTANT NOTE FOR UK USE: The wires in this mains lead use the
following colour code:
Green-and-yellow: Earth
Blue: Neutral
Brown: Live
As the colours of the wires in the mains lead of this appliance may not
correspondwiththecolouredmarkingsidentifyingtheterminalsinyourplug,
proceed as follows:
The wire which is coloured green-and-yellow must be connected to the
terminalin the plug which ismarked with the letter E,or by the earth symbol
or coloured green or green-and-yellow.

Page 5.605
REVISION 14: MAJIK and WAKONDASept 95
Copyright © 1995 by Linn Products Limited. All Rights Reserved.
INTRODUCTION
The wire which is coloured blue must be connected to the terminal which is
marked with the letter N or coloured black.
The wire which is coloured brown must be connected to the terminal which
is marked with the letter L or coloured red.
POSITIONING
You can put your MAJIK/WAKONDA more or less anywhere you find
convenient,butthereareafewconsiderationswhichmayaffectyourchoice.
Turntableshaveshortsignalleads,sotheMAJIK/WAKONDAwillneedtobe
closeto your turntable.However,iftheyare too closetogetherthecartridge
maypickuphum fromtheamplifier,especiallyifitis amovingcoilcartridge.
30 cm between the amplifier and the cartridge is usually enough to avoid
such problems. Some cassette decks may also pick up hum if they are too
close to the MAJIK/WAKONDA
TheMAJIKis ahigh-poweredamplifierinacompactcaseandinnormaluse
the case will get quite warm. So allow a minimum of a few centimetres of
space around the amplifier, and ample access for air to circulate, and in
particular don't block the vent holes on the top. No harm will come to your
MAJIK if it has inadequate ventilation - it will simply turn itself off until the
temperature drops.
WARNING: Be careful about putting it on or close to anything
delicate or expensive which may be affected by the
heat.
USEFUL INFORMATION
LOADIMPEDANCE TheMAJIKwilldrivetwopairsof8Ohmloudspeakers,
or onepairof4Ohmloudspeakers.YoucanusetheMAJIKtodrivetwopairs
of4Ohmloudspeakersifonlymoderatelisteninglevelsare required as this
can cause the over-current protection to trip at moderate volume levels.
However, this will in no way damage the MAJIK. It is not possible to switch
between the speakers as they will be wired in parallel on the speaker
outputs.
PROTECTION The MAJIK provides fully automatic overload protection
against both over-current and overheating. If it operates, the audio signal
mutes until the power amplifier has reset itself, and un-mutes within a few
seconds. The volume is reduced by 1 dB, to reduce the likelihood of further
overloads.Ifoverloadpersists,thevolumewillbereducedbyafurther1dB,
and so on until no overload condition is sensed.
CUSTOMISING THE MAJIK There are three ways you can vary the
behaviour of THE MAJIK from standard:
- the display can be set to remain on all the time (MAJIK/WAKONDA)
- the start-up volume can be set to 15 instead of 30 (MAJIK/WAKONDA)
- the power amp can be disabled to save power when the MAJIK-
is being used as a pre-amp only.(MAJIK ONLY)
Thisis simply done byremoving the sleeve and fitting a shorting link across
specific pins. Please see the section on how do this.
PHASE The MAJIK and WAKONDA pre-amplifiers preserve the phase
of the signal to the power amplifier. Therefore the wiring from the power
amplifier to the speakers does not require its polarity inverted.

Page 5.606
REVISION 14: MAJIK and WAKONDA Sept 95
Copyright © 1995 by Linn Products Limited. All Rights Reserved.
INTRODUCTION
EXPANSION We designed the MAJIK and WAKONDA to last for many
years and to give your customers unique opportunities to extend their
capabilities as needs evolve and resources allow. At the rear of the MAJIK,
there is an expansion slot, known as the SNEAKY slot, into which one of a
range of SNEAKY add-on modules may by fitted:
ASNEAKY KUDOS tuner module for high-quality radio reception.
A SNEAKY AKTAMP active crossover board which, with additional ampli-
fiers can be used to drive Aktiv speakers.
SNEAKY KNEKT EitheraLine Driver module which will expandtheMAJIK
/ WAKONDA into the heart of a multi-room system feeding other rooms in
the house or a Local Receiver module could be fitted so that the MAJIK /
WAKONDA can integrate with a Linn multi-room system elsewhere in the
house.
PROBLEMS Rarely, some types of computer monitors and high-frequency
or low-energy fluorescent lights can affect the infra-red control range of the
MAJIK,ormake it behave erratically. Such problemsarevery rare and your
retailer will advise on a solution.
MAINTENANCE
FUSE PROTECTION A fuse is fitted to the power input socket on the rear
of the MAJIK. The fuse holder also contains one spare fuse.
TheLinnMAJIKamplifierisdesignedforalonglifeandanyservicingshould
be carried out by an authorised retailer.
CLEANING Dust or finger marks can be removed using a soft damp cloth.
Avoid the use of domestic cleaning products.
Notes:
1. KUDOS:
When fitting the KUDOS SNEAKY the display sleep function must be
disabled on the MAJIK main board. The KUDOS then controls this
function and cannot be configured to remain on.
2. MULTI-ROOM:
IfusingtheMajikinaMultiroomsystemwithanRCUinthesameroom
youwillneedtodisabletheIRreceiverintheMajik.Thisissimplydone
byfittingaLinkacrosspinswhicharelocatedintheSneakyBoardand
are clearly marked.
3. SNEAKY SLOT:
Always disconnect the MAJIK/WAKONDA from everything,
ESPECIALLY MAINS, before fitting a SNEAKY module or carrying
out any configurations.
Page 5.607
REVISION 14: MAJIK and WAKONDASept 95
Copyright © 1995 by Linn Products Limited. All Rights Reserved.
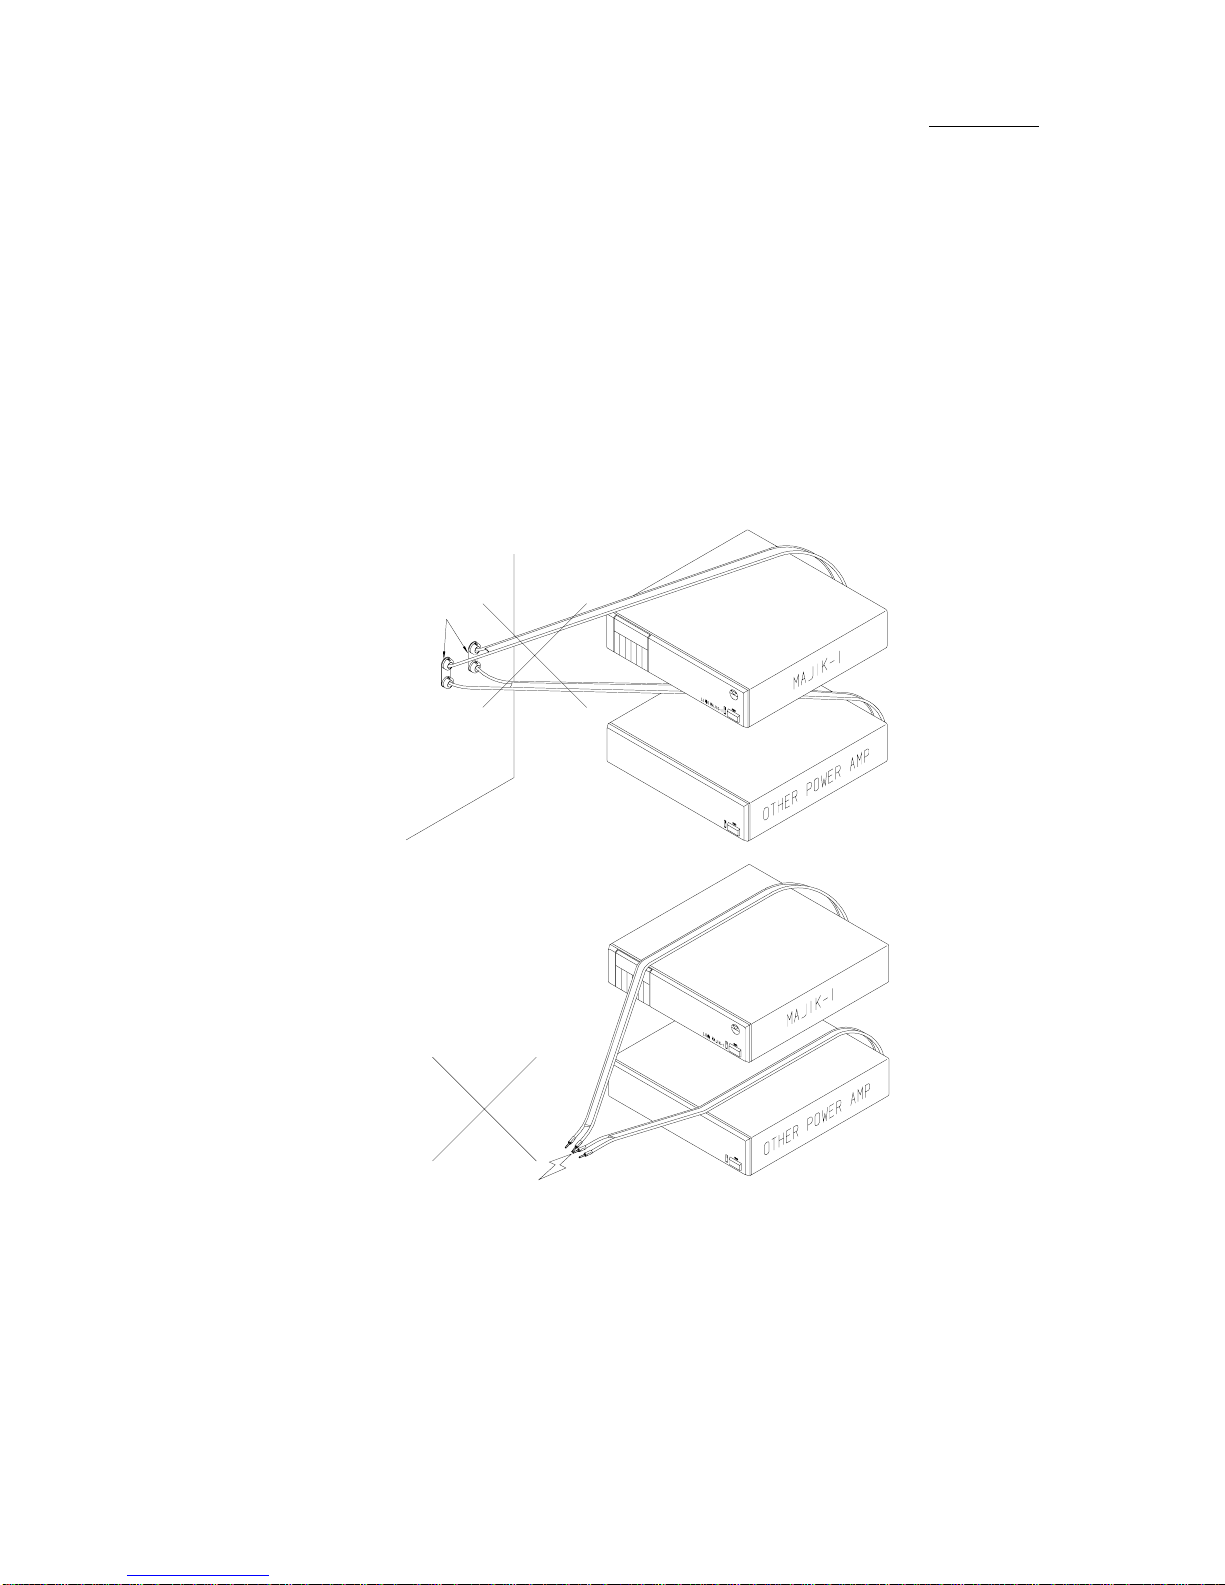
WARNING
WARNING
REMOVE
LINKS
MAJIKAMPLIFIERSDAMAGEDINTHISWAYWILLINCUR
FULL PARTS AND LABOUR CHARGES!
PleasenotewhenBi-AmpingANYMajikthateachofthetwomethods
shown will cause the Majik to suffer terminal damage
Whilst the protection was improved for the Majik in Feb. 1995, NO
amplifier likes to be "back driven".
Pleaseensurethat ALLTHEAMPLIFIERSARESWITCHED
OFF and all speaker links are removed before plugging or
unpluggingtheconnectorsintospeakersduringinstallationOR
demonstrations.
Page 5.608
REVISION 14: MAJIK and WAKONDA Sept 95
Copyright © 1995 by Linn Products Limited. All Rights Reserved.
MAJIK-IP only:
Move shorting link to change
from MM to MC.
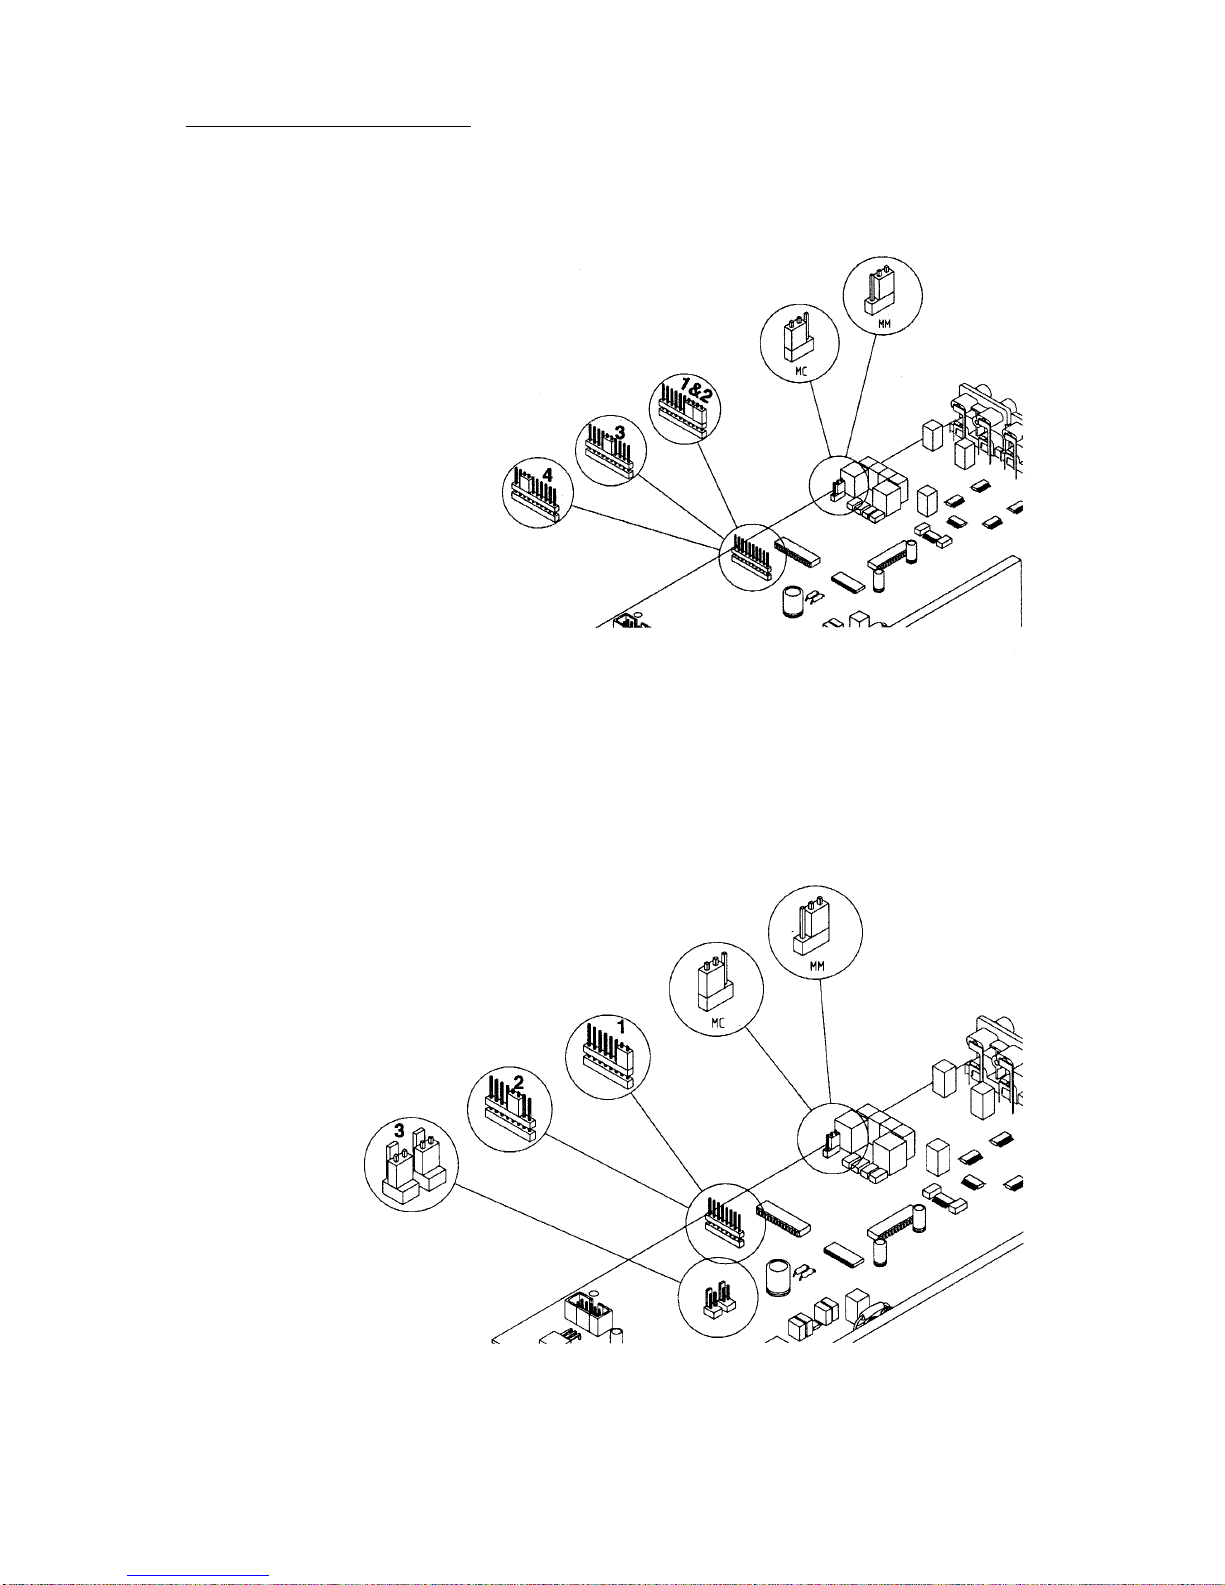
MAJIK
Board revision L 4 and L 5.
To customise fit Shorting Links
(Linn Part Number CONN 421) as shown:
1 Display ON all the time.
2 Start volume 15
(factory setting 30).
Please note:
Last four pins not used.
Board Revision 5 only:
3. Fit 2 links to disable Power
amplifier. (Power save mode )
MAJIK
From Board revision L6 upward
To customise fit Shorting Links
(Linn Part Number CONN 421) as
shown:
1 & 2 Disable the power-AMP.
(Power save mode )
3. Display ON all the
time.
4. Start volume 15
(factory setting
30).
Please note:
Last two pins not used.
MAJIK-IP only:
Move shorting link
to change from
MM to MC.
CONFIGURING THE MAJIK
Page 5.609
REVISION 14: MAJIK and WAKONDASept 95
Copyright © 1995 by Linn Products Limited. All Rights Reserved.
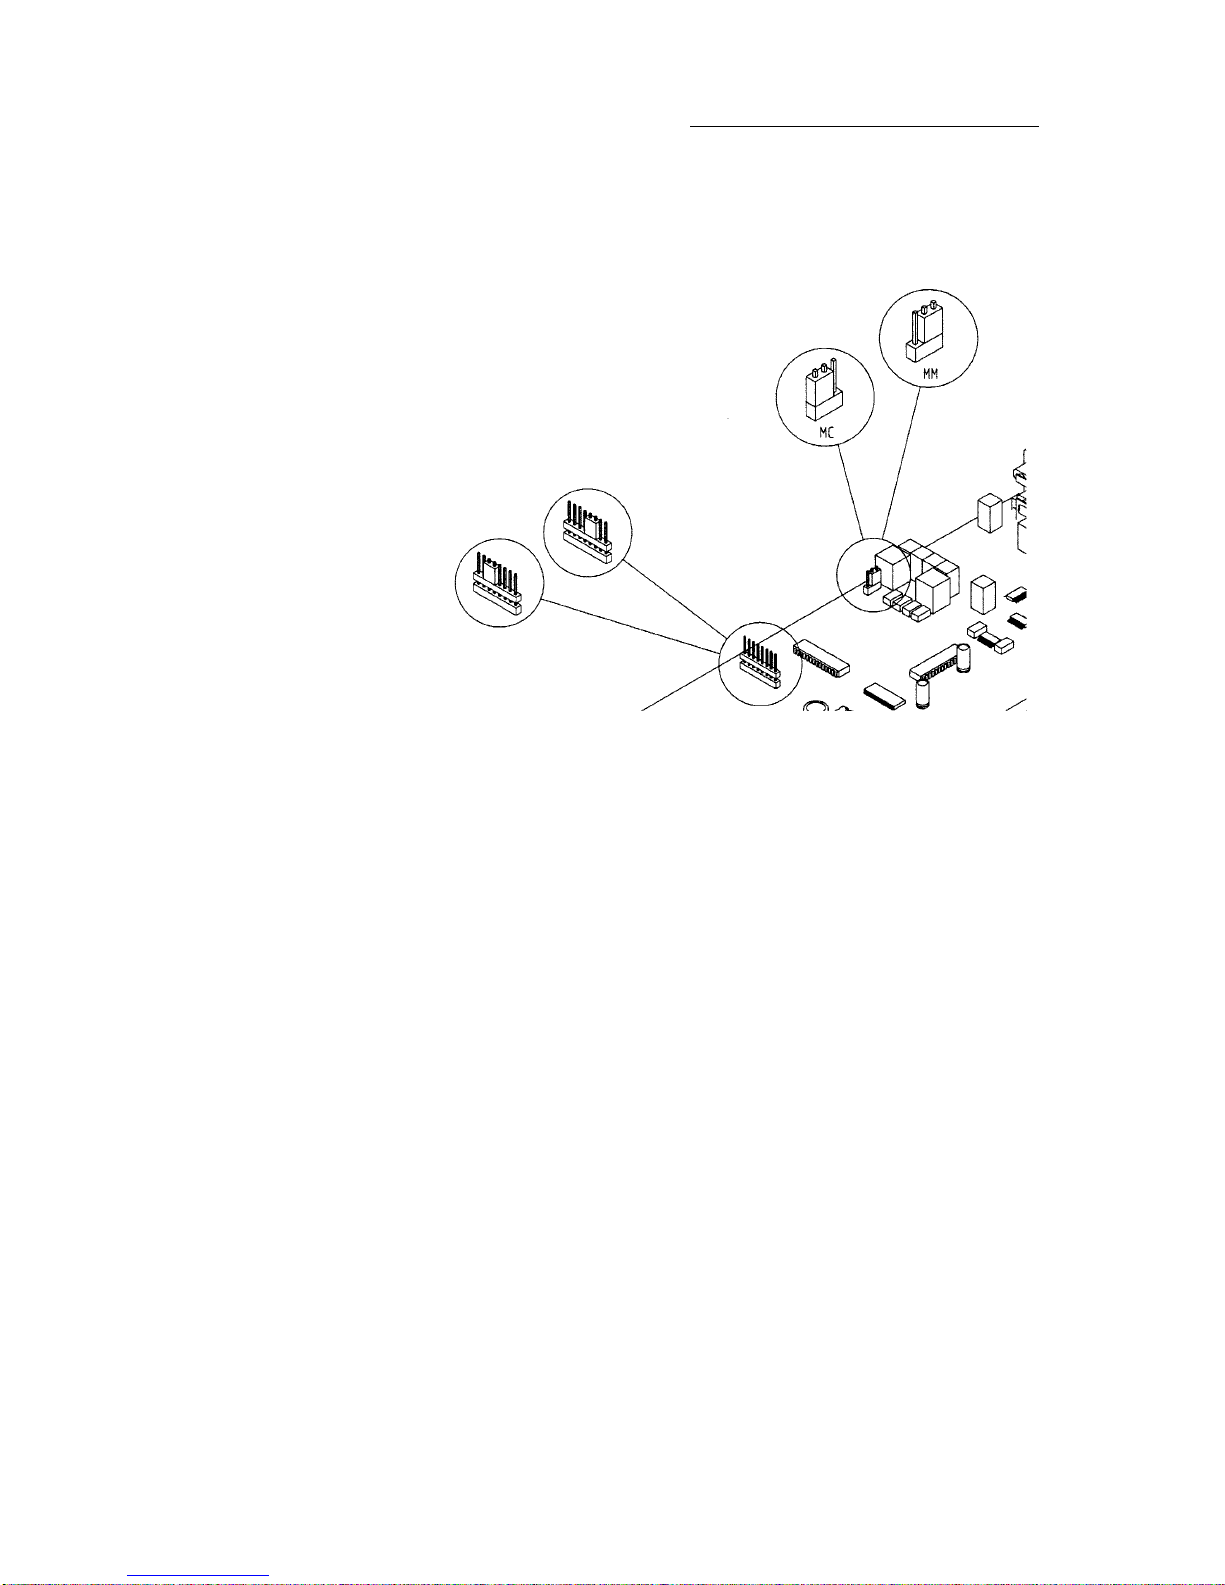
WAKONDA
From Board revision L6 upward
To customise fit Shorting Links
(Linn Part Number CONN 421) as
shown:
1. Display ON all the time.
2. Start volume 15
(factory setting 30).
Please note:
Last two pins not used.
CONFIGURING THE WAKONDA
WAKONDA-P only:
Move shorting link
Page 5.610
REVISION 14: MAJIK and WAKONDA Sept 95
Copyright © 1995 by Linn Products Limited. All Rights Reserved.
INSTALLING AKTIV MODULES IN THE MAJIK / WAKONDA
Time required:
30 min, approx.
INSTALLING AKTIV MODULES
Parts Required:
1 x Set Aktiv Modules. (See contents list in box.)
Tools Required:
1 x No 2 Pozi (or Supa) screwdriver
Antistatic work station
Before starting, you must ensure that you have a clean workbench and take
the necessary anti-static precautions. Always wear an anti-static wrist strap.
Refer to the Service Manual (5.8) for full details of the necessary working
practices. Always disconnect the MAJIK/WAKONDA from everything, ESPE-
CIALLY MAINS, before fitting a SNEAKY module.
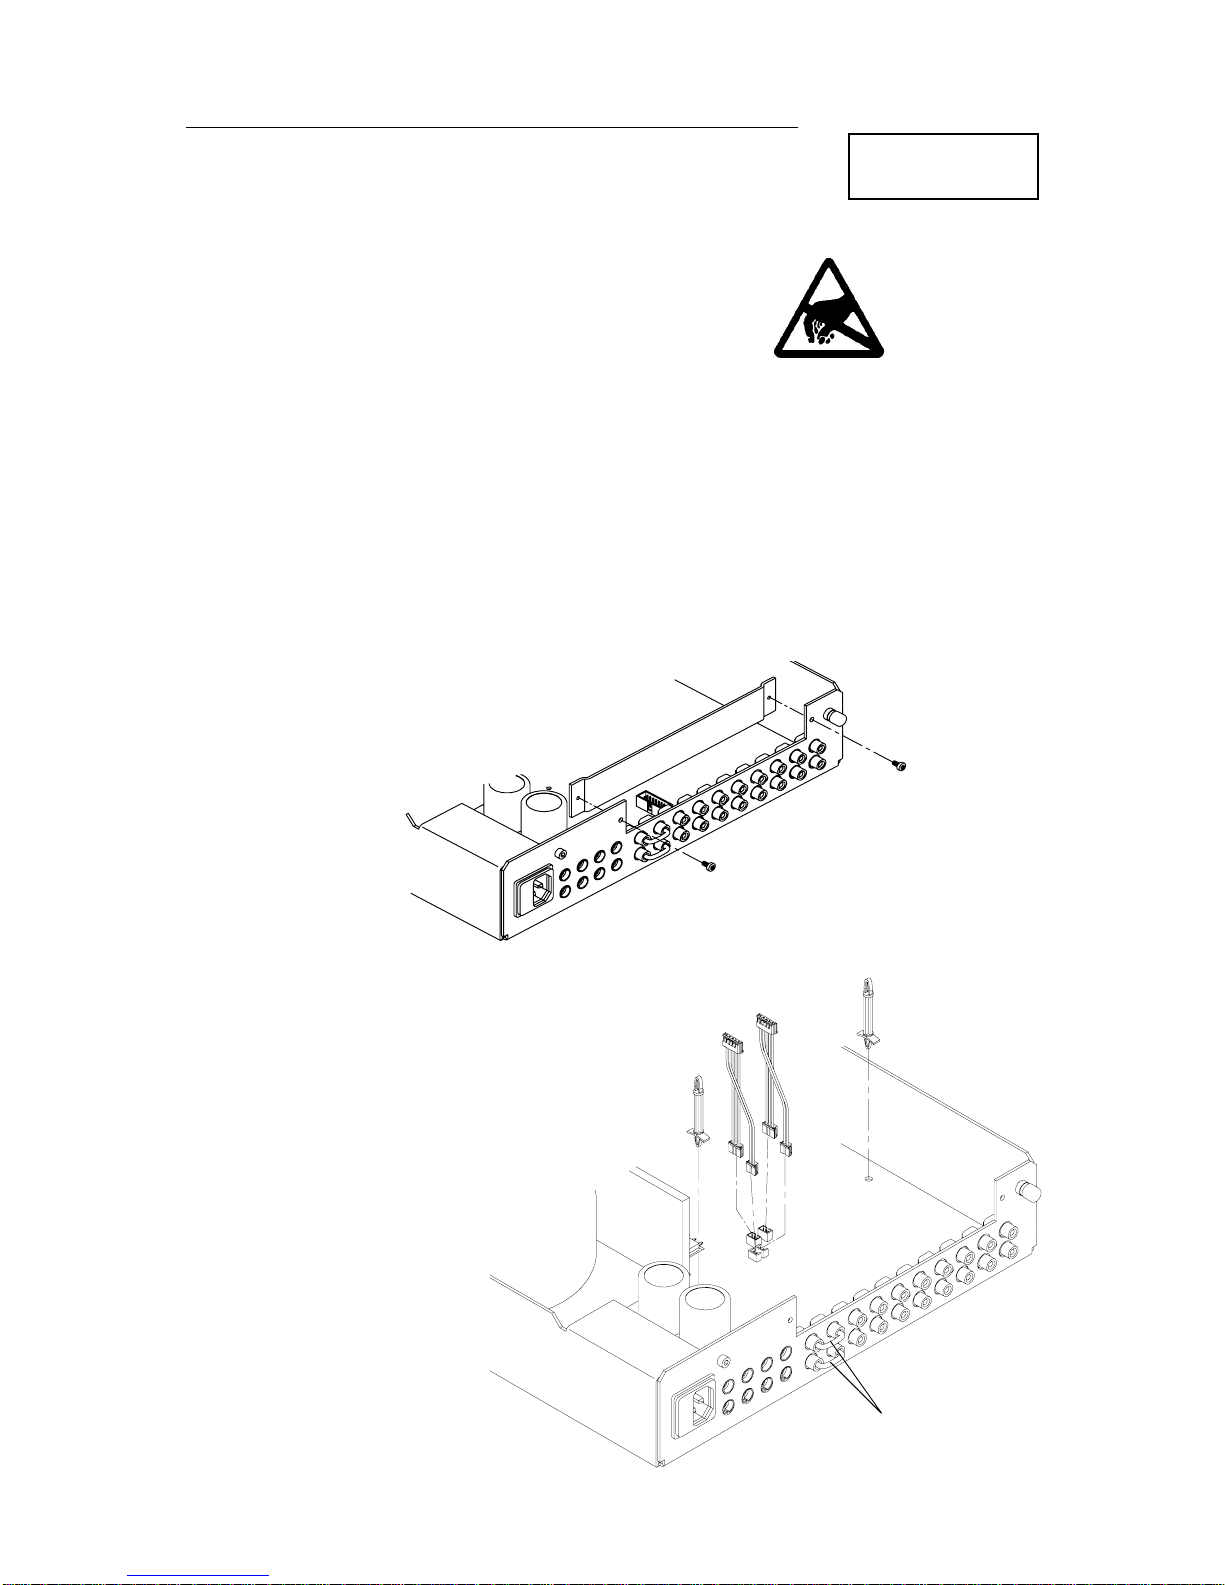
1 Remove the sleeve from the MAJIK and place the amplifier with the
back panel facing you.
2 Remove the 2 screws on the back panel and remove the SNEAKY
blanking plate.
Give the blanking plate to the customer to retain for future use.
3 Take 2 of the wiring harnesses, which
have a 5 way connector at one end and
a 2 and 3 way connector at the other
end.
Fit the 2 and 3 way connectors to the
MAJIK main board.
Make sure they are pressed fully home.
4. Fit the two long
standoffs to the
MAJIK main
board.
Make sure the
standoffs are
fitted the correct
way round.
right
left
Other manuals for MAJIK
1
This manual suits for next models
1
Table of contents
Other Linn Amplifier manuals

Linn
Linn Classik Music User manual

Linn
Linn Classik Music User manual

Linn
Linn LK240 User manual

Linn
Linn PRE-AMPLIFIER User manual

Linn
Linn Classik-K User manual

Linn
Linn Classik Music User manual

Linn
Linn Klout User manual

Linn
Linn Akurate Kontrol User manual

Linn
Linn Twin Klimax User manual

Linn
Linn LK1 User manual

Linn
Linn Classik Music Installation and operating instructions

Linn
Linn LK140 User manual

Linn
Linn LK1 User manual

Linn
Linn LK 100 User manual

Linn
Linn KNEKT ROOMAMP 2 User manual

Linn
Linn LK240 User manual

Linn
Linn MAJIK 2100 User manual

Linn
Linn MAJIK 2100 User manual

Linn
Linn AV 5125 User manual

Linn
Linn Kolektor User manual


