LightSpeed Technologies Zulu User manual
Zulu User Guide

Welcome
Congratulations on purchasing a Lightspeed Aviation Zulu headset. Your headset is a premium product
that will provide many years of comfortable high performance for your ying endeavors.
If this is your rst Lightspeed Aviation headset—welcome to the Lightspeed family! We look forward
to building a lasting community with our customers founded on products and service that are best in
class. To support your passion for ying we invite you to visit LightspeedAviation.com where you will
nd useful insights about our other products and aviation.
Thank you for choosing a Lightspeed Aviation headset.

Contents
Introduction .....................................................................2
Getting Started
Fitting Your Headset...................................................4
Battery Installation .....................................................5
Battery Types ................................................................6
Battery Life ...................................................................6
Controller.......................................................................6
Using Your Zulu Headset
Turning ON and OFF ..................................................8
Matching Stereo/Mono Setting to an
Audio Panel ..................................................................8
Front Row Center .......................................................8
Auto MusicMute .........................................................9
Wired Auxiliary Devices ...........................................9
Setting DIP Switches............................................... 10
Bluetooth Devices
Connecting Cell Phones for the First Time...... 13
Bluetooth Features.................................................. 14
Bluetooth Mode—ON and OFF.......................... 14
FAQ’s .................................................................................. 16
Peak Performance Tips............................................. 18
Specications................................................................ 19
Warranty Information............................................... 21
Contact Lightspeed Aviation................................. 24

Introduction
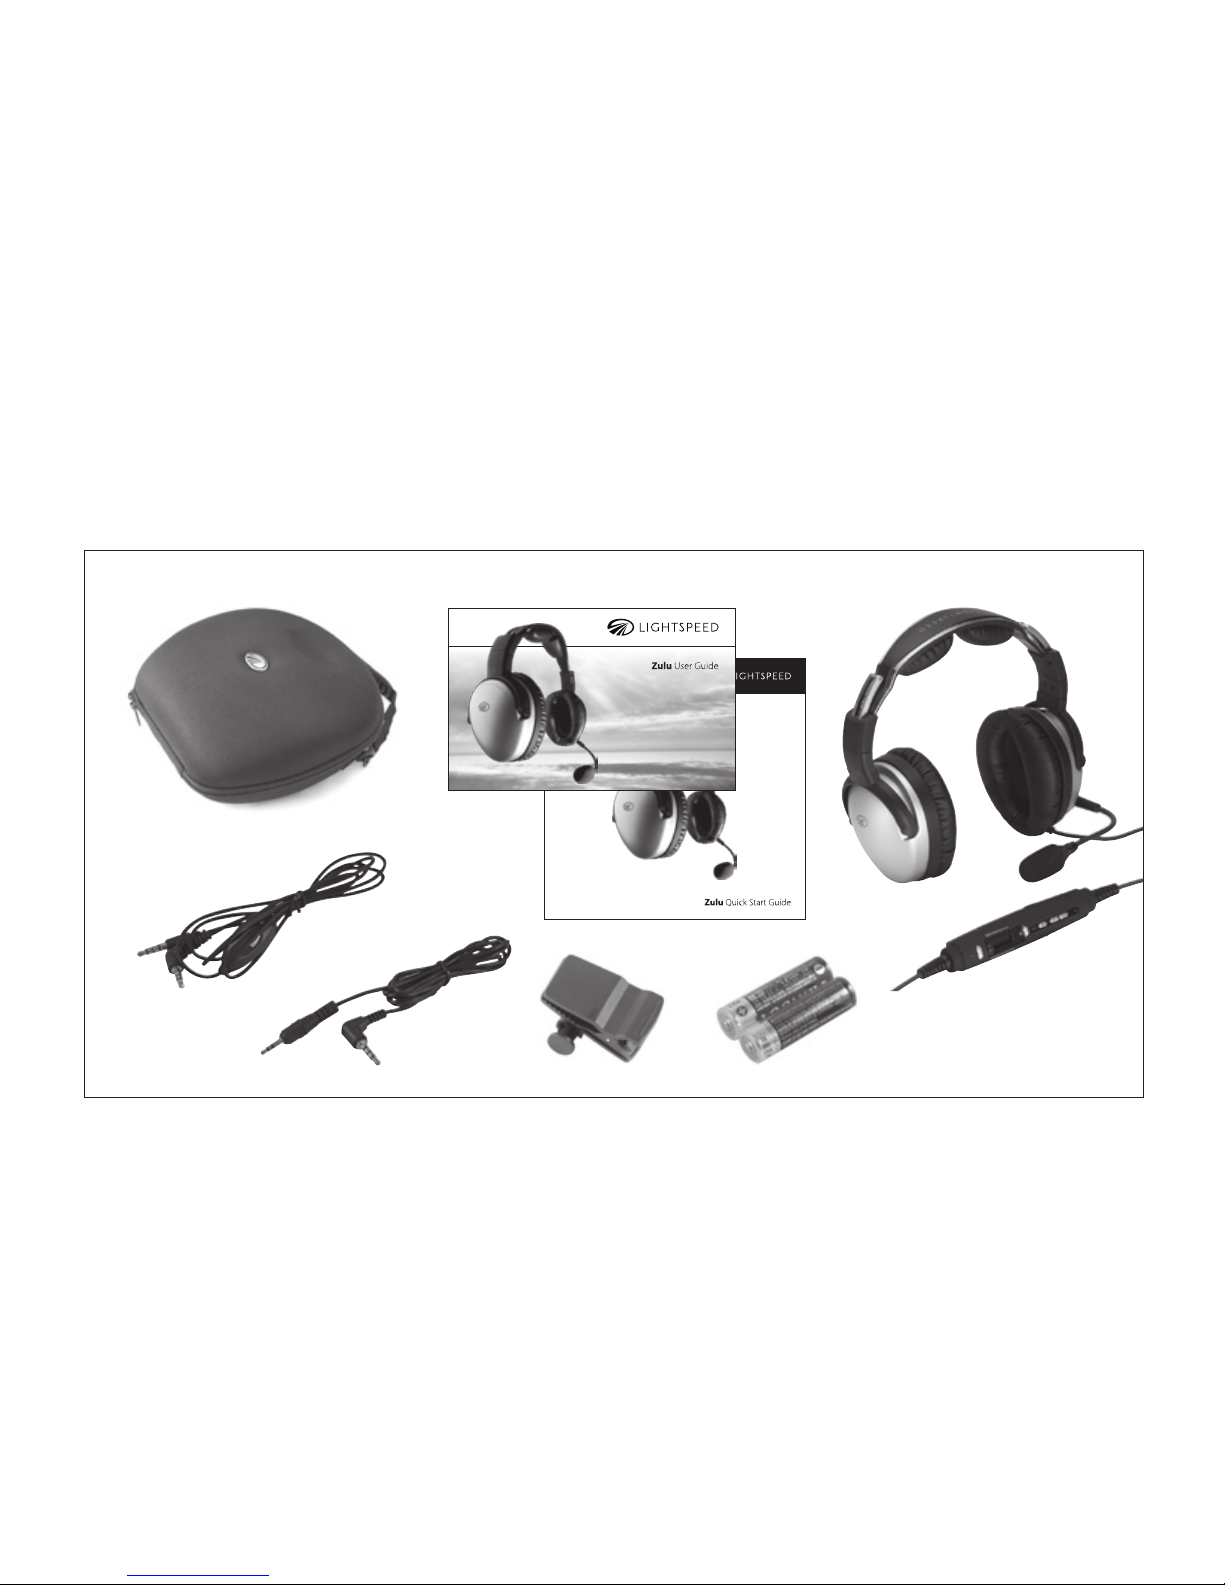
Your Zulu headset package includes (clockwise,
from top left on the following page):
• Carryingcase
• UserandQuickStartGuidewithwarranty
information
• ZuluANRheadsetwithZulucontroller
• TwoAAbatteries(notincludedwithpanel-
powered headsets)
• Cordclip
• Cellphonecablewithstandard2.5mm
connector
• Audiodevice/iPhonecablewithstandard
3.5mm connector
2
3
Introduction

Getting Started
Fitting Your Headset
Fitting your headset properly is the key to
comfortable use and superior Active Noise
Reduction (ANR) capabilities. To gain peak
performance from the ANR feature it’s necessary
to have a solid seal around your entire ear
combined with a symmetrical t on your head.
The following tips will assist in achieving the
proper t.
A. Fit your ears entirely within the ear cups
providing a solid seal.
B. Rest the headband lightly on top of your
head with the right and left sliders extended
to equal lengths.
4
C. Position the microphone 1/8 inch from your
mouth. Speak into the microphone side labeled
“talk”which is marked at the microphone base.
Battery Installation
The standard Zulu, Zulu:CD and Zulu:C battery–
powered headsets require two AA batteries
(included).Usealkalinebatteriesforbest
performance.
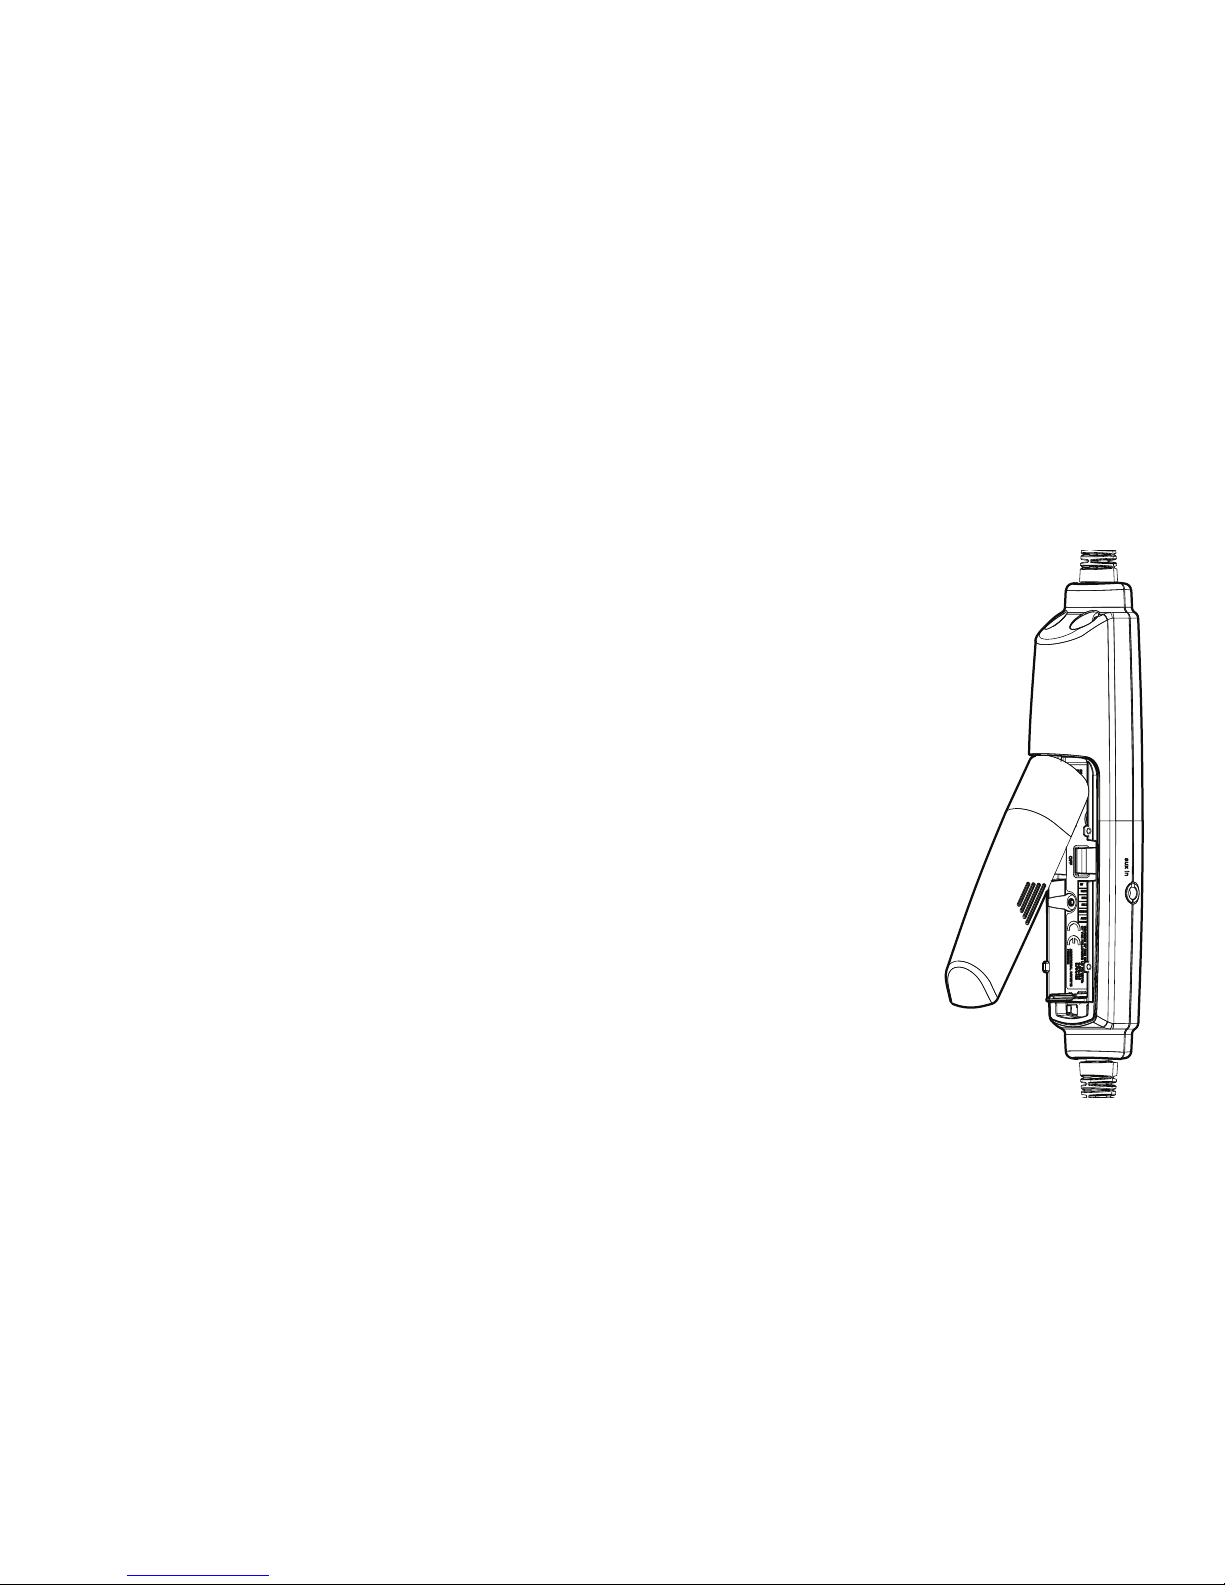
A. Open the controller battery/DIP switch door
by either pressing down on the circle icon or
by pulling open the door along the notched
edges. Insert two AA batteries with the
correct polarity positioning.
B. TheLEDashesGREENwhen
charged batteries are in use and
the power is on.
C. When batteries begin to run
low the power LED ashes
RED. If the LED ashes RED
during ight the headset
will continue to operate.
Install new batteries
as soon as possible at
any indication of low
batteries.
Battery/DIP switch door
5
Getting Started

Battery Types
Usetwo“AA”alkalineorlithiumbatteries.Lithium
batteries may provide improved battery life in
colder temperatures. We do not recommend
usingre-chargeablebatteriesormixingbattery
types and brands.
Battery Life
A set of batteries can provide up to 40 hours of
power. However, heavy Bluetooth usage can
signicantlyreducebatterylife.Underquiet
conditions Zulu will auto shut o approximately
two minutes after the headset is removed from
your head.
Controller
A. PowerindicatorLED:FlashesGREENwhen
power is supplied to Zulu and batteries are
strong. Flashes RED when batteries are low.
B. Power button: Powers on headset, turning on
Active Noise Reduction (ANR). Press button
once to turn Zulu on; press and hold to turn
Zulu o.
To toggle the LED brightness from bright to
dim quickly press the power button twice.
C. Volume control: Controls audio panel volume
with individual sliders for each ear. Does not
aect the volume of auxiliary devices.
D. BluetoothindicatorLED:FlashesBLUE
6
Getting Started
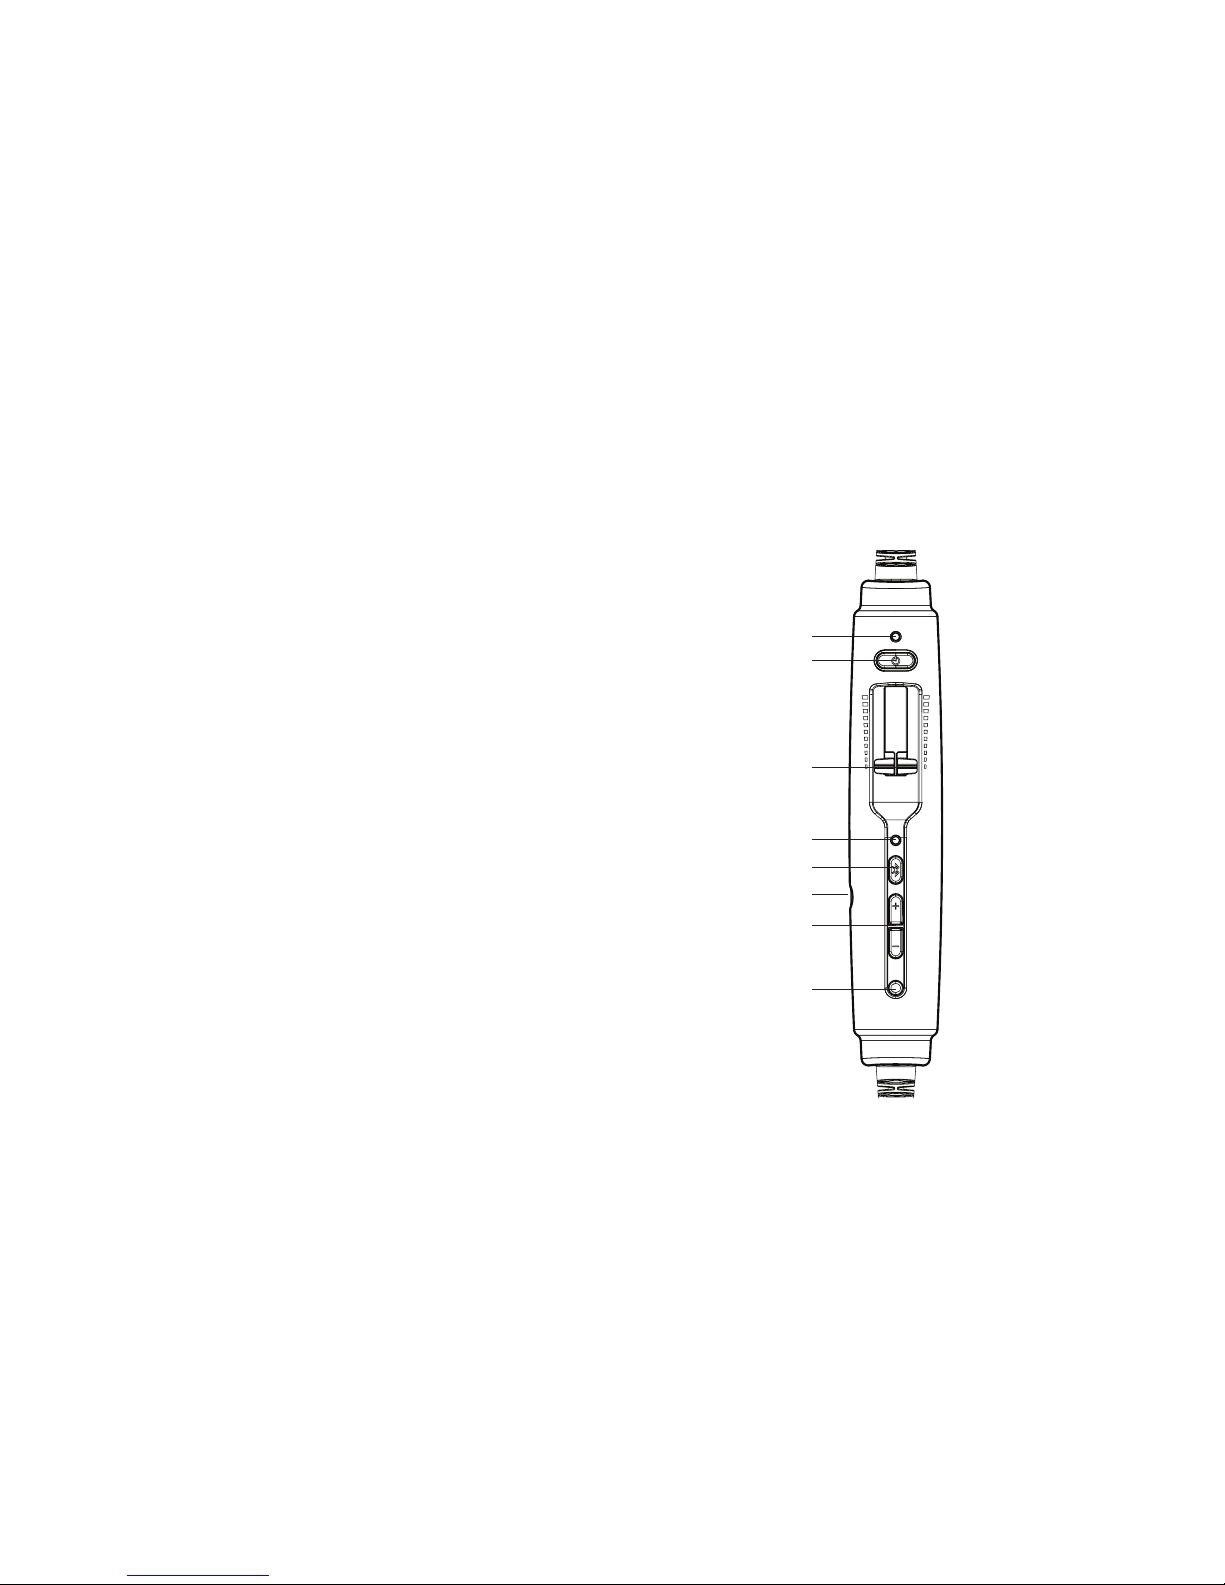
when Bluetooth mode is on and RED when
Bluetooth is being turned o. In pairing
mode,ashesalternatingREDandBLUE.
E. Bluetooth power button: Turns on and o
theBluetoothsignalandcontrolsBluetooth-
connected devices.
F. Auxiliary input jack: Provides a wired input
for audio and cell phone devices.
G. Bluetoothvolumebuttons:Controlsthe
volume of Bluetooth devices.
H. Auto MusicMute button: When enabled,
automatically quiets music and audio from
auxiliary devices during radio communications.
Does not aect cell phone calls.
A
B
C
D
E
F
G
H
The Zulu controller
7
Getting Started

Using Your Zulu Headset
Turning ON and OFF
ON: Press the power button once to turn on the
headset.TheGREENpowerLEDasheswhen
power is supplied. Active Noise Reduction (ANR)
is engaged when you turn on the headset.
OFF: Press and hold the power button until the
GREENpowerLEDturnso.
Zulu will auto shut o approximately two
minutes after removing the headset and under
quiet conditions.
The power LED ashes RED when batteries are
low; see Battery Installation, on page 5.
Matching Stereo/Mono Setting to an Audio
Panel
The Stereo/Mono DIP switch setting should match
the signal from your audio panel. For a stereo panel,
best performance is gained by setting the headset
for stereo. The same is also relevant to a mono
panel. Incorrect settings result in communications
being heard in only one ear. The Stereo/Mono DIP
switch does not aect auxiliary devices, so you can
enjoy auxiliary audio in stereo regardless of how the
Stereo/Mono DIP switch is set.
Front Row Center
FrontRowCenterisabuilt-infeaturethatgivesyou
atheater-likeexperience,enhancingstereosound
reproduction so that audio seems to come from all
around you, not just from your right and left.
8
Table of contents
Other LightSpeed Technologies Headphones manuals


