LG HX300G User manual

OWNER’S MANUAL
DLP PROJECTOR
HX300G
HX301G
Please read this manual carefully before operating
your set and retain it for future reference.
www.lg.com

DLP PROJECTOR
DLP PROJECTOR
Warning
This is a class B product. In a domestic environment this product may cause radio interference, in
which case the user may be required to take adequate measures.
This projector complies with EMC Directive and R&TTE Directive.
DE DK ES FI FR
GB GR HU IT NL
NO PL PT SE

Contents
3
Contents
Disposal of your old appliance
1. When this crossed-out wheeled bin symbol is attached to a product it means the product is covered by
the European Directive 2002/96/EC.
2. All electrical and electronic products should be disposed of separately from the municipal waste stream
through designated collection facilities appointed by your government or your local authorities.
3. The correct disposal of your old appliance will help prevent potential negative consequences for the
environment and human health.
4. For more detailed information about disposal of your old appliance, please contact your city office,
waste disposal service or the shop where you purchased the product.
5. The fluorescent lamp used in this product contains a small amount of mercury. Do not dispose of this
product with general household waste. Disposal of this product must be carried out in accordance to
the regulations of your local authority.
Safety Instructions .......................................................4
Names of parts
Main Body ..........................................................................................7
Control Panel .....................................................................................7
Connecting Part .............................................................................. 8
Remote Control .............................................................................. 9
Installing Batteries ........................................................................... 9
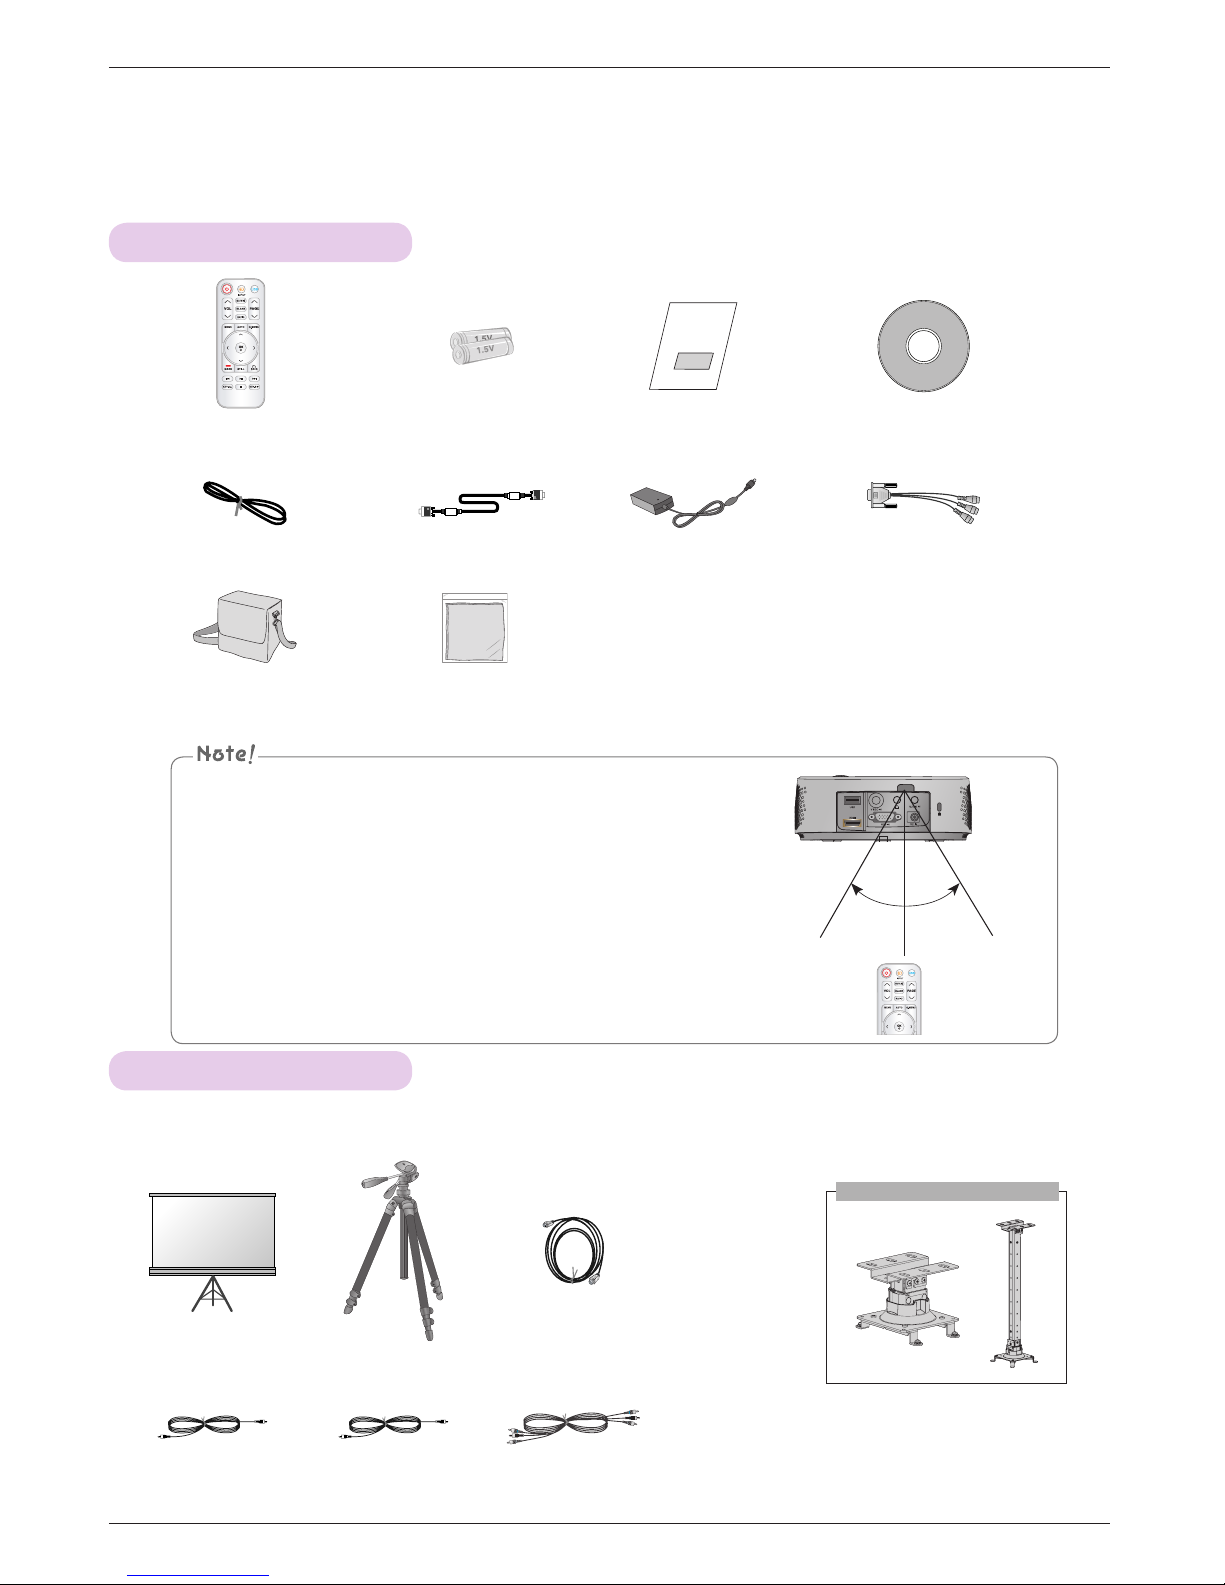
Accessories ......................................................................................10
Optional Extras ..............................................................................10
Installing and Composition
Installation Precautions ..................................................................11
Basic Operation of the Projector ...............................................12
How to install the projector using the tripod ..........................13
Kensington Security System .......................................................13
Turning on the Projector ..............................................................14
Turning off the Projector ..............................................................14
Focus and Position of the Screen Image ................................14
Selecting input mode ...................................................................14
Connection
Connecting to a Desktop PC ......................................................15
Connecting to a Video Source ...................................................15
Connecting to a DVD Player .......................................................16
Connecting to a D-TV Set-Top Box ..........................................16
Function
PICTURE Menu Options
Picture mode ................................................................................... 17
Adjusting Picture Mode ................................................................ 17
Advanced Control Function .........................................................18
Color Temperature Function ........................................................19
Picture Reset Function ..................................................................19
SCREEN Menu Options
To Change PJT Mode ..................................................................20
Using Aspect Ratio Function .....................................................20
Using Keystone Function ............................................................20
Auto Configure Function ..............................................................21
RGB Config. Function ...................................................................21
Using the Still Function ................................................................21
AUDIO Menu Options
What is FM Wireless Audio? (HX300G only) .......................22
Installing Instructions (HX300G only) .....................................23
What do I do if the FM receiving signal is not good?
(HX300G only) .............................................................................23
To listen through the FM receiver speaker
(HX300G only) .............................................................................24
Adjusting Volume ..........................................................................24
Function Audio ...............................................................................24
Adjusting Speaker Balance ........................................................25
Adjusting Treble .............................................................................25
TIME Menu Options
Sleep time Function .....................................................................26
Auto Off Function .........................................................................26
OPTION Menu Options
Selecting Language ..................................................................... 27
Using Blank Function ................................................................... 27
Selecting Blank image .................................................................27
Screen Capture Function ............................................................28
To adjust the brightness of the screen ...................................28
To make the power of the projector turn on automatically
when power is in...........................................................................28
Demo Mode Function ..................................................................29
Initial Setting Function .................................................................29
INFORMATION Menu Options
To See The Projector Information .............................................29
USB
To use the USB device
Connecting the USB device .......................................................30
Eject USB ........................................................................................30
Precautions when using the USB device ................................31
PHOTO LIST
Screen Components ....................................................................32
Photo Selection and Popup Menu ...........................................32
Full Screen Menu ..........................................................................33
MUSIC LIST
Screen Components ....................................................................34
Music Selection and Popup Menu ...........................................34
MOVIE LIST
Supported Movie File ...................................................................35
Precautions when playing the DivX ........................................36
Screen Components .................................................................... 37
Movie Selection and Popup Menu ........................................... 37
Playing the Movie ..........................................................................38
Option Menu Selection................................................................38
To See The DivX Registration Code.........................................39
Deactivation Function ...................................................................39
FILE VIEWER
Screen Components ....................................................................40
View File ...........................................................................................40
Information
Supported Monitor Display ..........................................................41
Maintenance ....................................................................................41
Specifications .................................................................................42
Open Source Software Notice ...................................................43

Safety Instructions
4
Safety Instructions
Please take note of the safety instructions to prevent any potential accident or misuse of the projector.
ꔈ Safety Instructions are given in two forms as detailed below.
WARNING : The violation of this instruction may cause serious injuries and even death.
NOTES : The violation of this instruction may cause injuries or damage to the projector.
ꔈ After reading this manual, keep it in the place that you can access easily.
Indoor Installation WARNING
Do not place the Projector in direct
sunlight or near heat sources such
as radiators, fires, stove etc.
This may cause a fire hazard!
Do not place flammable materi-
als in, on or near the projector.
This may cause a fire hazard!
Do not hang on the installed
projector.
It may cause the projector to fall,
causing injury or death.
Power WARNING
Indoor Installation NOTES
Earth wire should be connected.
Ensure that you connect the earth ground
wire to prevent possible electric shock (That
is a Projector with a three-prong grounded
AC plug must be connected to a three-
prong grounded AC outlet).
If grounding methods are not possible, have
a qualified electrician install a separate circuit
breaker.
Do not try to ground the unit by connecting
it to telephone wires, lightening rods, or gas
pipes.
The power cord should be inserted
fully into the power outlet to avoid
a fire hazard!
This may cause a fire hazard or damage
the unit.
Do not place heavy objects on
the power cord.
This may cause a fire or an electric
shock hazard!
Do not place the projector close
to sources of steam or oil such
as a humidifier.
This may create a fire hazard or an
electric shock hazard!
Do not place the projector where
it might be exposed to dust.
This may cause a fire hazard or
damage to the unit!
Do not block the vents of the pro-
jector or restrict air-flow in any way.
This would cause the internal tempera-
ture to increase and could cause a fire
hazard or damage to the unit!
Ensure good ventilation around the
projector. The distance between
the projector and the wall should
be more than 30 cm.
An excessive increase in its internal
temperature may cause a fire hazard or
damage to the unit!
Do not use the projector in a
damp place such as a bathroom
where it is likely to get wet.
This may cause a fire or an electric
shock hazard!
Do not place the projector direct-
ly on a carpet, rug or place where
ventilation is restricted.
This would cause its internal tempera-
ture to increase and might create a
fire hazard or damage the unit.
When installing the projector on
a table, be careful not to place it
near the edge.
The projector could fall causing injury
and damage to the projector.
Only use a suitable stand.
Only use the projector on a level
and stable surface.
It may fall and cause injury and/or
damage to the unit.
Disconnect from the power sup-
ply and remove all connections
before moving, or cleaning.

Safety Instructions
5
Using WARNING
If water is spilt into the projector unplug it from the power supply
immediately and consult your Service Agent.
This may cause an electric shock hazard or damage to the unit!
Dispose of used batteries
carefully and safely.
In the case of a battery being
swallowed by a child please consult
a doctor immediately.
CAUTION concerning the Power Cord
It is recommend that most appliances be placed on a dedicated circuit; that is, a single outlet circuit
which powers only that appliance and has no additional outlets or branch circuits.Check the specification
page of this owner's manual to be certain.
Do not overload wall outlets. Overloaded wall outlets, loose or damaged wall outlets, extension cords,
frayed power cords, or damaged or cracked wire insulation are dangerous.Any of these conditions could
result in electric shock or fire. Periodically examine the cord of your appliance, and if its appearance
indicates damage or deterioration, unplug it, discontinue use of the appliance, and have the cord
replaced with an exact replacement part by authorized service personnel.
Protect the power cord from physical or mechanical abuse, such as being twisted, kinked, pinched,
closed in a door, or walked upon. Pay particular attention to plugs, wall outlets, and the point where the
cord exits the appliance.
Do not remove any covers. High
risk of Electric Shock!
Don’t look directly into the lens
when the projector is in use. Eye
damage may occur!
Do not touch metal parts during
or soon after operation since the
vents will remain very hot!
Power WARNING
Power NOTES
Do not plug-in too many items
into one power outlet.
It may result in overheating of the out-
let and create a fire hazard!
Never touch the power plug with
a wet hand.
This may cause an electric shock
hazard!
Prevent dust from collecting on
the power plug pins or outlet.
This may cause a fire hazard!
Hold the plug firmly when
unplugging. If you pull the cord,
it may be damaged.
This may cause a fire hazard!
Do not use if the power cord or
the plug is damaged or any part
of the power outlet is loose.
This may cause a fire or an electric
shock hazard or damage to the unit!
Ensure the power cord does not
come into contact with sharp or
hot objects.
This may cause a fire or an electric
shock hazard or damage to the unit!
Place the projector where people
will not trip or tread on the power
cord.
This may cause a fire or an electric
shock hazard or damage to the unit!
Do not turn the projector On/Off by plugging-in or unplugging the
power plug to the wall outlet.
(Allow the unit to cool before removing power.)
It may cause mechanical failure or could cause an electric shock.
Do not place anything containing
liquid on top of the projector
such as flowerpot, cup, cosmet-
ics or candle.
This may cause a fire hazard or
damage to the unit!
In case of impact shock or damage
to the projector switch it off and
unplug it from the power outlet and
contact an authorized service center.
This may cause a fire or an electric shock
hazard or damage to the unit!
Do not allow any objects to fall
into the projector.
This may cause an electric shock haz-
ard or damage to the unit!

Safety Instructions
6
Using NOTES
Do not place heavy objects on
top of projector.
This may cause mechanical failure or
personal injury!
Take care not to impact the lens
particularly when moving the
projector.
Do not touch the lens of the pro-
jector. It is delicate and easily
damaged.
Others NOTES
Cleaning NOTES
Contact the Service
Center once a year to
clean the internal
parts of the projector.
Accumulated dust can
cause mechanical failure.
When cleaning the plastic parts such as projector case, unplug the power and
wipe it with a soft cloth. Do not use cleanser, spray water or wipe with a wet
cloth. Especially, never use cleanser (glass cleaner), automobile or industrial
shiner, abrasive or wax, benzene, alcohol etc., which can damage the product.
Use an air spray or soft cloth that is moist with a neutral detergent and water
for removing dust or stains on the projection lens.
It can cause fire, electric shock or product damage (deformation, corrosion and damage).
Cleaning WARNING
Do not use water while cleaning
the projector.
This may cause damage to the pro-
jector or an electric shock hazard.
In the unlikely event of smoke or
a strange smell from the projec-
tor, switch it off, unplug it from
the wall outlet and contact your
dealer or service center.
This may cause a fire or an electric
shock hazard or damage to the unit!
Use an air spray or soft cloth that
is moist with a neutral detergent
and water for removing dust or
stains on the projection lens.
Others WARNING
Do not attempt to service the projector yourself. Contact your dealer or service center.
This may cause damage to the projector and could give an electric Shock as well as invalidating the warranty!
Using WARNING
If the projector is in a room that experiences a gas leak, do not touch
the projector.
It can cause a fire or a burn by a spark.
Always open the lens door or
remove the lens cap when the
projector lamp is on.
Do not use any sharp tools on
the projector as this will damage
the casing.
In the event that an image does
not appear on the screen please
switch it off and unplug it from the
power outlet and contact your
Service Agent.
This may cause a fire or an electric
shock hazard or damage to the unit!
Do not drop the projector or
allow impact shock.
This may cause mechanical failure or
personal injury!
Be sure to unplug if the projector is
not to be used for a long period.
Accumulated dust may cause a fire haz-
ard or damage to the unit!
Only use the specified type
of battery.
This could cause damage to the
remote control.
Do not mix new batteries with old
batteries.
This may cause the batteries to over-
heat and leak.

Speaker
Names of parts
7
Names of parts
Main Body
* The projector is manufactured using high-precision technology. You may, however, see on the Projector screen tiny black
points and/or bright points (red, blue, or green). This can be a normal result of the manufacturing process and does not
always indicate a malfunction.
Control panel
Exhaustion Direction
High heat is generated, so do
not get near the exhaustion
direction during the use.
Focus ring
Speaker
Control Panel
MENU Button
Displays or closes menus.
POWER Button
Turns ON/OFF the projector.
∧/∨/</> Button
Adjusts functions of menus.
◉OK Button
Checks present mode and saves the change of functions.
* Do not touch the lens when using the projector or opening the lens door.

Names of parts
8
Connecting Part
USB
Headphone port
IR (Remote control sensor)
*
Do not block the IR port for normal operation
of remote control.
* When using HDMI/USB connector, if the size of the jack connecting
to the connector is too big, they may not be connected. Please use
standard size jack.
RGB IN
AUDIO IN
DC IN
Kensington Security
System Connector
(Refer to page 13)
VIDEO IN
HDMI

Names of parts
9
Remote Control
Installing Batteries
INPUT Button
KEYSTONE ꔌ,ꔍ Button
MENU Button
USB control Buttons
AUTO Button
VOLUME ∧/∨ Button
RATIO Button
CAUTION
RISK OF EXPLOSION IF BATTERY IS REPLACED WITH AN INCORRECT TYPE.
DISPOSE OF USED BATTERIES ACCORDING TO THE INSTRUCTIONS.
MUTE Button
BACK Button
OK◉, ∧/∨/</> Button
STILL Button
( Functions as the STILL button in
any mode other than DivX.)
BLANK Button
USB Button
Q.MENU Button
POWER Button
• Open the battery compartment cover on the back of the remote control.
• Insert the specified type of batteries with correct polarity, match “+” with “+”,
and match “-” with “-”.
• Install two 1.5V AAA batteries. Don’t mix used batteries with new batteries.
PAGE ∧/∨ Button
MARK Button

Names of parts
10
Ceiling mount for projector
Accessories
Optional Extras
* Contact your dealer to purchase these items.
* Optional parts can be changed without notice to improve the quality of the product, and new optional parts can be added.
▪ Use a remote control up to 6 m distance and 30° (left/right) within the
receiving unit scope.
▪ We recommend you to use the remote control under 3 m distance and
30° (left/right) when the cables are connected in the back outputs.
▪ When you carry the remote control in the portable bag, make sure that
the buttons on the remote control are not pressed by the projector,
cables, documents or any other accessories in the bag. Otherwise, it
may reduce the battery life significantly.
Remote Control AAA Battery Owner’s manual CD Owner’s manual
Power Cord Computer Cable AC-DC Adapter RGB to Component Cable
Portable bag Polishing Cloth
Projection Screen Tripod HDMI Cable
Video Cable Audio Cable Component Cable
30° 30°
Other manuals for HX300G
2
This manual suits for next models
1
Table of contents
Other LG Projector manuals

LG
LG CF181D Instruction Manual

LG
LG ProBeam BU70QGA User manual

LG
LG AJ-LAH1 User manual

LG
LG ProBeam BF50RG User manual

LG
LG CineBeam Al ThinQ HU810PW User manual

LG
LG BS254 User manual

LG
LG 1024X768 XGA User manual

LG
LG CineBeam Laser User manual

LG
LG CineBeam PH450UG User manual

LG
LG DX540 - XGA DLP Projector User manual