
Leica Digilux 3 Firmware update

Installation instructions for the firmware 2.0 for the
LEICA DIGILUX 3
Dear Customers,
By installing the firmware you can enhance the LEICA DIGILUX 3’s operation, and often, ensure compatibility
with newly marketed accessories.
Update Contents
Model Number DIGILUX 3
Update Version 2.0
Update File Name/
Size
For Windows: DL3_200.exe / 1.43 MB or 1.509.276 Bytes
(After self-extract, DL3___200.bin)
For Macintosh: DL3_200.zip / 1.38 MB or 1.455.464 Bytes
(After extract, DL3___200.bin)
Improvements
Date/Version Description of changes
2007/6/15
Version 2.0
1. Addition of a multiple exposure function.
2. Addition of a "panning mode"(MODE3) to the optical image stabilizer.
3. Addition of a "low-angle" viewing mode that makes it easier to view the LCD
display when the camera is held below eye level.
4. Addition of a feature that simplifies setting the aperture when using a lens
without an aperture ring.
5. Addition of two manual white balance settings to GUI. GUI design uses
navigational cursor to easily select and set white balance (WB) to change the
color temperature, or set the ISO sensitivity or flash mode.
The time restriction for making changes was removed.
6. Addition of a "HOLD" option to Auto Review mode, enabling continuous
viewing.
7. Addition of a feature to playback mode. It is now possible to select the
preceding or the next images while the image is still enlarged (zoom
function).
8. Addition of the [AUTO] option for setting the ISO sensitivity in the aperture-
[A] and shutter speed-priority [S] modes.
9. Addition of a GUI option to easily check the firmware version.
10. Improvement of the performance of the AE (Auto Exposure) and AWB (Auto
White Balance) functions.
11. It is now possible to continue shooting while RAW photo data is being saved.
12. Improvement of the focusing performance when shooting low-contrast
subjects.
13. Improvement of the white balance (WB), i.e. color rendition when shooting
situations with high- or low-color-temperature lighting.
14. Improvement of the precision of the AE (Auto Exposure) function when using
faster than F2.0 lenses.
15. The A (aperture priority) mode is now also available when e.g. Leica R lenses
are being used with the Leica R/D lens adapter.
Instruction manual for LEICA DIGILUX 3 Firmware Update 2.0
Leica Camera AG / Page 1 of 6 / As at June 2007
Firmware Update Procedures (Overview)
•STEP 1: Check the current version of firmware used by your camera.
•STEP 2: Download an updated version of the firmware and double click the downloaded file to decompress it.
•STEP 3: Copy the firmware file onto an SD / SDHC card.
•STEP 4: Install the firmware update.
IMPORTANT
Please do not turn off your camera, or do not remove the memory card while updating your camera's firmware.
DOING SO CAN CAUSE SERIOUS DAMAGE TO YOUR CAMERA.
If the camera malfunctions after the firmware updating, please contact your Leica dealer or your local Leica
distributor (for addresses, see camera Warranty Card).
Actual Procedure
STEP 1:
Confirming the current firmware version.
Leica recommends that you update the firmware in your
camera if either of the following conditions exists:
A: If the firmware version is not displayed on the LCD using
the following procedure.
B: If the firmware version indicated is older than the version
being offered.
The firmware updating is not necessary if the firmware version
on your camera is newer than listed on this service.
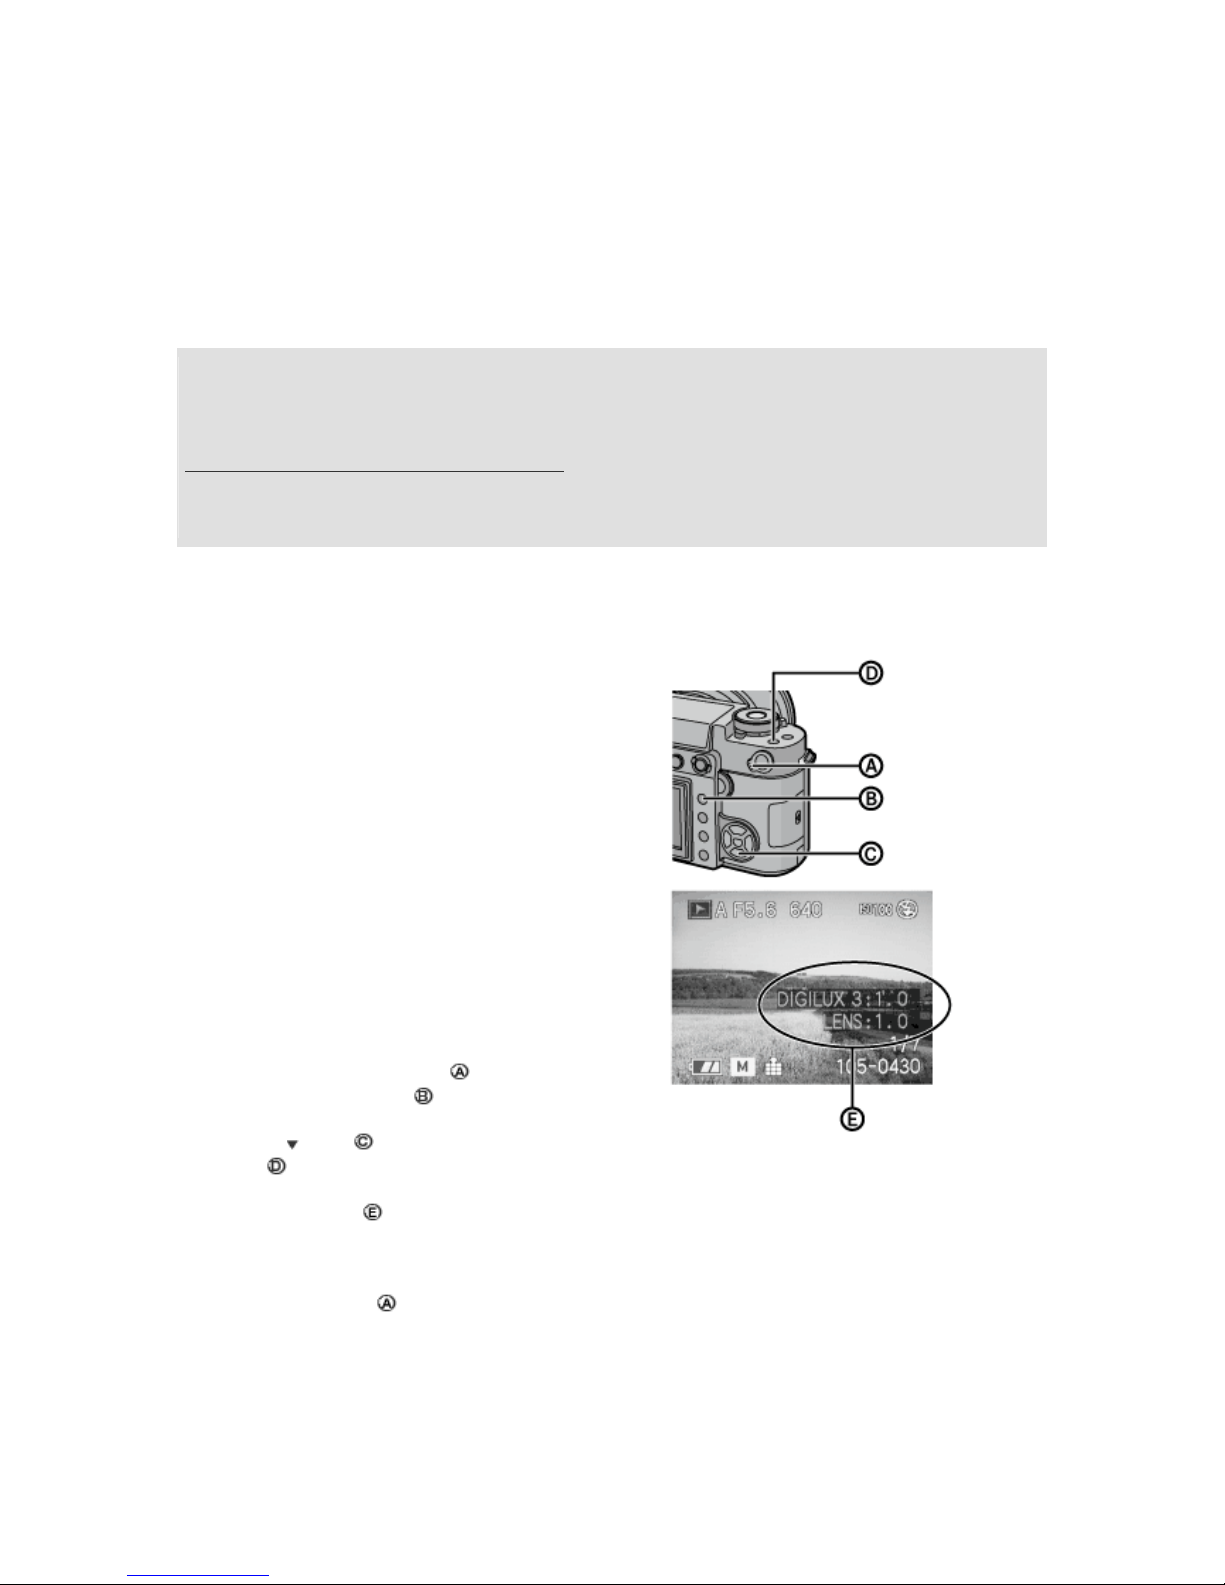
1. Attach a lens to the camera body and then insert an SD or
SDHC memory card.
2. Set the camera’s power switch to ON.
3. Press the playback button to set the camera to playback
mode.
4. Press the button , while holding down the [FUNC.2]
button .
The screen shows ( )
DIGILUX 3:1.0-----Camera body Firmware version
LENS:1.0------------Lens Firmware version
5. Set the power switch to OFF, after checking this.
Leica Camera AG / Page 2 of 6 / As at June 2007

STEP 2.
Downloading the updated version of the firmware, downloading the file, and self-
extracting it.
For Windows
1. Make a temporary folder on your PC for downloading the file, e.g. C:/Temp.
2. Download and save the firmware in the folder you made in the above step.
DL3_200.exe
3. Double click the downloaded file
You may see following message after double clicking the downloaded file, please ignore it and just click
Run and move to the next step.
4. The self-extracted file DL3_200.bin will appear.
The file size should be 4.665.412 Bytes (approx. 4.45 MB). If the file size is not the same, please
download and double click the file again. The file size can be checked by right-clicking on the file and
selecting Properties.
For Macintosh
1. Make a temporary folder on your PC for downloading the file.
2. Download and save the firmware in the folder you made in the above step.
DL3_200.zip
DOWNLOAD
DOWNLOAD
Leica Camera AG / Page 3 of 6 / As at June 2007

3. Extract downloaded file
- Depending on your Macintosh setting the file may be extracted automatically.
- If your OS is older than Mac OS X 1.02, Please use Extract software, if your Macintosh OS is newer
than Mac OS X 1.03, double click the file, DL3_200.zip.
4. The extracted file DL3_200.bin should be 4.665.412 Bytes (approx. 4.45 MB), if the file size is not the
same, please download and double click the file again.
The file size can be checked by File in Finder, then see information.
STEP 3.
Copying the firmware file onto an SD / SDHC memory card. Preparing a memory
card with the extracted file from STEP 2 above.
Preparation of the card
•Use an SD / SDHC card formatted in the LEICA DIGILUX 3.
•8 MB or more must be free on the memory card.
•For information on formatting the memory card, please refer to the relevant section in the camera’s
instructions.
Copying the downloaded file onto the card
1. Connect your LEICA DIGILUX 3 and your PC with the USB cord and set the camera to PC mode by
selecting the option in the menu.
Press the Menu button to enter USB mode.
Press the Up button and then press Menu again.
2. Copy the file into the Root directory* of the memory card.
3. When copying is finished, unplug the USB cable to release the PC from USB Mode (the Windows
Explorer will show below when copy process is completed; Windows XP and the screen may differ
depending on the setting).
4. Turn off the camera by pressing the power switch.
* Root directory = The first or top-most directory in the hierarchy.
Files can be copied directly from the PC by using SD / SDHC card reader/writer devices with the USB
port. Format the memory card with the LEICA DIGILUX 3 in such cases.
Note
When formatting the memory card, all data, including protected data, will be erased and can not be
recovered. Please make sure not to lose your important data, i.e. to save it to other storage devices such
as your PC’s hard disc.
Leica Camera AG / Page 4 of 6 / As at June 2007

STEP 4.
Carrying out of the update
1. Make sure to turn off the camera’s power switch.
2. Connect the AC adaptor's power cord to a mains outlet.
3. Using the DC cord, connect the DC output on the adaptor with the DC input terminal on the LEICA
DIGILUX 3.
4. Insert the memory card prepared as described in STEP 3 into the camera.
5. Turn on the camera’s power switch.
6. Press the Play button to enter the Play mode.
7. After the message of "PLEASE WAIT ..." is displayed, the following display will continuously be shown on
the LCD (Fig.1).
Version number varies according
to the updated firmware used.
Note
If a newer version than the downloaded firmware is already installed in the LEICA DIGILUX 3, the
firmware update process will not start and the camera will display that no update file can be found.
Please turn off your camera in such a case.
Leica Camera AG / Page 5 of 6 / As at June 2007

8. Press the Up button to select Yes.
9. Press the Menu/Set button. The update process will start and the screen will change.
The firmware update will take about 2 to 3 minutes.
The green bar extends further to the
right as the process progresses.
Note
Please do not attempt the following operations before the next step (10) is completed.
•Turning the power off and on
•Opening the memory card compartment
•Removing the memory card
•Removing the lens
•Removing the AC adaptor cord
•Removing the DC cable
10. Once the firmware update process is completed, the LEICA DIGILUX 3 will turn the power off and back
on. After that, it will be in the initial mode automatically.
11. To verify the version number, follow Step1 at the beginning, the camera body version number
indicates 2.0, the process is completed.
12. Turn the camera off with power switch.
13. Remove the memory card.
About the memory card after it has been used for a firmware update.
Please format the memory card used for a firmware update before taking photos again, otherwise it may
cause the LEICA DIGILUX 3 to malfunction and/or the number of pictures that can be saved on the
memory card may decrease.
Leica Camera AG / Page 6 of 6 / As at June 2007
Other manuals for Digilux 3
4
Table of contents
Other Leica Digital Camera manuals


