Legacy ProLine Series User manual

PL1145
Operating Instructions
ProLine Series


About Topaz3
Topaz3 is the exclusive supplier of Maxon®, Legacy and
TruTalk brand communication products.
Our product line ranges from FCC licensed two-way
radios suitable for Business and Industry (B&I) markets
like farm, government, law enforcement, utility, etc. to
consumer recreational and light-duty business markets.
Product offerings include a variety of UHF and VHF
handheld and mobile radios, repeaters and RF link
modules as well as FRS (Family Radio Service), GMRS
(General Mobile Radio Service) radios, Citizen’s Band
radios and weather monitors.
Available accessory items include: a variety of carrying
cases, spare batteries, desktop and mobile chargers,
ear bud speaker microphones, and more for each radio
model.
For additional information on our product line, visit our
website:
www.topaz3.com

Table of Contents / Contenido
I. FCC RF Exposure Compliance Requirements -
for Occupational Use Only...............1
I.
Requerimientos de Obediencia a la
Exposición de RF del FCC - para uso
Ocupacional Solamente ............................46
II. Unpacking and Checking Equipment.....3
II. Desempaque y Verificación del Equipo...........27
III. Getting Started.......................................4
III. Preparación.....................................................28
Charging the NiMH Battery Pack............4
Cargador de la Batería de NiMH.....................28
Attaching and Removing the Battery Pack.6
Instalación y Retiro de la Batería.....................30
Installing the Antenna...........................7
Instalación de la Antena................................31
Installing the Belt Clip...........................7
Instalación del Clip de Cinturón.....................31
Installing the Speaker Mic. Jack Cover......7
Instalación de la Cubierta de la Clavija
de Conexión de Micrófono del Altavoz...........32
Attaching the Optional Speaker Mic........8
Agregando el Micrófono de Altavoz Opcional ...32
IV. Control Buttons / Operation Features.....9
IV. Botones de Control del Radio / Rasgos
de Funcionamiento....................................33
V. Radio Operation....................................10
V. Funcionamiento del Radio..............................34
Power On / Transmit.............................10
Encienda / Transmite......................................34
VI. Channel Frequency Selection.................11
VI. Selección de Frecuencia de Canales................35

VII. CTCSS Tone Signaling............................13
VII. Señal de Tonos de CTCSS................................38
VIII. CTCSS Tone Setup.................................14
VIII. Arreglo de Tonos de CTCSS
..............................
39
IX. Channel Setting Confirmation...............17
IX. Confirmación de la Configuración
de Canales..................................................43
Frequency Confirmation......................17
Confirmación de la Frecuencia........................43
CTCSS Tone Confirmation....................18
Confirmación de Tonos de CTCSS.....................43
X. Radio Functions....................................19
X. Funciones del Radio........................................44
Time-Out-Timer (T-O-T).......................19
Temporizador de Tiempo Límite (T-O-T)............44
Battery Save.......................................19
Preservación de Batería..................................45
Low Battery Warning...........................19
Aviso de Batería Baja.....................................45
XI. Licensing, Safety and Service Information..20
XI. Información de Autorización y Servicio...........47
FCC Licensing....................................20
Licencia de la FCC........................................47
Safety Information...............................20
Información de Seguridad..............................47
Service..............................................21
Servicio.......................................................48
XII. Maintenance.........................................21
XII. Mantenimiento................................................49
XIII. Software Copyrights...............................22
XIII. Derechos de Propiedad Literaria del Software...50
XIV. Topaz3 / Legacy Product Warranty.........23
XIV. Garantía del Producto de Topaz3 / Legacy.........51

I. FCC RF Exposure Compliance Requirements -
for Occupational Use Only
The Federal Communications Commission (FCC), with
its action in General Docket 93-62, November 7, 1997,
has adopted a safety standard for human exposure to
Radio Frequency (RF) electromagnetic energy emitted
by FCC regulated equipment. Topaz3 / Legacy subscribes
to the same safety standard for the use of its products.
Proper operation of this radio will result in user
exposure far below the Occupational Safety and Health
Act (OSHA)and Federal Communications Commission
limits.
CAUTION - DO NOT transmit for more than 50% of total
radio use time (50% duty cycle). Transmitting
more than 50% of the time can cause FCC
RF exposure compliance requirements to be
exceeded.
•This radio is NOT approved for use by the general
population in an uncontrolled environment. This radio
is restricted to occupational use, work related operations
only where radio operator must have the knowledge to
control its RF exposure conditions.
•The radio is transmitting when the red LED on the
front of the radio is illuminated. You can cause the radio
to transmit by pressing the P-T-T bar on the radio.
•When transmitting, hold the radio in a vertical position
with its microphone 1 to 2 inches (2.5 to 5 cm) away
from your mouth. Keep the antenna at least 1 inch
(2.5 cm) from your head and body.
1

I. FCC RF Exposure Compliance Requirements -
for Occupational Use Only, continued
•ALWAYS use Maxon, Legacy and TruTalk authorized
accessories: antennas, batteries, belt clips, speaker
mics, etc.
•Failure to observe these restrictions will result in
exceeding the FCC RF exposure limits.
2
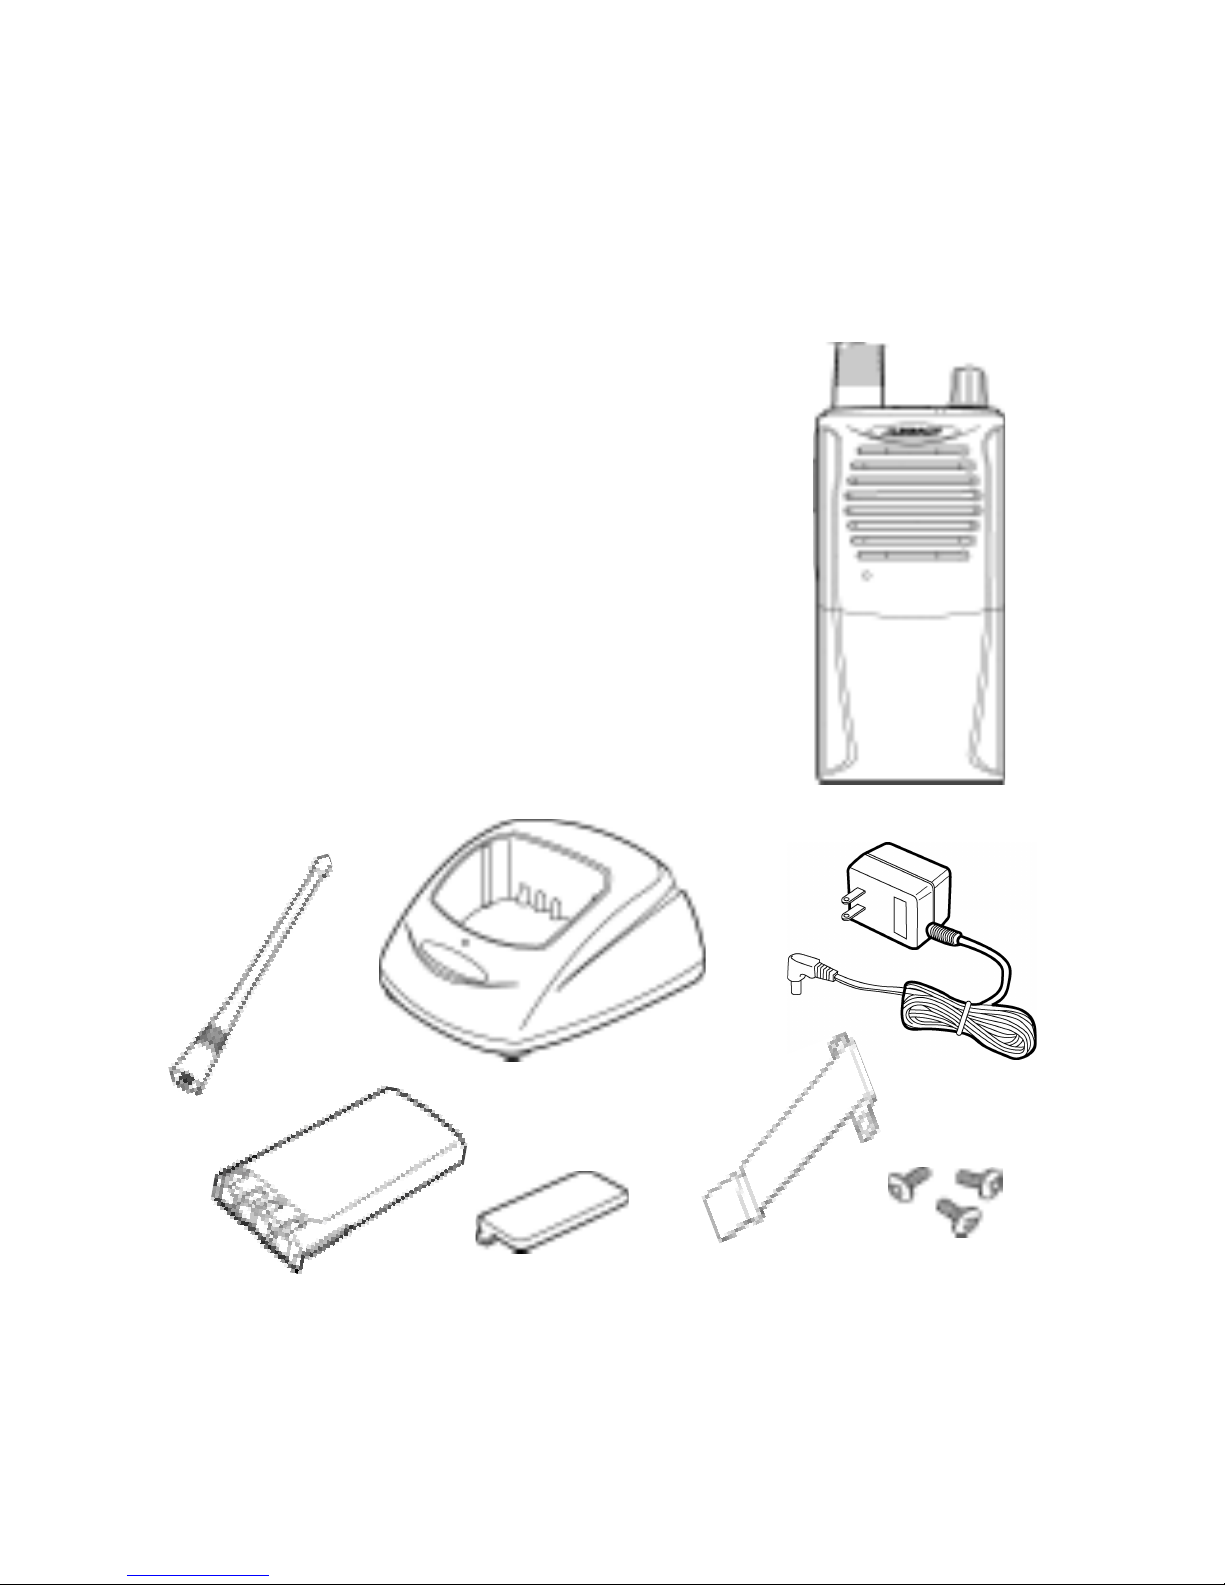
II. Unpacking and Checking Equipment
Carefully unpack the radio and its accessories. Use
the item list below to identify the components included
in the product packaging, to ensure that no items are
discarded in the packing materials.
Radio Body
Antenna
Battery Charger (with plastic spacer)
AC Adapter
NiMH Battery Pack
Speaker Microphone Jack Cover
Belt Clip
Screw Set
Operating Instructions
If any items are missing or damaged, you should
contact the Topaz3 Customer Service Department.
Dial 1-800-821-7848, Ext. 499 for assistance.
3

III. Getting Started
Charging the NiMH Battery Pack
You will need to charge the battery pack fully before
initial use. For best results from your charging cycle,
follow these tips:
•Ensure the ambient temperature is between 41 and
104 °F (5 and 40°C) while charging. Temperatures
outside this range may not fully charge the battery.
• Always switch OFF the transceiver equipped with
a NiMH battery pack before charging. Using the
radio during the charging cycle will hinder correct
charging.
• Do not recharge the battery pack if it is already
fully charged. Doing so may cause the life of the
battery pack to shorten or the battery pack may
be damaged.
• If the battery is stored for 2 months or more, it is a
good idea to complete the charge / discharge cycle
two or three times to allow the battery capacity
to return to normal.
• Never dispose of the battery in fire - it can explode
causing personal injury.
• Never attempt to disassemble the battery or remove
its case material or charging contacts. Do not short
the battery terminals.
4

III. Getting Started, continued
Charging the NiMH Battery Pack, continued
NOTE: The first few uses from the battery will not be
at “normal” capacity. After repeating the charge / dis-
charge cycle two or three times, the battery capacity
will increase to provide full capacity.
1. Plug the AC adapter cable in the adapter jack
located on the rear of the charger, then into
an AC outlet.
2. Slide the NiMH battery pack (or the radio equipped
with a NiMH battery pack) into the charging slot.
3. Ensure that the metal contacts on the battery pack
come in contact with the charging terminals.
4. When charging the NiMH battery pack alone, insert
the provided plastic spacer into the charging well,
then insert the battery pack.
5. The charger LED will light to advise that charging
has begun. Charge the standard battery pack for
9 hours, THEN REMOVE THE PACK OR RADIO
FROM THE CHARGER.
IMPORTANT NOTE:
The charger DOES NOT TURN OFF AUTO-
MATICALLY after the charging cycle has been
completed. You will need to unplug the AC
adaptor from the outlet.
5
Other manuals for ProLine Series
2
This manual suits for next models
1
Table of contents
Other Legacy Two-way Radio manuals


