
Kohler AC Power User manual


Thank You for Choosing KOHLER
Need help? Contact our Customer Care Center.
USA/Canada: 1-800-4KOHLER (1-800-456-4537)
Mexico: 001-800-456-4537
For service parts information, visit kohler.com/serviceparts.
For care and cleaning information, visit kohler.com/clean.
Warranty
This product is covered under the KOHLER® Electronic Faucets, Valves, and
Controls Five-Year Limited Warranty, found at kohler.com/warranty.
For a hardcopy of warranty terms, contact the Customer Care Center.
1419479-2-A2 Kohler Co.

Tools and Materials
Before You Begin
WARNING: When using electrical products, basic precautions should
always be followed, including the following:
DANGER: Risk of electric shock. Connect only to a circuit protected by a
Ground-Fault Circuit-Interrupter (GFCI)*.
*Outside North America, this may be known as a Residual Current Device (RCD).
WARNING: Risk of electric shock. Grounding is required. A qualied
electrician should make all electrical connections.
WARNING: Risk of electric shock. Disconnect the power before servicing.
WARNING: Risk of injury or property damage. Read all instructions
thoroughly before beginning installation.
CAUTION: Risk of product damage. This product contains sensitive
electronic components. Do not store open containers of chemical or cleaning
products near this product.
Kohler Co. 3 1419479-2-A
Sealant 1" to 1-1/4" Hole Bit
1/4"
Plus:
• Foaming Hand Soap (1 cP – 100 cP)
•Single AC Supply SKU 13480-NA
•Multi-Outlet AC Supply SKU 13481-NA

IMPORTANT! Your product may appear dierent than illustrated. The installation
procedure is the same. Consult the specication sheet for rough-in dimensions for
your model requirements.
Provide a constant unswitched 120 VAC electrical outlet located below the sink
within 5’ (1.5 m) of the control box.
Follow all local plumbing and electrical codes.
Soap Requirements
CAUTION: Risk of product damage. The foaming hand soap must have a
dynamic viscosity rating between 1 centipoise – 100 centipoise (cP) measured
in cP or grams/cm-s units. Soaps with a dynamic viscosity greater than 100 cP
can cause premature wear and damage to the soap dispenser components and
may void the product warranty.
CAUTION: Risk of property damage. Only use liquid foaming hand soap
that contains no suspended particles or microbeads. Do not use non-foaming
liquid hand soaps, which typically have a dynamic viscosity rating of 1000 cP
– 3500 cP.
CAUTION: Risk of product damage. Do not use alcohol-based soap and/or
soaps with alcohol.
NOTE: Kohler foaming hand soaps are precisely formulated to work with this
product and have a dynamic viscosity rating of 1 cP – 20 cP.
NOTE: See kohler.com for more information on recommended foaming hand soaps.
Precise information on soap material properties and dynamic viscosity rating can be
found on the soap manufacturers published material safety data sheets.
1419479-2-A4 Kohler Co.

Roughing-in
Floor
4"
(102 mm) Min
Mounting Surface
14-1/2"
(368 mm)
11-1/2" (292 mm) Min
12-1/2" (318 mm) Max
5" (378 mm) Min
Kohler Co. 5 1419479-2-A

1. Install the Spout
Nut
Tubes Sensor
Threaded
Stud Metal
Washer
Rubber
Gasket
Spout
1" (25 mm) Min -
1-1/2" (38 mm) Max
2-1/2"
(64 mm) Min
A 1" (25 mm) minimum to 1-1/4" (32 mm) maximum diameter mounting hole is
required.
Determine the mounting-hole location.
NOTE: The mounting hardware provided is for a standard deck thickness of 1/4” (6
mm) minimum to 2” (51 mm) maximum. For a deep rough-in installation where deck
thickness is 2” (51 mm) minimum to 4-1/2” (114 mm) maximum, order the deep
rough-in kit from kohler.com/serviceparts.
A 2-1/2" (64 mm) minimum distance is required between the nished wall and the
center of the spout.
A 1" (25 mm) to minimum to 1-1/2″ (38 mm) maximum distance is required
between the sink edge and the center of the spout.
Drill a hole through the mounting surface according to the surface manufacturer’s
instructions.
Insert the spout with tubes and wires through the mounting hole.
From under the sink, slide the rubber gasket and metal washer onto the stud.
If desired, add sealant to the underside of the escutcheon as needed. Wipe away
any excess sealant.
Thread the nut onto the stud and wrench-tighten to secure the spout to the
mounting surface.
1419479-2-A6 Kohler Co.
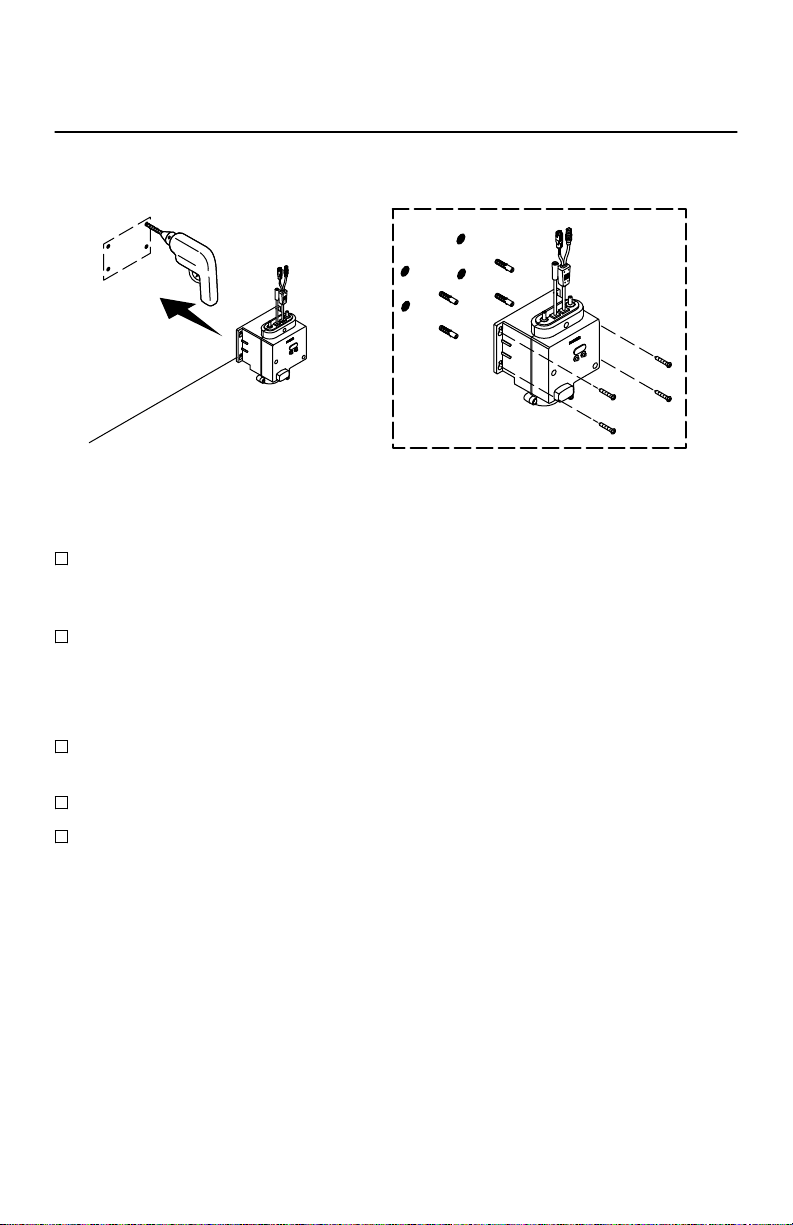
2. Install the Control Box
Position the control box 11-1/2" (292 mm) minimum to 12-1/2" (318 mm)
maximum below the deck. Check the Specication Sheet for the control box
location.
Mark the location of the mounting holes.
NOTE: The provided wall anchors are for concrete wall installation. Use the
appropriate wall anchors depending on your wall material.
Drill the holes per the anchor manufacturers instructions. If using the provided
wall anchors, drill 1/4” (6 mm) pilot holes.
Aach the control box to the wall as shown.
Secure with the four screws provided.
Kohler Co. 7 1419479-2-A

3. Install the AC Single Supply
5' (1.5 m)
AC Supply
IMPORTANT! Follow the correct power system installation based on your model.
For a multi-output AC supply power unit installation, refer to “Install AC Multi-
Output Supply.”
Connect the power cord from the control box to the power cord from the Single
AC Supply SKU 13480-NA. Maintain a drip loop when connecting.
Plug the AC supply into an unswitched 120 VAC electrical outlet.
Secure any excess wire under the deck.
1419479-2-A8 Kohler Co.

4. Install the AC Multi-Output Supply
Red
Black
AC Gang
Supply
AC Supply
Cable
IMPORTANT! Follow the correct power system installation based on your model.
For a single AC supply power unit installation, refer to Install the “AC Single
Supply.”
IMPORTANT! Installation must not exceed two soap dispensers and two faucets on a
multi-outlet supply.
Mount the AC supply under the deck using the two screws provided. Orient as
shown.
Remove the cover.
Connect the faucet wire to the faucet. Maintain a drip loop when connecting.
If needed, cut and strip the AC supply wires to length.
Connect the stripped ends to the boom terminal block in the supply box.
Secure the terminal box cover to the terminal box.
NOTE: AC supply cables are available in lengths of 4' (1.2 m), 6' (1.8 m), 8' (2.4 m), 10'
(3 m) and 12' (3.6 m).
Connect the power cord from the control box to the power cord from the Multi-
outlet AC Power Supply SKU 13481-NA. Maintain a drip loop when connecting.
Kohler Co. 9 1419479-2-A

Plug the AC supply into an unswitched 120 VAC electrical outlet.
Secure any excess wire under the deck.
1419479-2-A10 Kohler Co.
Table of contents
Languages:
Other Kohler Bathroom Aid manuals


Popular Bathroom Aid manuals by other brands

Pressalit Care
Pressalit Care R2040 Assembly instruction

Invacare
Invacare 9630E Styxo Assembly, installation and operating instructions

Leckey
Leckey firefly splashy BIG user manual

NRS Healthcare
NRS Healthcare H85350 User instructions

WENKO
WENKO 23285100 Assembly instructions

Dietz SmartCare
Dietz SmartCare TAYO operating instructions


