Kogan SMARTERHOME KASMARTBLIB User manual

KOGAN SMARTERHOME™
SMART BLINDS DRIVER
KASMARTBLIB

2
Installation 3
Configuration 6
Connect to SmarterHome™ App 8
Using SmarterHome™ App 11
Google Home Control 13
Amazon Alexa Control 16
Specifications 19
3
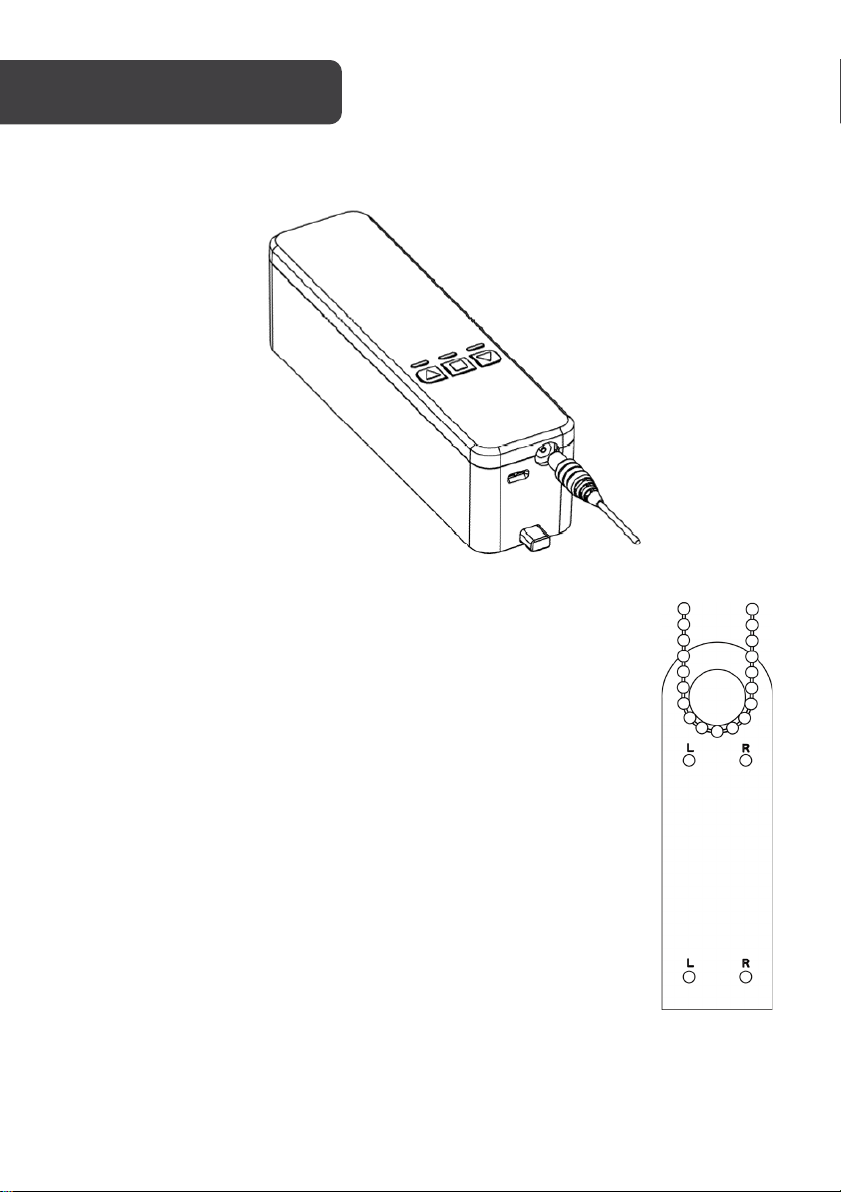
Power on the device
Connect the power adaptor with a wall outlet, then connect the power cable to the device.
Installing mounting bracket
Pull down on the blind adjustment chain, ensuring it is taut and without
slack. Hang the supplied installation card on the bottom of the chain,
keeping the chain held tight. According to the chain position, mark the
two “L” or “R” holes on your wall.
To identify Left or Right usage:
While standing and facing the blinds, if the chain/rope is on your left
hand side, refer to “L”.
If the chain/rope is on your right hand side, refer to “R”.
INSTALLATION
4
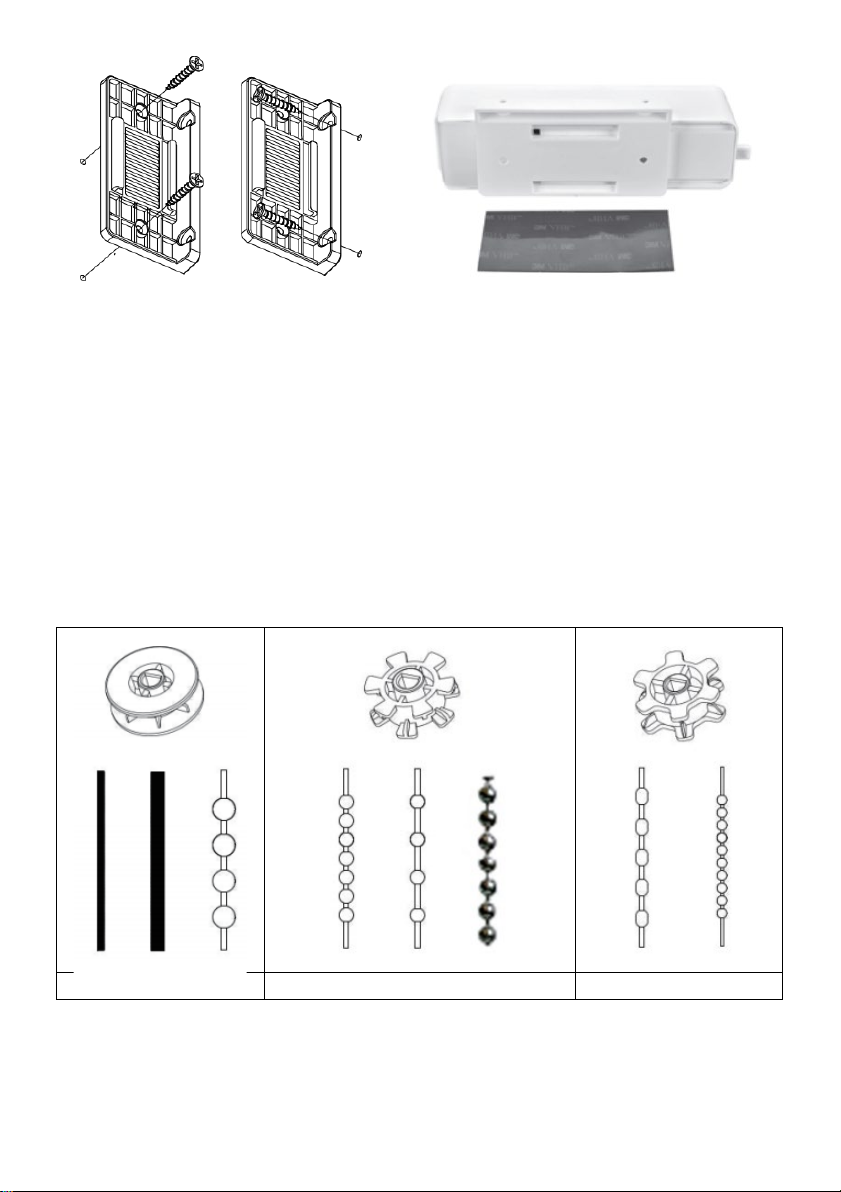
Installation mode 1 (permanent)
For permanent installation, mark the two
holes for either “L” or “R” installation with
the card. Replace the card with the
mounting bracket, and screw into place.
The mounting bracket can be installed this
way either by its side or flat.
Installation mode 2 (no holes, removable)
For a removable installation, use supplied
3M adhesive to fix to wall. It is
recommended to leave the mounting
bracket to set on the wall for at least 12
hours before applying the full weight of the
attached device.
Fitting blind adjustment chain to device
Open the device backing by pushing gently inwards to release.
Determine the suitable gear from the below diagram, and attach this to the device.
Fix the blind adjustment chain to the gear, and close the device backing.
2mm 4mm 6mm
4.5x6mm 4.5x12mm metal chain
beaded chain 3.2mm
5
Please note that if the incorrect gear is selected, the chain will be noisy during operation.
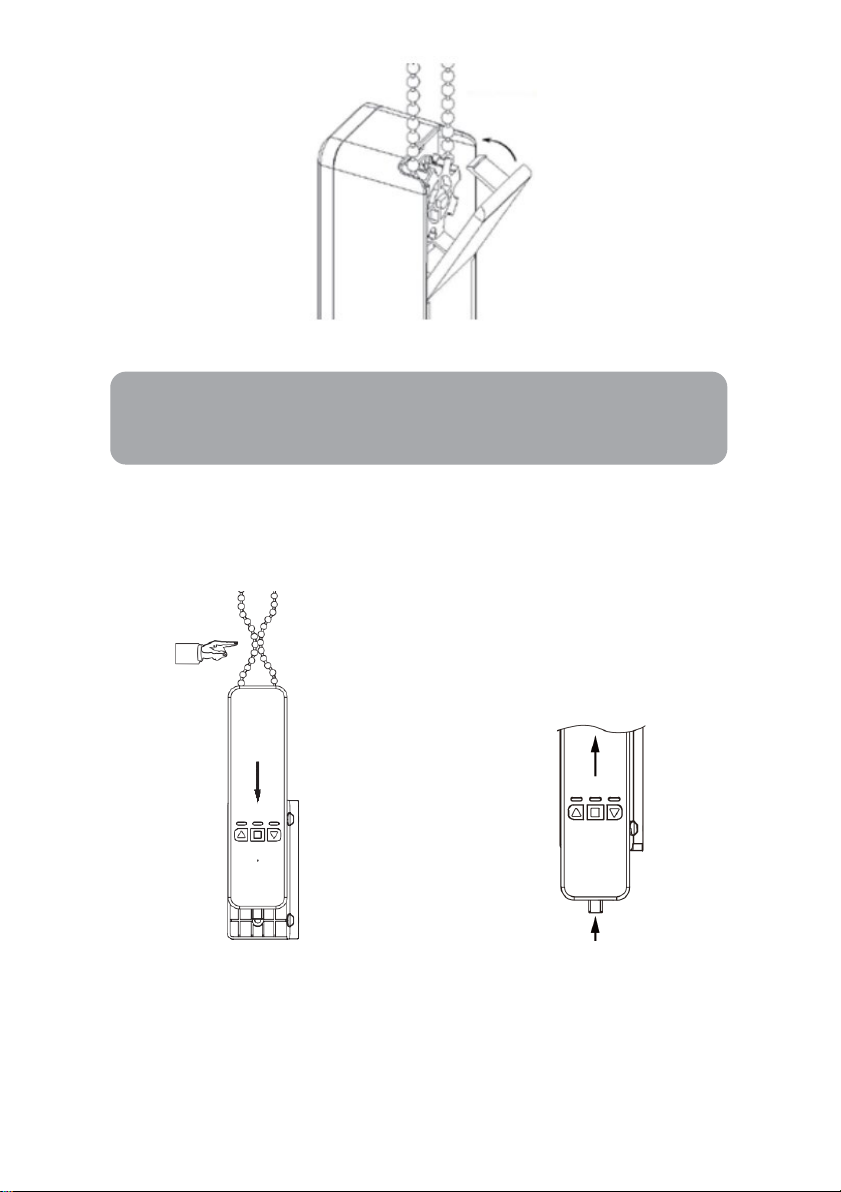
Attaching device to mounting bracket
Once the mounting bracket is installed, simply attach the device to the bracket via the two
grooves on the rear of the device, and slide down until it locks into place. Ensure the chain is
reasonably tight, with no slack.
Slide down until it locks into place,
ensure the chain is taut.
Release button
To remove the device from the mounting bracket, simply press in on the Release Button.
Push up from beneath, sliding up along the groove, open up back board and remove chain.
Note:
This device is suited only for blinds with a looped adjustment chain, and
not suited for blinds with free-hanging cords or an adjustment wand/rod.
6
Running direction
With the chain placed on the motor, check if the running direction matches that of the
blinds. If not, there are two methods for changing the running direction.
A: Press and hold “Up” button for six seconds, until the blue light begins to flash. This
reverses the blind running direction.
B: After connection with the app is complete, you can change device motor direction by
selecting ‘Motor direction’ from the ‘More’ submenu. You will then need to reset the device
limit, as the difference in direction will change the limit.
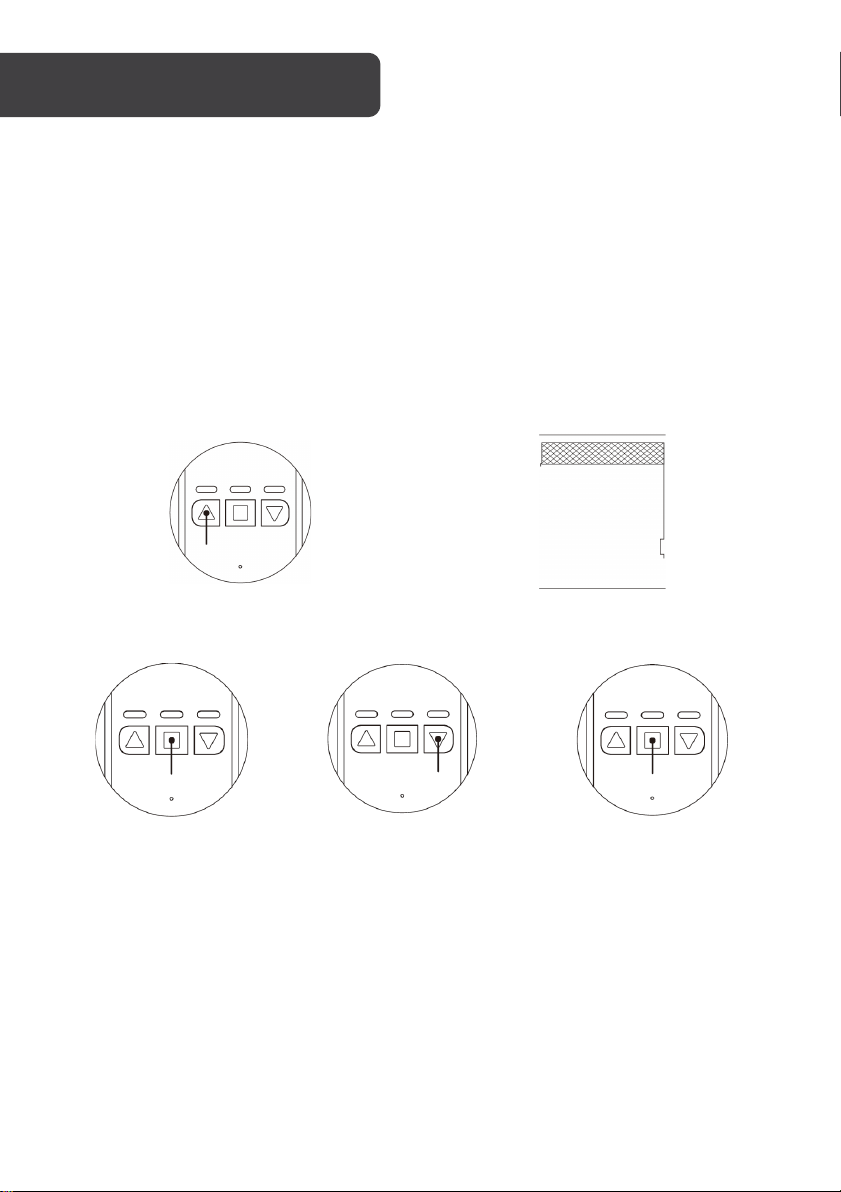
Set device limits
1.
Push the Up Arrow (left button) until
the shades open all the way.
2. Reach high limit position, push the
Stop Button.
3. Push and hold the
Stop Button until the
red light flashes
(about 5 seconds).
4. Once the red light
flashes push the
Down Arrow until the
shades close.
5. Hit the Stop Button when
they are completely
closed. The device will
wait few seconds and
then flash.
Now the blinds motor will automatically stop at the pre-set upper and lower limits. If the
range changes, please reset the device.
CONFIGURATION

7
Pairing with the remote
Device not only pairs with the mobile, but also with the remote.
Push and hold Stop
(middle button) until the red
light flashes
(about 5 seconds).
Once it starts flashing, push
either the up or down
button on the remote.
Pairing is successful when
up and down lights on the
blind motor are flashing.
A holder for the remote control is included, which can be secured to the wall if desired.
Factory Reset
To reset the device, push the Up Arrow (left button) & Down Arrow (right button) for about 8
seconds until it flashes the lights.
8
Install App
Download the “Kogan SmarterHome” app from the Play Store (Android) or App Store (iOS).
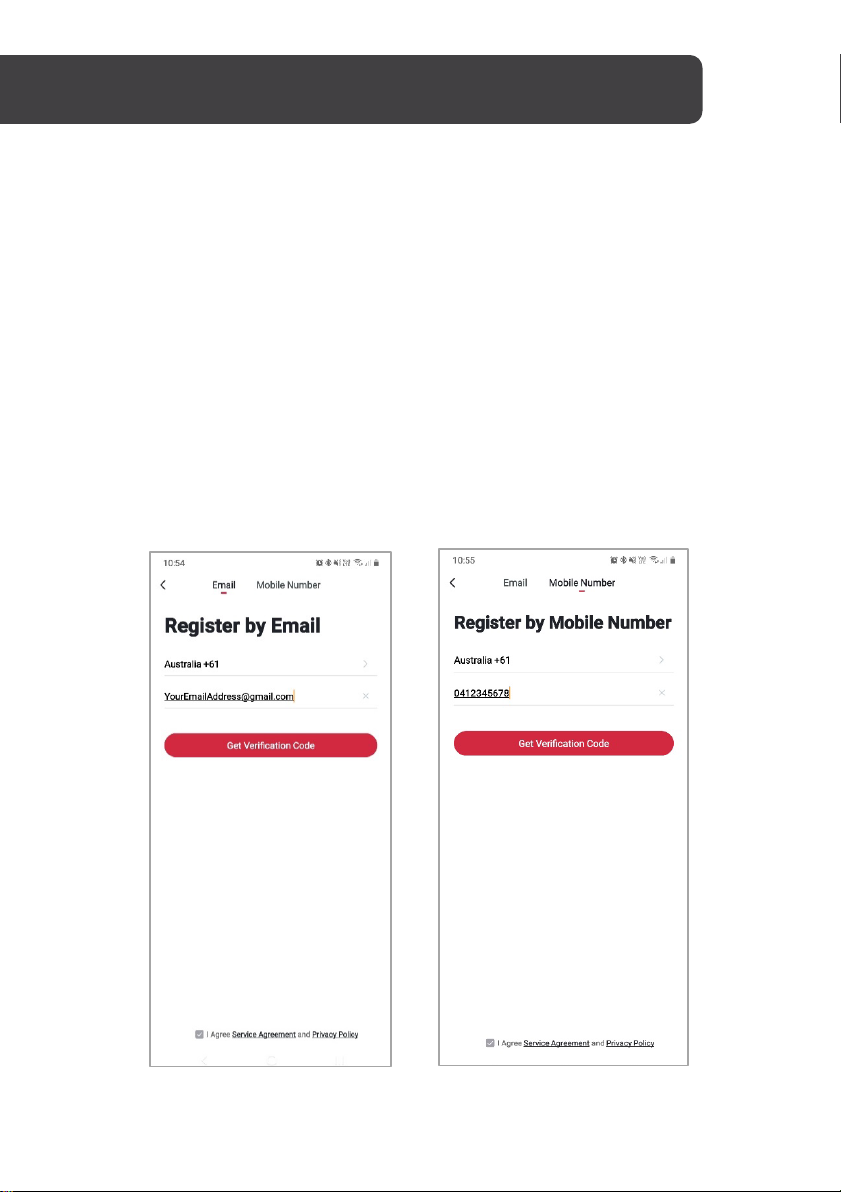
Register
If you do not have a Kogan SmarterHome™ account, register or sign in with a verification
code sent by SMS.
To register:
1. Tap to enter registration page.
2. The system automatically recognises your country/area. You can also select your
country code manually. Enter your email address and tap ‘Next.’
3. Alternatively, you can select ‘Register by mobile number’ and enter the verification
code sent to you by SMS.
4. Create a profile on the next page to define your location and room.
CONNECT TO SMARTERHOME™ APP
9
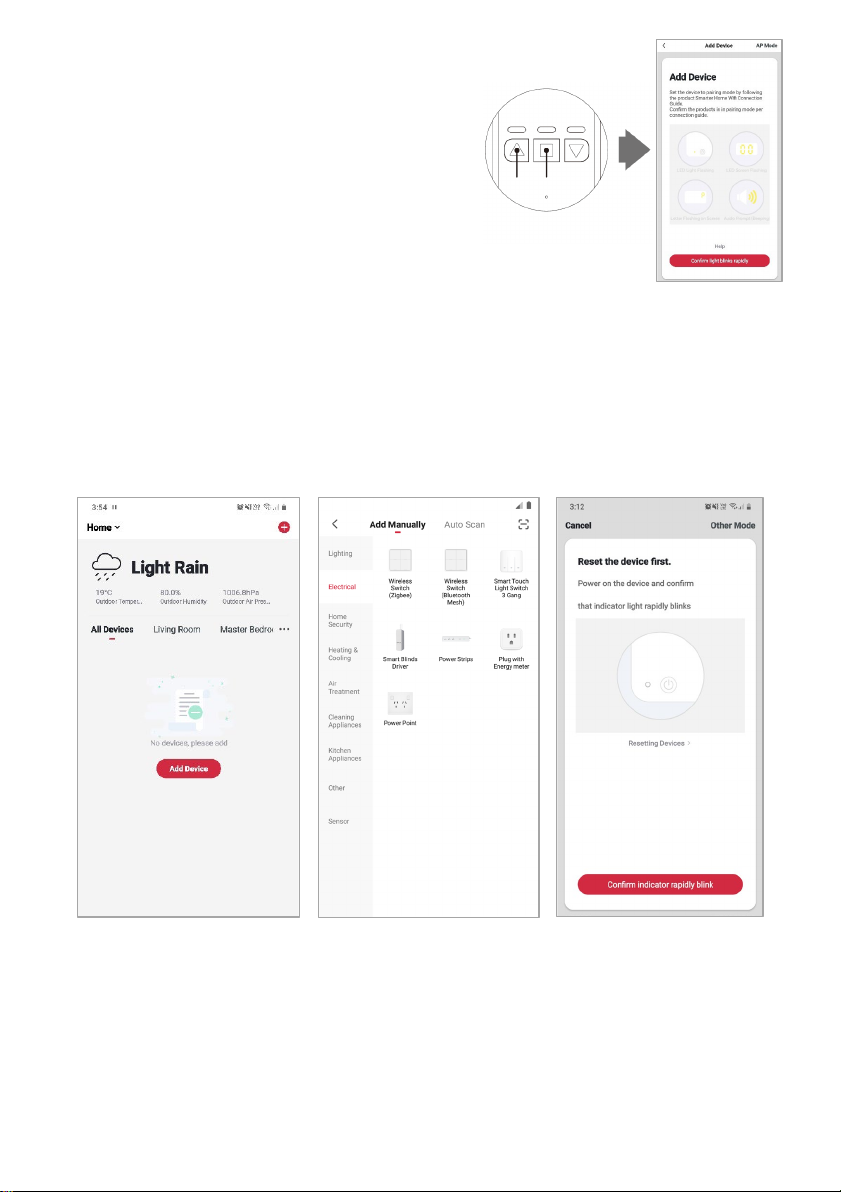
Set device in pairing mode
When the device is first turned on, it may automatically
enter pairing mode (the Up arrow will be continuously
flashing).
If not automatically in pairing mode when powered on, you can
manually set the device in pairing mode by holding the ‘Up’ arrow
(left button) and Stop Button (middle button)
simultaneously until the ‘Up’ arrow begins flashing in blue.
Add device through network
5. Once registered, tap “+” in the upper right corner of the app’s home page to add a
new device through the network.
6. Select the product type from the list of options in the app (Electrical > Smart Blinds
Driver).
7. Ensure that the device is in pairing mode, with the example of indicator, and tap
“Confirm light is rapidly flashing”.
10
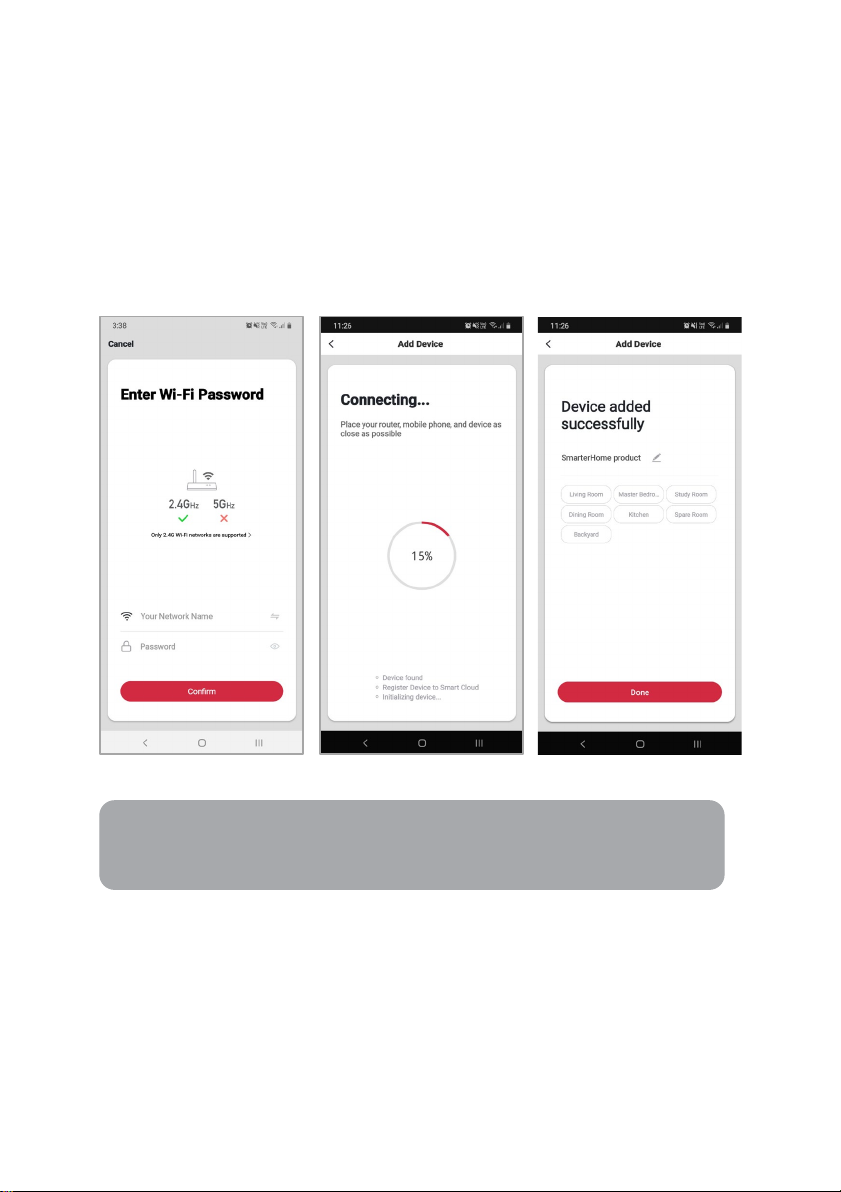
8. Upon successfully confirming pairing mode, enter your Wi-Fi details. It is important
that your SmarterHome™ device and the app are connected to the same Wi-Fi
network during setup.
9. The device will commence the pairing process and connect to the app. Ensure your
Wi-Fi router, mobile phone, and the SmarterHome™ device are kept close until
connection is complete.
10. After successfully being added, you will have the option to rename the device and
assign it to a location. It will now be listed on the app’s home page. Tap the device
listing to enter its control page.
Notes:
•The device and the app have to use the same Wi-Fi network.
•The device is only compatible with 2.4Ghz networks.
Table of contents
Popular Window Blind manuals by other brands


Current
Current E-WAND Installation manual and user's guide

weinor
weinor VertiTex ZipR Maintenance Instructions and Directions for use for the end user

Roto
Roto ZAR M R4/R7 Mounting instructions

SOMFY
SOMFY Movelite WT Series instructions

Acmeda
Acmeda RF400 Series instructions

Motura
Motura Pli_353/3 manual