
Kobian CyperPix S550V User manual

i
Table of Contents
1 Getting Started ...................................................................................... 1
Package Contents .................................................................................................. 1
System Requirements ............................................................................................ 2
Safety Information................................................................................................... 2
FCC Compliance and Advisory ............................................................................... 3
Camera Components .............................................................................................. 4
Front ............................................................................................................... 4
Rear................................................................................................................ 4
Top ................................................................................................................. 4
Side ................................................................................................................ 5
Using the Included Accessories .............................................................................. 5
Attaching the Wrist Strap ................................................................................ 5
Using the Soft Case ....................................................................................... 5
2 Preparing to Take Pictures ................................................................... 6
Installing the Batteries ............................................................................................ 6
Low Battery Indicator .............................................................................................. 7
Turning the Power On ............................................................................................. 7
Setting the Date and Time ...................................................................................... 8
Setting the Beep Sound.......................................................................................... 9
Auto Power Off Settings ......................................................................................... 9
TV Out Signal Set-Up ........................................................................................... 10
Setting the Language............................................................................................ 10
Using a Memory Card ........................................................................................... 11
Inserting an SD memory card....................................................................... 11
Removing an SD memory card .................................................................... 11
Setting the Camera Mode ..................................................................................... 12
Auto Photo Mode .........................................................................................12
Manual Photo Mode ..................................................................................... 12
Playback Mode............................................................................................. 12
Video Mode .................................................................................................. 12
Audio Recording Mode ................................................................................. 12
PC Cam Mode.............................................................................................. 12
3 Taking Pictures.................................................................................... 13
Previewing a Picture ............................................................................................. 13
Setting the LCD Display Mode.............................................................................. 13
Using the Zoom Feature ....................................................................................... 14
Using the Auto and Manual Photography Modes.................................................. 15
Using the Mode Dial ..................................................................................... 15
Taking Pictures .....................................................................................................16
Setting the Image Quality and Size....................................................................... 17
Adjusting the Exposure .........................................................................................18

ii
Setting the White Balance .................................................................................... 18
Setting the Flash ................................................................................................... 19
Using Macro Mode................................................................................................ 19
Setting the Self-Timer ........................................................................................... 20
Recording Video Clips.......................................................................................... 21
Recording Audio Clips........................................................................................... 21
Functions Available in Each Camera Mode .......................................................... 22
4 Reviewing Photos & Video and Audio Clips..................................... 23
Viewing Pictures and Listening to Audio ............................................................... 23
Viewing Pictures in Thumbnail Mode .................................................................... 24
Zooming the Displayed Image .............................................................................. 24
Erasing Files from Memory ................................................................................... 25
Deleting a Single File ................................................................................... 25
Deleting All Unprotected Files ...................................................................... 25
Protecting Photos and Video Clips....................................................................... 26
Removing Protection .................................................................................... 26
Using a Memory Card ........................................................................................... 27
Formatting Internal or SD Card Memory ............................................................... 27
5 File Names & Printing ......................................................................... 28
Folder Names ....................................................................................................... 28
File Names............................................................................................................ 29
DPOF Print Settings ............................................................................................. 29
Print Order Setting........................................................................................ 29
6 Making Connections ........................................................................... 30
Viewing Images on a TV ....................................................................................... 30
Selecting the Video Output Signal Mode .............................................................. 30
Downloading Images to a Computer..................................................................... 31
Using a Flash Memory Card Reader ............................................................ 31
Connecting the Camera to a Computer with a USB Cable .......................... 32
Understanding Camera Memory and Storage ...................................................... 33
Using the Camera in PC-Cam Mode .................................................................... 33
7 Installing Software .............................................................................. 34
Installing the Software Driver ................................................................................ 34
Installing MGI PhotoSuite 4 SE ............................................................................ 35
Using the MGI PhotoSuite 4 SE Application ......................................................... 36
8 Appendix .............................................................................................. 37
Indicator Lamp Status .......................................................................................... 37
Troubleshooting .................................................................................................... 38
Specifications........................................................................................................ 39

— 1 —
11
11
1Getting Started
USB
TV OUT
Software Installation
CD-ROM User Manual Quick Start Guide
Camera USB cable TV out cable
Soft case Strap 4 AAA batteries
Package Contents
Contact your dealer immediately if any of the items listed below are missing or
damaged.

— 2 —
Getting Started
System Requirements
Windows:
• PC with processor better than MMX Pentium 233 MHz
• Windows XP/2000/ME/98SE/98
• Minimum 32 MB RAM
• USB port
• CD-ROM drive
• 800x600 pixels, 16-bit color display compatible monitor
Specifications are subject to change without prior notice.
Safety Information
• Do not try to open the case of the camera or attempt to modify this cam-
era in any way. High-voltage internal components create the risk of elec-
tric shock when exposed. Maintenance and repairs should be carried out
by authorized service providers.
• Do not fire the flash too close to people or animal’s eyes, especially for
young children. Eye damage may be caused.
• Keep the camera away from water and other liquids. Do not use the cam-
era with wet hands. Never use the camera in the rain or snow. Moisture
creates the danger of fire and electric shock.
• Keep the camera and its accessories out of the reach of children and
animals to prevent accidents or damage to the camera.
• If you notice smoke or a strange odor coming from the camera, turn the
power off immediately and unplug the AC adapter from the power outlet.
Take the camera to the nearest authorized service center for repair. Never
attempt to repair the camera on your own.

Getting Started
— 3 —
FCC Compliance and Advisory
This device complies with Part 15 of the FF Rules. Operation is subject to the following
two conditions: 1.) this device may not cause harmful interference, and 2.) this device
must accept any interference received, including interference that may cause undesired
operation.
This equipment has been tested and found to comply with the limits for a Class B pe-
ripheral, pursuant to Part 15 of the FCC Rules. These limits are designed to provide
reasonable protection against harmful interference in a residential installation. This
equipment generates, uses, and can radiate radio frequency energy and, if not installed
and used in accordance with the instructions, may cause harmful interference to radio
communication. However, there is no guarantee that interference will not occur in a
particular installation. If this equipment does cause a harmful interference to radio or
television reception, which can be determined by turning the equipment off and on, the
user is encouraged to try to correct the interference by one or more of the following
measures.
• Reorient or relocate the receiving antenna.
• Increase the separation between the equipment and receiver.
• Connect the equipment to an outlet on a circuit different from that to which
the receiver is connected.
• Consult the dealer or an experienced radio/TV technician for help.
Any changes or modifications not expressly approved by the party responsible for com-
pliance could void the user’s authority to operate the equipment. Where shielded inter-
face cables have been provided with the product or specified additional components or
accessories elsewhere defined to be used with the installation of the product, they must
be used in order to ensure compliance with FCC regulation.

— 4 —
Getting Started
Camera Components
Front
Rear
Flash Viewfinder
Lens
Viewfinder
Operation lamp
Zoom in/Up button
Zoom out/Down button
DISP button
MENU/OK button
Battery cover
SHIFT/FLASH button
Self-timer/Stop/Left button
Macro/Pause/Right button
LCD screen
Speaker
Shutter button
Mode dial Power button
Top
Microphone
Self-timer lamp

Getting Started
— 5 —
Side
NOTE:
Don’t swing the camera
when carrying it by the
wrist strap.
Using the Included Accessories
Attaching the Wrist Strap
The illustration shows how to
attach the wrist strap to your
camera.
Using the Soft Case
• Store the camera in the included
soft case when not in use.
• Slide the camera in the case with
the LCD screen facing down as
illustrated.
Macro switch
Video out terminal
USB port
USBTV OUT
— 6 —
22
22
2 Preparing to Take Pictures
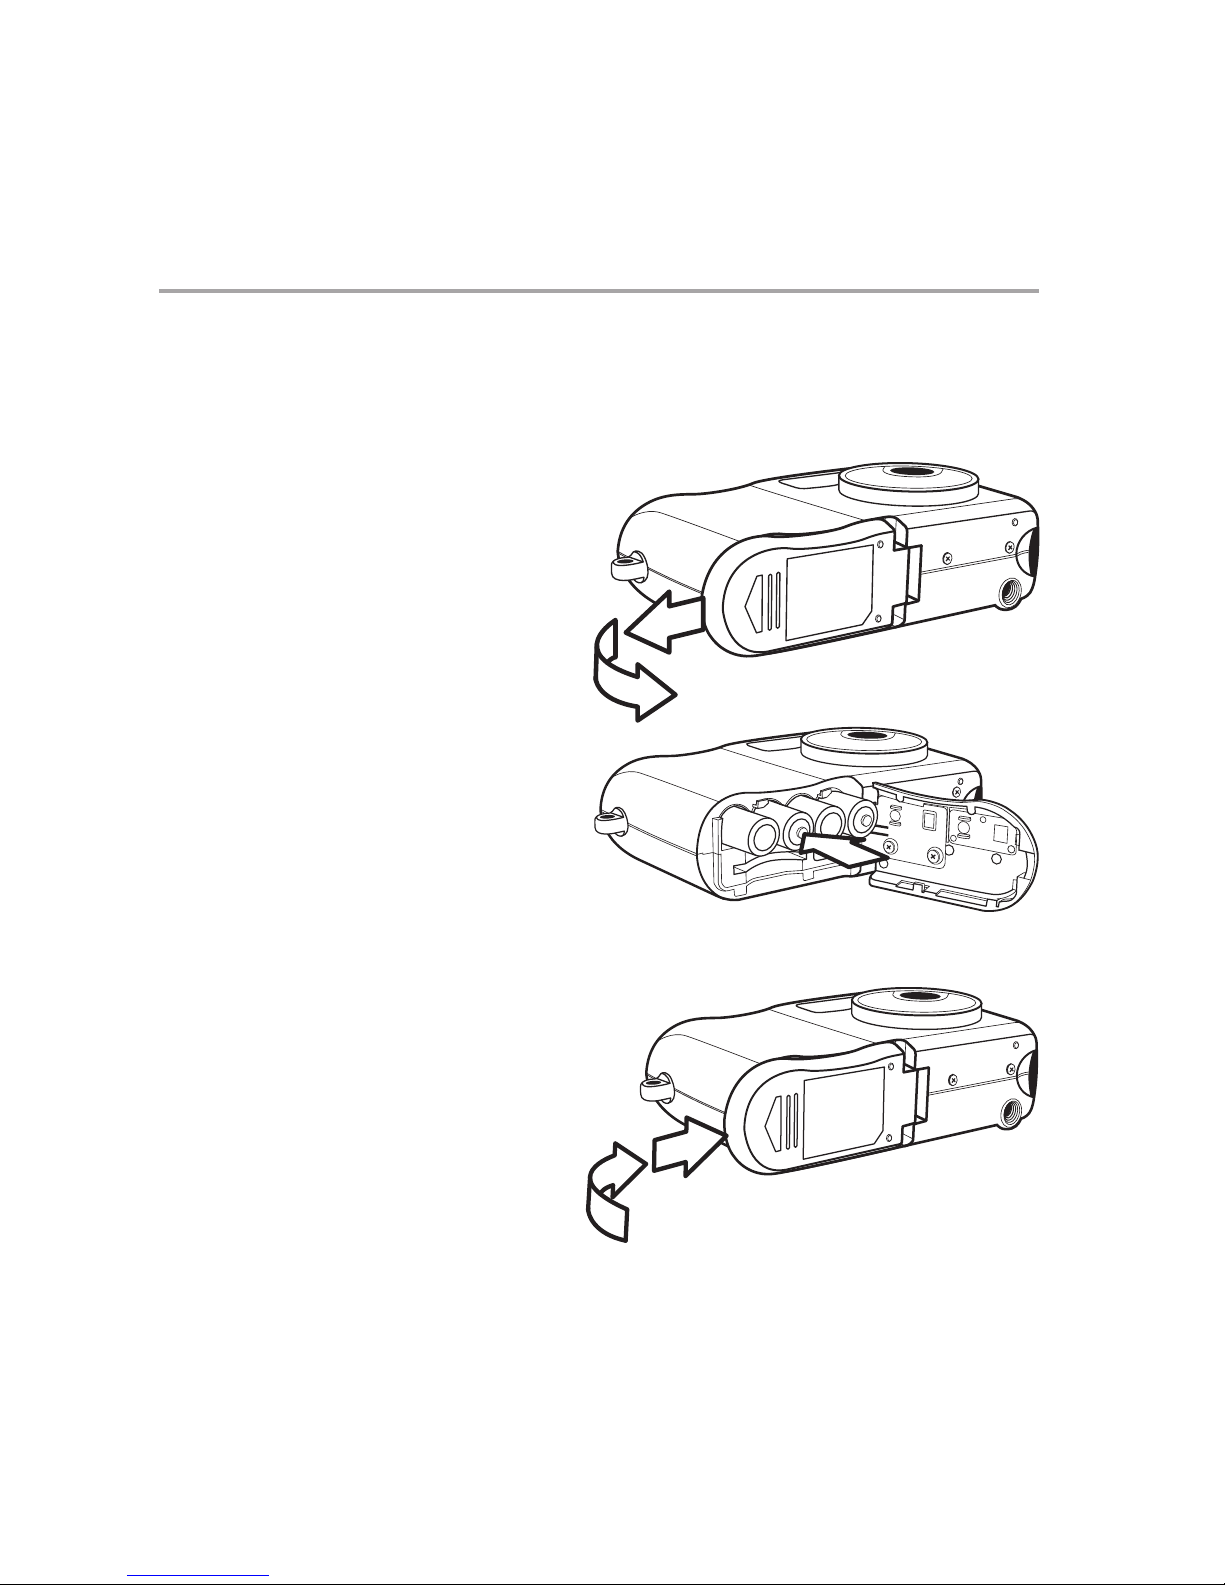
Installing the Batteries
The camera is powered by four AAA-size alkaline batteries or rechargeable Ni-MH (min.
550 mAh / 1.2 V ) batteries.
Follow these instructions to insert batteries into the camera.
1 Slide open the battery cover.
2 Insert four AAA-size alkaline
batteries with the positive (+)
and negative (–) poles match-
ing the directions indicated
inside the battery cover.
3 Slide the battery cover back
into the closed position.
IN

Preparing to Take Pictures
— 7 —
Low Battery Indicator
The low battery indicator
appears on the LCD monitor when the batteries near
depletion. Change the batteries when the low battery indicator appears.
NOTES:
•Do not use manganese batteries. Manganese batteries
cannot supply sufficient power to support camera opera-
tion.
•Replace all batteries at the same time. Never mix old and
new batteries.
•Remove batteries from the camera if you do not plan on
using it for more than two weeks.
•The camera body will feel warm after extended use. This
is normal.
Turning the Power On
Press and hold the POWER
button until the LED indicator
begins flashing green. It takes
about 3 seconds to power on
the camera.
NOTE:
Set the date and time after turning on the camera for the first
time.
Power button
Power LED
indicator

Preparing to Take Pictures
— 8—
Setting the Date and Time
1 Turn the mode dial to any function except
PLAY or PC Cam.
2 Press the MENU button.
3 Press the right button to select the SETTING
menu.
4 Press the up or down buttons to select the
DATE & TIME item.
5 Press the SHIFT button to enter the DATE &
TIME submenu.
6 Press the up or down buttons to change the
year.
7 Press the left or right buttons to advance to
the month setting. Repeat to set the date and
time.
8 Press the SHIFT button to exit the DATE &
TIME submenu.
9 Press the down button to select DATE
STYLE.
10 Press the SHIFT button to enter the DATE
STYLE submenu.
11 Press the up or down buttons to select the
desired date format:
yyyy/mm/dd, mm/dd/yyyy, or dd/mm/yy.
12 Press MENU/OK to save the new date, time, and date display format.
DATE & TIME
DATE & TIME
SETTING
SETTING
DATE STYLE
DATE STYLE
BEEP
BEEP
VIDEO SYSTEM
VIDEO SYSTEM
DATE & TIME
DATE & TIME
2002
2002
ď07
07
ď24
24
ď05:44
05:44
yyyy/mm/dd
yyyy/mm/dd
mm/dd/yyyy
mm/dd/yyyy
dd/mm/yyyy
dd/mm/yyyy
DATE STYLE
DATE STYLE
Table of contents
Other Kobian Digital Camera manuals

Kobian
Kobian CyperPix E350V User manual

Kobian
Kobian VQ2220 Operating and safety instructions

Kobian
Kobian CyperPix E685P User manual

Kobian
Kobian CyperPix E460M User manual

Kobian
Kobian CyperPix E550V User manual

Kobian
Kobian CyperPix S555V User manual

Kobian
Kobian CyperPix E560M User manual

Kobian
Kobian CyperPix E660P User manual

Kobian
Kobian CyperPix E450V User manual

Kobian
Kobian CyperPix E585D User manual


