KEUCO 30096 012000 User manual
Collection EDITION 300
Modell 30096 012000
Installation
Montage
309003-03-19022014 P.V.
KEUCO Gmb & Co.KG
Postfach 1365, D-58653 emer
Telefon : 02372/904-0
Telefax : 02372/904-236
Internet: http://www.keuco.de
E-mail : [email protected]
* IMPORTANTES CONSIGNES DE SECURITE
* ATTENTION - Ce produit soit être installé par une personne qualifiée selon les règlements
et prescriptions locales et conformément aux instructions de montage jointes. Une installation
correcte réduit le risque d`incendie, d`électrocution ainsi que de brûlures et de blessures.
Ce produit est uniquement conçu pour un montage mural.
1. Avant d`effectuer la maintenance, veillez à toujour couper le courant.
2. Utilisez cet appareil uniquement dans le but prévu conformément aux instruction
de ce mode d`emploi. Utilisez uniquement les accessoires conseillés par le fabriquant.
3. Ne pas utiliser s`il ne fonctionne pas correctement, ni après une chute ou s`il a été
endommagé. Expédiez alors làppareil vers un service aprés-vent afinqu`il soit
contrôle et réparé.
4. A monter dans les pièces sèches uniquement.
5. Remplacez les lampes usées par des tubes de type F14T5.
6. Evitez tout contact avec le blindage de sûreté de la lampe.
7. Ne placez aucun objet sur le miroir.
* MISE A A TERRE:
Ce produit doit absolument être à la terre. Comme alternative, le branchement de terre
de l`appareil peut être relié au circuit électrique par un conducteur de protection.
* IMPORTANT SAFETY INSTRUCTIONS
* WARNING - This product must be installed by a qualified person, in accordance with local rules
and regulations and according to the instructions in the enclosed installation manual. Correct
installation reduces the risk of fire, electric shock, burns and injury. The product is designed for
wall mount only.
1. Always disconnect the power before servicing.
2. Only use this appliance for the purpose specified in the instructions.
Only use accessories recommended by the manufacturer.
3. Do not use this appliance if it does not work properly or if it has been dropped or
damaged. Return the appliance to a service center for inspection and repair.
4. Only assemble in dry locations.
5. Replace used lamps with fluorescent lamps (type F14T5).
6. Avoid contact with the lamp containment barrier.
7. Do not place anything on top of mirror.
* GROUNDING INSTRUCTIONS
This product must be grounded. Alternatively, the equipment grounding terminal can
be connected to the circuit conductors by means of an equipment grounding conductor.

Ø 0,23"
1.
25,12"
25,59"
5,28"
25,59"
1,16"
2,48"
74,80" - 78,74"
3,94"
20,39"
3,94"
78,74"
1,02"
19,29"
2.
3.
Illuminated mirror - Mounting instructions:
Drill 4 holes (ø 0,23") at a horizontal distance of
19,29"/3,94" insert the wall anchors, and screw
in the screws.
Auxiliary astener:
Drill a hole (ø 0,23") about 20,39" from the top
edge of the illuminated mirror. Insert a wall anchor
and attach the auxiliary fastener.
Fixation du miroir à lampes:
Percez 4 trous de (ø 0,23") avec un écart horizontal
de 19,29"/3,94" introduire les chevilles et visser
les vis.
Fixation supplémentaire:
Perçage de (ø 0,23") à env. 20,39" du bord supérieu
du miroir. Introduire les chevilles et visser la fixation
supplémentaire.
For Household / Domestic Use only
Article ménager / Usage demestique uniqement
2
Illuminated mirror - dimensions:
Dimensions du miroir à lampes:
2
3
1
1
3
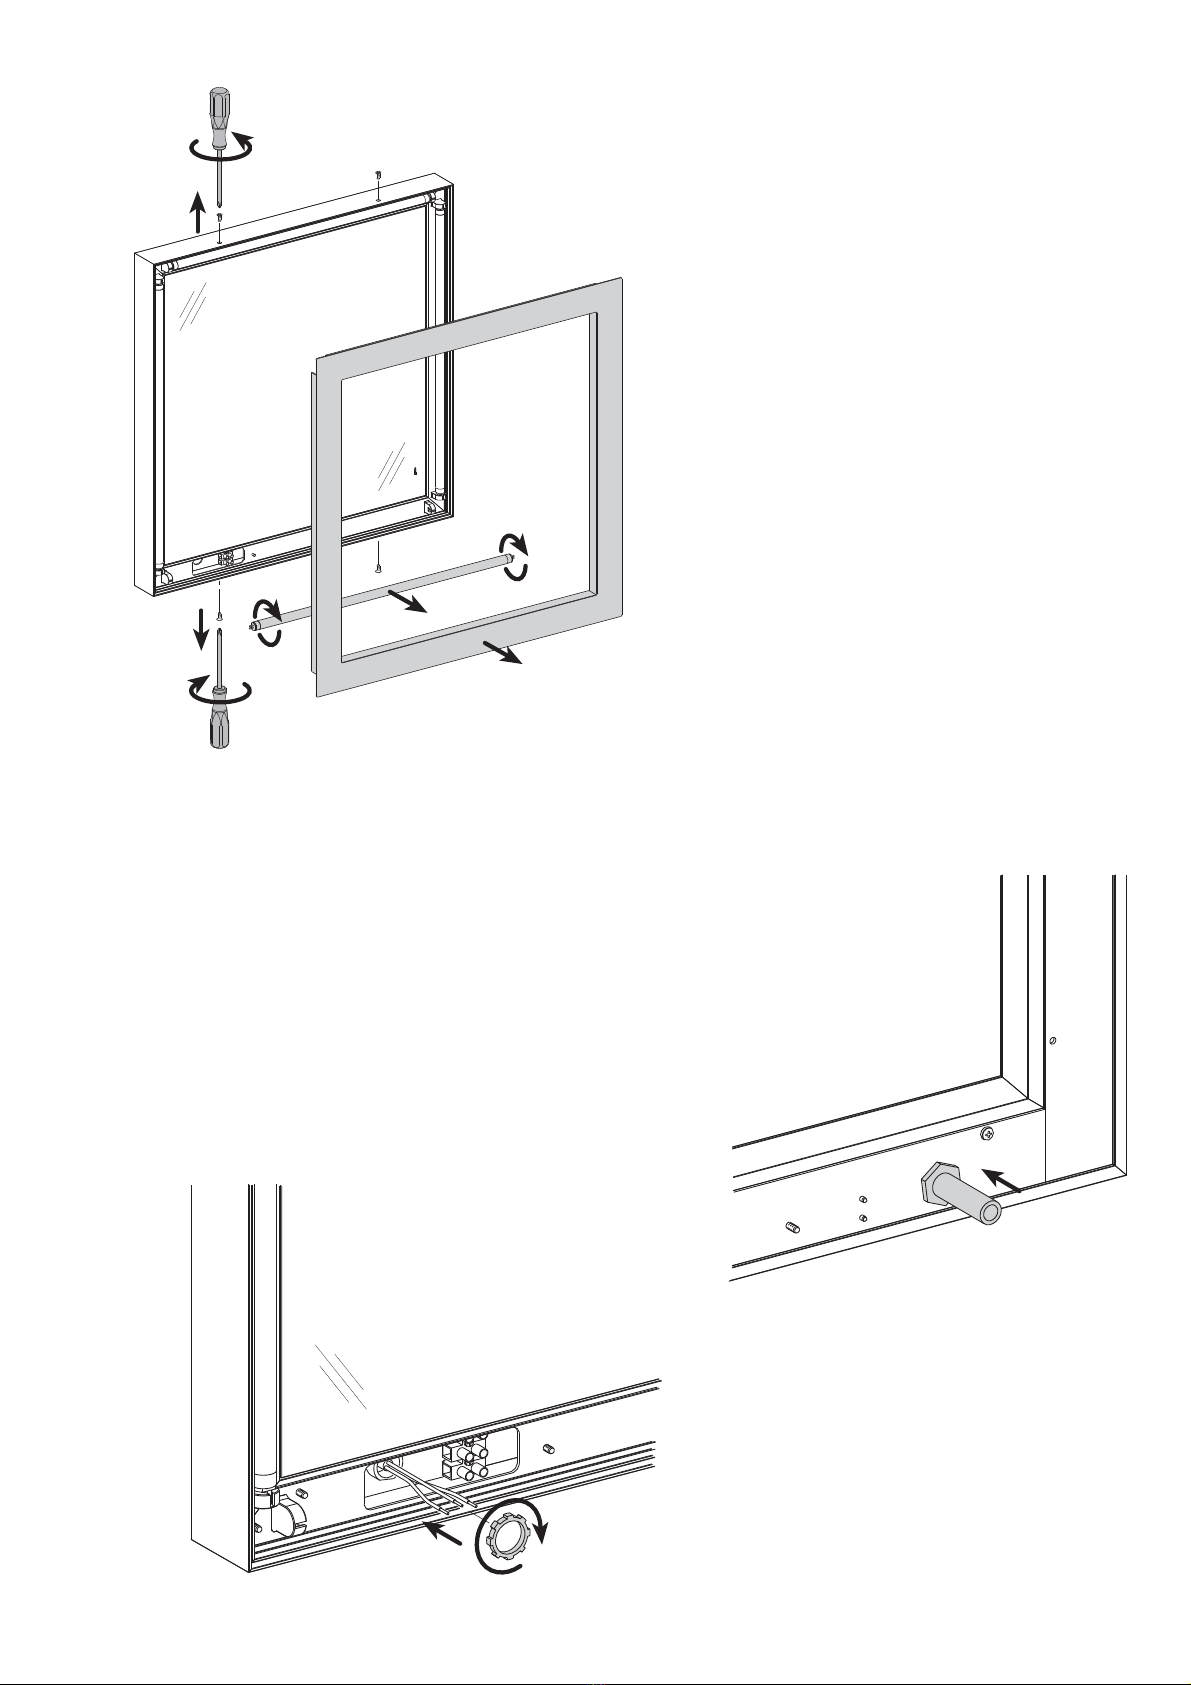
Mirror deflector:
1. Loosen the 4 fastening screws of the
mirror deflector.
2. Carefully remove the mirror deflector
from the illuminated mirror.
3. Remove the lower fluorescent bulb by
turning it.
Ecran du miroir:
1. Desserrer les vis de fixation (4x) de
l'écran du miroir.
2. Retirer avec précaution l'écran du
miroir éclairant.
3. Retirer le tube fluorescent inférieur
en le tournant.
Install 1/2" conduit connector and conduit in to cover.
(Not included with cabinet)
ouse installation wires must be in conduit.
Connect wires to terminal block as show in wiring diagram.
Terminal screw torque 7 in-lbs (0.8 Nm) max.
Monter un raccord de gaine et la gaine 1/2" dans le cache
(non livré avec l`armoire).
Touts les câbles sont á mettre sous gaine.
Faire les connexions comme indiqué sur le schéma électrique.
Couple de rotation maximum des vis de fixation 7 in-lbs (0.8 Nm).
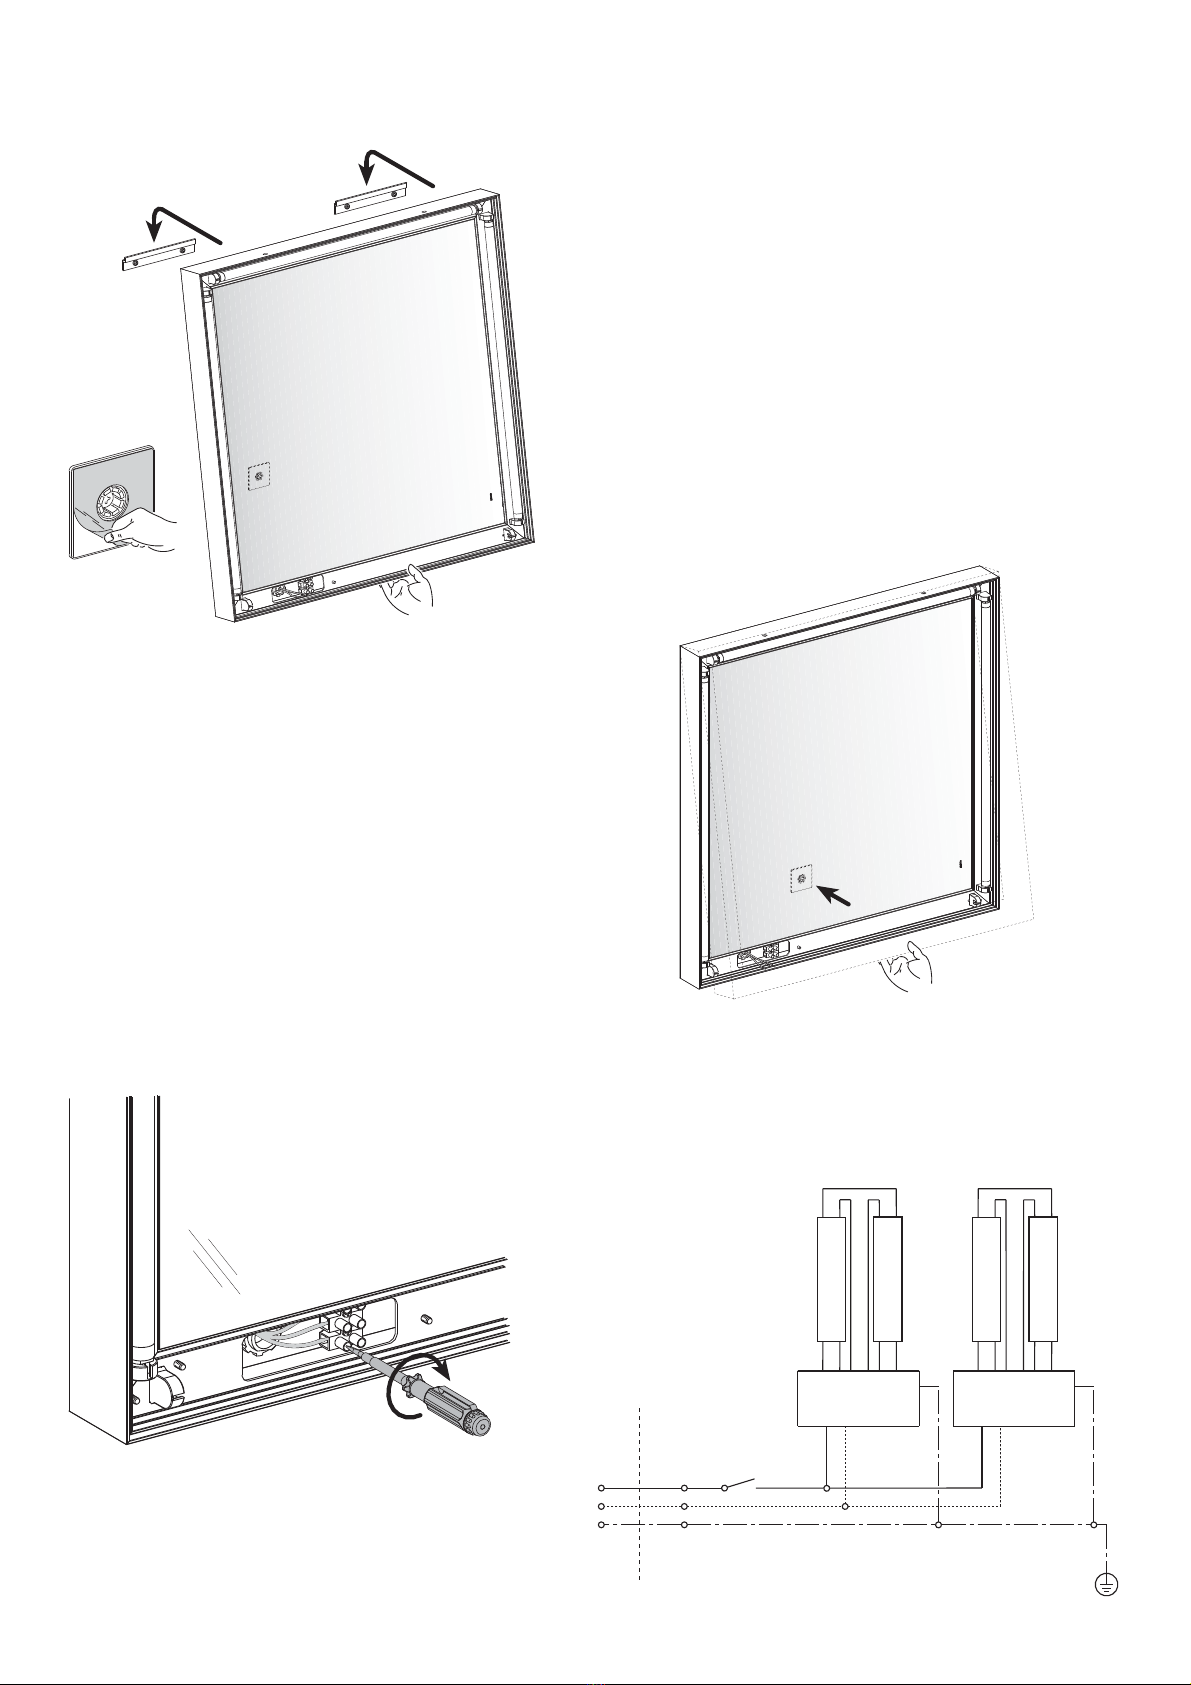
BLACK / NOIR
W ITE / BLANC E
GREEN / VERT
T5 14 W
Ballast
Switch On-Off
Ground
T5 14 W
1
2
3
T5 14 W
Ballast
T5 14 W
1
4
Auxiliary astener:
1. Carefully lift bottom of the illuminated mirror
from the wall.
2. Remove the protective foil from the auxiliary
fastener.
3. Carefully press the illuminated mirror against
the auxiliary fastener.
Fixation supplémentaire:
1. Décoller prudemment du mur la partie inférieure
du miroir.
2. Retirer la feuille protectrice de la fixation
supplémentaire.
3. Appuyer prudemment sur le miroir à hauteur de
la fixation supplémentaire.
Mounting and Ad justing the Illuminated Mirror.
Suspendre le miroir et l`orienter.
WHEN LIFTING THE ILLUMINATED MIRROR,
TAKE CARE NOT TO REMOVE THE ILLUMINATED
MIRROR FROM THE SCREWS.
EN SOULEVANT LE MIROIR VEILLEZ A CE QUE
LE MIROIR NE SE DETACHE PAS DES VIS
AUXQUELLES IL EST SUSPENDU.
Wiring diagram
Schéma électrique

5
2
1
3
3
4
Mirror deflector:
1. Insert the lower fluorescent bulb by turning it.
2. Carefully insert the mirror deflector into the
illuminated mirror.
3. Use the 4 fastening screws to attach the mirror
deflector to the illuminated mirror.
4. Remove the protective foil from the mirror
deflector.
Ecran du miroir:
1. Insérer le tube fluorescent inférieur et le
positionner en le tournant.
2. Insérer avec précaution l'écran dans le miroir
éclairant.
3. Visser l'écran au miroir à l'aide des vis de
fixation (4x).
4. Retirer la feuille protectrice de l'écran du miroir.
Replacing the bulb:
1. Loosen the fixing bolt of the mirror deflector (4x).
2. Carefully remove the mirror deflector.
3. Remove the fluorescent bulb by turning it
and insert a new fluorescent bulb.
Remplacer la lampe:
1. Desserrer les vis de fixation (4x) de lécran du miroir.
2. Retirer prudemment lécran du miroir.
3. Sortir le tube fluorescent en le tournant puis
installer un neuf.
INSTUCTIONS PERTAINING TO FIRE HAZARD; OR RISK OF INJURY
IMPORTANT LUMINAIRE INSTRUCTIONS
The lamp is Hot when switched on!
WARNING - In order to reduce the risk of FIRE or INJURY:
Turn off power and allow the appliance to cool down before replacing lamp.
Do not touch hot lamp or lamp containment berrier.
Keep inflammable materials away from lamp.
Do not operate the luminaire with a missing or damaged lamp containment barrier.
INSTRUCTIONS CONCERNANT LE RISQUE D`INCENDIE OU LE RISQUE DE BLESSURES
INSTRUCTIONS IMPORTANTES CONCERNANT L`ECLAIRAGE
La lampe devient TRES CHAUDE lorsqu`elle est allumée!
AVERTISSEMENT - Afin de réduire tout risque D`INCENDIE ou DE BLESSURES:
Débrancher et laisser refoidir l`apparell avent de remplacer la lampe.
Ne pas toucher la lampe chaude ou la douille.
Tenir tout matériau inflammable éloigné de la lampe.
Ne pas faire fonctionner l´éclairage si un des éléments électriques est défectueux ou s`il manque.
6
6
8
1
4
8
5
2
10
8
7
8
6
3
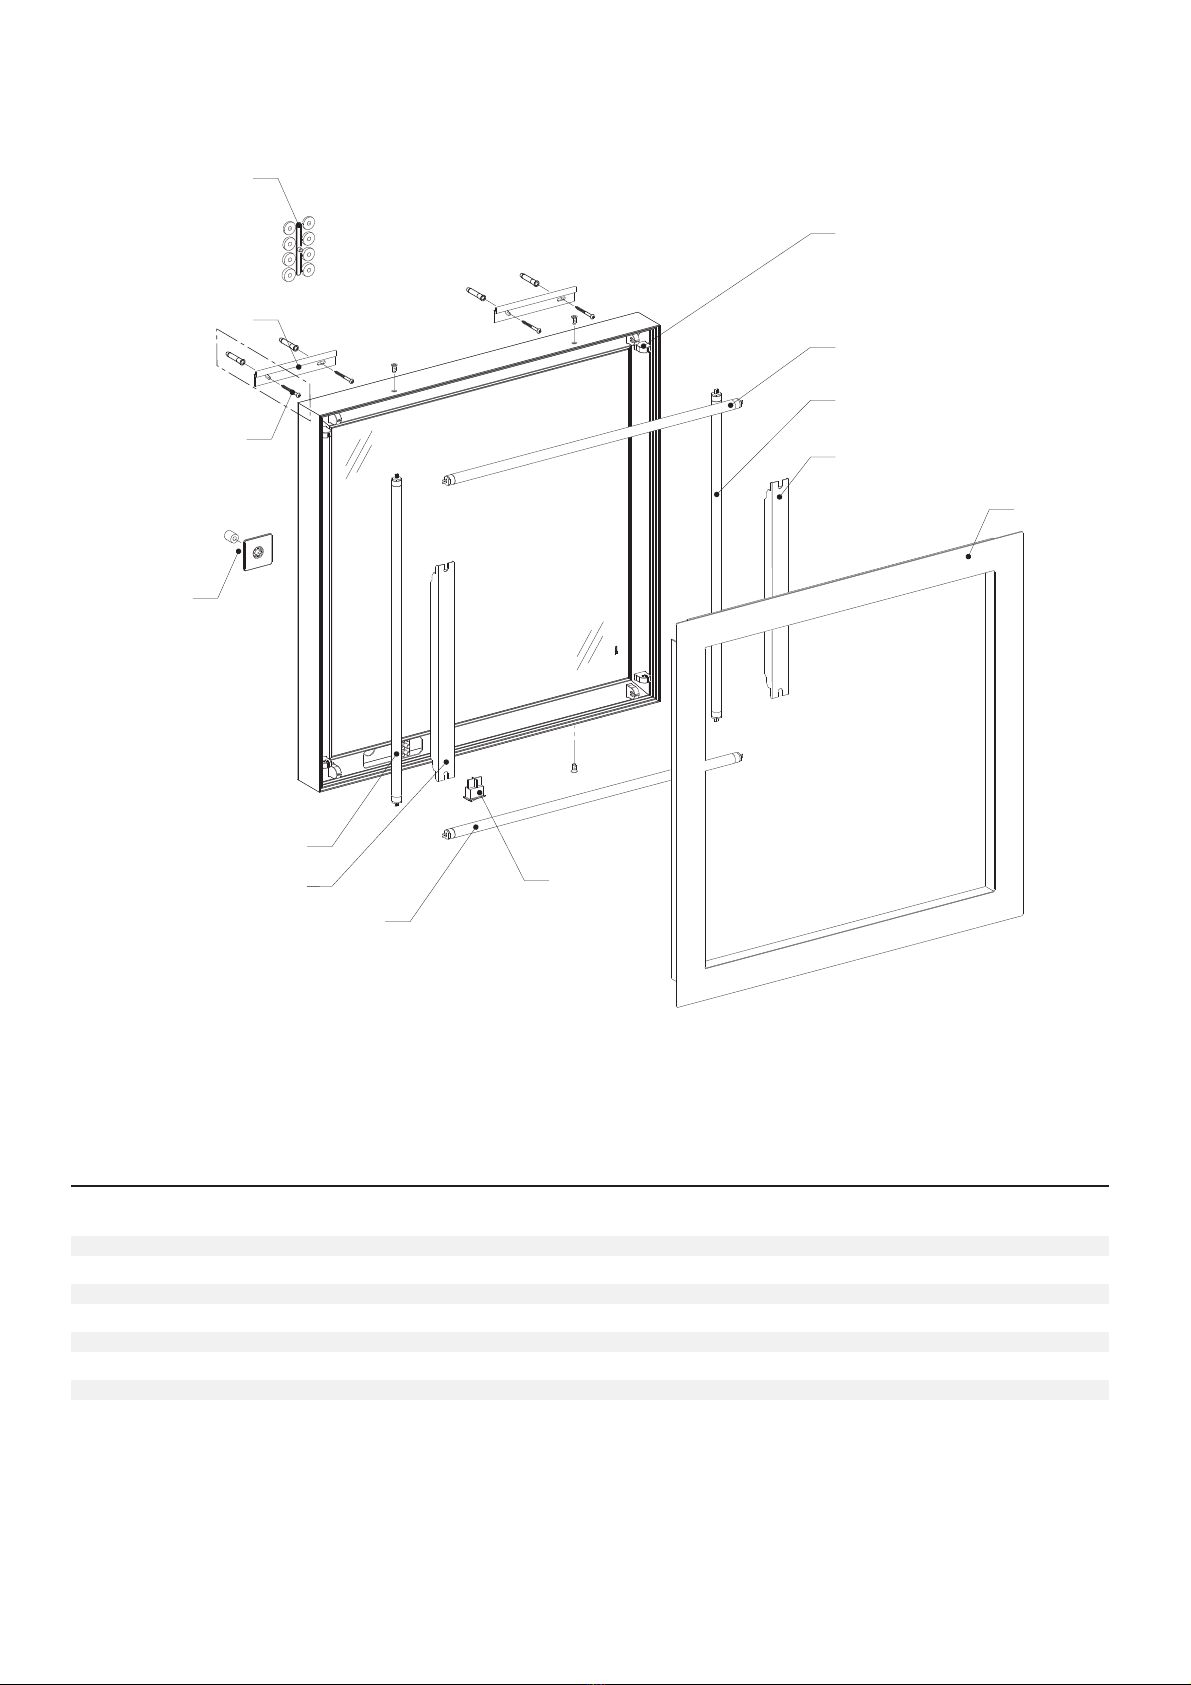
Model/Modèle 30096..20
No. Qty Name Dimensions Order no.
No. Qté Désignation Dimensions No.De commande
1 2 anging rail / Rail de suspension 150 mm 220954
2 2 Spacer / Ecarteur 300505
3 1 Screws and wall anchors / Vis et chevilles 303826
4 1 Auxiliary fastener / Fixation supplémentaire 406083
5 1 Light switch / Interrupteur 305796
6 2 Fluorescent lamp ballast / Ballast électronique 310530
7 8 Socket / Douille 309246
8 4 Fluorescent bulb / Tube fluorescent Ø16 x 549 mm (type F14T5) 308985
10 1 Mirror deflector / Ecran du miroir 650 x 650 mm 406433
Other KEUCO Lighting Equipment manuals


Popular Lighting Equipment manuals by other brands


Qazqa
Qazqa Suplux SL 3 Black 103062 instruction manual

Commercial Electric
Commercial Electric 54568141 Use and care guide

CREE LIGHTING
CREE LIGHTING 304 Series installation instructions

Goobay
Goobay 49867 user manual

ECOMAN ITALIA
ECOMAN ITALIA LED T8 instruction manual

Alkalite
Alkalite Krypton KT-81 user manual


