Kedacom ZCS-KDCA1 User manual

KEDACOM
User Manual for
Data Docking Station ZCS-KDCA1
V2 (August, 2018)

i
Trademark
Kedacom™ and are trademarks of Suzhou Keda Technology Co., Ltd. in China and
various other countries. All other trademarks mentioned in this document are the property of their
respective holders.
Suzhou Keda Technology Co., Ltd.
131 Jinshan Road
New District, Suzhou, 215011
People's Republic of China
http://www.kedacom.com/en
Tel: +86-512-68418188
Fax: +86-512-68412699
© 2018 Suzhou Keda Technology Co., Ltd. All rights reserved.
Without the prior written permission of Suzhou Keda Technology Co., Ltd., any reproduction, translation
or retransmission of all or any part of this document for any purpose in either electronic or mechanical
form is not allowed.
Notice
The information in this document is subject to change without notice. Every effort has been made in the
preparation of this document to ensure accuracy of the contents, but all statements, information, and
recommendations in this document do not constitute a warranty of any kind, express or implied. Suzhou
Keda Technology Co., Ltd. is not responsible for printing or clerical errors.

ii
Target Audience
Administrators and Operators of Video Surveillance Products
Document Version
V2
Applicable Models
ZCS-KDCA1
Related Document
Quick Start Guide
Convention
Icon
Convention
Notices and warning: necessary
supplement of operations
Sign
Convention
BOLD
Menu, e.g. Drag to Zoom
>
Connector between menus of
different level, e.g. Settings >
Camera

Data Docking Station User Manual
1
Contents
1. Product Introduction ............................................................................................................................. 2
1.1 Appearance ..................................................................................................................................... 2
1.2 Specifications................................................................................................................................... 3
1.3 Features........................................................................................................................................... 3
2. Startup..................................................................................................................................................... 5
3. Login ....................................................................................................................................................... 7
3.1 Non-card Login................................................................................................................................ 7
3.2 Card Login....................................................................................................................................... 8
4. Settings................................................................................................................................................. 14
4.1 User............................................................................................................................................... 14
4.1.1 Create...................................................................................................................................... 14
4.1.2 Edit.......................................................................................................................................... 15
4.1.3 Remove................................................................................................................................... 15
4.1.4 Synchronize with DDSMMS.................................................................................................... 16
4.2 Device............................................................................................................................................ 17
4.2.1 Register BWC Offline.............................................................................................................. 17
4.2.2 Register BWC Online.............................................................................................................. 20
4.3 File................................................................................................................................................. 22
4.3.1 Query....................................................................................................................................... 22
4.3.2 View......................................................................................................................................... 23
4.3.3 Download................................................................................................................................ 24
4.3.4 Delete...................................................................................................................................... 25
4.4 Upgrade......................................................................................................................................... 25
4.5 Slot................................................................................................................................................. 28
4.6 Settings.......................................................................................................................................... 28
4.6.1 Information.............................................................................................................................. 28
4.6.2 Configurations......................................................................................................................... 29
4.6.3 Network................................................................................................................................... 29
4.6.4 Server...................................................................................................................................... 30
4.6.5 Reboot..................................................................................................................................... 30
4.7 Log................................................................................................................................................. 33
5. Appendix: Glossary of Terms............................................................................................................. 34
Data Docking Station User Manual
2
2
1. Product Introduction
The law enforcement recording system is composed of body worn camera (hereinafter referred to as “BWC”) and the
management platform, which further includes DDS (Data Docking Station) and DDSMMS (Data Docking Station
Multi-point Management Software). User can acquire, upload, store and handle videos, voices and pictures in the
BWC through the management platform. The DDS can collect data in BWC and upload it onto DDSMMS. The
following will introduce functions of the DDS.
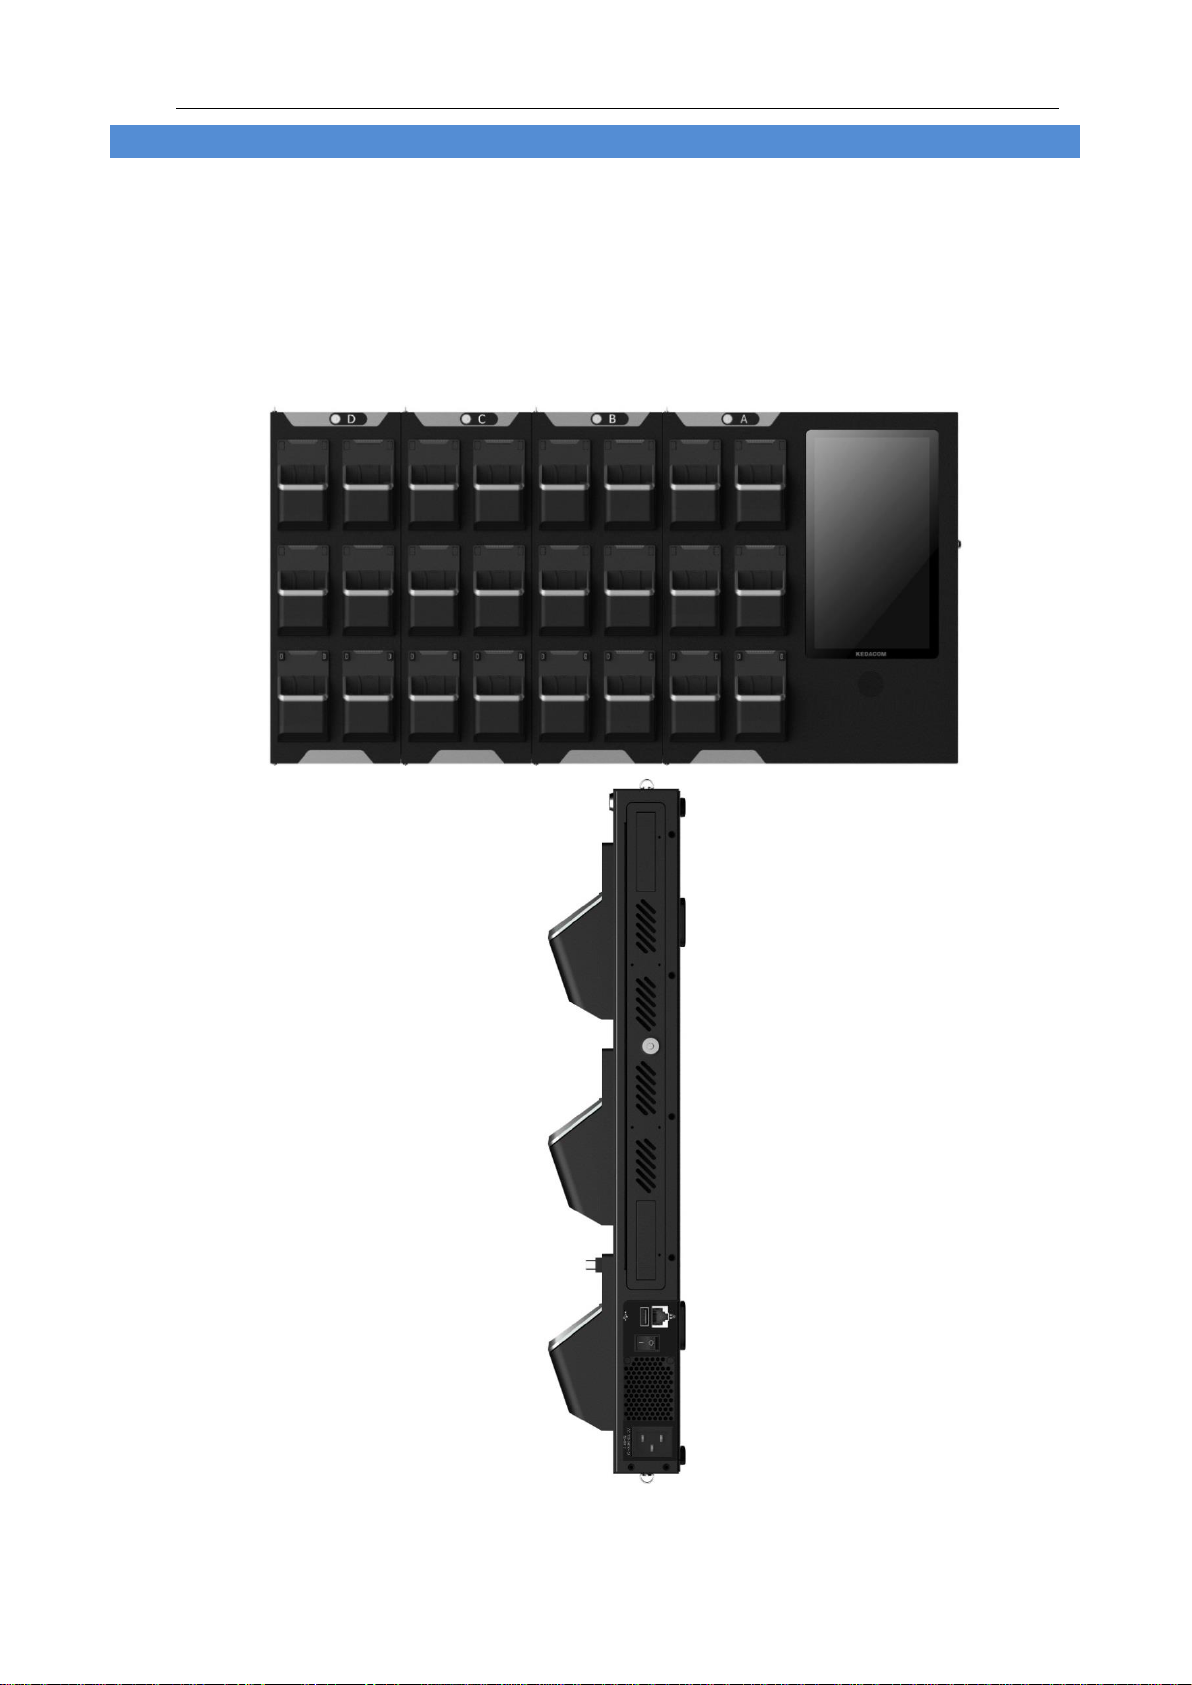
1.1 Appearance
Picture 1-1 DDS ZCS-KDCA1

Data Docking Station User Manual
3
3
1.2 Specifications
Hardware
Configuration
Platform
Intel N3710 or Intel 3700
Screen
13.3”touch panel; resolution 1920*1080
Main
Chipset
Intel chipset
RAM
4G DDR3
Hard Disk
Storage
Standard 1 x 4T surveillance-level hard disk, max supporting 3 x 3.5”
hard disk slots; recommend configuring 1 x 8T and 2 x 4T hard disks.
Data Dock
Standard 6 slots, extendable to 24 slots
Loudspeaker
For playback and acoustic alarming
Overload
Protection
Over-voltage protection, over-current protection, overpower protection,
short-circuit protection
Software
Configuration
Operating
System
KEDACOM Data Docking Station Multi-point Management Software
Working
Condition
Temperature
-10°C ~ 55°C
Humidity
10%~95%RH, non-condensing
Structure
Installation
Wall mount, desktop
Size
6-slot: W*H*D=430mm*510mm*102mm (depth including the slot)
12-slot: W*H*D=620mm*510mm*102mm (depth including the slot)
18-slot: W*H*D=810mm*510m m*102mm (depth including the slot)
24-slot: W*H*D=1000mm*510mm*102mm (depth including the slot)
Weight
Excluding packing: Including packing:
6-slot: 10.30kg 6-slot: 13.15kg
12-slot: 13.98kg 12-slot: 17.97kg
18-slot: 17.65kg 18-slot: 22.78kg
24-slot: 21.33kg 24-slot: 27.60kg
Interface
Power
Supply
Smart temperature control power supply, rated voltage: AC100V - 240V
~ 50 / 60HZ (wide voltage), non-stop working for 7*24hrs
Network Port
GB network port
USB Port
Standard 1 x USB 2.0 port
BWC Slot
Slot Design
Extended docks
1.3 Features
Wall-mount and desktop design takes small space and is easy to install, low power consumption platform,
mute-style design
13.3”color LCD touch panel with resolution of 1920*1280
Standard 6 slots, able to connect to extended docks, each with 6 slots; max support 3 extended docks and
connecting to 24 BWCs at the same time
When it connects to 24 BWCs, the full load transmission data is no less than 5MB/s
The guide rail is designed especially for KEDACOM BWC; it locks the BWC automatically when it is
inserted and input password on the touch panel to unlock
The 2 slots at the bottom of the dock have extendable and retractable USB ports, which allow
GAT947.2-2015 standard BWC to access
Apply insertion design for the 3 hard disks and the standard physical storage space is 4TB
The slot at the top right corner of the dock has the priority of data collection

Data Docking Station User Manual
4
4
The DDS has a common USB port for connecting to keyboard or mouse
It recognizes accessed BWC automatically and display corresponding officer ID, officer name, importing
status and progress
If a BWC is bound with a certain user, when it is inserted into the DDS, the system will archive the imported
file to the bound username automatically without inputting the username and password. Refer to the
device registration part for binding a user
User can perform operations to the inserted BWC such as automatic charging, time correction and data
export
Resume from break-point, during file importing, when the BWC reconnects with the DDS after
disconnection, the system will continue importing the data
Exported data from BWC will be deleted automatically
User can view information of imported files, including file size, video duration and user info, and can also
play the video-audio files
User can upgrade connected KEDACOM BWC

Data Docking Station User Manual
5
5
2. Startup
Start DDS
User can start the DDS when it is connected to the power supply and well electrified. Input password “kedacom” to
login. Meanwhile, the DDS program is started and a window will pop up as follows. No other operation is needed.
Picture 2-1 Interface of DDS
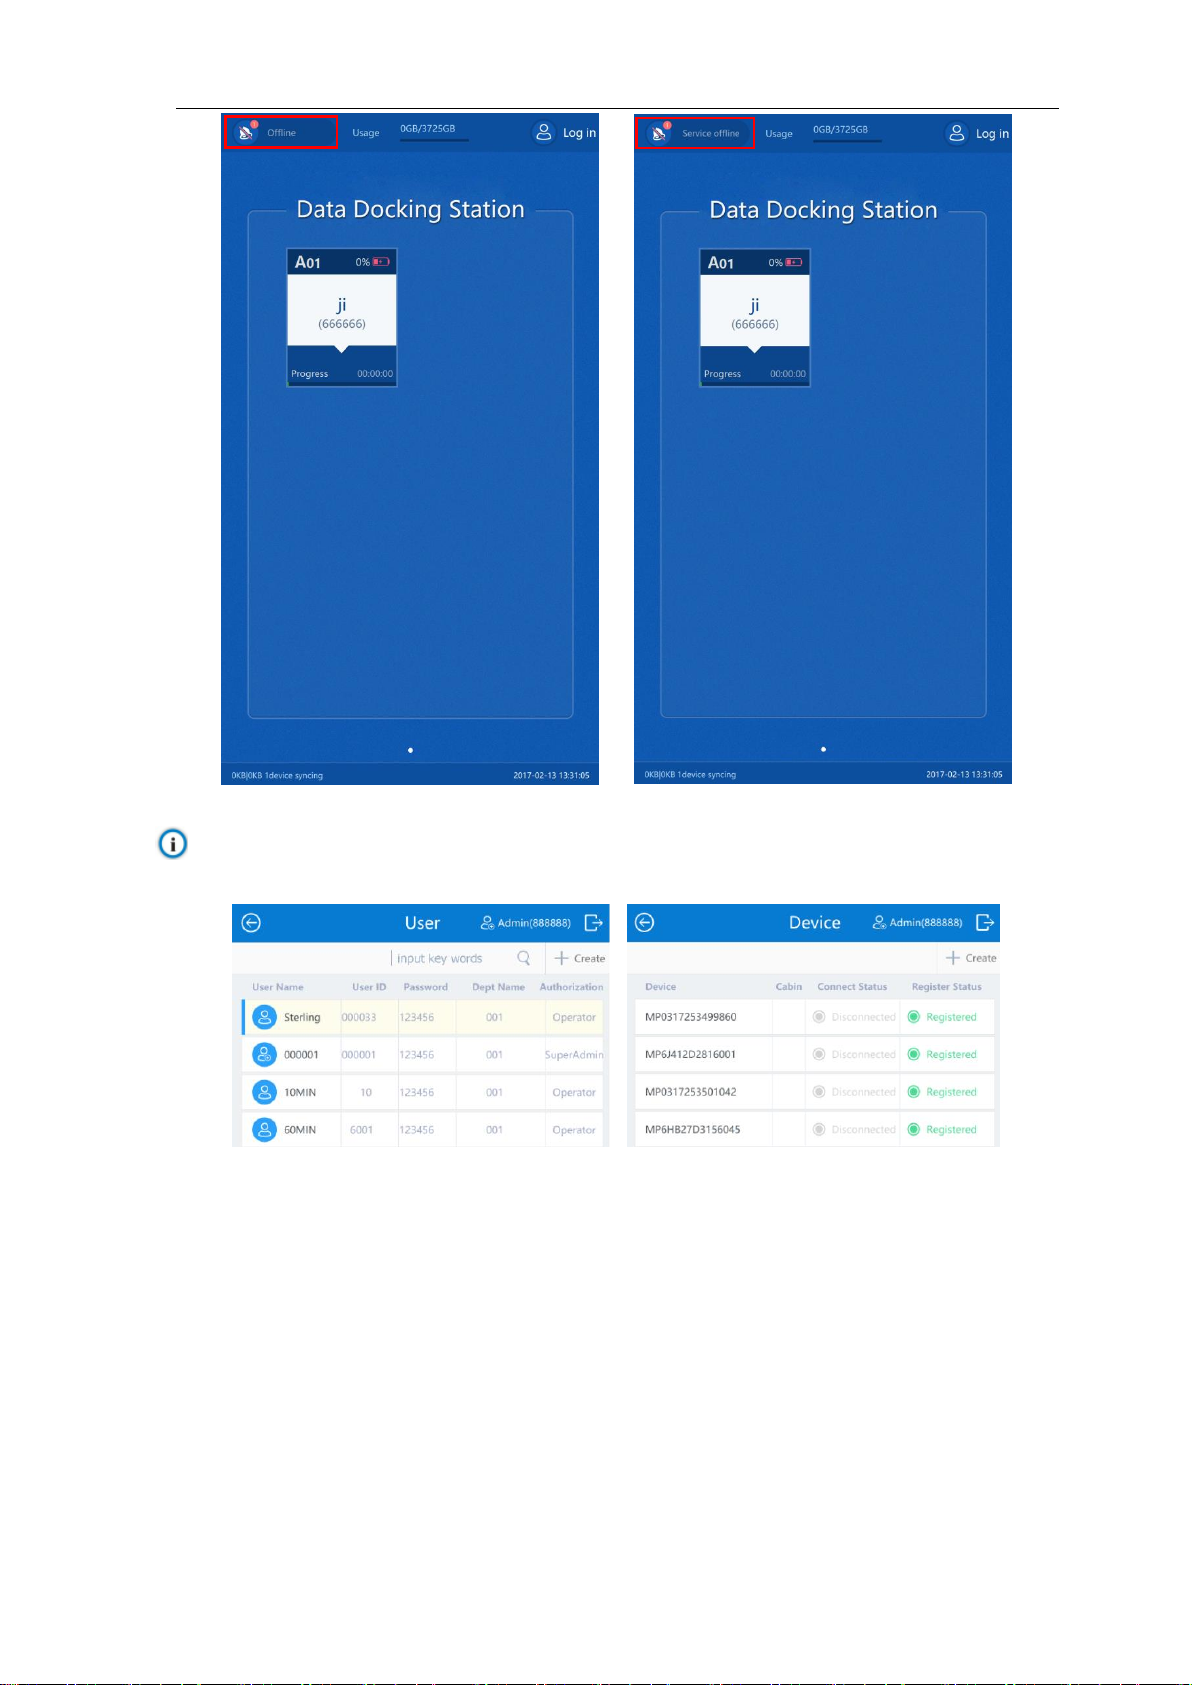
Alarm Notification
After the DDS is started, if the network or the platform (i.e. the DDSMMS) is disconnected, the DDS will trigger
acoustic alarm with text reminder, as shown below.
Data Docking Station User Manual
6
6
Picture 2-2 Alarm reminder interface of DDS
Note: If the User or Device interface prompts “Offline”, no operations can be performed on the interface, as
shown in the following pictures.
Picture 2-3 Offline

Data Docking Station User Manual
7
7
3. Login
Different users may have different authorities to perform on DDS. Please refer to Table 4-1 for the details. This
manual will introduce all functions of the DDS from the super admin user’s point of view. There are two methods to
login.
3.1 Non-card Login
Start DDS and tap the login icon at the top right corner. Input user name and password and tap “Log in”to enter the
homepage. Different types of users may enter different interfaces, as shown below.
Picture 3-1 Admin/Super admin user online/offline interface
Picture 3-2 Operator user online interface
Other manuals for ZCS-KDCA1
1
Table of contents
Other Kedacom Docking Station manuals


