JVC KW-AV61BT User manual

GET0889-001A
[UI]
KW-AV61BT/KW-AV51
INSTRUCTION MANUAL
MONITOR WITH DVD RECEIVER
For installation and connections, refer to the separate manual.
For canceling the display demonstration, see page 7.
Covers_KW-AV61[UI].indb 2Covers_KW-AV61[UI].indb 2 12/11/01 10:0112/11/01 10:01

2
Thank you for purchasing a JVC product.
Please read all instructions carefully before operation, to ensure your complete understanding and to obtain the best
possible performance from the unit.
WARNINGS: (To prevent accidents and
damage)
• DO NOT install any unit or wire any cable in a location
where;
– it may obstruct the steering wheel and gearshift
lever operations.
– it may obstruct the operation of safety devices
such as air bags.
– it may obstruct visibility.
• DO NOT operate the unit while driving.
If you need to operate the unit while driving, be sure
to look around carefully.
• The driver must not watch the monitor while driving.
• The driver must not put on the headphones while
driving.
The marking of products using lasers
The label is attached to the chassis/case and says
that the component uses laser beams that have been
classified as Class 1. It means that the unit is utilizing
laser beams that are of a weaker class.There is no
danger of hazardous radiation outside the unit.
EN_KW-AV61UI.indb 2EN_KW-AV61UI.indb 2 12/11/09 11:5212/11/09 11:52
3
Cautions on the monitor:
• The monitor built in this unit has been produced with
high precision, but it may have some ineffective dots.
This is inevitable and is not considered defective.
• Do not expose the monitor to direct sunlight.
• Do not operate the touch panel using a ball-point
pen or similar tool with the sharp tip.
Touch the buttons on the touch panel with your
finger directly (if you are wearing a glove, take it off).
• When the temperature is very cold or very hot...
–
Chemical changes occur inside, causing malfunction.
– Pictures may not appear clearly or may move
slowly. Pictures may not be synchronized with
the sound or picture quality may decline in such
environments.
For safety...
• Do not raise the volume level too much, as this will
make driving dangerous by blocking outside sounds,
and may cause hearing loss.
• Stop the car before performing any complicated
operations.
Temperature inside the car...
If you have parked the car for a long time in hot or cold
weather, wait until the temperature in the car becomes
normal before operating the unit.
How to read this manual:
• Illustrations of KW-AV61BT are mainly used for explanation.
• This manual mainly explains operations using the buttons on the monitor panel and touch panel. For
operations using the remote controller (RM-RK256), ☞page 59.
• < > indicates the variable screens/menus/operations/settings that appear on the touch panel.
• [ ] indicates the buttons on the touch panel.
• Indication language: English indications are used for the purpose of explanation. You can select the
indication language from the <Settings> menu. (☞page 45)
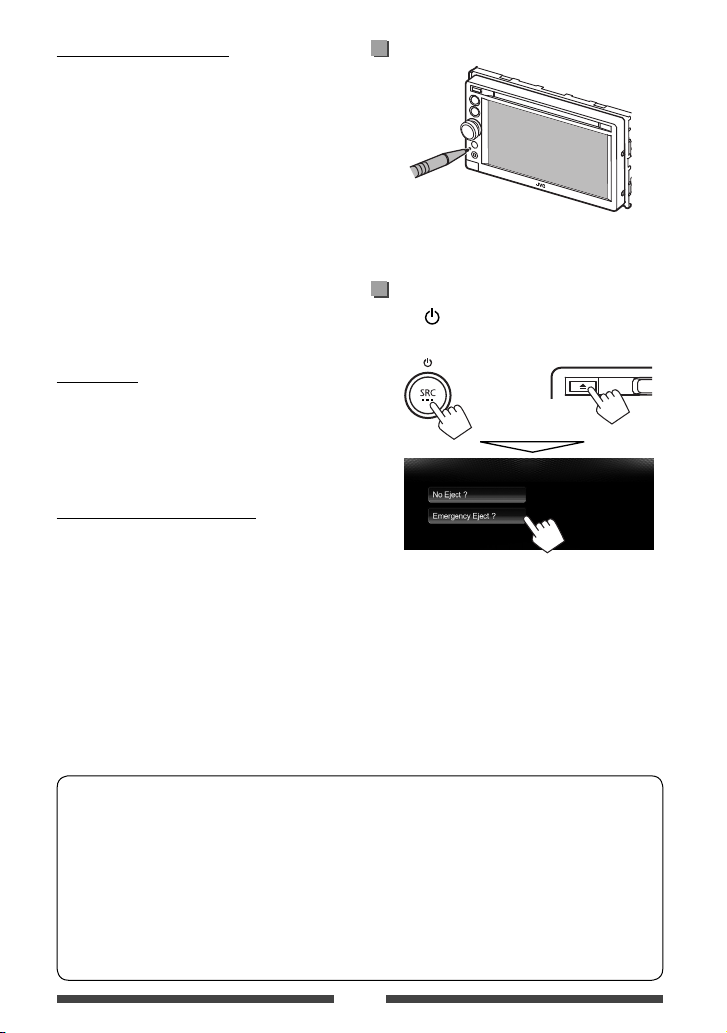
How to reset your unit
• Your preset adjustments will also be erased (except
the registered Bluetooth devices).
How to forcibly eject a disc
Press SRC/ and 0on the monitor panel at the same
time.
+
•Be careful not to drop the disc when it ejects.
•If this does not work, reset your unit. (☞above)
EN_KW-AV61UI.indb 3EN_KW-AV61UI.indb 3 12/11/09 11:5212/11/09 11:52

4
Contents
How to reset your unit........................................... 3
How to forcibly eject a disc.................................... 3
INTRODUCTIONS
Detaching/attaching the monitor panel...5
Component names and functions ............6
Initial settings .......................................7
Setting the clock ....................................8
Common operations ...............................9
Turning on the power ...........................................9
Turning off the power............................................9
Adjusting the volume ...........................................9
Turning off the screen ........................................... 9
Turning on/off the AV source .............................. 10
Touch screen operation........................................10
Switching screens ................................11
AV SOURCE OPERATIONS
Selecting the playback source ...............12
Listening to the radio ...........................13
Disc operations.....................................18
Playing a disc.......................................................18
Playable disc types .............................................. 19
Playback operations ............................................20
Settings for disc playback.................................... 24
USB operations.....................................25
Playing a USB device ...........................................25
Listening to the iPod/iPhone device ......27
Preparation .........................................................27
Setting iPod control mode...................................28
Selecting preference settings for iPod/iPhone
playback..............................................................28
iPod/iPhone playback operations for <Head>
mode...................................................................29
iPod/iPhone playback operations for <iPod Out>
mode...................................................................30
Using an App of iPod touch/iPhone.....................31
Using other external components..........33
Front AUX ............................................................33
AV-IN................................................................... 33
Using the external navigation unit ..................... 34
Sound adjustment................................36
Using the sound equalization.............................. 36
Adjusting the crossover frequency....................... 37
Changing display design .......................38
Setting for video playback ....................40
Adjusting the picture........................................... 40
Changing the aspect ratio ................................... 41
Zooming the picture............................................41
Using a rear view camera ......................42
Setting menu items..............................43
Memorizing/recalling the settings .....................46
Updating the system...........................................47
Adjusting the touch position .............................. 47
BLUETOOTH OPERATIONS
Information for using Bluetooth®
devices..........................................48
Bluetooth operations for KW-AV61BT ....48
Connecting Bluetooth devices.............................49
Setting up Bluetooth........................................... 51
Using the Bluetooth mobile phone......................52
Settings for Bluetooth mobile phones................. 56
Using the Bluetooth audio player........................ 57
Bluetooth operations for KW-AV51 ........58
Using the Bluetooth mobile phone .....................58
Using the Bluetooth audio player ....................... 58
REFERENCE
Using the remote controller ..................59
Operations using the remote controller
(RM-RK256) ........................................................59
Maintenance .......................................62
More about this unit.............................63
Troubleshooting...................................66
Specifications.......................................70
EN_KW-AV61UI.indb 4EN_KW-AV61UI.indb 4 12/11/09 11:5212/11/09 11:52

5
AttachingDetaching
Turn off the power before detaching the monitor panel.
(☞page 9)
1
2
Cautions
• Hold the monitor panel securely so as not to drop it accidentally.
• Fit the monitor panel onto the attaching plate until it is firmly locked.
Detaching/attaching the monitor panel
INTRODUCTIONS
EN_KW-AV61UI.indb 5EN_KW-AV61UI.indb 5 12/11/09 11:5212/11/09 11:52

6
Screen (touch panel) Monitor panel
1Loading slot
20(Eject) button
Ejects the disc.
3HOME/DISP OFF button
• Displays the <HOME> screen. (Press)
(☞page 12)
• Turns off/on the screen. (Hold) (☞page 9)
4SRC/ button
• Turns off the power. (Hold) (☞page 9)
• Turns on the power. (Press) (☞page 9)
• Selects the AV source. (Press) (☞page 12)
Caution on the volume setting:
Digital devices produce very little noise compared
with other sources. Lower the volume before
playing these digital sources to avoid damaging
the speakers by sudden increase of the output
level.
Component names and functions
5VOLUME/ATT knob. (☞page 9)
• Attenuates the sound. (Press)
• Adjusts the audio volume. (Turn)
6Remote sensor
7Reset button
Resets the unit. (☞page 3)
8AUX input jack
9(Detach) button
Detaches the monitor panel. (☞page 5)
You can change the color of the buttons on the
monitor panel. (☞page 38)
EN_KW-AV61UI.indb 6EN_KW-AV61UI.indb 6 12/11/09 11:5212/11/09 11:52
7
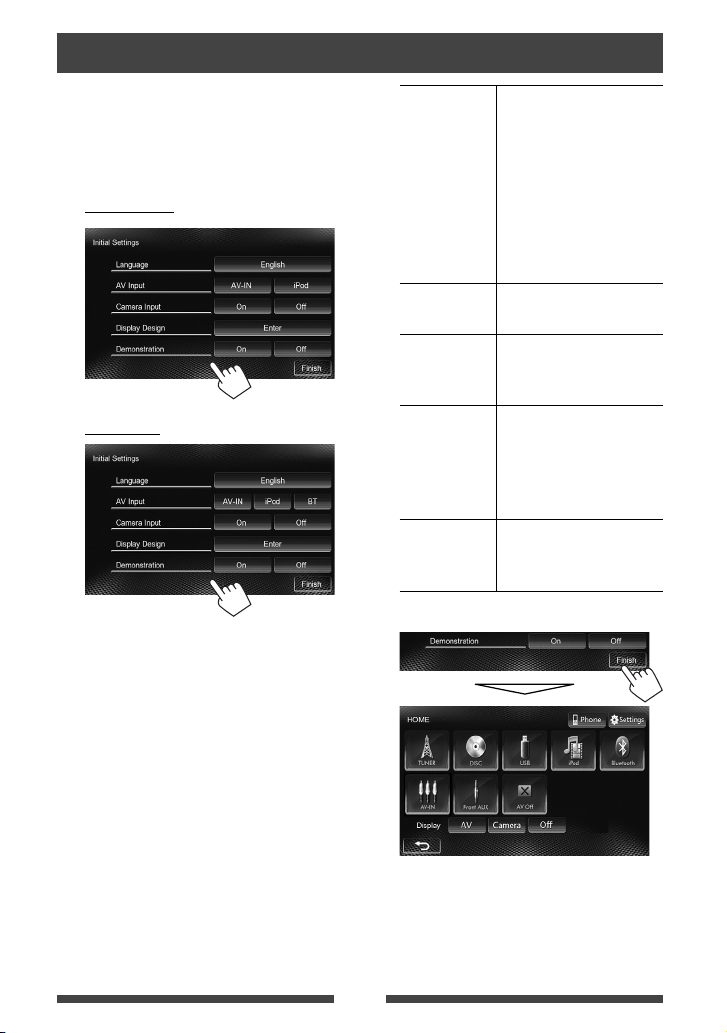
Initial settings
When you power on the unit for the first time or reset
the unit, the initial setting screen appears.
• You can also change the settings on the <Settings>
screen. (☞page 43)
1For KW-AV61BT
For KW-AV51
Language Select the text language used
for on-screen information.
(☞page 45)
• Set <GUI Language>
to display the operation
buttons and menu items
in the selected language
([Local]: initially selected)
or English ([English]).
AV Input Select an external component
to play. (☞page 44)
Camera Input Select [On] when connecting
the rear view camera.
(☞page 45)
Display
Design
Select the background
and the colors of the text,
touch panel buttons and
the monitor panel buttons.
(☞page 38)
Demonstration
Activate or deactivate the
display demonstration.
(☞page 44)
2 Finish the procedure.
The <HOME> screen is displayed.
• [AV Off] is selected initially. Select the playback
source. (☞page 12)
EN_KW-AV61UI.indb 7EN_KW-AV61UI.indb 7 12/11/09 11:5212/11/09 11:52

8
Setting the clock
1Display the <HOME> screen.
On the source control screen:
2Display the <Settings> screen.
3Display the <Time Set> screen.
4Set the clock time.
To synchronize the clock time with
Radio Data System
To set the clock manually
1Select the time display format
2Adjust the hour
3Adjust the minute
5Finish the procedure.
EN_KW-AV61UI.indb 8EN_KW-AV61UI.indb 8 12/11/09 11:5212/11/09 11:52

9
Turning on the power
Turning off the power
(Hold)
Adjusting the volume
To adjust the volume (00 to 50)
IncreaseDecrease
• On the source control screen, you can also adjust the
volume by moving your finger on the touch panel
as illustrated. (Not available depending on the AV
source.)
IncreaseDecrease
To attenuate the sound
The ATT indicator lights up.
To cancel the attenuation, press the VOLUME/ATT
knob.
Common operations
Turning off the screen
(Hold)
The screen is turned off.
• You can also turn off the screen on the <HOME>
screen.
To turn on the screen
or
Touch the screen to display the <HOME> screen.
EN_KW-AV61UI.indb 9EN_KW-AV61UI.indb 9 12/11/09 11:5212/11/09 11:52
10
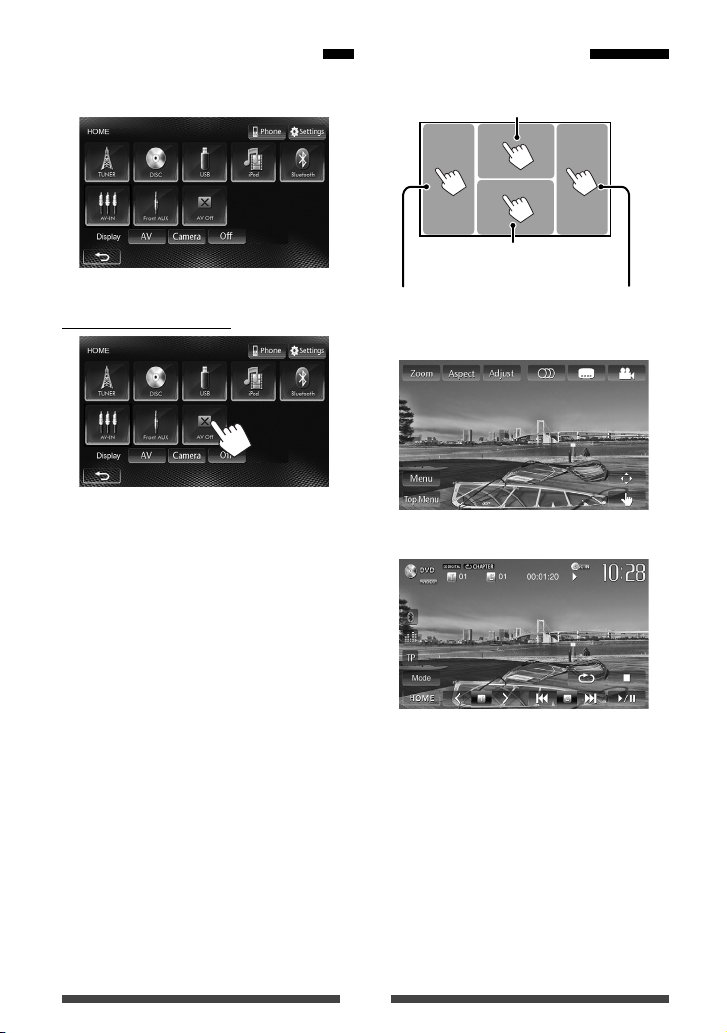
Touch screen operation
BDisplays the source control
screen while playing a video.
Goes to the previous
chapter/track.*
Goes to the next
chapter/track.*
ADisplays the video control menu while
playing a video.
AVideo control menu
BSource control screen for video playback
• The operation buttons disappear by touching the
screen or when no operation is done for about 10
seconds.
*Not available for video from an external component.
Dragging your finger to left or right functions in the
same way as touching.
Turning on/off the AV source
You can activate the AV function by selecting source on
<HOME> screen.
To turn off the AV source
The AV source is turned off.
EN_KW-AV61UI.indb 10EN_KW-AV61UI.indb 10 12/11/09 11:5212/11/09 11:52
This manual suits for next models
1
Table of contents
Other JVC Car Receiver manuals


