JVC KD-S100J User manual

ENGLISHESPAÑOL
FRANÇAIS
CD RECEIVER KD-S100
RECEPTOR CON CD KD-S100
RÉCEPTEUR CD KD-S100
INSTRUCTIONS
MANUAL DE INSTRUCCIONES
MANUEL D’INSTRUCTIONS
For customer Use:
Enter below the Model No.
and Serial No. which are
located on the top or bottom
of the cabinet. Retain this
information for future
reference.
Model No.
Serial No.
GET0395-001A
[J]
Cover_KD-S100[J]f.indd 2Cover_KD-S100[J]f.indd 2 9/20/06 2:23:34 PM9/20/06 2:23:34 PM

2
ENGLISH
Warning:
If you need to operate the unit while driving, be
sure to look ahead carefully or you may be involved
in a traffic accident.
INFORMATION (For U.S.A.)
This equipment has been tested and found to comply with the limits for a Class B digital device, pursuant to Part
5 of the FCC Rules. These limits are designed to provide reasonable protection against harmful interference in
a residential installation. This equipment generates, uses, and can radiate radio frequency energy and, if not
installed and used in accordance with the instructions, may cause harmful interference to radio communications.
However, there is no guarantee that interference will not occur in a particular installation. If this equipment does
cause harmful interference to radio or television reception, which can be determined by turning the equipment
off and on, the user is encouraged to try to correct the interference by one or more of the following measures:
– Reorient or relocate the receiving antenna.
– Increase the separation between the equipment and receiver.
– Connect the equipment into an outlet on a circuit different from that to which the receiver is connected.
– Consult the dealer or an experienced radio/TV technician for help.
Caution:
Changes or modifications not approved by JVC could void the user’s authority to operate the equipment.
IMPORTANT FOR LASER PRODUCTS
. CLASS LASER PRODUCT
2. CAUTION: Do not open the top cover. There are no user serviceable parts inside the unit; leave all servicing to
qualified service personnel.
3. CAUTION: (For U.S.A.) Visible and/or invisible class II laser radiation when open. Do not stare into beam.
(For Canada) Visible and/or invisible class M laser radiation when open. Do not view directly with
optical instruments.
4. REPRODUCTION OF LABEL: CAUTION LABEL, PLACED OUTSIDE THE UNIT.
[European Union only]
Notice:
The display window built in this unit has been
produced with high precision, but it may have
some ineffective dots. This is inevitable and is not
malfunction.
Caution on olume setting:
Discs produce very little noise compared with other
sources. Lower the volume before playing a disc
to avoid damaging the speakers by the sudden
increase of the output level.
EN02-09_KD-S100[J]2.indd 2EN02-09_KD-S100[J]2.indd 2 8/29/06 2:59:20 PM8/29/06 2:59:20 PM
ENGLISH
3
Thank you for purchasing a JVC product.
Please read all instructions carefully before operation,
to ensure your complete understanding and to obtain
the best possible performance from the unit.
The following marks are used to indicate...
: Built-in CD player operations.
: External CD changer operations.
: SD player operations.
: External USB memory operations.
How to reset your unit
• Your preset adjustments will also be erased.
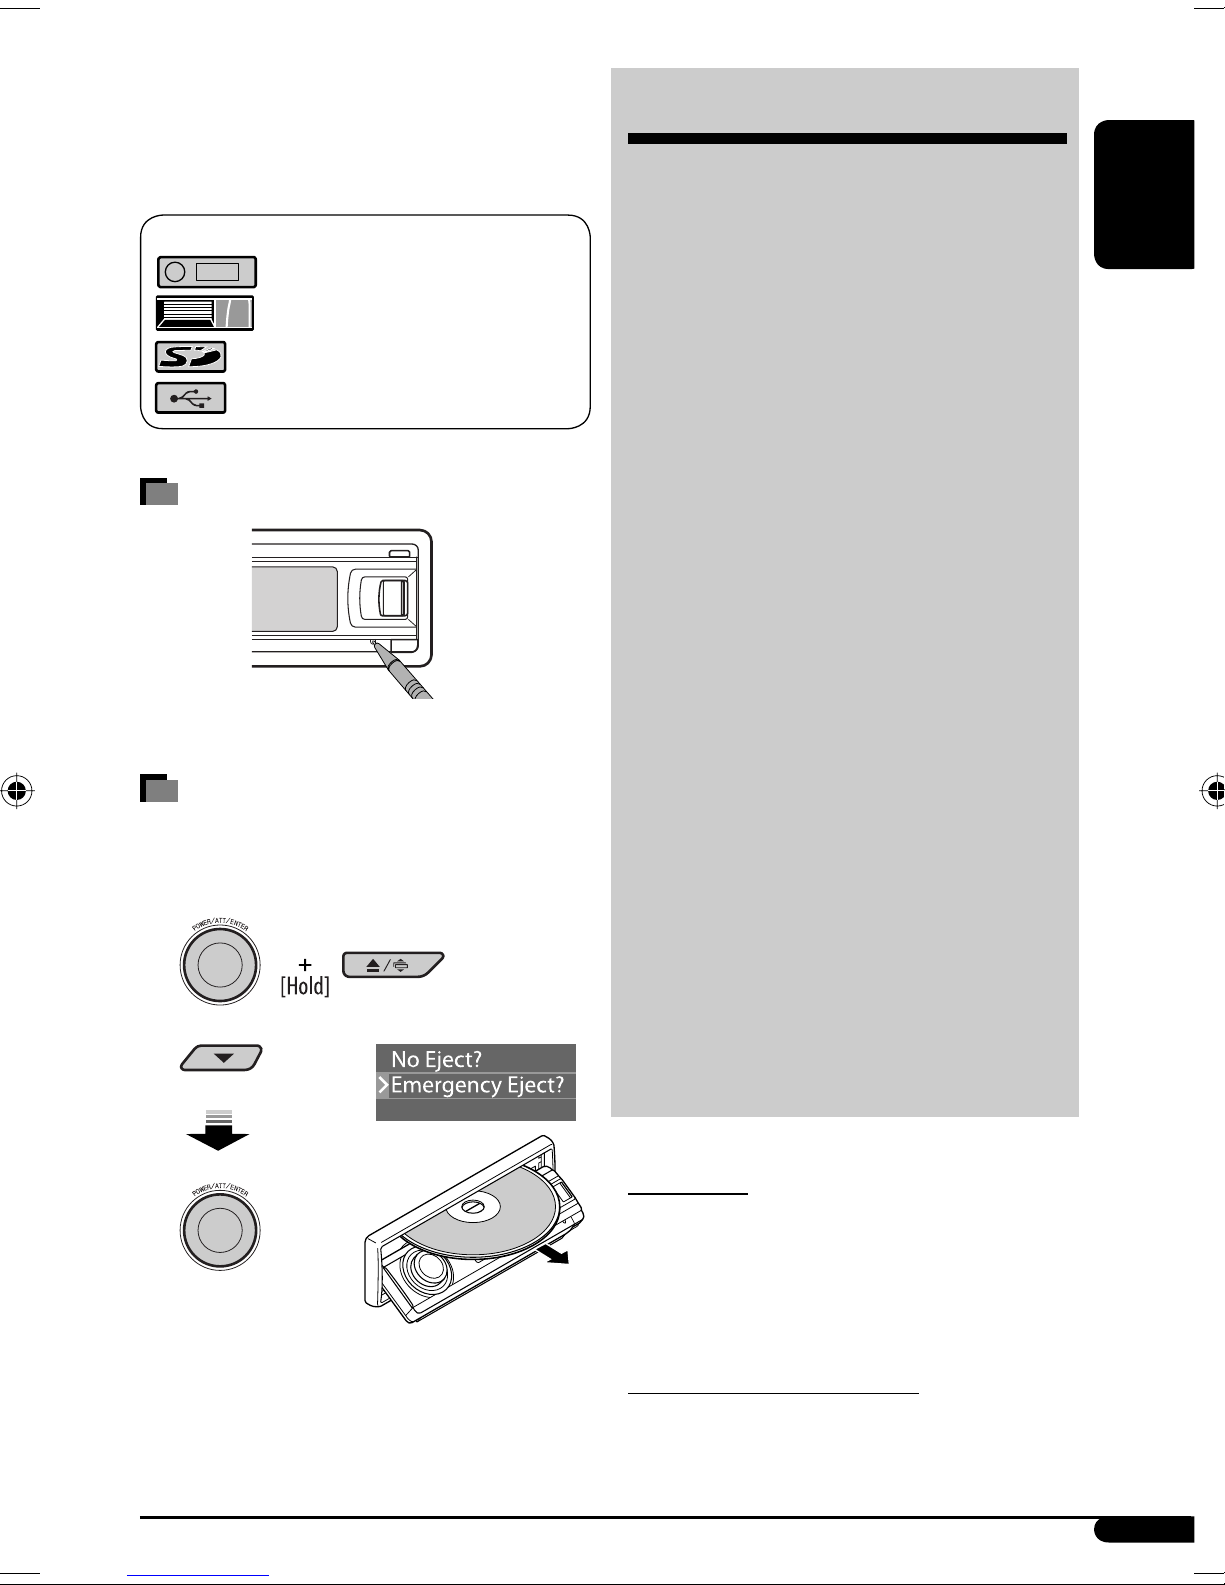
How to forcibly eject a disc
• If an SD card is inserted, eject the SD card first (see
page 0).
1
2
• If this does not work, reset your unit.
• Be careful not to drop the disc when it ejects.
CONTENTS
Control panel ................................. 5
Remote controller — RM-RK300 .......... 5
Getting started ............................... 7
Basic operations ................................................. 7
Radio operations ............................ 8
Disc/SD card/USB memory
operations ................................... 10
Playing a disc in the unit .................................... 0
Playing discs in the CD changer .......................... 0
Playing from an SD card ..................................... 0
Playing from a USB memory ..............................
Sound adjustments ......................... 14
Activating the Bongiovi Acoustics Digital Power
Station™ ..................................................... 4
Setting the sound modes—SEL ......................... 4
General settings — PSM ................. 15
Title assignment ............................ 19
Satellite radio operations ............... 20
iPod ®/D. player operations ............. 23
Other external component operations
... 25
Maintenance .................................. 26
More about this unit ....................... 27
Troubleshooting ............................. 30
Specifications ................................. 34
For safety...
• Do not raise the volume level too much, as this will
block outside sounds, making driving dangerous.
• Stop the car before performing any complicated
operations.
Temperature inside the car...
If you have parked the car for a long time in hot or cold
weather, wait until the temperature in the car becomes
normal before operating the unit.
EN02-09_KD-S100[J]2.indd 3EN02-09_KD-S100[J]2.indd 3 8/29/06 2:59:22 PM8/29/06 2:59:22 PM

4
ENGLISH
Entering the various menus
The main menu contains four menus (MODE, PSM, SEL,
TITLE).
• If no operation is done for about 5 seconds, menu
screen is canceled.
1
2 Select a menu you want.
3 Enter the selected menu.
• To go back to the previous screen
or exit the MENU screen, press
BACK repeatedly.
4 Operate as instructed on the screen.
• To go back to the MENU screen, press MENU.
Changing the display information
and patterns
Ex.: When tuner is selected as the source
Detaching the control panel
Attaching the control panel
Changing the control panel angle
1
2
When using the remote controller
Caution:
The unit is equipped with the steering wheel
remote control function.
Time countdown indicator
Source operation display Clock time display
Small graphic display
Large graphic display
(full display size)
Steering wheel remote
controller (equipped in the car)
OE remote adapter
(not supplied)
Steering wheel
remote input
EN02-09_KD-S100[J]f.indd 4EN02-09_KD-S100[J]f.indd 4 9/20/06 2:24:39 PM9/20/06 2:24:39 PM

ENGLISH
5
1 BAND button
2 SOURCE button
3 • Control dial
• POWER/ATT (attenuator)/ENTER button
4 MENU button
5 5 (up) / ∞ (down) buttons
6 Display window
7 B (Bongiovi Acoustics Digital Power Station™)
button
8 USB (Universal Serial Bus) input terminal
Parts identification
Control panel
9 DISP (display) button
p 0 (eject) / (angle) button
q 4 /¢ buttons
w Remote sensor
DO NOT e pose the remote sensor to strong light
(direct sunlight or artificial lighting).
e BACK button
r Reset button
t (control panel release) button
Remote controller — RM-RK300
Installing the lithium coin battery
(CR2025) For USA-California Only:
This product contains a CR Coin Cell Lithium Battery
which contains Perchlorate Material—special
handling may apply.
See www.dtsc.ca.gov/hazardouswaste/perchlorate
Aim the remote controller directly at the remote
sensor on the unit. Make sure there is no obstacle
in between.
Continued on the ne t page
EN02-09_KD-S100[J]2.indd 5EN02-09_KD-S100[J]2.indd 5 8/29/06 2:59:24 PM8/29/06 2:59:24 PM

6
ENGLISH
Warning:
• Do not install any battery other than CR2025 or
its equivalent; otherwise, it may explode.
• Do not leave the remote controller in a place
(such as dashboards) exposed to direct sunlight
for a long time; otherwise, it may explode.
• Store the battery in a place where children
cannot reach to avoid risk of accident.
• To prevent the battery from over-heating,
cracking, or starting a fire:
– Do not recharge, short, disassemble, heat the
battery, or dispose of it in a fire.
– Do not leave the battery with other metallic
materials.
– Do not poke the battery with tweezers or
similar tools.
– Wrap the battery with tape and insulate when
throwing away or saving it.
Main elements and features
1 (standby/on/attenuator) button
• Turns the power on if pressed briefly or
attenuates the sound when the power is on.
• Turns the power off if pressed and held.
2 SOURCE button
Selects the source.
3 5 (up) / ∞ (down) buttons
• For FM/AM: Changes the preset stations.
• For SIRIUS®/XM: Changes the categories.
• For MP3/WMA/SD/USB: Changes the folders.
• While listening to an Apple iPod or a JVC
D. player:
– Pauses/stops or resumes playback with ∞.
– Enters the main menu with 5.
(Now 5/∞/4/¢ work as the menu
selecting buttons.)*
4 VOL ( olume) + / – buttons
Adjusts the volume level.
5 Number buttons
• For FM/AM: Selects the preset station if pressed,
or store a station if pressed and held.
• For SIRIUS®/XM: Selects the preset channels if
pressed, or store a channel if pressed and held.
• For CD/CD Text: Selects the tracks.
• For MP3/WMA/SD/USB: Selects the folders.
• For CD changer: Selects the discs.
6 ANGLE button
Adjusts the control panel angle.
7 BAND button
Selects the band.
8 4 / ¢ buttons
• For FM/AM: Searches for stations if pressed, or
skips frequencies after pressed and held.
• For SIRIUS®/XM: Changes the channels if
pressed briefly, or changes the channels rapidly
if pressed and held.
• For CD/CD Text/MP3/WMA/SD/USB: Changes
the tracks if pressed, or fast-forwards or reverses
the track if pressed and held.
• While listening to an iPod or a D. player (in
menu selecting mode):
– Selects an item if pressed briefly. (Then, press
∞ to confirm the selection.)
– Skips 0 items at a time if pressed and held.
* 5 : Returns to the previous menu.
∞ : Confirms the selection.
EN02-09_KD-S100[J]2.indd 6EN02-09_KD-S100[J]2.indd 6 8/29/06 2:59:24 PM8/29/06 2:59:24 PM

ENGLISH
7
Getting started
Basic operations
~ Turn on the power.
Ÿ
FM/AM = SIRIUS*/XM* = CD* =
SD* = USB* = CD-CH*/iPod*/D. player*
(or EXT-IN) = LINE-IN = (back to the
beginning)
* You cannot select these sources if they are not
ready or not connected.
!
For FM/AM tuner
For SIRIUS radio
For XM tuner
⁄ Adjust the olume.
@ Adjust the sound as you want. (See
pages 14 and 15.)
To drop the olume in a
moment (ATT)
To restore the sound, press it
again.
To turn off the power
Setting the clock
• See also “General settings — PSM” on pages
5 – 7.
1 Enter the PSM menu (see page 4).
2 Set the clock.
1 Select “Clock H” (hour), then adjust the hour.
2 Select “Clock M” (minute), then adjust the
minute.
3 Select “24H/ 2H,” then “24Hours” or
“ 2Hours.”
3 Finish the procedure.
To check the current clock time while the
power is turned off
EN02-09_KD-S100[J]2.indd 7EN02-09_KD-S100[J]2.indd 7 8/29/06 2:59:25 PM8/29/06 2:59:25 PM

8
ENGLISH
4 MO indicator lights up. Reception
improves, but stereo effect will be
lost.
To restore the stereo effect, repeat the same
procedure and select “Off” in step 3. The MO indicator
goes off.
Tuning in to FM stations with
strong signals only—LO (local)/
DX (Distance-Extreme)
1 Enter the MODE menu (see page 4).
2
3
4 DX indicator goes off and LO
indicator lights up. Only stations
with sufficient signal strength will be
detected.
To tune in to all recei able stations, repeat the
same procedure and select “DX” in step 3. The LO
indicator goes off and DX indicator lights up.
Storing stations in memory
You can preset six stations for each band.
FM station automatic presetting —
SSM (Strong-station Sequential
Memory)
1 Select the FM band (FM1 – FM3) you
want to store into.
Radio operations
~
Ÿ
! Start searching for a station.
When a station is received, searching stops.
To stop searching, press the same button
again.
To tune in to a station manually
In step ! above...
1
2 Select a desired station frequency.
When an FM stereo broadcast is hard
to recei e
1 Enter the MODE menu (see page 4).
2
3
Selected band appears.
EN02-09_KD-S100[J]2.indd 8EN02-09_KD-S100[J]2.indd 8 8/29/06 2:59:26 PM8/29/06 2:59:26 PM

ENGLISH
9
2 Enter the MODE menu (see page 4).
3
4
Local FM stations with the strongest signals are
searched and stored automatically in the FM band.
Manual presetting
Ex.: Storing FM station of 92.5 M z into preset
number 4 of the FM1 band.
1
2
3 Enter the MODE menu (see page 4).
• If you hold down 5/∞, the Preset Station List
appears (go to step 6).
4
5
6 Select a preset number.
• You can move to the lists of the other FM bands
by turning the control dial.
7 Store the station.
When using the remote controller
After tuning in to a station you want to preset...
Listening to a preset station
1
2
When using the remote controller
Directly select the preset number.
EN02-09_KD-S100[J]2.indd 9EN02-09_KD-S100[J]2.indd 9 9/6/06 3:04:24 PM9/6/06 3:04:24 PM

10
ENGLISH
Disc/SD card/USB memory
operations
Playing a disc in the unit
All tracks will be played repeatedly until you change the
source or eject the disc.
To stop play and eject the disc
Note:
If a USB memory is attached to the unit, you cannot
eject the disc. “ lease Eject USB” flashes on the
display. If this happens, detach the USB memory,
then, press 0 / button again.
Playing discs in the CD changer
All discs in the magazine will be played repeatedly until
you change the source.
• Ejecting the magazine will also stop playback.
* If you have changed the external input setting to
“Ext In” (see page 17), you cannot select the CD
changer
Playing from an SD card
Before detaching the control panel, turn off the power.
~
Ÿ
ress in the SD card until you hear a clicking
sound.
To eject the SD card, press the SD card again.
• ress the SD card softly (do not release your
finger quickly); otherwise, the SD card may
pop out from the unit.
! Attach the control panel.
SD loading slot
SD card
EN10-15_KD-S100[J]f.indd 10EN10-15_KD-S100[J]f.indd 10 9/20/06 2:25:36 PM9/20/06 2:25:36 PM
This manual suits for next models
1
Table of contents
Other JVC Car Receiver manuals


