JVC EXAD KW-AVX900 User manual
For installation and connections, refer to the separate manual.
INSTRUCTIONS
LVT1670-001A
[A]
For canceling the display demonstration, see page 8.
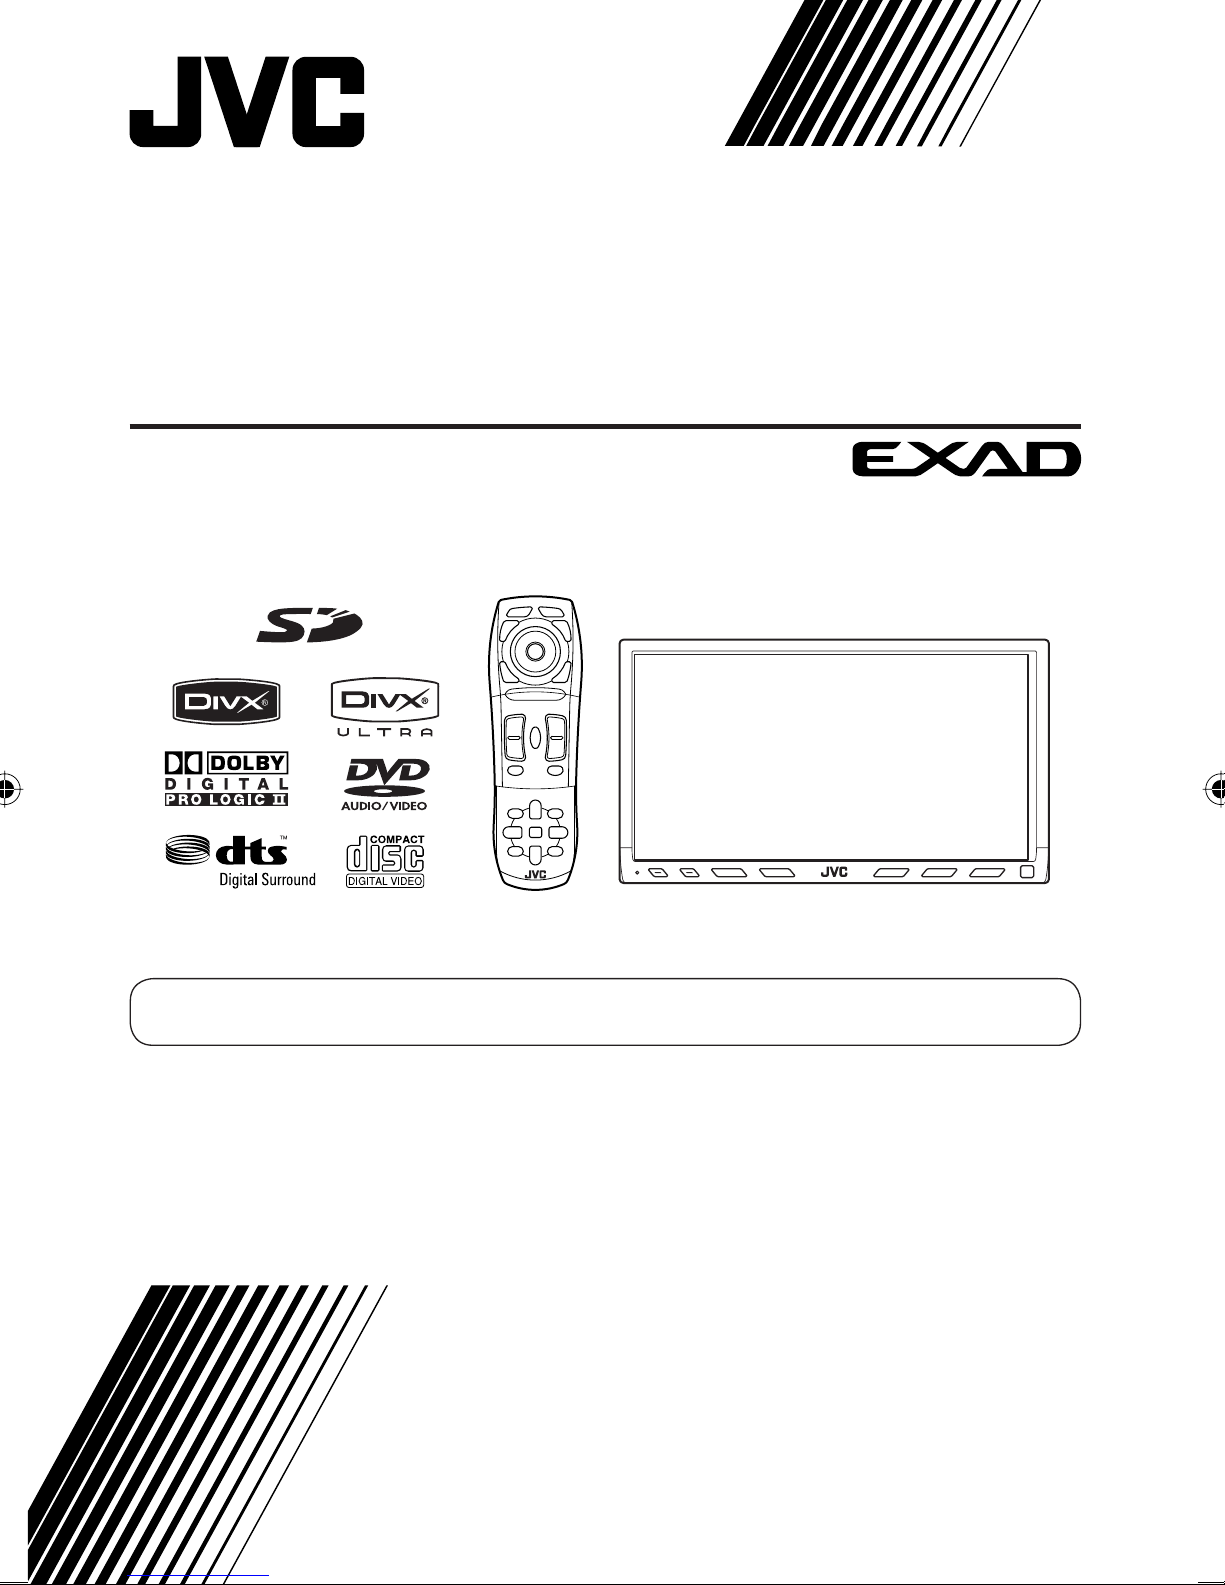
DVD RECEIVER WITH MONITOR
KW-AVX900
Cover_KW-AVX900A_f.indd 2Cover_KW-AVX900A_f.indd 2 07.3.13 11:29:05 AM07.3.13 11:29:05 AM
2
Thank you for purchasing a JVC product.
Please read all instructions carefully before operation, to ensure your complete understanding and to obtain the best
possible performance from the unit.
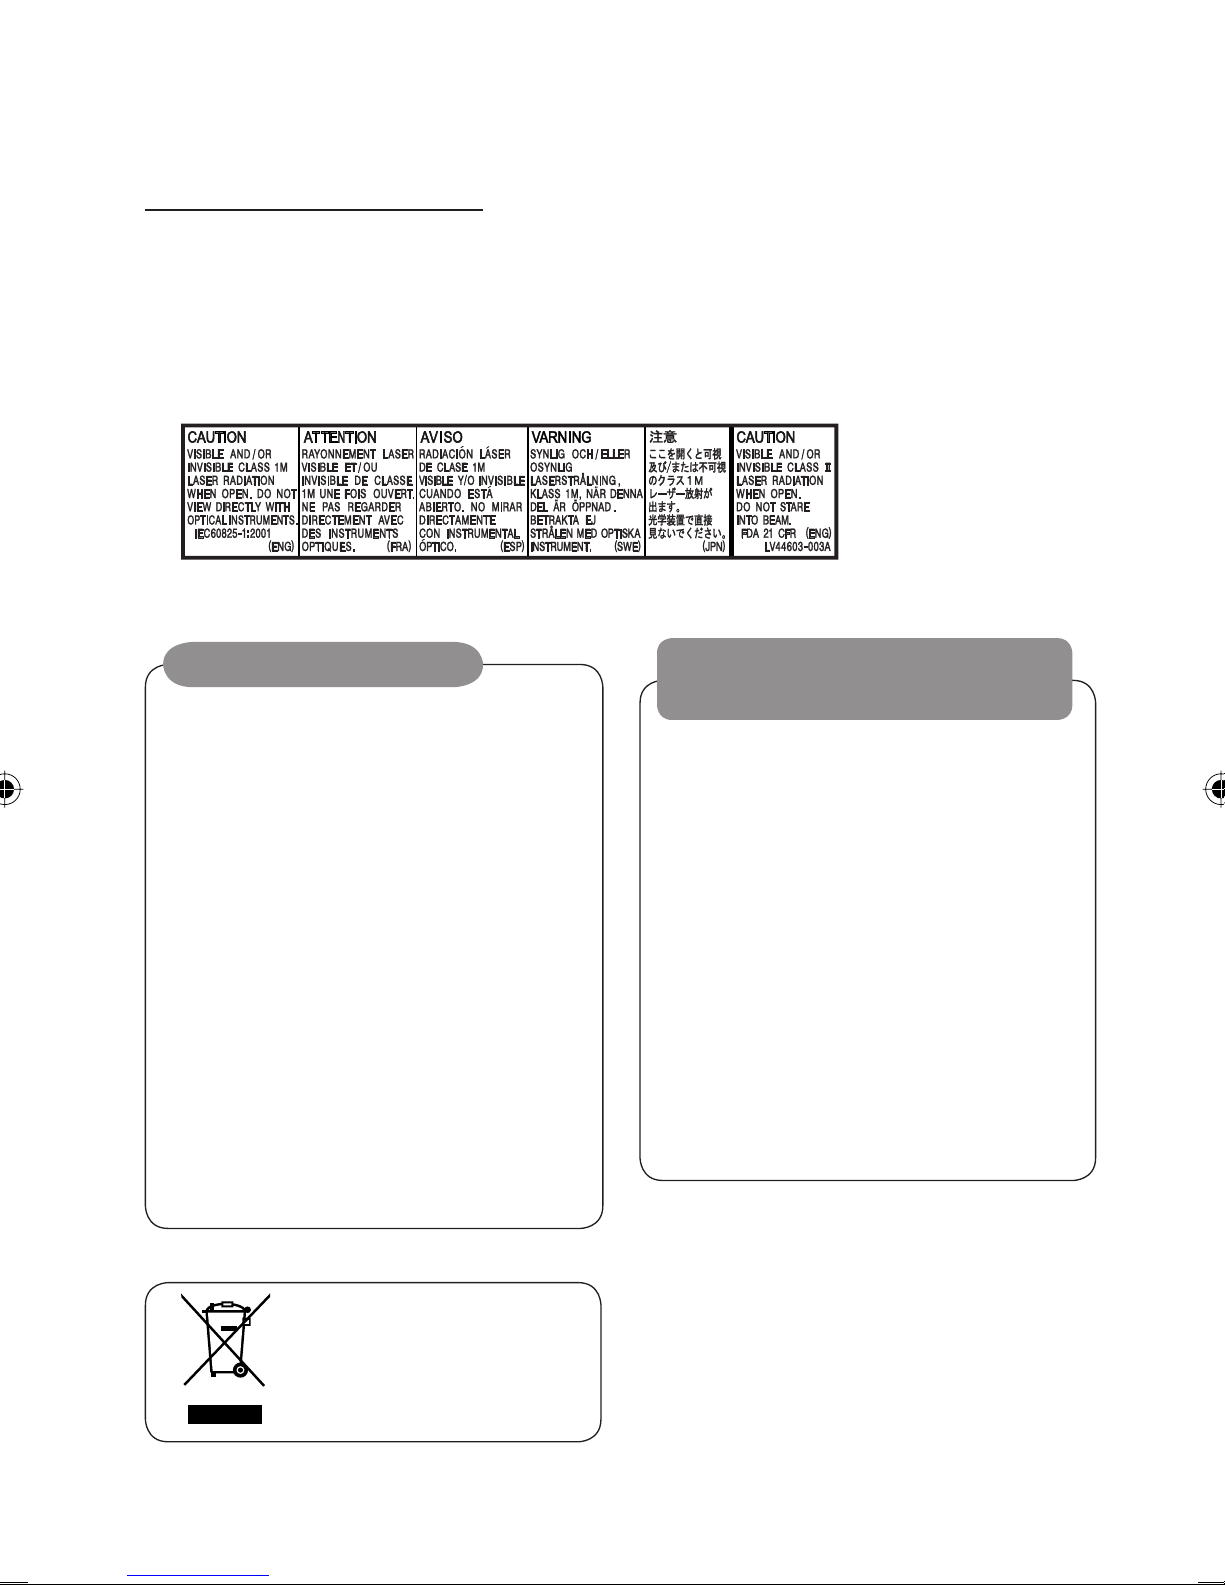
IMPORTANT FOR LASER PRODUCTS
1. CLA 1 LA ER PRODUCT
2. CAUTION: Do not open the top cover. There are no user serviceable parts inside the unit; leave all servicing to
qualified service personnel.
3. CAUTION: Visible and/or invisible class 1M laser radiation when open. Do not view directly with optical
instruments.
4. REPRODUCTION OF LABEL: CAUTION LABEL, PLACED OUT IDE THE UNIT.
WARNINGS:
To prevent accidents and da age
• DO NOT install any unit and wire any cable in
locations where;
– it may obstruct the steering wheel and
gearshift lever operations.
– it may obstruct the operation of safety devices
such as air bags.
– it may obstruct visibility.
• DO NOT operate the unit while driving.
If you need to operate the unit while driving, be
sure to look around carefully.
• The driver must not watch the monitor while
driving.
• The driver must not put on the headphones while
driving.
Cautions on the onitor:
• The monitor built in this unit has been produced
with high precision, but it may have some
ineffective dots. This is inevitable and is not
malfunction.
• Do not expose the monitor to direct sunlight.
• Do not operate the touch panel using a ball-point
pen or similar tool with the sharp tip.
Touch the buttons on the touch panel with your
finger directly (if you wear a glove, take it off).
• When the temperature is very cold or very hot..
– Chemical changes occur inside, causing
malfunction.
– Pictures may not appear clearly or may move
slowly. Pictures may not be synchronized with
the sound or picture quality may decline in
such environments.
[European Union only]
EN02-07_KW-AVX900A_f.indd 2EN02-07_KW-AVX900A_f.indd 2 07.3.13 11:34:06 AM07.3.13 11:34:06 AM
3INTRODUCTION
How to reset your unit
• Your preset
adjustments will also
be erased.
How to forcibly eject a disc
• If this does not work, reset the unit.
For safety...
• Do not raise the volume level too much, as this will
block outside sounds, making driving dangerous.
• top the car before performing any complicated
operations.
Te perature inside the car...
If you have parked the car for a long time in hot or cold
weather, wait until the temperature in the car becomes
normal before operating the unit.
Contents
INTRODUCTION
Playable disc type ............................ 4
Basic operations—
Monitor panel/touch panel ............ 5
Basic operations—
Re ote controller (RM-RK251) ...... 6
OPERATIONS
Before operating the unit ................ 8
Co on operations ........................ 9
Listening to the radio ...................... 10
Disc operations ................................ 13
Dual Zone operations ....................... 27
SD operations .................................. 30
USB operations ................................ 32
Watching TV .................................... 34
EXTERNAL DEVICES
Bluetooth® operations—
Cellular phone/audio player .......... 37
Listening to the CD changer .............. 44
Listening to the iPod/D. Player ......... 46
Using other external co ponents ..... 48
SETTINGS
Sound equalization .......................... 51
Assigning titles to the sources .......... 52
Menu operations ............................. 53
REFERENCES
Maintenance ................................... 63
More about this unit ........................ 64
Troubleshooting .............................. 71
Specifications .................................. 76
NO EJECT?
EMERGENCY EJECT?
Exit
ENTER
Back
11
3
2
at the same time
EN02-07_KW-AVX900A_f.indd 3EN02-07_KW-AVX900A_f.indd 3 07.3.13 11:34:09 AM07.3.13 11:34:09 AM

4
Disc type Recording for at, file type, etc. Playable
DVD DVD Video (Region Code: 4)*1
DVD Audio
DVD-ROM
DVD Recordable/Rewritable
(DVD-R*2/-RW, +R/+RW*3)
• DVD Video: UDF bridge
• DVD-VR
• DivX/MPEG1/MPEG2/JPEG/MP3/
WMA/WAV/AAC: I O 9660 level
1, level 2, Romeo, Joliet
• DVD-RAM cannot be played.
DVD Video
DVD-VR (non-CPRM only)
DivX/MPEG1/MPEG2
JPEG
MP3/WMA/WAV/AAC*4
MPEG4
DVD+VR
Dual Disc DVD side
Non-DVD side
CD/VCD Audio CD/CD Text (CD-DA)/DT -CD
VCD (Video CD)
CD-ROM
CD-I (CD-I Ready)
CD Recordable/Rewritable
(CD-R/-RW)
• I O 9660 level 1, level 2, Romeo,
Joliet
CD-DA
MP3/WMA/WAV/AAC*4
JPEG
DivX/MPEG1/MPEG2
MPEG4
*1 If you insert a DVD Video disc of an incorrect Region Code, Region code error” appears on the monitor.
*2 DVD-R recorded in multi-border format is also playable (except for dual layer discs).
*3 It is possible to play back finalized +R/+RW (Video format only) discs. However, the use of +R double layer disc is
not recommended.
*4 This unit can play back AAC files encoded using iTunes.
Caution for DualDisc playback
The Non-DVD side of a “DualDisc” does not comply with the “Compact Disc Digital Audio” standard. Therefore,
the use of Non-DVD side of a DualDisc on this product may not be recommended.
Playable disc type
EN02-07_KW-AVX900A_f.indd 4EN02-07_KW-AVX900A_f.indd 4 07.3.13 11:34:10 AM07.3.13 11:34:10 AM
5INTRODUCTION
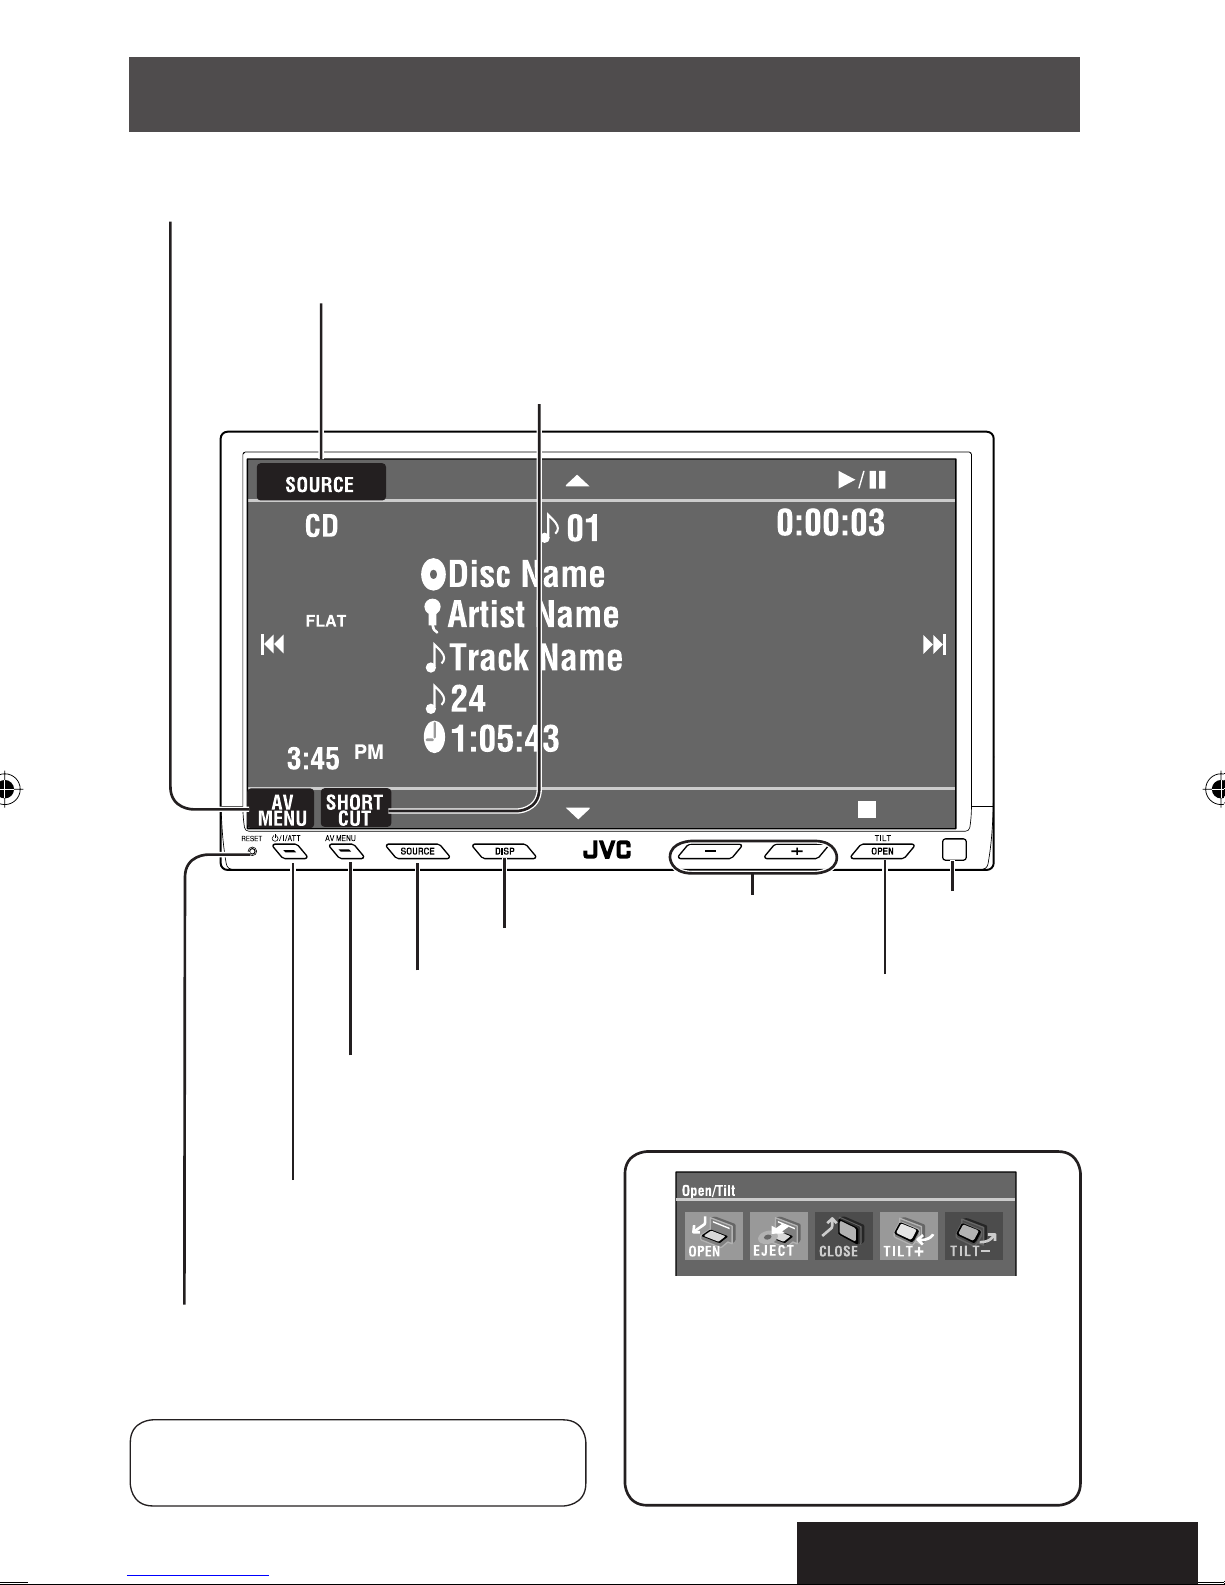
Basic operations — Monitor panel/touch panel
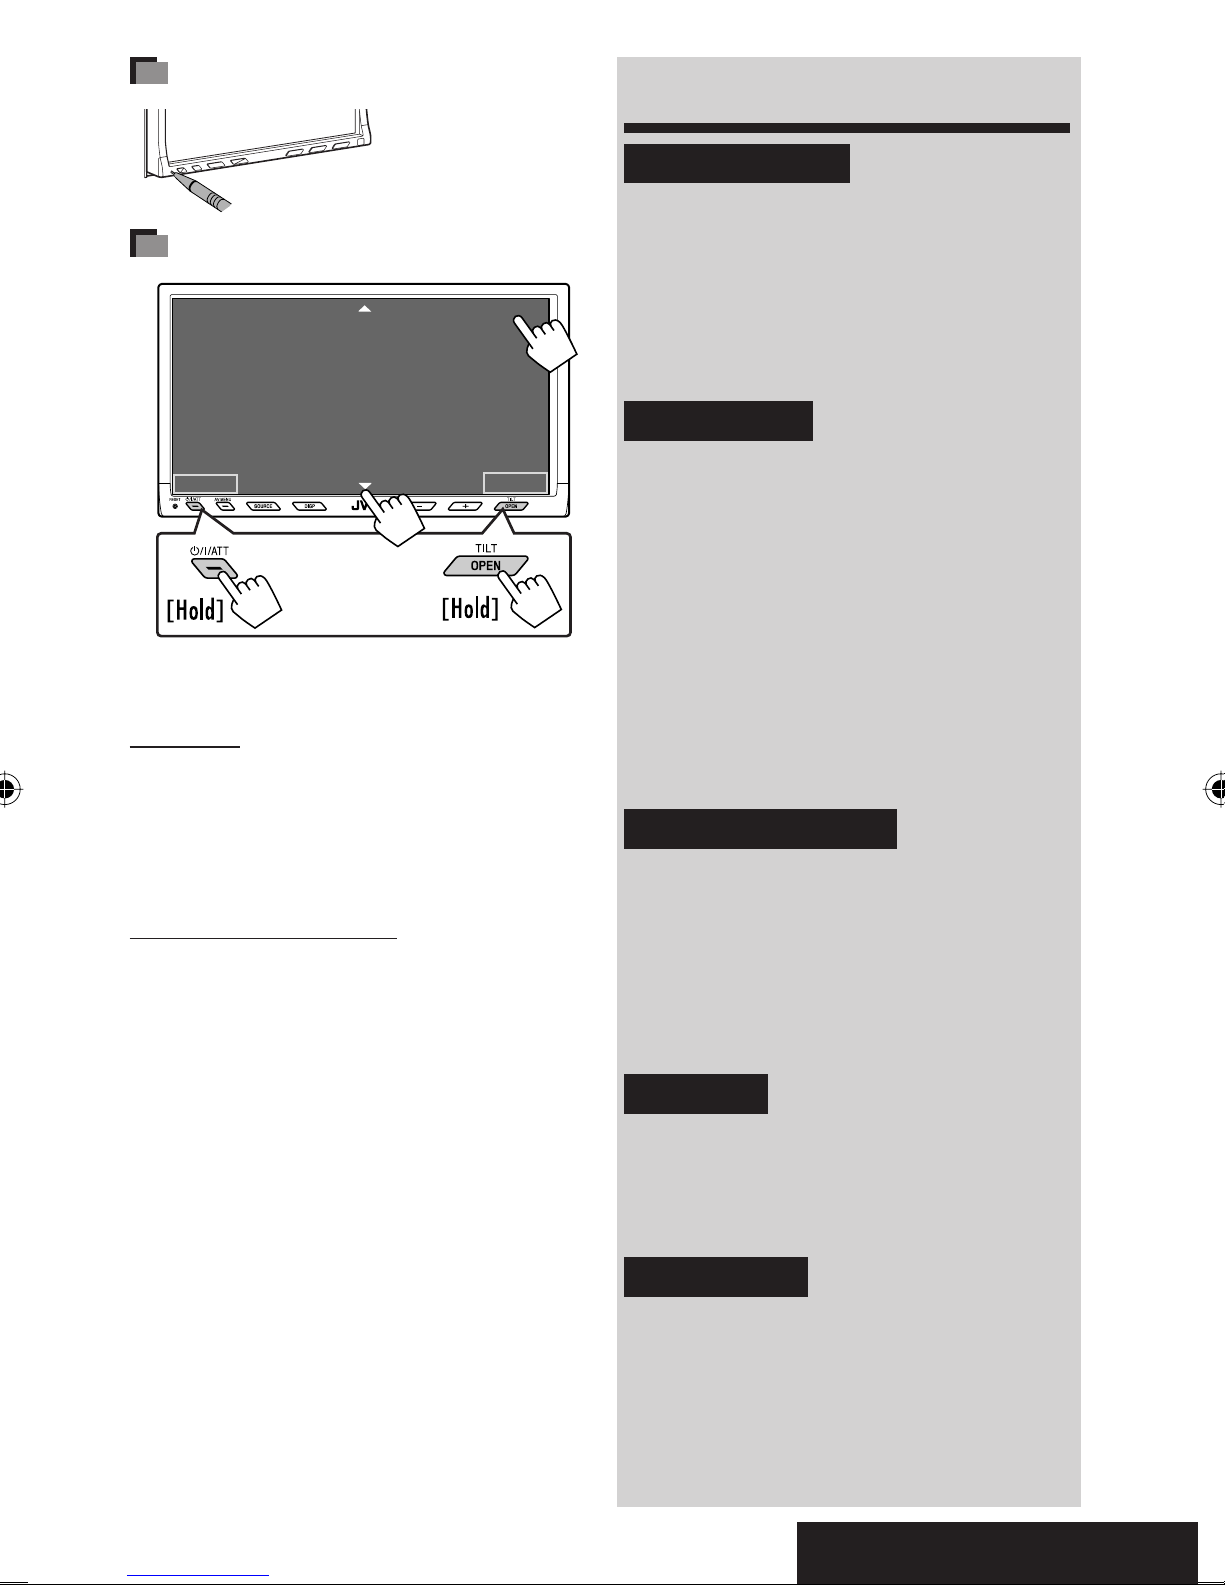
• Turn on the power.
• Turn off the power [Hold].
• Attenuate the sound (if the power is on).
Change the sources.
• ☞ page 9.
Re ote sensor
Adjust the volu e.
Reset the unit.
• Use only when the internal system malfunctions.
Display <AV Menu>.
• ☞ page 53.
Display and erase the Short Cut windows.
Available functions vary among the sources. For details, see each source
operation section.
Change the display infor ation.
• [OPEN]: Open the onitor panel.
• [EJECT]: Eject the disc.
• [CLOSE]: Close the onitor panel.
• [TILT +/–]: Tilt the onitor panel.
• [Exit]: Erase this screen.
• haded icons cannot be used at that time.
• For details on the touch panel operations,
see each source operation sections.
Display <Source Menu>.
• ☞ pages 9 and 27.
• Display the <Open/Tilt> screen
• Eject the disc and display the <Open/Tilt>
screen [Hold].
• Close the onitor panel when the <Open/Tilt>
screen is displayed.
Display <AV Menu>.
• ☞ page 53.
EN02-07_KW-AVX900A_f.indd 5EN02-07_KW-AVX900A_f.indd 5 07.3.13 11:34:12 AM07.3.13 11:34:12 AM
6
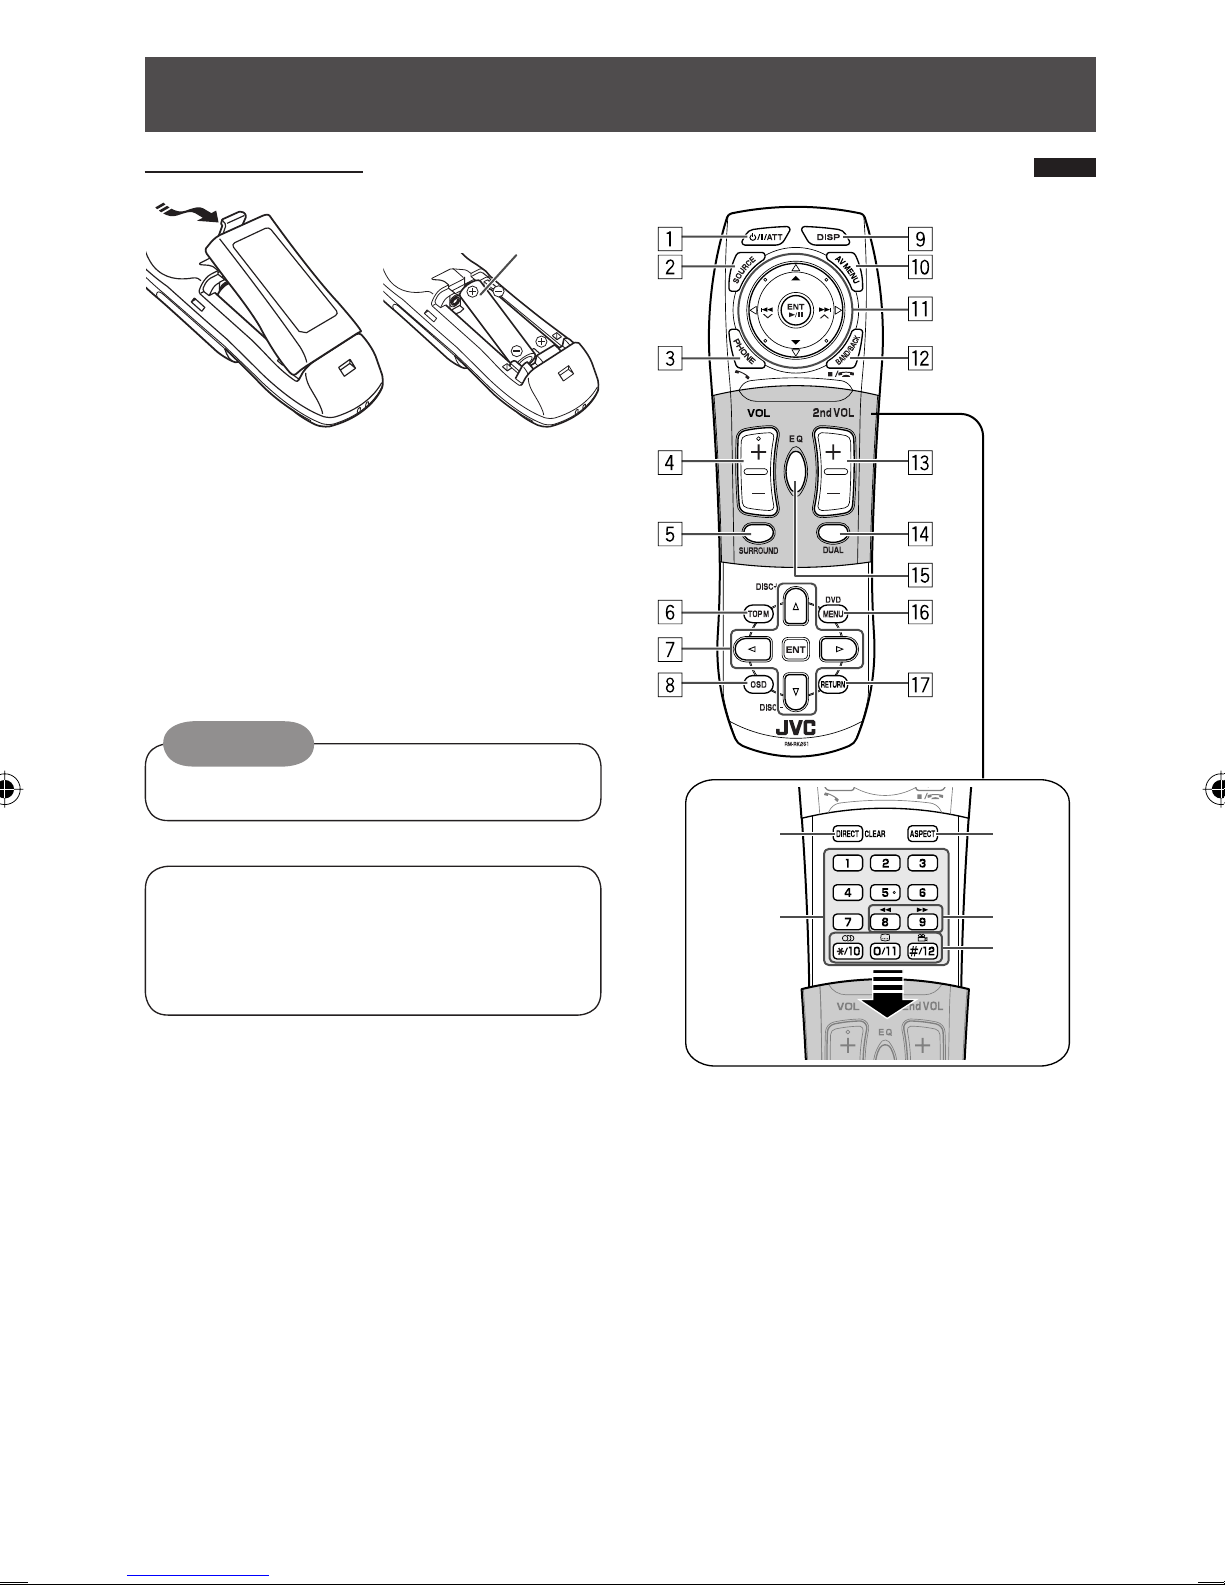
Basic operations — Remote controller (RM-RK251
Installing the battery
If the range or effectiveness of the remote controller
decreases, replace both batteries.
Before using the re ote controller:
• Aim the remote controller directly at the remote
sensor on the unit.
• DO NOT expose the remote sensor to bright light
(direct sunlight or artificial lighting).
Caution:
• Do not expose batteries to heat or flame.
IMPORTANT:
If Dual Zone is activated (☞ page 27), the remote
controller functions only for operating the DVD/CD
player and the built-in TV.
Main ele ents and features
i
o
;
a
s
1*1 • Turns on the power.
• Attenuates the sound if the power is on.
• Turns off the power if pressed and held (while
the power is on).
2*1 elects the source.
3*1 • Displays <Dial Menu>.
• Displays <Redial> list if pressed and held.
• Answers incoming calls.
4*1,2 Adjusts the volume level.
R03/LR03/AAA
EN02-07_KW-AVX900A_f.indd 6EN02-07_KW-AVX900A_f.indd 6 07.3.13 11:34:14 AM07.3.13 11:34:14 AM

7INTRODUCTION
w TUNER: Selects the bands.
DISC/SD/USB: Stops play.
Bluetooth PHONE: Ends the call.
Bluetooth UDIO: Plays/pauses.
• This button does not function as the B CK
button for this model.
e*2 djusts the volume level through the 2nd UDIO
OUT plug.
r*2 ctivates or deactivates Dual Zone.
t*1,2 Selects the sound mode.
y • DVD Video/DivX 6: Shows the disc menu.
• VCD: Resumes PBC playback.
• DVD-VR: Shows the Play List screen.
u RETURN button
• For VCD: Returns to the PBC menu.
i DISC/SD/USB: Switches number entry mode.
• lso functions as CLE R button to erase the
misentry after entering the wrong number.
o • Enter the numbers.
• FM/ M/TV: Selects the preset station/channel
directly.
• CD changer: Selects the disc directly.
;*1 Changes the aspect ratio of the playback
pictures.
a Reverse search/forward search for disc/SD/USB
operations.
s • DVD Video: Selects audio language ( ),
subtitles ( ), angle ( ).
• DVD udio: Selects audio stream ( ).
• DVD-VR: Turn on/off subtitles ( ), and
selects audio channel ( )
• DivX: Selects audio language ( ),
subtitles ( ).
• VCD: Selects audio channel ( ).
*1 If Dual Zone is activated, these buttons cannot be
used.
*2 These buttons can be used only when the slide cover is
closed.
*3 5 : Returns to the previous menu.
∞ : Confirms the selection.
5*1,2 Selects surround mode.
6 • DVD/DivX 6: Shows the disc menu.
• VCD: Resumes PBC playback.
• DVD-VR: Shows the Original Program screen.
7 • Makes selection/settings.
• ~: Skips back or forward by 5 minutes for
DivX/MPEG1/MPEG2.
• DISC +/– buttons: Changes discs for “CD-CH.”
8 Shows the on-screen bar.
9*1 Changes the display information.
p Display or erase <AV Menu>.
q For disc/SD/USB operations:
• 6: Plays/pauses.
• 5 / ∞:
DVD: Selects the title/group.
DVD-VR: Selects the program/playlist.
SD/USB/other discs (except VCD/CD): Selects
the folders.
• 4 / ¢:
– Press briefly: reverse skip/forward skip.
– Press and hold: reverse search/forward
search.
For FM/AM operations:
• 5 / ∞: Selects the preset stations.
• 4 / ¢: Functions to search for stations.
– Press briefly: uto Search
– Press and hold: Manual Search
For TV operations:
• 5 / ∞: Selects the preset stations.
• 4 / ¢: Functions to search for stations.
– Press briefly: uto Search
– Press and hold: Manual Search
For Apple iPod/JVC D. player operations:
• ∞: Pauses/stops or resumes playback.
• 5: Enters the main menu (then 5 / ∞ /
4 / ¢ work as the menu selecting
buttons).*3
• 4 / ¢ (in menu selecting mode)
– Selects an item if pressed briefly. (Then,
press ∞ to confirm the selection.)
– Skips 10 items at a time if pressed and held.
For Bluetooth operations:
• 4 / ¢: reverse skip/forward skip (for
audio operation)
• 6: nswers incoming calls (for “Bluetooth
PHONE”), plays/pauses (for “Bluetooth
UDIO”)
EN02-07_KW-AVX900A_f.indd 7EN02-07_KW-AVX900A_f.indd 7 07.3.14 8:05:04 PM07.3.14 8:05:04 PM
8
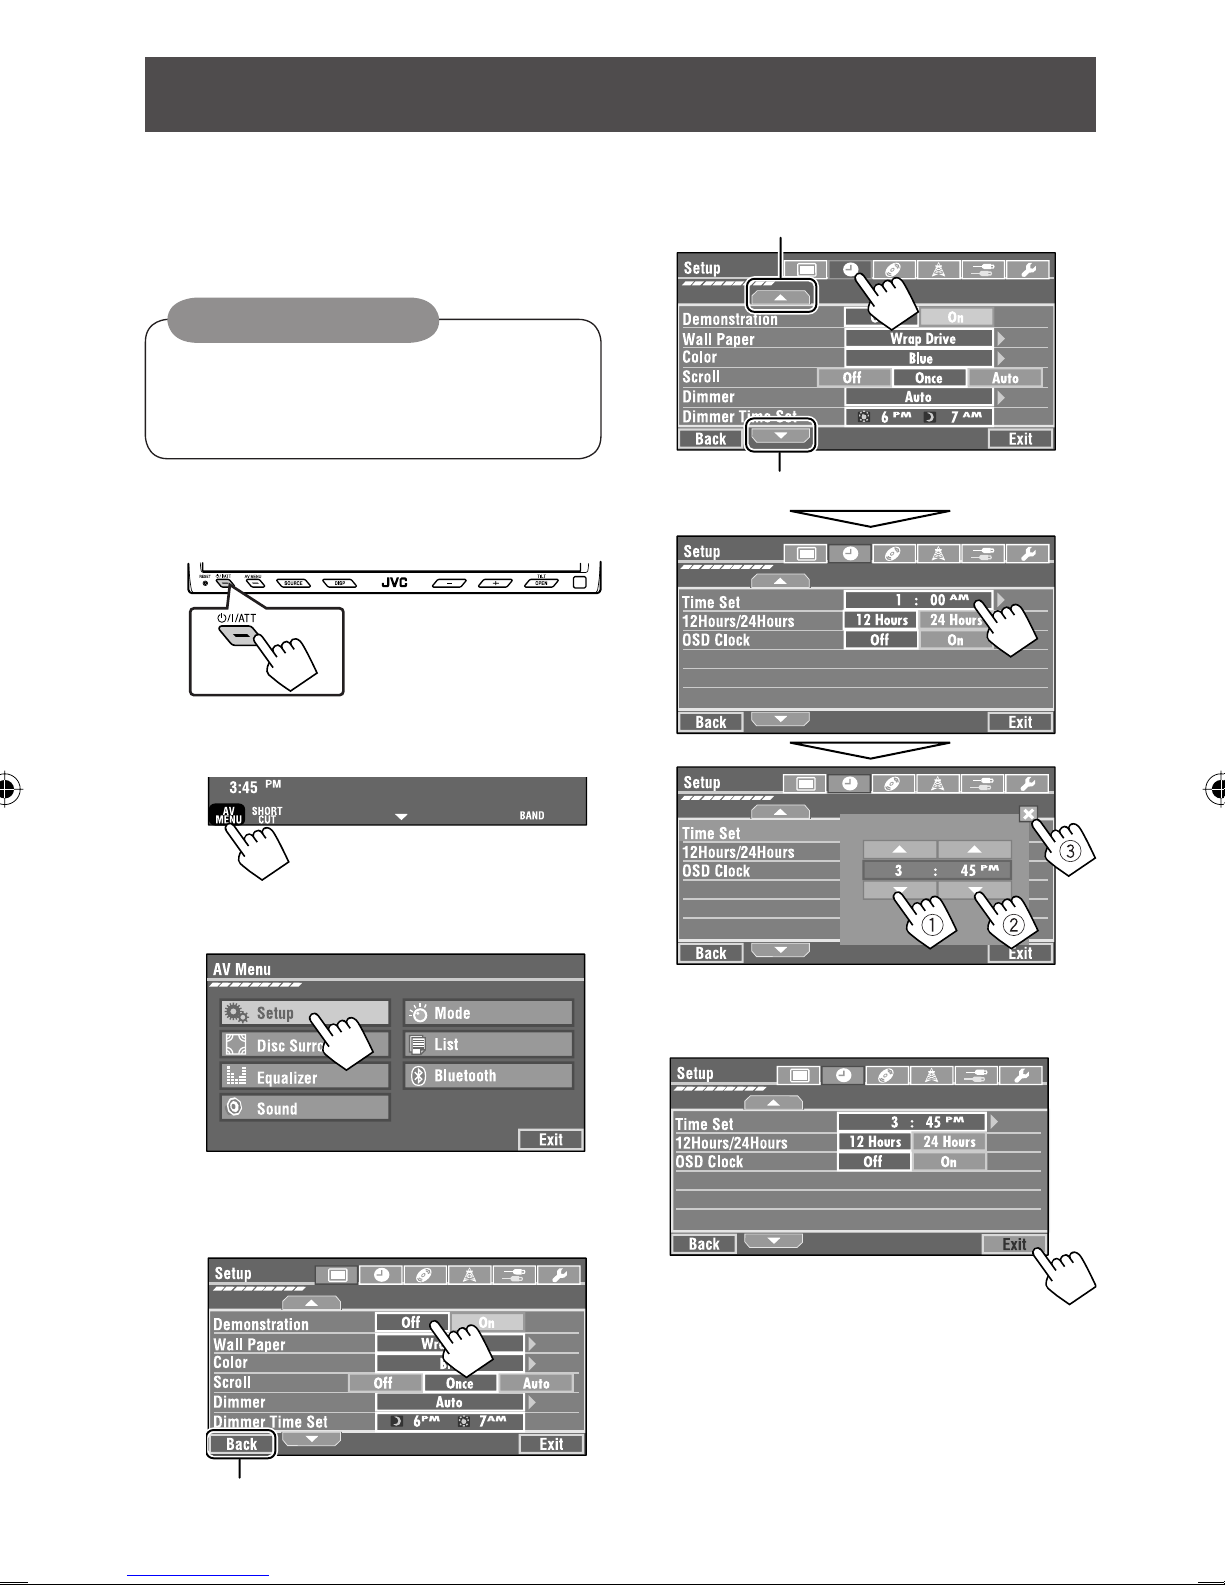
Cancel the display demonstration and set the clock (☞
pages 54 and 55 for details).
• Non-available items will be displayed being shaded
on the V Menu screens.
Indication language:
In this manual, English indications are used
for purpose of explanation. You can select the
indication language on the monitor. (☞ page 55)
~ Turn on the power.
Ÿ Display <AV Menu>.
! Display the <Setup> menu.
⁄ Cancel the display demonstrations.
Select < ff>.
@ Set the clock settings.
¤ Finish the procedure.
Before operating the unit
Moves to the succeeding menu page
Moves to the preceding menu page
Return to the previous screen.
EN08-12_KW-AVX900A_f.indd 8EN08-12_KW-AVX900A_f.indd 8 07.3.13 11:35:46 AM07.3.13 11:35:46 AM
OPERATIONS
9
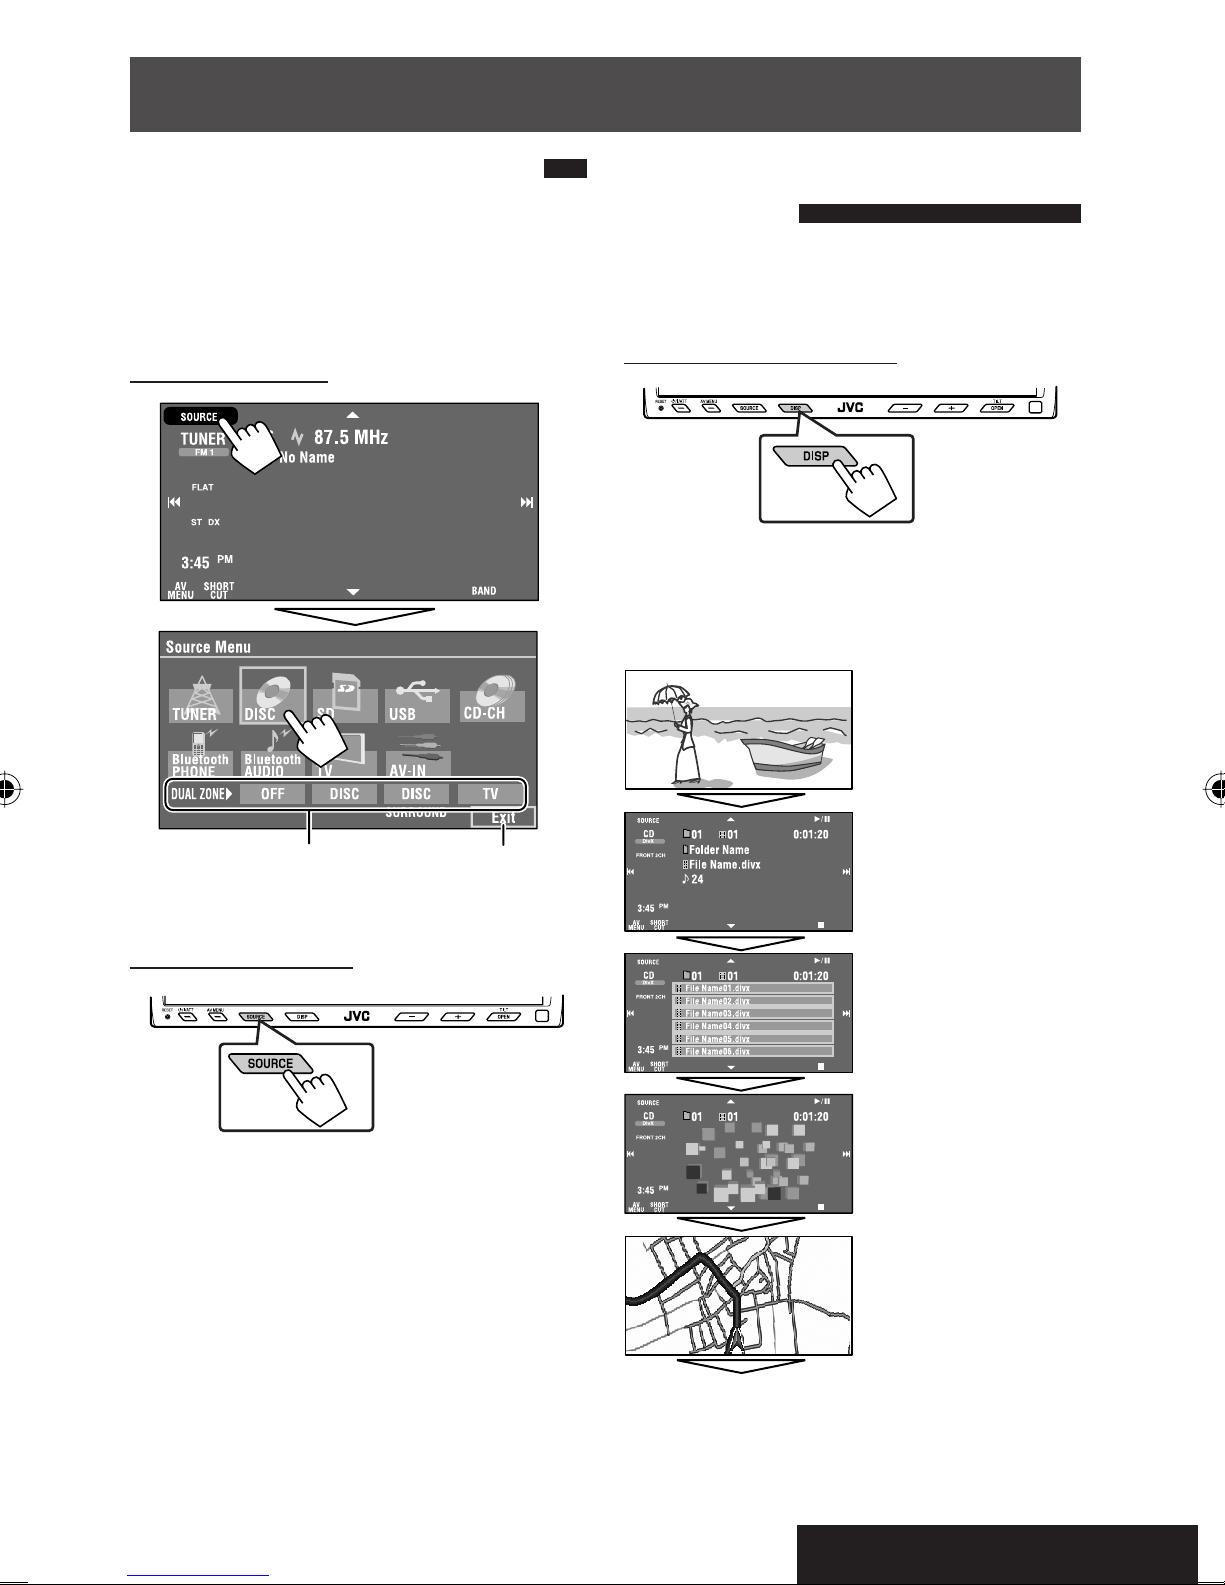
Selecting the playback source
• vailable sources depend on the external
components you have connected, media you have
attached, and the <Input> settings you have made
(☞ pages 58 and 59).
n the touch panel:
n the monitor panel:
TUNER = DISC (DVD/VCD/CD) = SD = USB =
CD-CH, iPod, D.PLAYER, or EXT-IN = Bluetooth
PH NE = Bluetooth AUDI = TV = AV-IN =
(back to the beginning)
• You cannot select these sources if they are not ready.
Changing the display
information
• vailable display information varies among the
playback sources.
n the monitor panel only:
• Each time you press DISP, the display changes to
show the various information.
Ex. When the playback source is a DivX disc.
Exit Source information screen
nimation screen
Navigation screen
(When <Navigation> is
selected for <AV Input>):
(☞ page 58).
Back to the beginning
Playback picture screen
(only for video sources)
Preset station (service) list,
track (file) list, or phone
number list
Common operations
☞ page 27
EN08-12_KW-AVX900A_f.indd 9EN08-12_KW-AVX900A_f.indd 9 07.3.13 11:35:48 AM07.3.13 11:35:48 AM

10
When an FM stereo broadcast is
hard to receive
1 Press [AV MENU].
• You can also use V MENU on the monitor panel.
2 Press [Mode].
Listening to the radio
~ Press [S URCE], then press [TUNER]. (☞ page 9)
• You can also use SOURCE on the monitor panel. Press it repeatedly.
Ÿ Press [BAND].
! Press [4] or [¢] to search for a station—Auto Search.
• Manual Search: Hold either [4]or [¢] until “Manual Search” appears on the display, then press it
repeatedly.
• The ST indicator lights up when receiving an FM stereo broadcast with sufficient signal strength.
3
Reception improves, but stereo effect will be lost.
• The MONO indicator lights up.
To restore stereo effect, select < ff>.
Preset No.
Band
☞ page 9
Sound mode
(☞ page 51)
☞ page 11, 51
: Buttons on the
touch panel. In the
explanation, they
are indicated inside
[ ].
Tuner indicators
ssigned station name (☞ page 52). If no name is assigned,
“No Name” appears.
EN08-12_KW-AVX900A_f.indd 10EN08-12_KW-AVX900A_f.indd 10 07.3.13 11:35:50 AM07.3.13 11:35:50 AM
Other manuals for EXAD KW-AVX900
4
Table of contents
Other JVC Car Receiver manuals

JVC
JVC KD-S713R User manual

JVC
JVC KW-AV71BT User manual

JVC
JVC GET0626-001B User manual

JVC
JVC KD-G747 User manual

JVC
JVC KD-APD58 - Radio / CD User manual

JVC
JVC KW-XG706 User manual

JVC
JVC KD-NX5000J Guide

JVC
JVC KD-AR470 - Radio / CD Guide

JVC
JVC KW-V620BT User manual

JVC
JVC KD-AVX11 - EXAD - DVD Player User manual


