Joovv Mini User manual

User Manual
Mini • Solo • Duo •Quad •Elite
JOOVVSOCIALJOOVVSOCIALJOOVV.COM
© Copyright Joovv, Inc. All rights reserved.
Corporate Office
Joovv, Inc.
555 N. El Camino Real, Suite 342
San Clemente, CA 92672
Customer Service
Email: [email protected]
Web: www.joovv.com
Setup: www.joovv.com/setup
Getting Started:
Introduction Section 1
Treatment Guidelines Section 2
Testimonials Section 3
Setup Guides:
Joovv Solo & Joovv Mini Section 4
Joovv Duo Section 5
Joovv Quad Section 6
Joovv Elite Section 7
Other Information:
Troubleshooting Guide Section 8
Frequently Asked Questions Section 9
General Information Section 10
TABLE OF CONTENTS
TABLE OF CONTENTS

Welcome to the Joovv family! You’ve chosen the
only device that was purposefully designed to
provide the most optimal light therapy
experience possible.
Your Joovv delivers clinical-grade irradiance at
both 660 nm (visible red light), 850 nm (non-
visible near infrared light), or a combination of
both. These light wavelengths have been
scientifically proven to provide therapeutic
effects.
Your Joovv works by emitting red and near
infrared light within a certain range of
therapeutic wavelengths and intensity. These
treatments penetrate your body to generate a
number of health benefits.
How Joovv Works
Red Light
Near Infrared Light
Many of these benefits happen because red and
near infrared light activates various metabolic
pathways, leading to increased production of
ATP (adenosine triphosphate), enhanced cellular
signaling, and elevated protein synthesis.
Red and near infrared light therapy has been
proven to be effective for a wide range of health
issues, including, but not limited to the following:
• Muscle recovery
• Athletic performance
• Joint pain and arthritis
• Sexual performance
• Mental clarity
• Relaxation and sleep
The light energy emitted by Joovv should be used
on bare skin for best results.
Joovv is indicated for the relief of muscle spasms,
minor muscle & joint aches, as well as pain &
stiffness associated with arthritis.
FDA Indication
INTRODUCTION
1

It’s important to be consistent with treatments
of light therapy. That’s why we recommend
using your Joovv every day, or at least 4 to 5
times per week. For additional health benefits,
including pain relief from aches and strains, up
to 3 treatments per day can be helpful.
Consistency is Key
The amount of time required to see benefits and
improvements depends on your health goals.
The cellular health benefits of light therapy have
been thoroughly proven across hundreds of
clinical studies, so trust that your body is
benefiting from every therapy session. But there
are many factors that may affect how quickly
you experience improvements in your symptoms.
Some people will see benefits within a matter of
days. But overall improvements in health or skin-
related issues can take 8-12 weeks of consistent
use. By using your Joovv on a daily basis, you
can maximize your body’s rate of healing.
Results and Expectations
Your Joovv comes with everything you need to
access the amazing health benefits of light
therapy. For the best results, please read this
manual completely before using your Joovv.
Getting Started with Joovv
Prior to using your Joovv, please check for
photosensitivity. To do this, expose an area of
your forearm 6 inches away from the device for
3 minutes. If you experience any redness or
discomfort, you might be photosensitive and we
recommend consulting with your doctor or
healthcare provider prior to using your Joovv.
Light Sensitivity
Joovv delivers clinical-grade power—also called
irradiance—of red and near infrared light. For
optimal results, we recommend positioning your
Joovv approximately 6 inches from the area on
your body that you intend to treat. The
recommended default treatment time is 10
minutes, which—at this distance—will result in a
total energy delivery of up to 60 Joules/cm².
Clinical studies have shown that this
combination of distance and irradiance is
optimal for producing health benefits in both
superficial and deep tissues.
Treatment Instructions
TREATMENT GUIDELINES
2

"Photobiomodulation has a wide range of clinically-proven health
benefits. Everything from enhanced muscle recovery, to increased
testosterone production, to improved skin collagen—and much more. After
using the Joovv for close to 2 years, it's the only light therapy device I'd
ever recommend. Give it a try—you won't be disappointed."
- Ben Greenfield, Voted America’s Top Personal Trainer
"The research supporting light therapy is shockingly robust, and my own
experience matches up with what is documented in scientific literature. In
particular, using Joovv has resulted in improved energy, markedly reduced
fibromyalgia pain, elevated mood, improved skin, and enhanced weight
loss. As you can imagine, I'm a huge fan—and can't recommend this
product enough!"
- Dr. Sarah Ballantyne, Medical Biophysicist and New York Times Best-Selling Author
⋆⋆⋆⋆⋆
“Less muscle soreness
after exercise and am
now sleeping like a
log.”
Rebecca D.
⋆⋆⋆⋆⋆
“The Joovv has
improved my lower
back pain and my skin
is looking so much
better!”
Julie L.
⋆⋆⋆⋆⋆
"More energy, better
libido, and mild weight
loss. Absolutely great
light therapy product."
Olli S.
⋆⋆⋆⋆⋆
"I love the Joovv! It
feels like my own
personal superhuman
charger."
Tim F.
TESTIMONIALS
3

Setting Up Your
Joovv Solo & Joovv Mini
If you’d prefer instructional setup videos, please visit: www.joovv.com/setup
!
4

1 x Device 1 x Power Cord
2 x Threaded Posts 2 x Braided Steel Cables - 90cm
1 x M5 Allen Wrench 1 x Instruction Manual
JOOVV SOLO & JOOVV MINI
1 x Door Hook 1 x Height-Adjusting System
DOOR MOUNTING KIT
Parts List
4.1
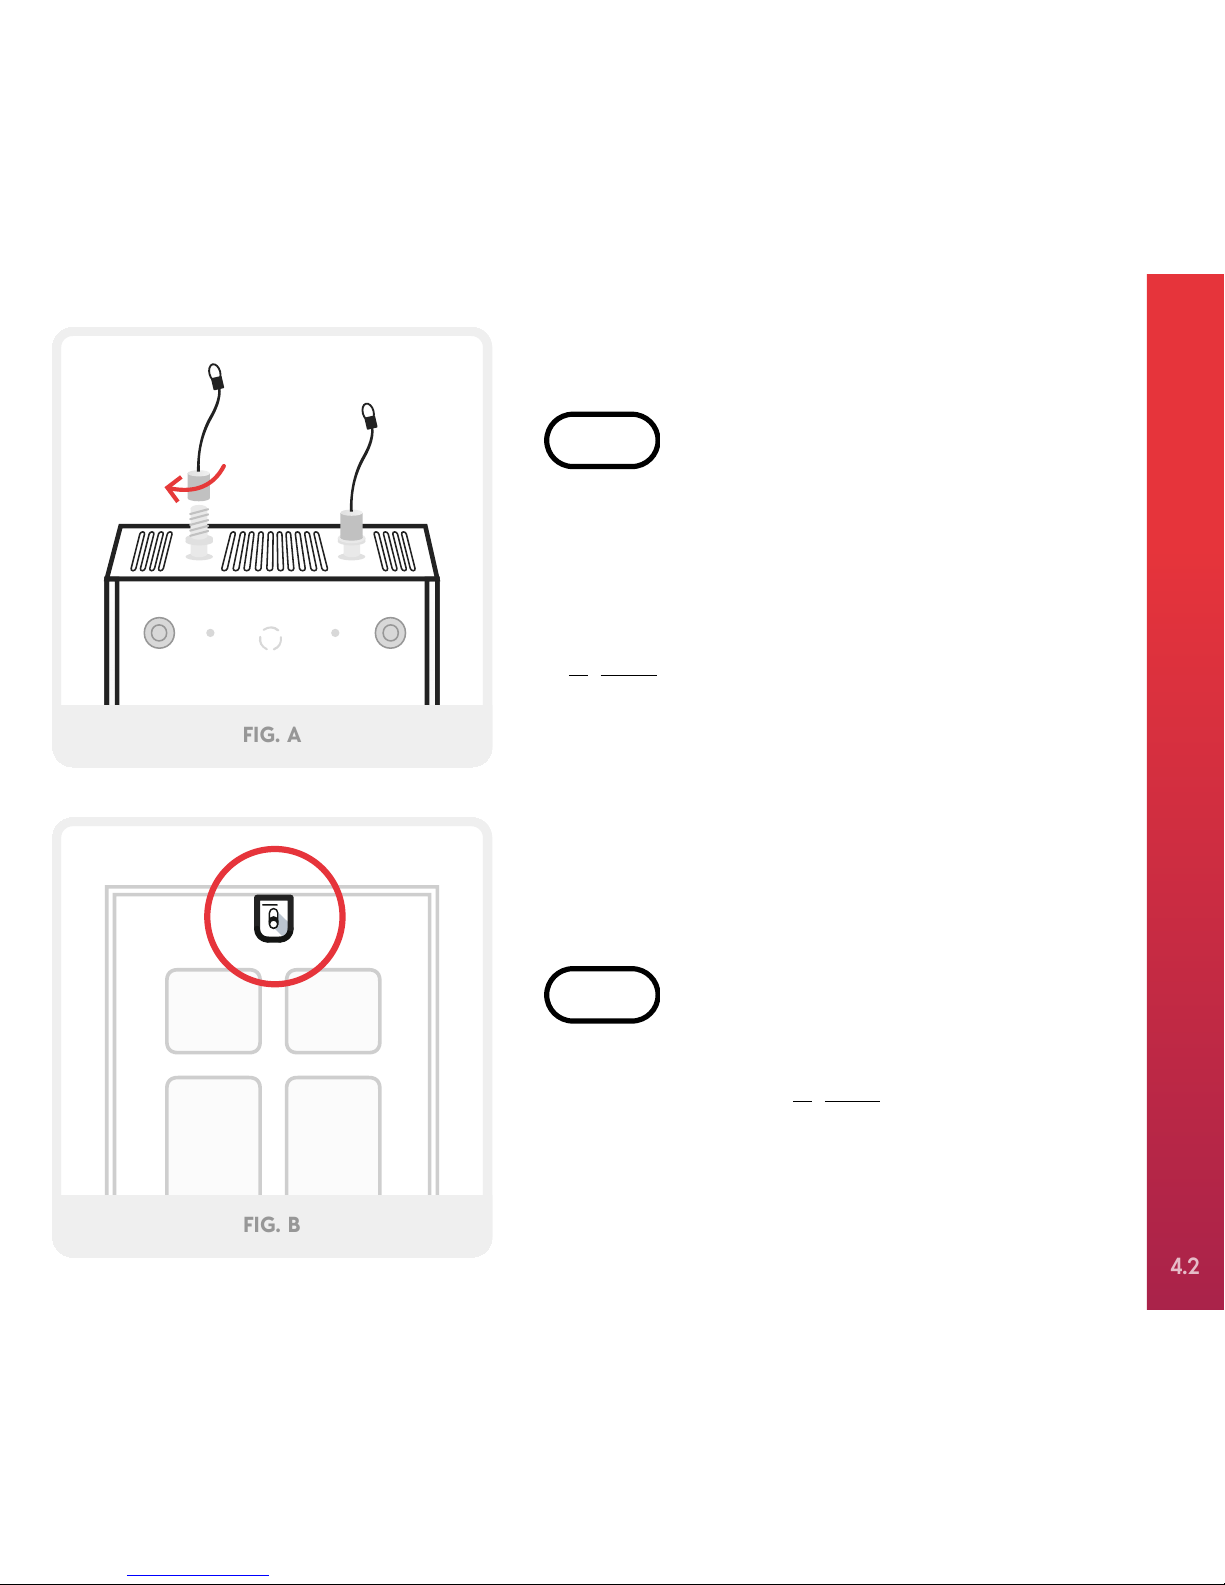
Lay all of the included hardware, including your
Joovv, on a padded surface. Next, screw in the
threaded posts to the top of the device and hand-
tighten with the included Allen wrench. Then, screw
the cable supports to the threaded posts, as shown
in Figure A.
STEP 1
FIG. A
Hang the included custom hook on any standard-
sized door, as shown in Figure B.
STEP 2
FIG. B
SETTING UP YOUR JOOVV SOLO & JOOVV MINI
4.2

Connect the cable supports to the snap link attached
to the height-adjusting system. Then, connect the
snap link on the opposite end directly to the door
hook, as shown in Figure C.
STEP 3
FIG. C
To raise your Joovv to your desired height, pull down
on the loose cable while supporting the device with
your opposite hand, as shown in Figure D.*
*Caution: Be sure to adequately support the device
while raising and lowering it with the height-
adjusting system.
STEP 4
FIG. D
SETTING UP YOUR JOOVV SOLO & JOOVV MINI
4.3
Other manuals for Mini
1
This manual suits for next models
4
Table of contents
Other Joovv Medical Equipment manuals


