JALL Sunrise Pro User manual

Sunrise Pro Wake Up Light
ACA-002-M
User Manual
Please read the instructions carefully before use and keep it with proper storage
(V1.0)

01
SAFETY INSTRUCTIONS
MAINTENANCE AND CARE
WHAT'S INCLUDED
PRODUCT OVERVIEW
GET STARTED
OPERATION GUIDE
Time Setting
Screen Brightness Adjustment
Alarm clock setting
Snooze
FM Radio
Sleep Aid
Sunlight Simulation Lamp
Ambient Lamp
Music
SPECIFICATIONS
CAUTIONS
STORAGE
FCC Statement
02
02
03
03
04
05
05
07
09
14
16
18
22
23
25
26
26
27
28
CONTENT

1. Cleaning: Clean the product with a soft and dry cloth.
2. Avoid Abrasive Cleaning Agents: Do not use abrasive cleaning agents, pads, or cleaning
solvents such as alcohol or acetone, as they can damage the product's surface.
3. Safe Storage: If the product will not be used for an extended period, unplug the power
adapter from the socket and store the product in a safe and dry location where it will not be
crushed, banged, or subject to damage.
02
MAINTENANCE AND CARE
To ensure your safety and prevent the risk of fire, electric shock, or injury, please read and
carefully follow these instructions before using this product.
1. Household Use Only: This product is intended for household use only, including use in hotels.
It is not suitable for commercial use.
2. Stable and Non-Slip Surface: Place the product on a stable, level, and non-slip surface to
prevent it from falling or tipping over during use.
3. Avoid Wet Surroundings: Do not use this product in wet surroundings such as the bathroom,
near a shower, or a swimming pool to avoid water damage and electric shock.
4. Water Damage Prevention: Avoid letting water run into or spill onto the product as it can
damage the internal components.
5. Keep Adapter Dry: Ensure that the power adapter does not get wet while in use to avoid
electric shock or damage to the product.
6. Use Original Accessories: Only use the original adapter and USB cable provided with this
product to prevent damage or malfunctions.
7. Not a Substitute for Sleep: Do not use this product as a substitute for adequate sleep. It is
designed to help you wake up more easily but should not be used to reduce your sleeping time.
SAFETY INSTRUCTIONS
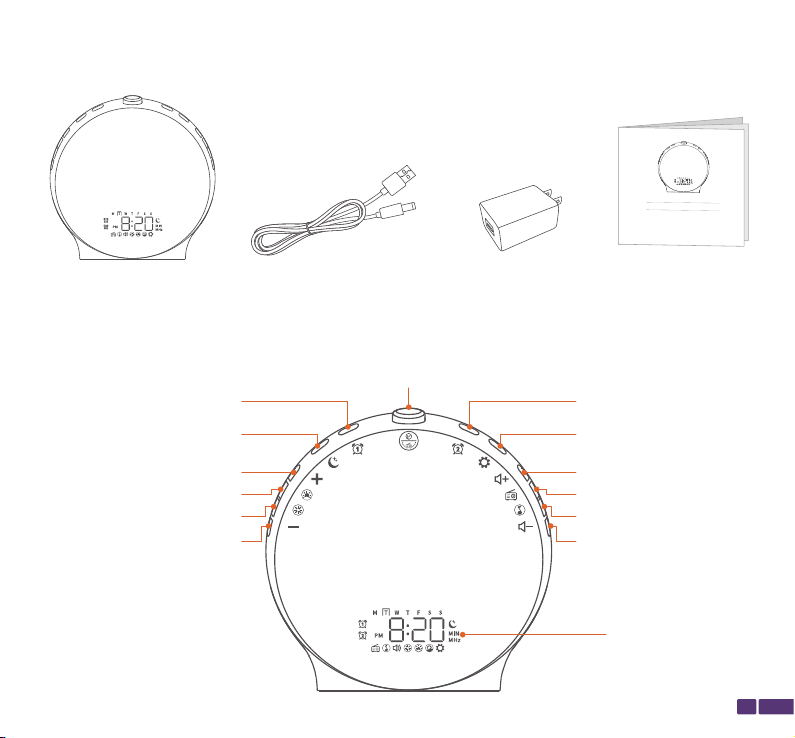
PRODUCT OVERVIEW
Alarm 2Alarm 1
Ambient Lamp
Sunlight Simulation Lamp
Brightness +
Brightness -
Sleep Aid
Volume -
FM Radio
Music
Volume +
Snooze/Setup+-/FM Radio Tuning
LCD Display
03
WHAT'S INCLUDED
Wake Up Light DC Cable Adapter(Optional) User Manual
Time Setting/Screen
Brightness Adjustment
Sunrise Pro Wake Up Light
ACA-002-M
User Manual
Please read the instructions carefully before use and keep it with proper storage
(V1.0)
04
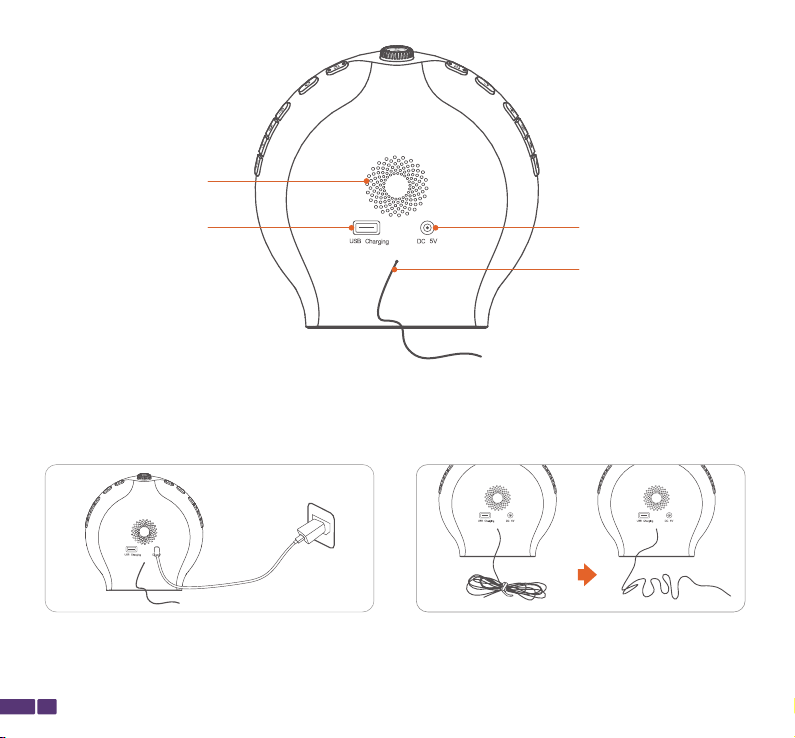
Power Out interface
Speaker
FM Antenna
Power In interface
GET STARTED
1. Connect to Power: Connect the Wake-up
Light to the provided USB cable and adapter
and plug it into a power source to power it.
2. FM Radio Reception: Loosen the tie that
secures the FM antenna and unroll the wire
to improve FM radio signal reception.
3. Power On/Off: Important: This product does not have a power on/off button. It will turn on
automatically once the power adapter is plugged into a socket. To disconnect power, please
unplug the power adapter.

Time Setting
OPERATION GUIDE
Note:
If there is no operation within 15 seconds, the wake-up light will automatically save the current
settings and exit the setting mode.
The wake-up light has a built-in button battery that can continue timing for up to three years
after a power outage.
To ensure proper use of the wake-up light, it is important to set the time correctly.
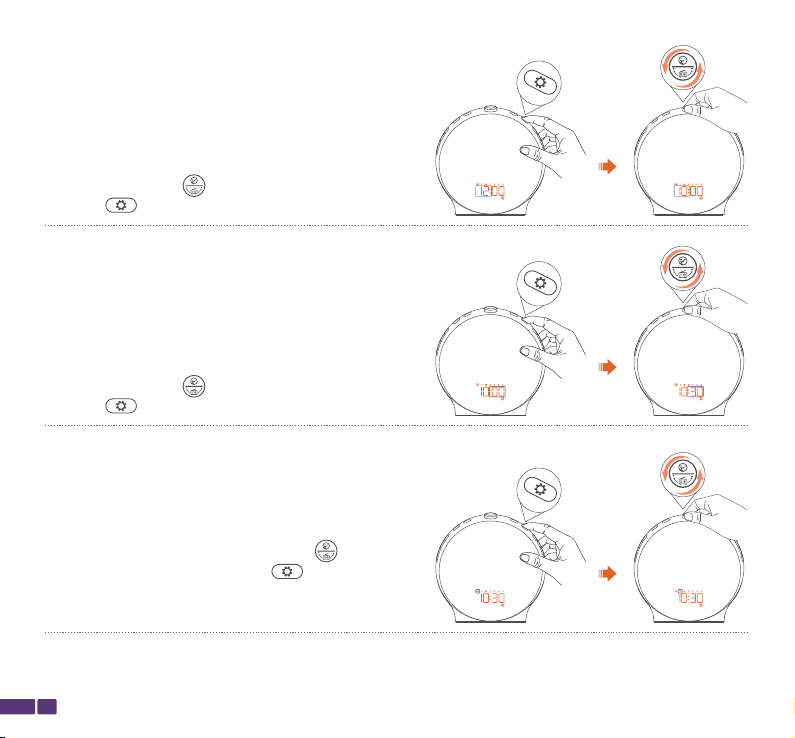
Step 1:
Press and hold the button for 2 seconds
until 12 hours (12H) starts flashing on the screen
to begin setting the time.
05
Step 2:
Rotate the top button to select 12 hours or 24
hours, then press the button once to
confirm.
Here are the steps to set the time on the wake-up light:
06
Step 4:
When the screen displays HH:MM and MM is flashing,
rotate the top button to adjust the minutes, then
press the button once to confirm.
Step 5:
When the screen displays MTWTFSS and the day
indicator is flashing, rotate the top button to adjust
the day of the week, then press the button once
to confirm.
The clock is now set and ready for use.
Step 3:
When the screen displays HH:MM and HH is flashing,
rotate the top button to adjust the hours, then
press the button once to confirm.

07
If you select 12-hour format, the screen will display "PM" corresponding to the current time,
and the alarm time format will also be displayed in 12-hour format. "PM" accordingly. Setting
the date will automatically display the day of the week.
Note:
Note:
Screen Brightness Adjustment
To adjust the screen brightness, please follow the steps below:
Press the button to cycle through the screen brightness options. There are four brightness
levels to choose from: off, night, day, and AUTO.
Off:
The screen display is turned off.

08
Night:
The screen brightness is at the lowest level.
Day:
The screen brightness is at the highest level.
AUTO:
The screen brightness is at the lowest level between 10:00 PM and
6:00 AM, and at the highest level during all other times.

Alarm clock setting
The wake-up light is designed to help you wake up easily by simulating a sunrise. Once enabled,
the alarm clock will gradually become brighter before the alarm sounds, waking you up with a
soft, natural sound. You can easily set two alarms: Alarm 1 and Alarm 2, and each alarm can be
set to ring on weekdays or weekends separately using the buttons on the device.
Step 2:
While the HH on the alarm is flashing, rotate the top
button to adjust the hour for the alarm, then
press the Alarm 1 button to confirm the hour.
Step 1:
Hold down the Alarm 1 button for 3 seconds.
The Alarm 1 icon on the screen will start
flashing, and the screen will display the alarm
time for Alarm 1.
09
Taking Alarm 1 as an example, follow these steps to set it up:
This manual suits for next models
1
Table of contents