IRiver H10 User manual
Before using the product
Precautions and Safety
3
Before using the product
Precautions and Safety
2
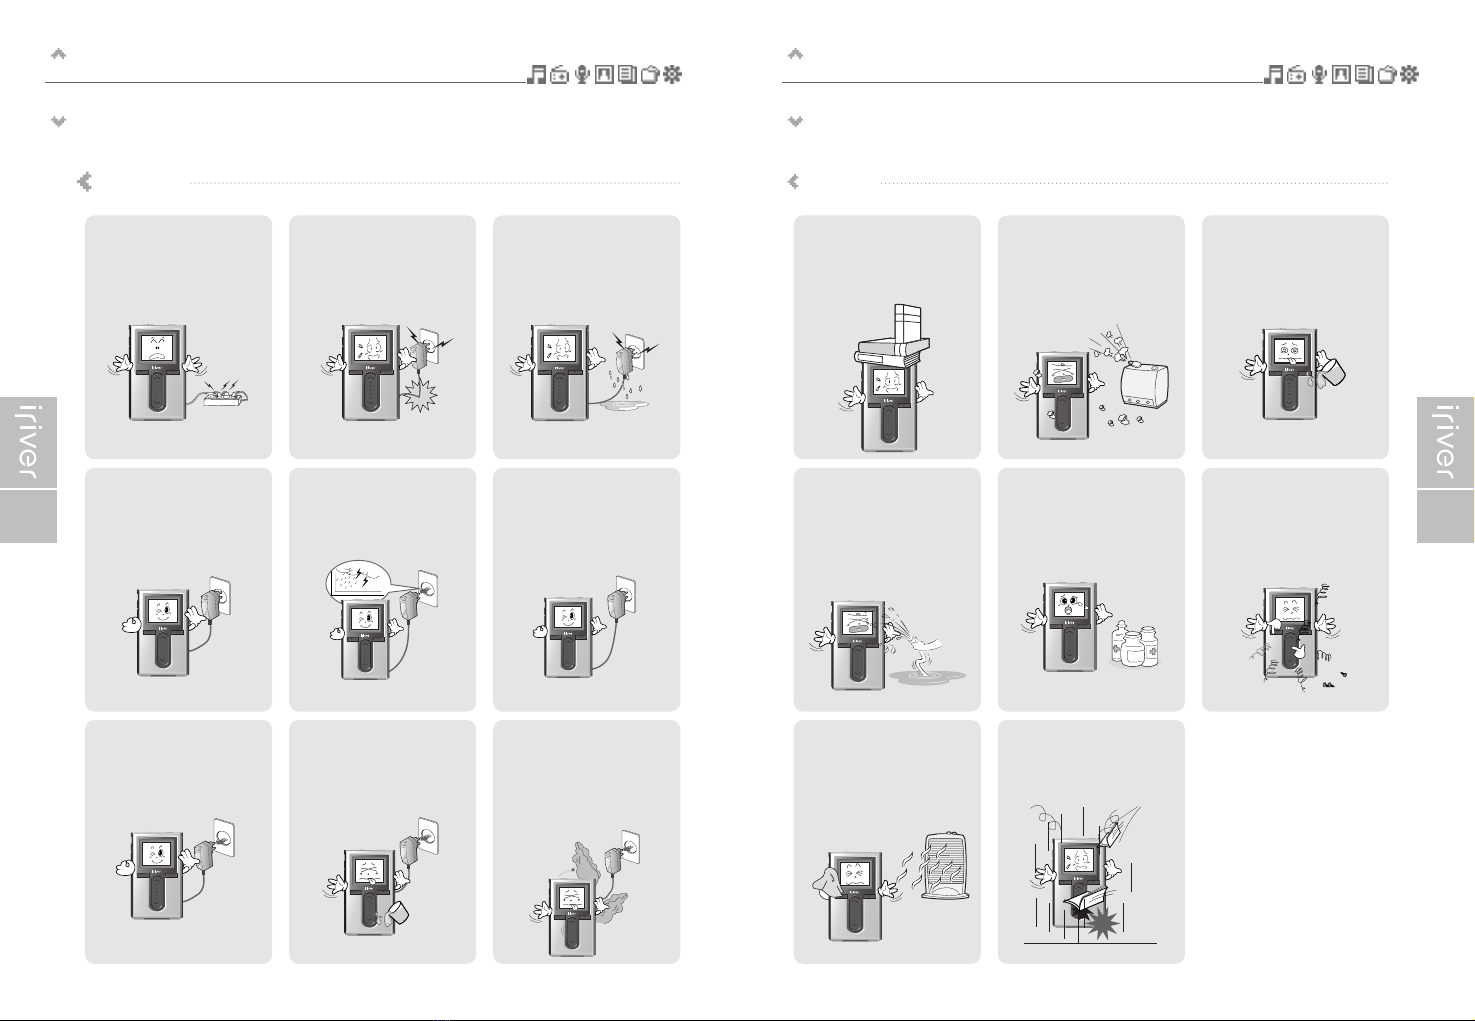
Do not overload a single
power circuit.
Overheating or fire can result.
Do not handle power plug
and adapter with wet hands.
Electrical Shock may result.
Do not kink or crease the
power cable or place heavy
objects on the power cable.
Fire can result from damaged
power ca les.
Unplug adapter when it’s
not in use.
Overheating or fire can result.
Immediately power off the player
and unplug the AC adapter if
smoke or odors emit from the
player or adapter.
Fire can result from improper use.
Immediately power off the
player and unplug the
AC adapter if water or other
liquids are present.
Fire can result from improper use.
Firmly plug the adapter into
the wall socket.
Fire can result from improper use.
Use only the supplied
AC adapter.
Use of nonauthorized power
adapters is not recommended.
Electrical Shock may result.
Unplug the AC adapter
during electrical storms.
Electrical Shock may result.
Electricity
Please read the notices efore using for your safety. Please read the notices efore using for your safety.
Do not place heavy objects
on the device.
Damage to your player may result
from improper use.
Avoid contact with water and
other liquids.
Damage to your player may result.
Keep away from harsh
environments including
humid, dusty, and smoky
areas.
Damage to your player may result
from improper use.
Keep out of direct sunlight
and extreme heat and cold.
Damage to your player may result
from improper use.
Do not drop or subject the
device to impact.
Damage to your player may result
from improper use.
Do not use water or
chemicals to clean the
player. Clean the surface with
a soft cloth.
Damage to your player may result
from improper use.
Do not use excessive force
on the buttons or attempt to
disassemble the device.
Damage to your player may result
from improper use.
Do not clean with chemical or
detergent.
Damage to your player may result
from improper use.
Product
Before using the product
Precautions and Safety
5
Before using the product
Precautions and Safety
4
Please read the notices efore using for your safety.
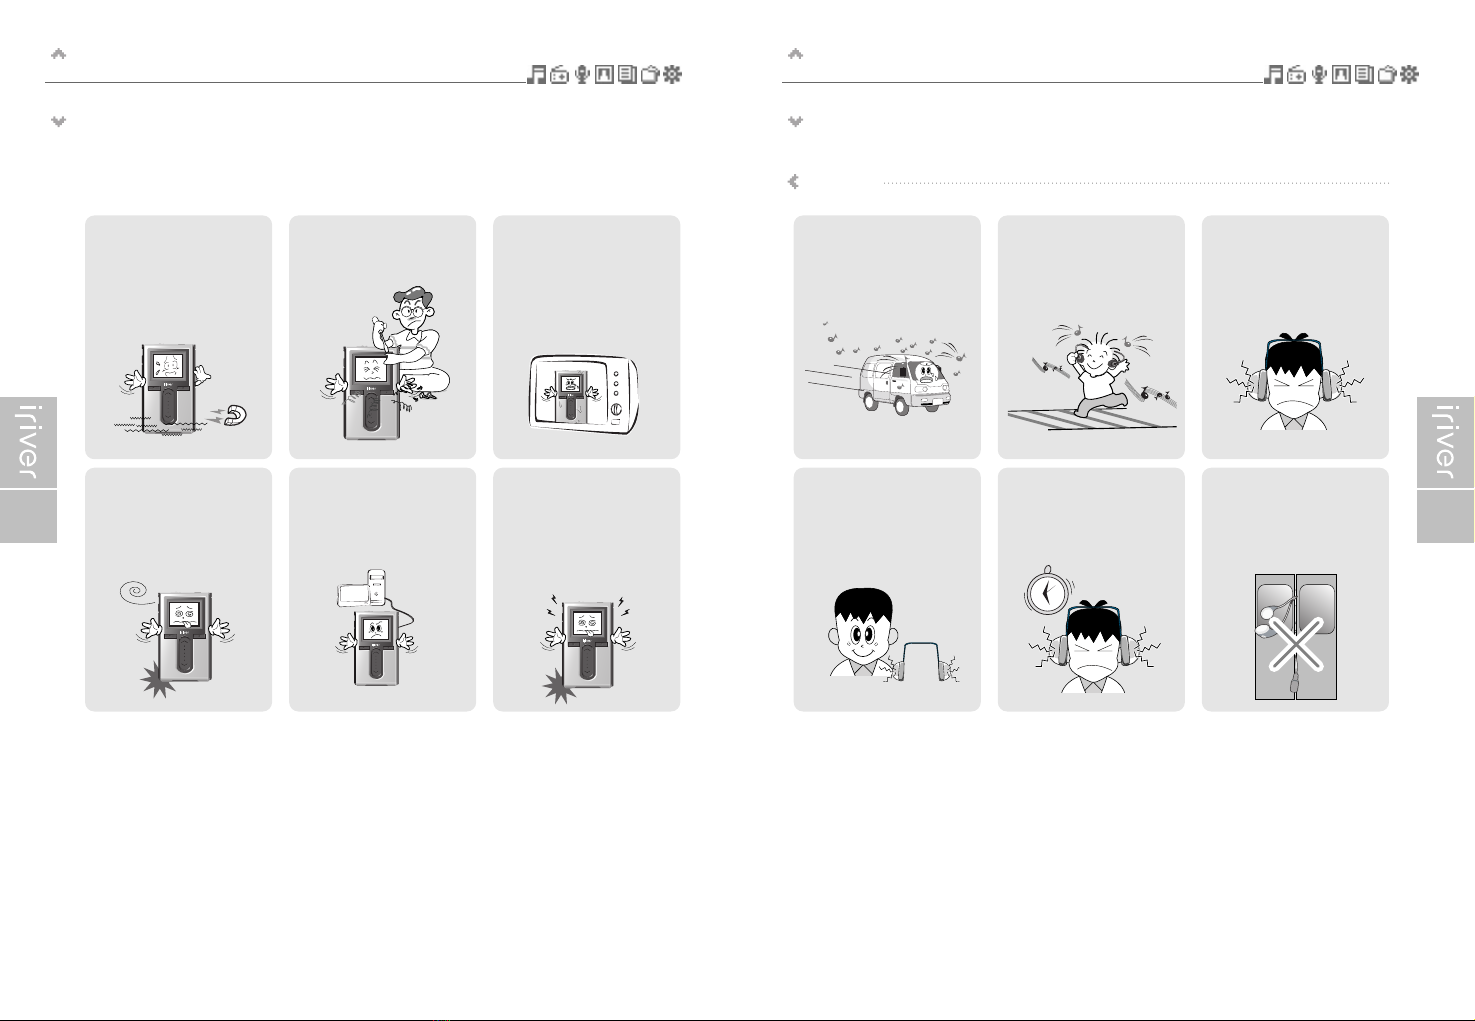
Keep the player away from
strong magnets.
Damage to your player may result
from magnets such as CRT, TV,
monitor and speaker.
Bad sectors can be created in
HDD because of physical
impact.
Data in HDD can e damaged.
Always keep a proper ackup of data
stored on porta le devices.
Do not dry the product with
heater or microwave.
Damage or severe injury may result
from improper use.
Do not disassemble or modify.
Damage to your player may result
from improper use.
When you upload or download
files using U B cable, do not
disconnected the U B cable
suddenly or turn it off.
Data in HDD can e damaged.
Data can be damaged because
of physical impact, lightning
and power failure.
Users are responsi le for creating
ackup data and iriver Limited is not
responsi le for any damaged data.
Do not use headphones /
earphones while cycling,
driving, or operating any
motorized vehicle.
It is dangerous and is illegal in some
areas.
Do not use headphone /
earphones at high volume.
Hearing experts advise against
listening to continuous, loud and
extended play.
Reduce volume while walking,
especially at pedestrian
crosswalk.
Reduce volume or stop using
the player if you experience a
ringing in your ears.
Hearing experts advise against
listening to continuous, loud and
extended play.
Keep headphone/earphone
cords under control to avoid
getting caught on varous objects.
Do not use at high volume for
continuous listening.
Hearing experts advise against
listening to continuous, loud and
extended play.
Others
Please read the notices efore using for your safety.
Getting started
Features of the H10
9
Getting started
Features of the H10
8
1Vivid color display – 1.8-inch TFT LCD with 260,000 colors
The 1.8-inch, 260,000 color TFT LCD shows off an exciting new visual interface that makes it easy to
navigate through your music.
2mall Device – Large Capacity
The H10 features a 2MB hard drive that can hold more than 1,500 music files.
(1GB = 1,000,000,000 Bytes - Not all memory availa le for storage.)
3Convenient ID3 tag database
Searching with the ID3 tag data ase ena les you to select the music file y artist, al um or genre.
4Intuitive software (iriver plus)
The intuitive software makes it easy to manage all of your music.
5Faster file transferring – upporting U B 2.0 interface
USB 2.0 supports transfer rates up to 480M ps.
6Firmware upgradeable
Firmware upgrades keep your player up to date.
7Photo and text viewer
View digital photos or text files on the player’s color screen.
8Enhanced 3D sound
SRS WOW sound effect technology provides rich ass sound and dynamic 3D sound effect.
9Customizable EQ settings
Over 30 preset EQs to choose from and a custom user EQ.
10 FM radio and recording
Listen to FM radio using the automatic scanning and channel memory functions.
You can also record the FM roadcast while you listen.
11 Easy to use touch strip
Navigating through your music is easy using convenient touch strip scrolling.
Getting started
Connecting the product
17
Getting started
LCD screen display
16
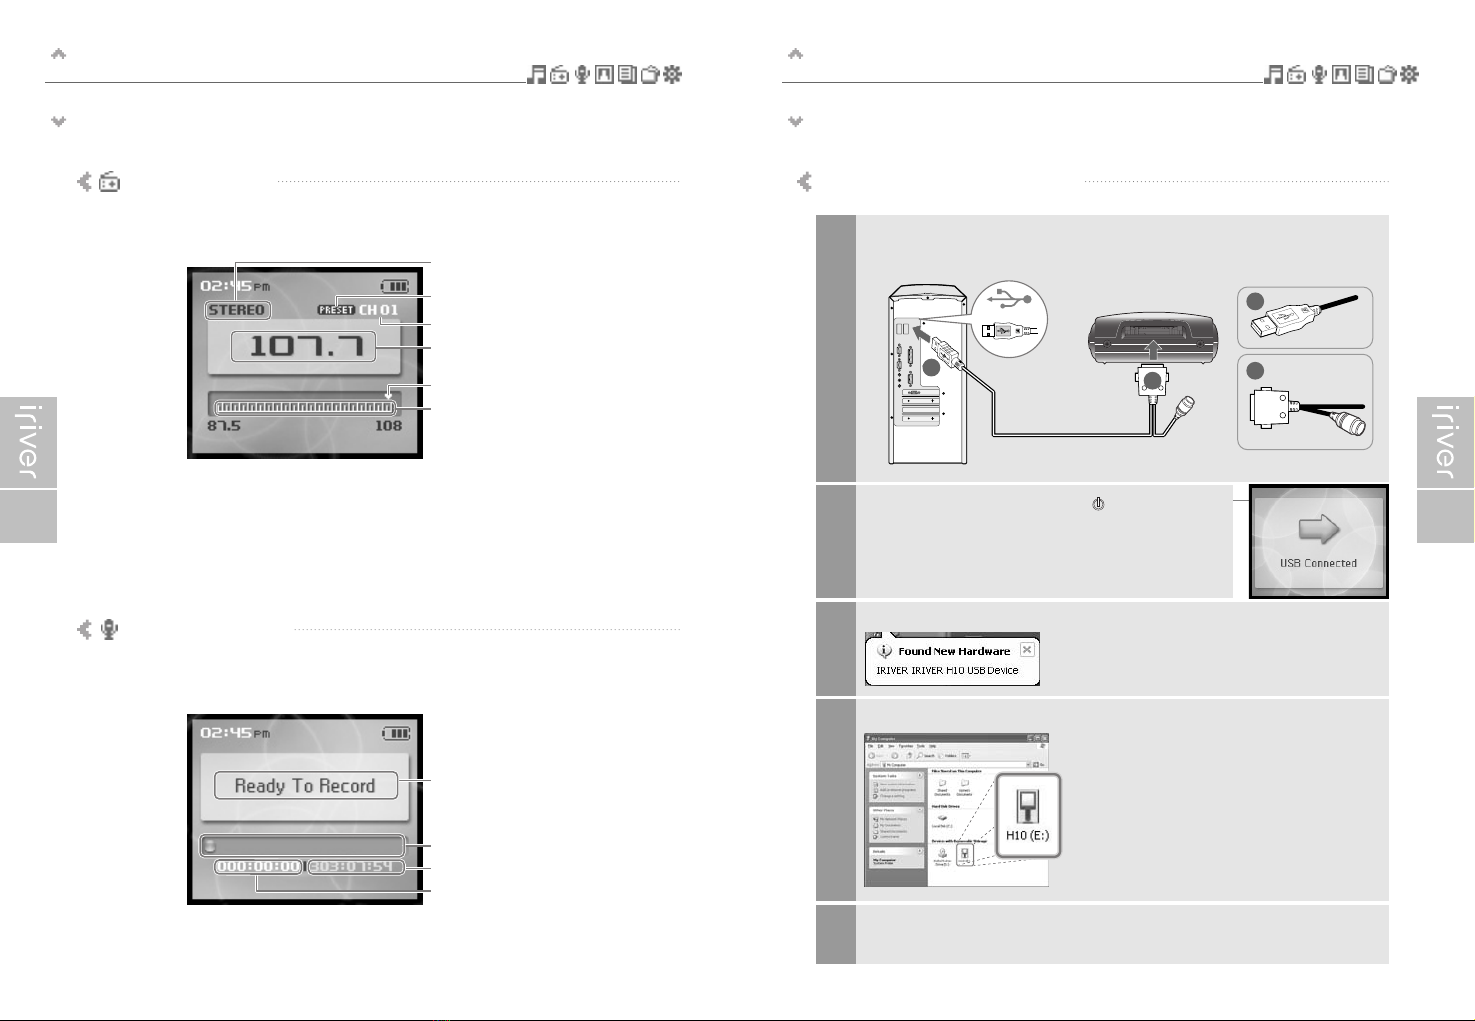
Recording status
Free space
Remaining recording time
Record elapsed time
Stereo
Preset
Channel num er
Selected frequency
Frequency ar
Frequency range
Connecting PC – Connecting cableI FM RADIO screen
I RECORDING screen
This manual covers the use of the H10 player hardware. For instructions on related software and instructions for getting
music on your player, please see the included iriver plus user manual.
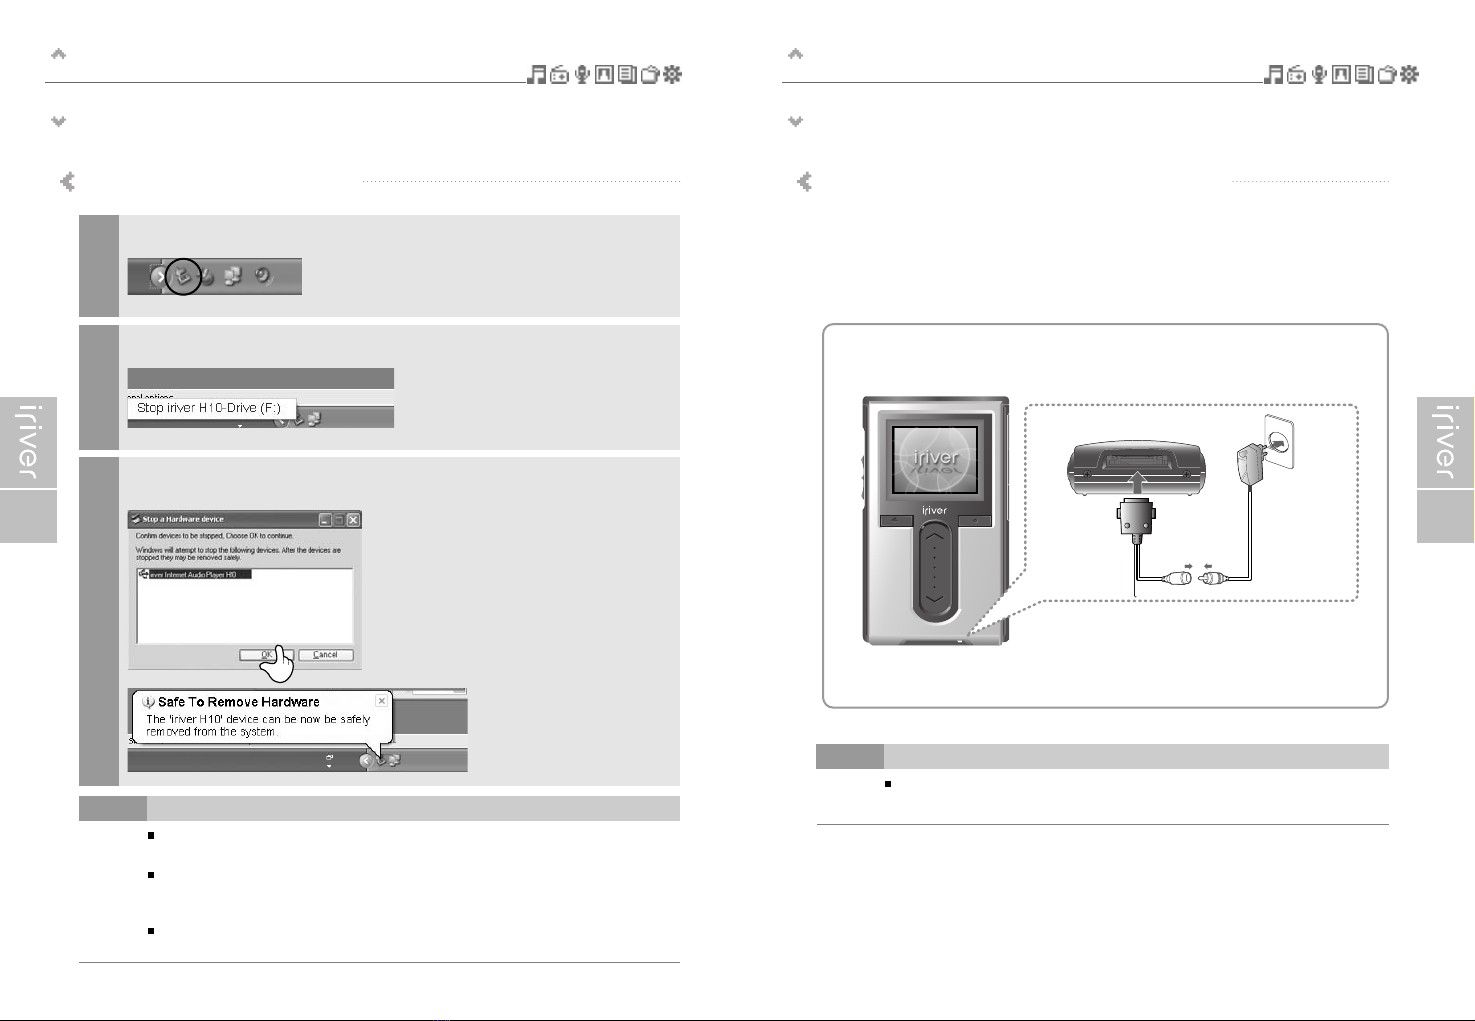
Connect the included USB ca le to the port on the H10 then to an open USB port on
your computer.
1
The H10 will display as a new device under My Computer.
4
A
A
B
B
Power on the player y pressing the [ ] utton.
The LCD screen will display <USB Connected>.
2
Windows may show “Found New Hardware” when the player is first attached.
3
The H10 is now installed and working properly.
Please see the included iriver plus user guide for steps to load music onto the player.
5
Getting started
Connecting the product
19
Getting started
Connecting the product
18
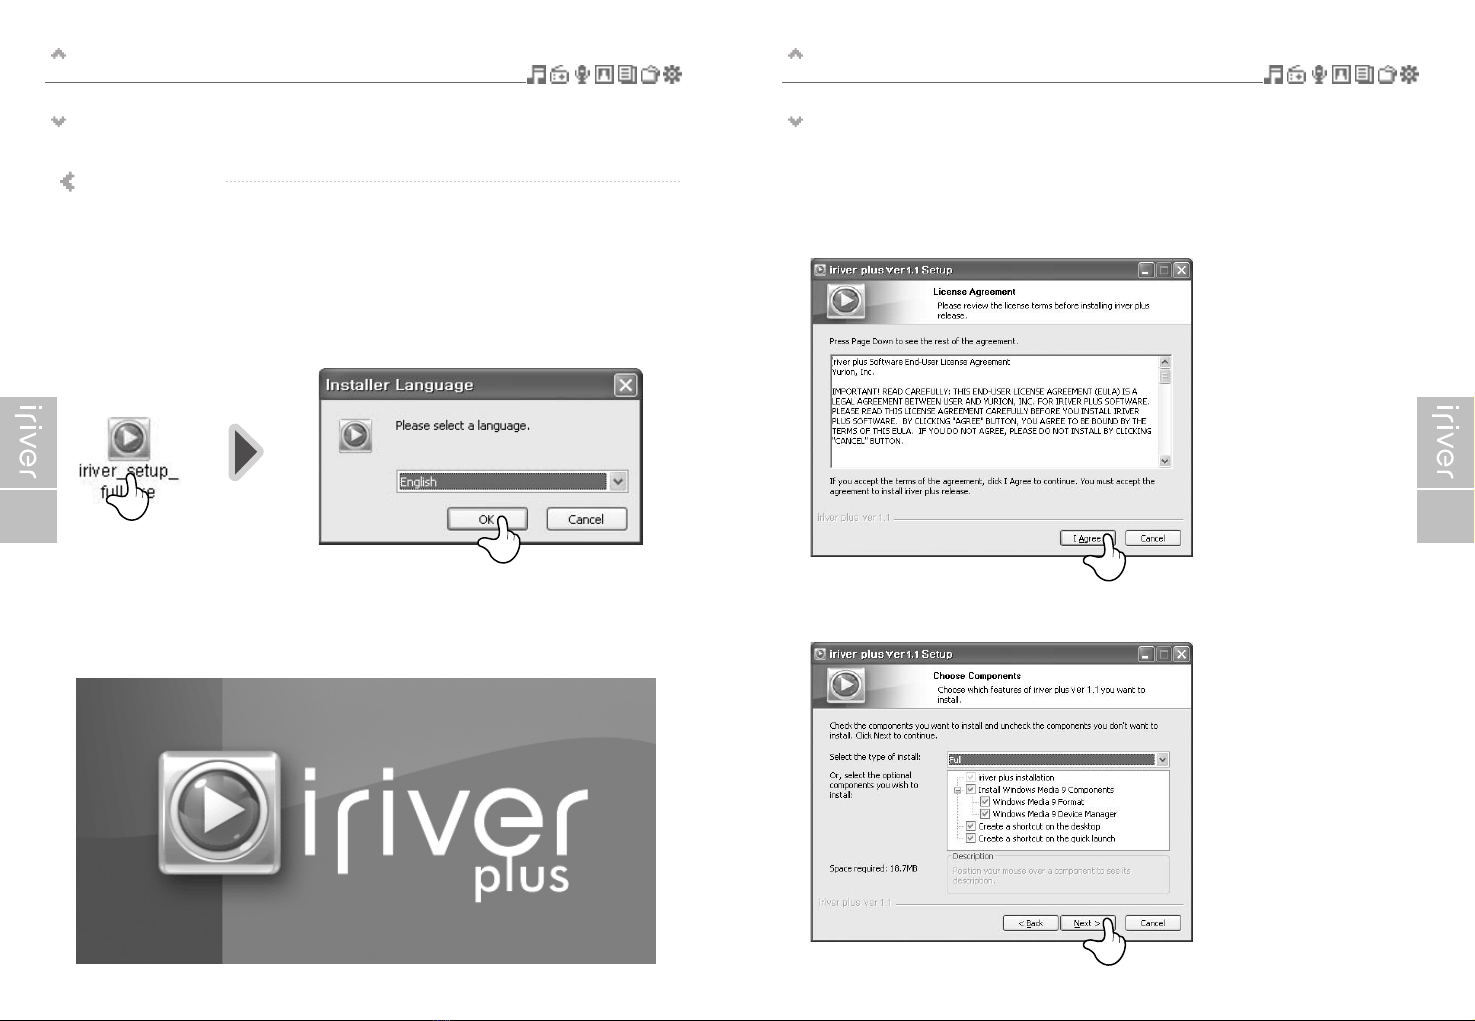
Connecting PC – Disconnecting cable
The tray icon may e hidden in some Windows XP operating system settings.
Click the "Display hidden icon" to view the hidden icon.
Hardware safe removal may not e availa le while using some applications such as
Windows Explorer or Windows Media Player.
Please close all applications using the player efore the hardware safe removal process.
In some Windows XP operation system settings, hardware safe removal is temporarily
unavaila le due to some internal system communication. Wait for a moment and try it again.
Note
If a power source is connected, the charging indicator on the DC jack will illuminate.
(The charge indicator will dim after charging is complete.)
Note
Connecting the power – connecting the adapter (player)
1. Connect the supplied ca le to the player.
2. Connect the AC adapter to the DC jack on the ca le.
3. Connect the AC adapter plug to a power socket.
AC adapter for this product is 100~240V, 50~60Hz.
<Bottom of the player>
Be sure to use the supplied AC adapter to connect the ca le
to the player.
Click the icon on the system tray.
1
Click the popup message as shown elow.
2
When the "Safe To Remove Hardware" popup window appears, click the [OK] utton
and disconnect the USB ca le from PC.
3
Getting started
Installing the software
25
Getting started
Installing the software
24
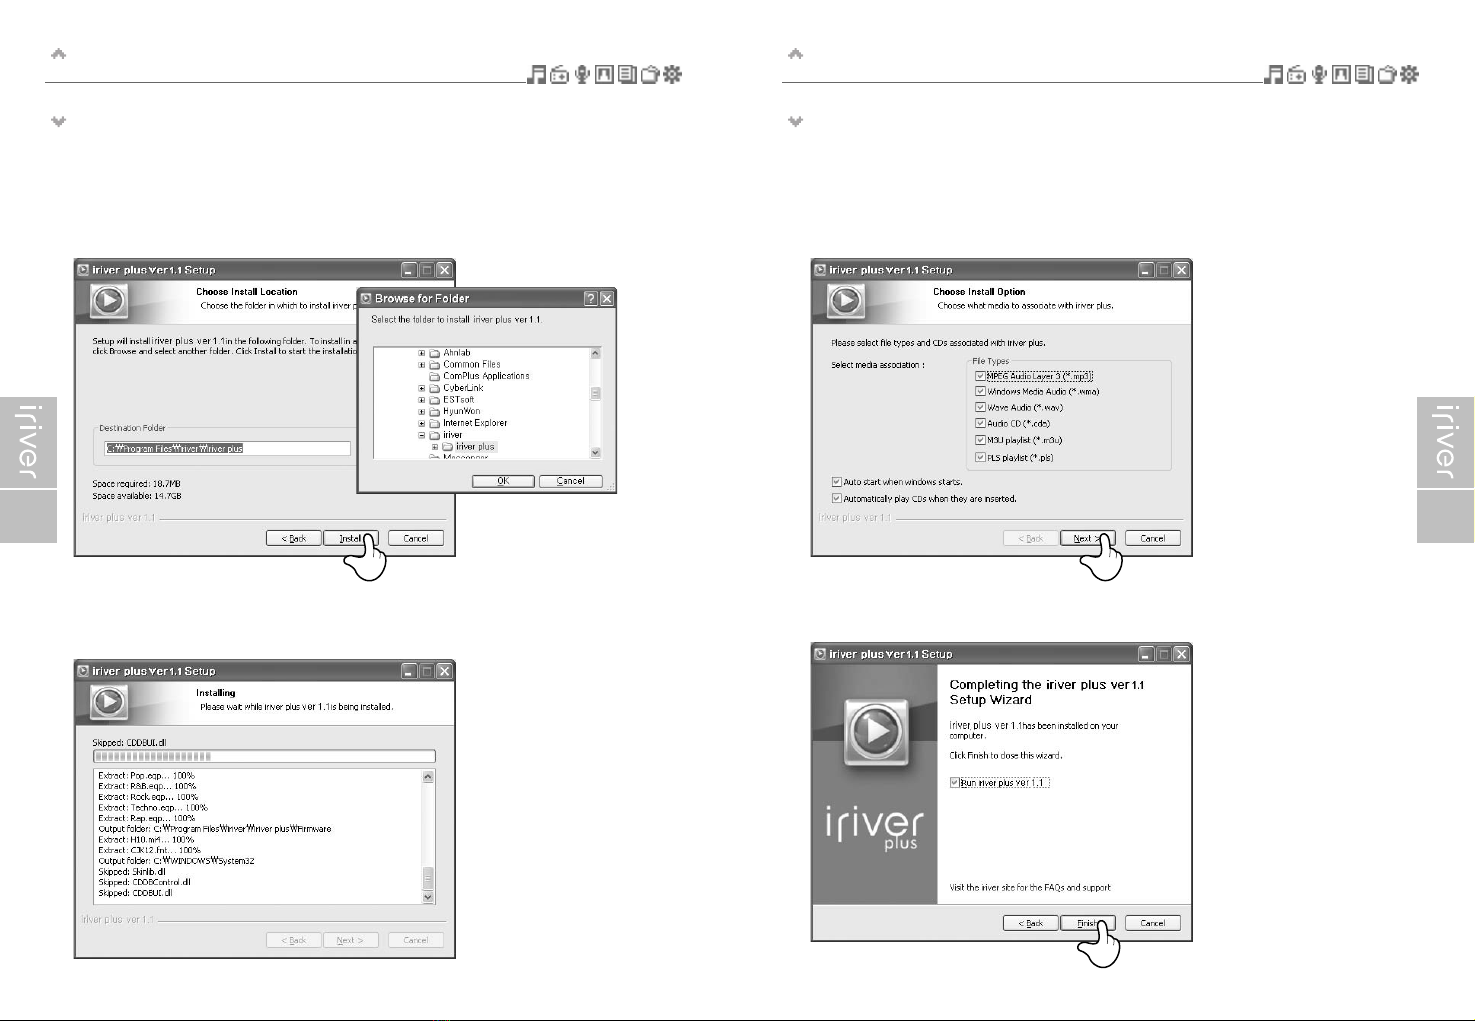
1. The program installation process will start automatically after inserting the Installation CD to
the PC's CD-ROM drive. If the program installation process does not start automatically,
click the "My Computer" icon and run “iriver_setup_full.exe” file in the CD-ROM drive.
2. If the "Installer Language" window appears, select the desired language and click the
[OK] utton.
3. Follow the on screen instructions which appear as each window.
Installing iriver plus
4. If the "License Agreement" window appears, click the [I Agree] utton.
5. Select the components and click the [Next] utton.
This manual covers the use of the H10 player hardware. For instructions on related software and instructions for getting
music on your player, please see the included iriver plus user manual.
This manual covers the use of the H10 player hardware. For instructions on related software and instructions for getting
music on your player, please see the included iriver plus user manual.
Getting started
Installing the software
27
Getting started
Installing the software
26
6. Select the installation folder and click the [Install] utton.
7. The installation process screen appears.
8. Select the file type and click the [Next] utton.
9. Click the [Finish] utton when the installation complete screen is displayed.
This manual covers the use of the H10 player hardware. For instructions on related software and instructions for getting
music on your player, please see the included iriver plus user manual.
This manual covers the use of the H10 player hardware. For instructions on related software and instructions for getting
music on your player, please see the included iriver plus user manual.
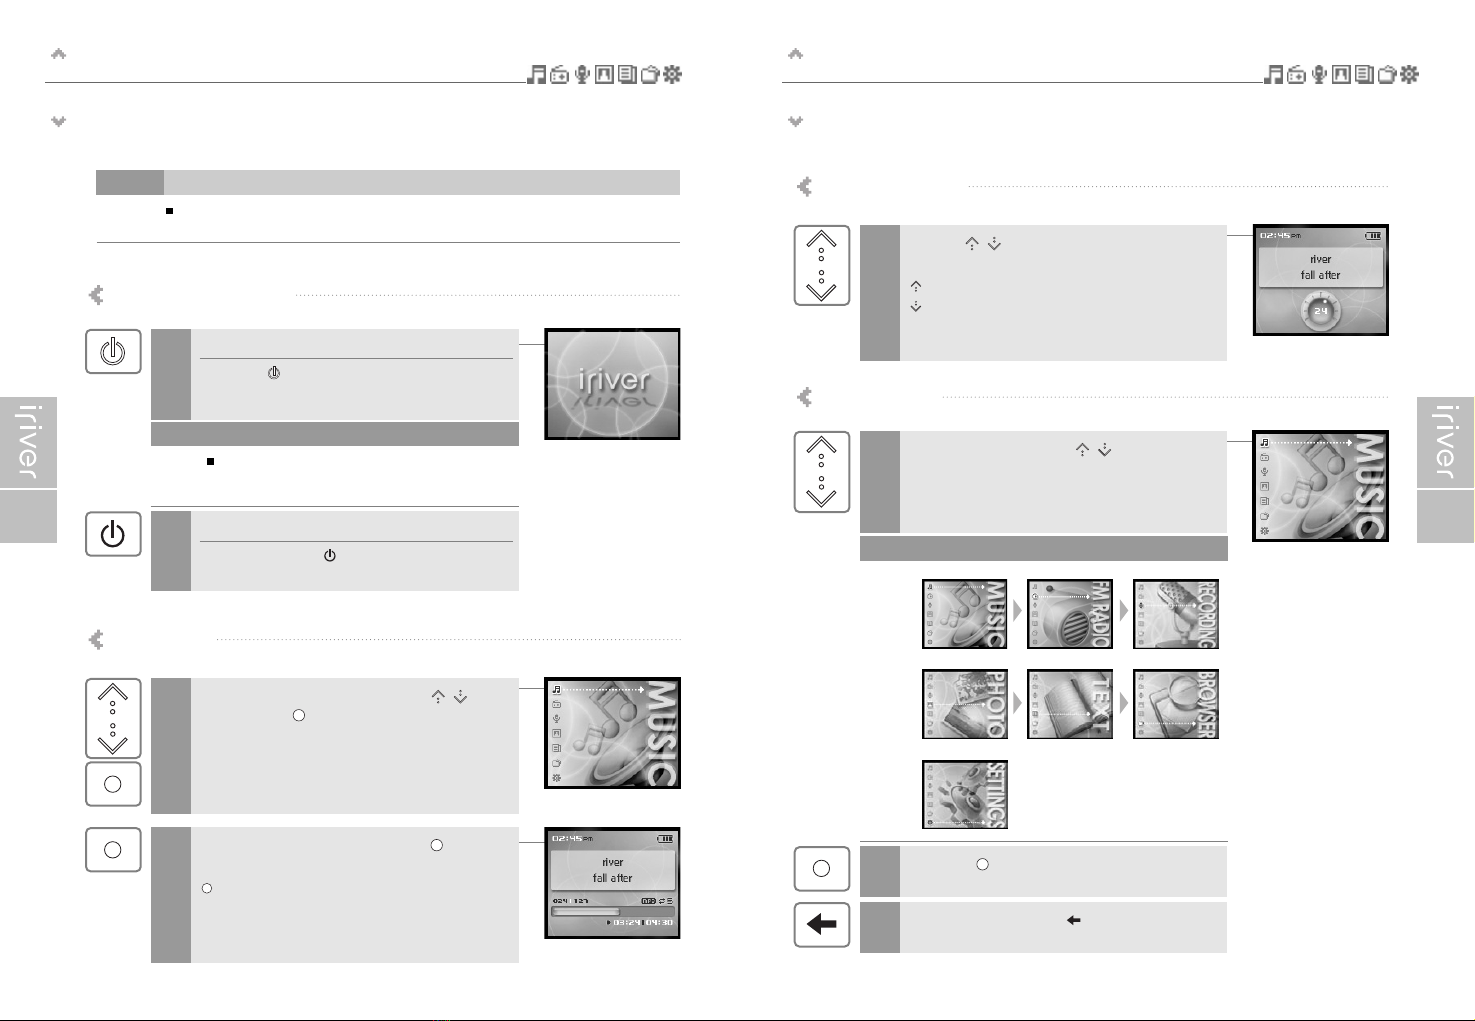
Quick start
Controlling volume and changing modes
31
Quick start
Turning on/off the player and playing music
30
Turning on/off the player
Turning on the player
Press the [ ] button.
The initial screen will be displayed.
1
Changing mode
Turning off the player
Press and hold the [ ] button.
The player will be turned off.
1
If the player does not run after pressing the button
check whether the HOLD switch is set to OFF or the
battery is discharged.
Note
Note
Controlling volume
Use the [ / ] scroll to control volume
during playback.
: Volume up
: Volume down
1
After finding the music and press the [ ] button to
play it.
: Plays the selected title
2
Playing music
Select the <MUSIC> mode using the [ / ] scroll
and press the [ ] button when the main screen
appears.
1
Select the mode using the [ / ] scroll when
the main menu appears.
There are 7 modes including MUSIC FM RADIO
RECORDING PHOTO TEXT BROWSER SETTINGS.
1
Press the [ ] button to enter the desired mode.
2
If you press and hold the [ ] button in any screen
you can return to the main menu.
3
Button image with white background = Press the button quickly.
Button image with black background = Press and hold the button.
Note
This manual covers the use of the H10 player hardware. For instructions on related software and instructions for getting
music on your player please see the included iriver plus user manual.
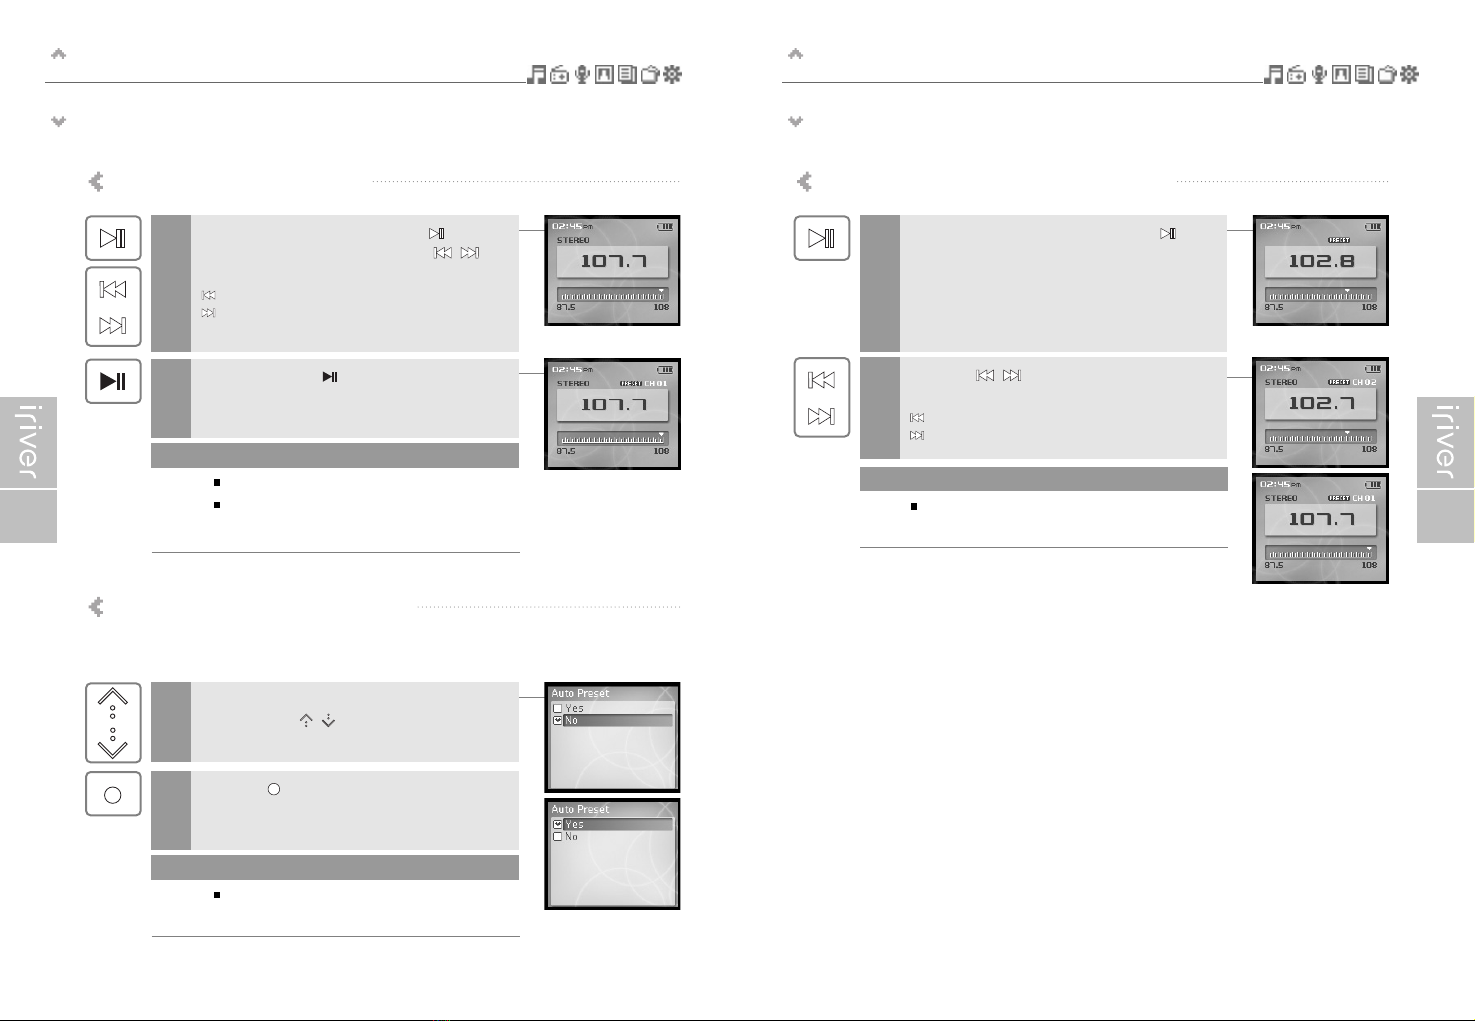
Basic operation
Listening to F radio
45
Basic operation
Listening to F radio
44
Scanning FM radio frequency – PRESET feature
If <PRESET> is not displayed press the [ ]
button to enable "Preset" mode.
1
Press the [ / ] button to move to
previous/next Preset station.
: Moves to previous Preset station
: Moves to next Preset station
2
Only stored Preset stations can be selected.
Note
Storing FM radio station - Manually
If <PRESET> is displayed press the [ ] button to
disable "Preset" mode and press the [ / ]
button to increase/decrease the frequency.
: Decreases frequency
: Increases frequency
1
Press and hold the [ ] button.
If all 20 available channels are filled the station will not be
stored.
2
Up to 20 channels can be stored.
Once all 20 channels are filled new stations can not
be stored. Please refer to page 46 to delete a station
before storing another.
Note
Storing FM radio stations - Automatically
<Auto Preset>will program up to 20 stations automatically in the 20 channels.
The <Auto Preset> function can be set in <SETTINGS> - <Extra> - <Auto Preset>.
If the <Auto Preset> screen appears move to
[Yes] using the [ / ] scroll.
1
Press the [ ] button.
The tuned stations will be stored one by one.
2
In areas where the signal is weak some channels
may not be stored.
Note

Basic operation
Recording
51
Basic operation
Recording
50
Recording FM radio station
Select the <FM RADIO> mode using the
[ / ] scroll from the main menu.
1
2
Press and hold the [ ] button to record radio
broadcasting while listening.
3
Press the [ ] button to stop recording.
4
Press the [ ] button to switch to Radio mode.
Volume control is not available while recording.
Note
Notices for recording
Playing the recorded file
Press the [ ] button in recording standby mode
to play the recorded file.
1
Recording is automatically stopped if :
- The player's memory is full.
- The battery is low.
Note
The recorded file is saved in following locations
depending on the SOURCE.
Voice
My Recordings\Voice\VoiceYYMMDDXXX.MP3
Line In
My Recordings\Audio\AudioYYMMDDXXX.MP3
Tuner
My Recordings\Tuner\TunerYYMMDDXXX.MP3
(YYMMDD - Y : Year M : Month D : Day)
Use the <BROWSER> menu to select and play files.
Note
Other manuals for H10
6
Table of contents
Other IRiver MP3 Player manuals

IRiver
IRiver Astell & Kern AK380 User manual

IRiver
IRiver T8 User manual

IRiver
IRiver Astell & Kern AKT1 User manual

IRiver
IRiver Lplayer 4GB User manual

IRiver
IRiver iFP-300 Series User manual

IRiver
IRiver X20 2GB User manual

IRiver
IRiver CLIX User manual

IRiver
IRiver H320 User manual

IRiver
IRiver iFP Series User manual

IRiver
IRiver N10 User manual

IRiver
IRiver H120 User manual

IRiver
IRiver T20 User manual

IRiver
IRiver H10 5GB User manual

IRiver
IRiver iFP-790 Assembly Instructions

IRiver
IRiver T8 User manual

IRiver
IRiver E100 4GB User manual

IRiver
IRiver T7 2GB User manual

IRiver
IRiver T30 512MB User manual

IRiver
IRiver T6 2GB User manual

IRiver
IRiver IFP-800 Series Assembly Instructions