Infinity INFMBB400 User manual

This product is serviced exclusively by Prospec Electronics Inc. and must be
returned to Prospec for in and out of warranty repairs. It can not be serviced
under warranty by other Infinity service centers.
For service contact us :
3325 South Morgans Point Road Mt Pleasant SC 29466
Tel 843-849-9037
Or visit: www.prospecelectronics.com
3325 South Morgans Point Rd. | Mt. Pleasant, SC 29466
. .
P: 843 849 9037 | www.prospecelectronics.com
Operation Manua l
Mode l No.: INFMBB-400
“Made for iPod”, and “Made for iPhone” mean that an electronic
accessory has been designed to connect specifically to iPod, or
iPhone, respectively, and has been certified by the developer to
meet Apple performance standards. Apple is not responsible for
the operation of this device or its compliance with safety and
regulatory standards. Please note that the use of this accessory
with iPod, or iPhone may affect wireless performance.
iPhone, iPod, iPod classic, iPod nano, and iPod touch are
trademarks of Apple Inc., Registered in the U.S. and other
countries.
iPhone 6 Plus
iPhone 5S
iPhone 6
iPod touch
6th generation

25
Troubleshooting
Advisory Name
The radio has detected a fault with the SiriusXM antenna. The antenna
cable may be either disconnected or damaged.
Verify that the antenna cable is connected to the SiriusXM Connect
Vehicle Tuner.
Inspect the antenna cable for damage and kinks. Replace the antenna
if the cable is damaged.
SiriusXM products are available at your local car audio retailer or
online at www.shop.siriusxm.com.
The following information helps you self-diagnose common issues without the need for
contacting SiriusXM support.
Recommended Description
Check Antenna
The radio is having difficulty communicating with the SiriusXM
Connect Vehicle Tuner. The tuner may be disconnected or damaged.
Verify that the SiriusXM Connect Vehicle Tuner cable is securely
connected to the radio.
Check Tuner
No Signal The SiriusXM Connect Vehicle Tuner is having difficulty receiving
the SiriusXM satellite signal.
Verify that your vehicle is outdoors with a clear view of the sky.
Verify that the SiriusXM magnetic mount antenna is mounted on a
metal surface on the outside of the vehicle.
Move the SiriusXM antenna away from any obstructions.
Inspect the antenna cable for damage and kinks.
Consult the SiriusXM Connect Vehicle tuner installation manual for
more information on antenna installation. Replace the antenna if the
cable is damaged. SiriusXM products are available at your local car
audio retailer or online at www.shop.siriusxm.com.
Subscription
Updated
The radio has detected a change in your SiriusXM subscription status.
Press ENTER button to clear the message.
Visit www.siriusxm.com or call 866-635-2349 in the USA or 877-
438-9677 in Canada if you have questions about your subscription.
Channel Not
Available
The channel that you have requested is not a valid SiriusXM channel
or the channel that you were listening to is no longer available.
You may also see this message briefly when first connecting a new
SiriusXM Connect Vehicle tuner.
Visit www.siriusxm.com for more information about the SiriusXM
channel line up.
Channel Not
Subscribed
The channel that you have requested is not included in your SiriusXM
subscription package or the channel that you were listening to is no
longer included in your SiriusXM subscription package.
In the U.S.A., visit www.siriusxm.com or call 1-866-635-2349 if you
have questions about your subscription package or would like to
subscribe to this channel. In Canada, visit www.siriusxm.ca or call
1-877-438-9677.
Channel Locked The channel that you have requested is Locked by the radio Parental
Control feature. See the description on Parental Control, page 14 for
more information on the Parental Control feature and how to access
locked channels.
对折基准线
对折基准线
24
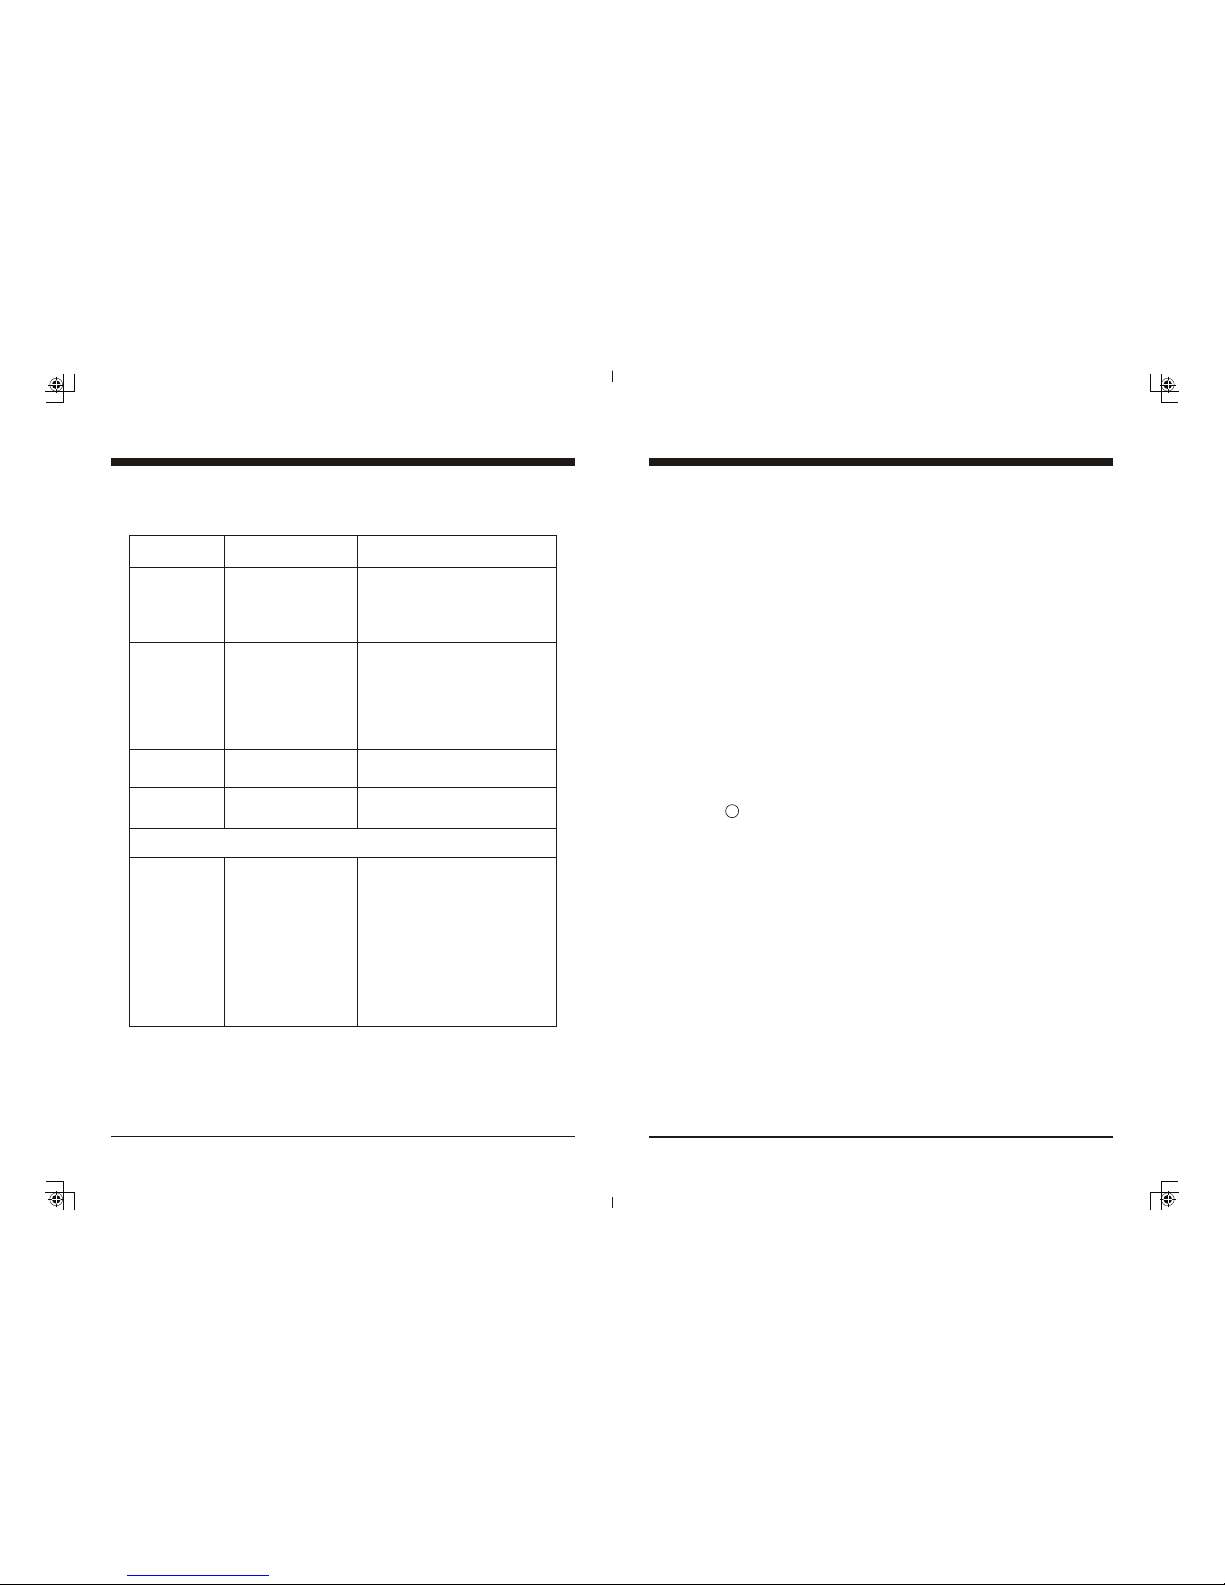
Troubleshooting
*Note: In many respects, a stereo acts much like a computer and occasionally requires a
reboot. In the unlikely event of product malfunction, a reset can usually fix the issue.
For software reset operation, please refer to page 10.
Issue
No power
No Sound
No Reception
USB stick not
reading
Cause
1. Incorrect wiring
2. Fuse is blown
3. Low battery voltage
1. Speaker connection
came loose
2. Bad speaker
3. Output blown
4. Volume too low on
media device
1. Antenna not firmly
seated in socket
1. File must be a mp3
or wma file
Solution
1. Double check wiring
2. Replace fuse
3. Check voltage of vehicle battery
with multimeter. Voltage must
be at least 11V.
1. Double check connections.
2. Replace bad speaker with known
good speaker and connect.
3. Send unit in for repair.
4. Increase volume of media device
1. Insert firmly
1. Convert format to mp3 or mwa.
1
Table of Contents
Table of Contents ----------------------------------------------------------------- 1
Product Description -------------------------------------------------------------- 2
Mounting the Black Box -------------------------------------------------------- 3
Wiring Configuration ------------------------------------------------------------ 4
General Function of Buttons ---------------------------------------------------- 5
Sign up Display & Home Menu ------------------------------------------------ 6
General Operations --------------------------------------------------------------- 7
General Settings ------------------------------------------------------------------ 8
Radio Section Operation ------------------------------------------------------- 11
SiriusXM Section Operation ----------------------------------------------- 14
Bluetooth Section Operation -------------------------------------------------- 16
USB Section Operation -------------------------------------------------------- 20
iPod/iPhone Operation --------------------------------------------------------- 22
AUX Section Operation -------------------------------------------------------- 23
Troubleshooting ----------------------------------------------------------------- 24
While in Bluetooth mode :
No Connection 1. You turn Bluetooth off
2. You are not connect
to the “MBB”
address on your
portable media
device.
3. Out of range
4. The connection is
already in use.
1. Turn Bluetooth on in Settings.
2. Choose “MBB”
3. Bring portable media device closer
to the receiver. Device needs to be
within 30’.
4. Ask the person who first paired to
drop out.
R

注:切边后的成品尺寸一定为 145x210mm
对折基 准 线
对折基 准 线
2
Product Description
AM/FM/WB/RDS
Bluetooth Audio Streaming with ID tagging
USB input and control - for USB drives and iPod/iPhone (iAP2)
Auxiliary input
50W x 4 amplifier
Wired remote / RF remote option
U.S. and European tuning
Charging through USB
4 pair of RCA output including subwoofer output
Can Bus Control via NMEA2000
Multizone Control (Zone 1, Zone 2)
TM
SiriusXM-Ready (SiriusXM connect tuner and subscription required)
The Infinity brand is part of Harman International Industries. In 1958, Harman
Kardon developed the world’s first stereo receiver.
Sirius, XM and all related marks and logos are trademarks of Sirius XM Radio
Inc. All rights reserved.
The INFMBB400 incorporates the following features:
23
AUX Section Operation
1. To Select AUX mode
At Home Menu, press TUNE Up or Down to move the highlight to AUX source, then
press ENTER button to go into the AUX mode, press MENU button again to toggle
between AUX#1 and AUX#2..
Note: highlight movement indicated by the icon background change.
The use of auxiliary mode allows you to play
the portable music device through the
headphone jack.
Note: An additional accessory/adaptor must be
purchased in order for this to happen.

注:切边后的成品尺寸一定为 145x210mm
对折基 准 线
对折基 准 线
3
Mounting the Black Box
1. Precautions
Choose the mounting location carefully so that the unit will not interfere with the normal
driving functions of the boat.
Avoid installing the unit where it would be subject to high temperature, such as from direct
sunlight or hot air, or where it would be subject to dust, dirt or excessive vibration. Use only
the supplied mounting hardware for a safe and secure installation.
2. Mounting illustrations
3. Installation Note
Please find enclosed nylon wire tie-downs (wire clamps) for added support. (Use the wire
clamps to hold down the harness, preventing water from running along the wires and into
the unit.)
22
1. Connect
Connect an iPod/iPhone to the USB input. Once inserted, the audio files will be recognized.
The track information displays on the screen once playback starts.
2. Play/Pause Play
While iPod/iPhone is playing, press the PAUSE button to pause the playback, and
press it again to resume playback.
3. Track Up/Down
While iPod/iPhone is playing, press TUNE Up or Down button to select the next or
previous track.
3. Track Repeat play
While iPod/iPhone is playing, press MENU button to activate navigation, it will
highlight at RPT, then press MENU button to toggle select Track Repeat or RPT OFF.
(Note: Refers to play of current track repeatedly.)
4. Random play
While iPod/iPhone is playing, press MENU button to activate navigation, then press
TUNE Down button to move highlight to RDM, then press MENU button to toggle
select Track Random or RDM OFF.
(Note: Refers to play of all the tracks in a random sequence.)
iPod/iPhone Operation
Only displays when EQ / LOUD ON
was selected in the Settings.
ID3 tag:
Song name
Artist
Album
Play/Pause
RPT: Track Repeat play
RDM: Track Random play
Track No.
Track elapse time
Play mode
Note: refers to PLAY; refers to PAUSE.
Note: Please make sure the iPod/iPhone cable is connected correctly.
It is recommended to use the original cable for connection.
Do NOT mount black
box in either of the
following positions.
This will allow water
to intrude and will
result in damage to
the unit.
Better
(45 facing upward)
Best
(90 facing
upward)
Correct Mounting Positions (Wires downwards)
Incorrect Mounting Positions (Wires upwards)

对折基 准 线
对折基 准 线
4
Wiring Configuration
(AUTO ANT)
(ACC )
( GROUND )
FUSE
BLUE
RED
BLACK
GRAY
GRAY/BLACK
VIOLET
VIOLET/BLACK
(FRONT RIGHT )
( REAR RIGHT )
GREEN
GREEN/BLACK
WHITE
WHITE/BLACK
( FRONT LEFT )
( REAR LEFT )
10 A
USB
ANT JACK
FRONT
LINE OUT
REAR
LINE OUT
AUX 2
AUX 1
6P REMOTE
CONTROL
12P CONNECTOR
6P REMOTE
CONTROL
NOTE:
1. When wiring, the red lead is recommended to be wired to ACC/ignition power lead.
2. Make sure that the black wire on the wiring harness is connected to a good ground point
on the boat. If the chassis of the boat is used as a ground point, make sure that the surface
is scraped clean of paint before attaching the wire to it. It is recommended to connect the
black ground wire directly to negative terminal (-) of the boat battery.
3. Before wiring your system, disconnect your boat battery’s positive (+) cable. This helps
prevent damage in case of a short.
SiriusXM
CONTROL
ZONE
LINE OUT
SUB
WOOFER
CAN BUS
21
4. Track Up/Down
While USB is playing, press TUNE Up or Down button to select the next or previous
track. To go fast forward or rewind, press and hold TUNE button.
Note: The Track No. would change simultaneously.
5. Scan Play
While USB is playing, press MENU button to activate navigation, it will highlight at
SCAN and blink, now repeat press MENU button to toggle select Track Scan, Directory
Scan, or SCAN OFF. (Note: The play mode icon would change simultaneously.)
6. Repeat play
While USB is playing, press MENU button to activate navigation, then press TUNE
Down button to move highlight to RPT, repeat press MENU button to toggle select Track
Repeat, Directory Repeat, or RPT OFF. (Note: The play mode icon would change
simultaneously.)
7. Random play
While USB is playing, press MENU button to activate navigation, then press TUNE
Down button to move highlight to RDM, repeat press MENU button while RDM blink
to toggle select Track Random, Directory Random, or RDM OFF. (Note: The play mode
icon would change simultaneously.)
8. F.LIST (Folder / File Search)
While USB is playing, press MENU button to
activate navigation, then press TUNE Down button
to move highlight to F.LIST, press ENTER button
to go inside the F.List.
In F.List, press TUNE Up or Down button to choose
desired Folder, press ENTER to display sub-directory
or files inside, press TUNE Up or Down button to
choose desired file and press ENTER button to play it.
Refers to play of current track repeatedly.
Refers to play of the tracks in current Directory repeatedly.
Refers to play of all the tracks in normal sequence.
Refers to play of all the tracks in a random sequence.
Refers to play of the tracks in current Directory in a random sequence.
Refers to play of all the tracks in normal sequence.
USB Section Operation
Refers to play of the first 10s of all the tracks in the USB device.
Refers to play of the first 10s of all the tracks in current Directory.
Refers to play of all the tracks in normal sequence.

5
General Function of Buttons
1. POWER, MUTE, PAUSE button
- With unit off, press it to power the unit on.
- With the unit on, press and hold it for over 2s to power the unit off.
- In Radio, SiriusXM, AUX mode, press it to MUTE sound output,
press again to resume sound output.
- In USB, BT Music mode, press it to PAUSE playback, press again
to resume playback.
2. MENU, ENTER button
- In any status, press and hold it for 2s to revert back to current source home display.
- In source playing status, press it to activate navigation function.
(Note: Navigation function would be disabled after 5s without operation.)
- In any selection status, press it to confirm selection.
3. VOLUME Up button
- Press to increase volume level.
4. VOLUME Down button
- Press to decrease volume level.
5. Tune Up button
- In playing status, press it to select the next station, channel, or track.
- In Navigation mode, press it to move highlight upward.
6. Tune Down button
- In playing status, press it to select the previous station, channel, or track.
- In Navigation mode, press it to move highlight downward.
1
5
3
2
6
4
MENU
ENTER
20
USB Section Operation
1. To Select USB mode
At Home Menu, press TUNE button to move the highlight to USB source, then press
ENTER button to go into the USB mode.
Note: highlight movement indicated by the icon background change.
2. USB Screen Description
3. Play/Pause Play
While USB is playing, press the PAUSE button to pause the playback, and press
it again to resume playback.
Only displays when EQ / LOUD ON
was selected in the Settings.
ID3 tag:
Song name
Artist
Album
Play/Pause
SCAN: Intro Scan play (Track / Directory Scan play)
RPT: Repeat play (Track / Directory Repeat play)
F.List: To display the File List
RDM: Random play (Track / Directory Random play)
Track No.
Track elapse time
Play mode
Note: refers to PLAY; refers to PAUSE.

6
Sign Up Display & Home Menu
2. Home Menu (Source display)
At Home Menu, press the TUNE Up/Down button to move to desired source and press
ENTER button to confirm.
Radio SiriusXM BT Music
USB AUX IN Settings
1. Sign Up Display
Once the unit is powered on, the introductory screen will appear for 3 seconds and then
switches to radio source display.
Push
19
4. Play/Pause Play
Once the BT device successfully pairs, it will begin to play the music in the device.
Note: For some Bluetooth phones, you might activate play from your phone first.
It depends on the phone itself.
While BT Music is playing,
Note: With the Bluetooth connection disconnected, once you power on the unit next time,
it will establish the Bluetooth connection automatically.
8. Bluetooth On/Off Setting
There is a Bluetooth On/Off feature in Settings which allows the user to turn off the
Bluetooth feature. With Bluetooth off selected, the BT Icon on Home Screen would be in
Gray and could not be selected. (Note: It defaults at Bluetooth ON.)
press the PAUSE button to pause the playback, and press
it again to resume playback.
5. Track Up/Down
While BT Music playing, simply press TUNE Up or Down button to select the next or
previous track.
6. Disconnect
In BT Music playing mode, if you want to disconnect the BT device, press MENU button
to activate navigation, it will highlight at DISCONN, press ENTER button to disconnect
the BT connection.
Note: When your BT device battery is at low charge, the Bluetooth connection may
occasionally be lost. To maintain good connectivity ensure that your BT device battery is
adequately charged.
7. Connect
With BT device paired OK, but disconnected, if you want to establish the BT connection,
first press MENU button to activate navigation, it will highlight at CONNE, press ENTER
button to connect the BT device.
Note: refers to PLAY; refers to PAUSE.
Bluetooth Section Operation

18
Bluetooth Section Operation
1. To Select Bluetooth mode
At Home Menu, press TUNE button to move the highlight to Bluetooth source, then simply
press ENTER button to go into the Bluetooth mode.
Note: highlight movement indicated by the icon background change.
2. Bluetooth Screen Description
3. Pair BT Device
If there is no BT device paired, go to settings on the BT device and turn the Bluetooth
option ON. Pick “MBB” option on your Bluetooth enabled device.
(if you are prompted for a password, the code entered will be “1234”.)
If there was already a BT device paired, press MENU button to highlight CONN and
press ENTER to establish the BT connection.
Only displays when EQ / LOUD ON
was selected in the Settings.
ID3 tag:
Song name
Artist
Album
Play/Pause
CONN: To establish Bluetooth connection.
DISCON: To disconnect the BT Device.
BT icon
If already has BT device
connected, here display
DISCON.
If no BT device connect,
here display CONN.
Paired device name.
7
General Operations
1. VOLUME Control
In any playing status, simply press VOL button to
display the volume adjust screen. Then press
TUNE UP/DN button to select VOLUME,
ZONE1, ZONE2, and
.
NOTE:
1. VOLUME refers to Main volume. Zone 1,
Zone 2 level will change along with
VOLUME adjustment.
2. Zone1, Zone2 volume level could be separately
adjusted only when it’s lower than Main volume.
2. MUTE Control
In Radio, SiriusXM, or AUX mode, press
MUTE button to mute sound output;
press again to resume sound output.
simply press VOL UP/DN
button to adjust it
3. General Settings
Press and hold MENU button to back to
Home Menu, then press TUNE UP/DN button
to move highlight to Settings source, then
simply press ENTER button to go into the
Setting mode.
Note: highlight movement indicated by the
icon background change.

对折基 准 线
对折基 准 线
8
3-1. Bass Control
At Setting screen, press TUNE Up or Down button
to select Bass, then press VOL Up or Down button
to adjust Bass level.
3-2. Treble Control
At Setting screen, press TUNE Up or Down button
to select Treble, then press VOL Up or Down button
to adjust Treble level.
3-3. Balance Control
At Setting screen, press TUNE Up or Down button
to select Balance, then press VOL Up or Down button
to adjust Balance level.
3-4. Fader Control
At Setting screen, press TUNE Up or Down button
to select Fader, then press VOL Up or Down button
to adjust Fader level.
3-5. Loud Control
At Setting screen, press TUNE Up or Down button to
select Loud, then press VOL Up or Down button to
select ON or OFF.
General Settings
17
any Channel, first go back to Home
Menu and select Settings. Press TUNE button to choose
Parental Lock.
- Parental Lock On / Off
Press VOL UP/DN button to move highlight to Off,
then press ENTER, it will prompt for passcode, input
four digits with VOL button and after each input press
ENTER button to jump to next input. After four digit
input, it will indicate “Lock is ON”.
With Parental Lock On selected, all the locked
channels are temporarily unlocked which will let you
listen to the locked channels without inputting the
passcode again.
Note: Once you leave SiriusXM mode or power off
the unit, it will revert to Parental Lock Off.
- To Unlock all channels
Press VOL UP/DN button to move highlight to ALL,
then press ENTER, it will prompt for passcode, input
four digits with VOL button and after each input press
ENTER button to jump to next input. After four digit
input, press ENTER button to unlock all channels.
- To Lock/Unlock channels one by one
Press VOL UP/DN button to move highlight to CH,
then press ENTER, it will prompt for passcode,
input four digit passcode, press ENTER button. It
will display the Channel list, press TUNE UP/DN
button and press MENU at the desired channel.
Note: if the selected channel was locked, then
pressing MENU button will unlock it; and if
the selected channel was unlocked, pressing
MENU button will lock it.
If you want to change your code, first go back to
Home Menu and select Settings. Press TUNE UP
button to choose Parental Lock. Press VOL button to
choose CODE CHANGE. It will prompt for current
11. Channel Parental Lock
The Parental Control feature allows you to limit access
to any SiriusXM channels, including those with mature
content. When enabled, the Parental Control feature
requires you to enter a passcode to tune to the locked
channels.
To Lock / Unlock
12. SiriusXM Parental Lock Code Change
passcode, then new code, and one more prompt for new code confirmation.
Use VOL button for code input, and press ENTER button after each input.
If a wrong digit is inputted, press TUNE DN button to move to previous digit input.
Note: Factory default passcode was 0000.
SiriusXM Section Operation
Table of contents
Other Infinity Two-way Radio manuals


