Iluv Morning Call 3 User manual

Morning Call 3
User Manual
1.2" Jumbo White LED Display Dual
Alarm Clock with Time Projection,
FM Radio, USB Charging Port, and
AC Power Adapter
Manual de usuario
Reloj con doble alarma, pantalla de proyección LED
de luz blanca y tamaño gigante de 1,2" y radio FM

WARNING AND SAFETY INSTURCTIONS
CAUTION
The lightning ash with arrowhead
symbol, within an equilateral triangle, is
intended to alert the user to the
presence of un-insulated “dangerous
voltage” within the product’s enclosure
that may be of sucient magnitude to
constitute a risk of electric shock to
persons.
CAUTION TO REDUCE THE RISK OF
ELECTRIC SHOCK, DO NOT
REMOVE COVER (OR BACK). NO
USER-SERVICEABLE PARTS INSIDE.
REFER SERVICING TO QUALIFIED
SERVICE PERSONEL.
The exclamation point within an
equilateral triangle is intended to
alert the user to the presence of
important operating and
maintenance (servicing)
instructions in the literature
accompanying the appliance.
RISK OF ELECTRIC SHOCK
DO NOT OPEN
!
AVISO E INSTRUCCIONES DE SEGURIDAD
El símbolo del relámpago con una flecha, dentro
de un triángulo equilátero, alerta al usuario de la
presencia de "voltaje peligroso" no aislado dentro
del producto, que puede ser de una magnitud
suficiente como para que haya riesgo de
electrocutarse.
SE RUEGA PRECAUCIÓN PARA REDUCIR EL
RIESGO DE DESCARGA ELÉCTRICA. NO QUITE LA
TAPA (O LA PARTE TRASERA). EN SU INTERIOR
NO HAY PIEZAS QUE PUEDAN SER ÚTILES PARA
EL USUARIO. CONTACTE CON PERSONAL
CUALIFICADO PARA CUALQUIER TRABAJO DE
SERVICIO.
El signo de exclamación dentro de un
triángulo equilátero quiere alertar al usuario de
la presencia de importantes instrucciones de
operación y mantenimiento (servicio) en la
documentación que acompaña al aparato.
2

IMPORTANT SAFETY INSTRUCTIONS
1. All the safety and operating instructions should be read before the product is operated
2. The safety and operating instructions should be retained for future reference.
3. All warnings on the product and in the operating instructions should be adhered to.
4. All operating and use instructions should be followed.
5. Use of controls or adjustments or performance other than those specied may result in hazardous
radiation exposure.
6. Do not use this product near water or expose to rain to prevent re or shock hazard. i.e. bathtub,
washbowl, kitchen sink, laundry tub, wet basement, or swimming pool, etc.
7. Cleaning – Unplug this product from the wall outlet before cleaning. Do not use liquid cleaners or aerosol
cleaners. Clean only with a dry cloth.
8. Unplug Morning Call 3 during lightning storms or when unused for long periods of time.
9. When main plug is connected, Morning Call 3 is readily operatable. In order to disconnect Morning Call 3
completely, the main plug should be disconnected from the main socket outlet.
10. Battery shall not be exposed to excessive heat such as sunshine or re.
11. If battery is incorrectly replaced, it may cause explosion. Replace only with the same or equivalent type. 3

INSTRUCCIONES DE SEGURIDAD IMPORTANTES
1. Todas las instrucciones de seguridad y funcionamiento deben leerse antes de que se utilice el producto.
2. Se deben conservar las instrucciones de seguridad y funcionamiento en el caso de futuras consultas.
3. Se deben seguir y acatar todas las advertencias que hay en el producto y en las instrucciones de funcionamiento.
4. Se deben seguir todas las instrucciones de funcionamiento y uso.
5. El uso de controles, ajustes o procedimientos distintos de los que aquí se especican puede provocar una peligrosa
exposición a radiación.
6. No use este producto cerca del agua ni lo exponga a la lluvia para evitar incendios o riesgo de descarga eléctrica (es decir,
en lugares como la bañera, lavabo, fregadero, lavadero, sótano húmedo, piscina, etc.).
7. Limpieza: desenchufe este producto de la toma de corriente antes de limpiarlo. No use limpiadores líquidos ni aerosoles.
Límpielo solo con un paño seco.
8. Desconecte Morning Call 3 durante tormentas eléctricas o cuando no se use durante un período de tiempo prolongado.
9. Cuando el enchufe principal está conectado, Morning Call 3 está listo para su uso. Para desconectar por completo el
Morning Call 3, el enchufe principal debe estar desconectado de la toma de corriente principal.
10. La batería no debe estar expuesta a un calor excesivo como el del sol, el fuego o de un grado similar.
11. Si la batería se sustituye de forma incorrecta, puede provocar una explosión. Reemplácela solo por otra del mismo tipo o
por una equivalente.
4
ON-OFF / FLIP
PROJECTION TIME / PRESET
RADIO / AL OFF
AL 2 / VOLTUN / HOUR TUN / MIN AL 1 / VOL
PM
BUZZER
RADIO
AL 1
BUZZER
RADIO
AL 2
Morning Call
SNOOZE / SLEEP / DIMMER
Alarm Repeat Index
1
2
3
4
5
6
7
=
=
=
=
=
=
=
Monday
Tuesday
Wednesday
Thursday
Friday
Saturday
Sunday
1-1
1-7
1-5
6-7
=
=
=
=
One day
Everyday
Every Weekday
Every Weekend
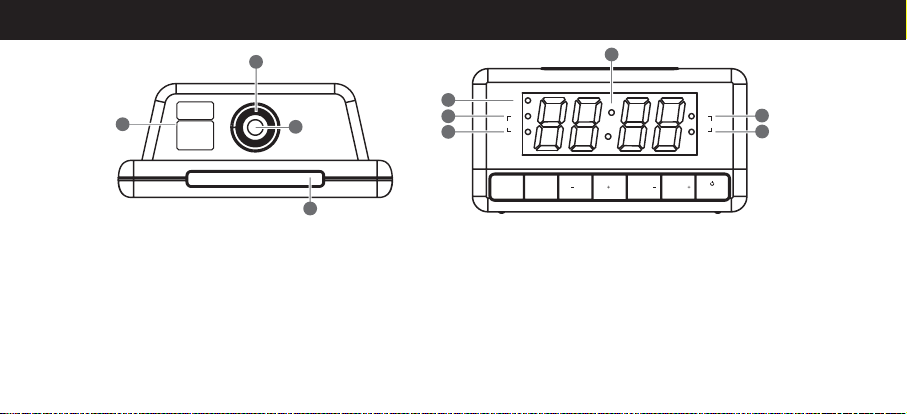
Projector focus adjustment dial
Projector lens
SNOOZE/SLEEP/DIMMER
Top Front
1
2
3
Alarm Repeat Index
Display
PM Indicator
4
5
6
Alarm 1 Indicator (Buzzer)
Alarm 1 Indicator (Radio)
Alarm 2 Indicator (Buzzer)
Alarm 2 Indicator (Radio)
7
8
9
10
OVERVIEW OF THE PRODUCT
15
42
3
6
7
8
9
10
Sintonizador de ajuste del foco del proyector
Cristal del proyector
MODO REPETICIÓN/SUSPENSIÓN/
REGULADOR DE INTENSIDAD
Índice de repetición de alarma
Pantalla
Indicador de P. M.
Indicador de alarma 1 (vibrador)
Indicador de alarma 1 (radio)
Indicador de alarma 2 (vibrador)
Indicador de alarma 2 (radio) 5

USB CHARGING
DC 5V/1.2A
6
Front Back
PROJECTION ON-OFF/180° FLIP11
12
13
14
ALARM 1/VOLUME DOWN
ALARM 2/VOLUME UP
POWER/RADIO/ALARM OFF
15
16
17
18
USB charging port
Antenna
Battery compartment
DC power input jack
19
20
21
22
ON-OFF / FLIP
PROJECTION TIME / PRESET
RADIO / AL OFF
AL 2 / VOLTUN / HOUR TUN / MIN AL 1 /VOL
PM
BUZZER
RADIO
AL 1
BUZZER
RADIO
AL 2
Morning Call
11 12 13 14 15 16 17
18
19
20
21 22
Botón para APAGAR O ENCENDER PROYECCIÓN/
TIME/PRESET
TUN-/HOUR
TUN+/MINUTE
HORA/REINICIAR
[TUN-/HOUR]/HORA
[TUN+/MIN]/MINUTO
DAR LA VUELTA 180° ALARMA 1/BAJAR VOLUMEN
ALARMA 2/SUBIR VOLUMEN
ENCENDIDO/RADIO/DESACTIVACIÓN DE
Speaker
Altavoz
ALARMA
Puerto de carga USB
Antena
Compartimento de la batería
Toma de entrada de alimentación de CC

Back
Connect the cord of the power adapter
to the DC power input jack of the Morning
Call 3.
1
Connect the plug of the power
adapter to a wall outlet.
2
Morning Call 3 display will be on,
indicating that it is powered on
and in standby mode.
3
POWER ON
CONNECTING TO POWER
AC Adaper
USB CHARGING
DC 5V/1.2A
Parte trasera
Conecte el cable del adaptador de alimentación a la toma de entrada de
alimentación de CC de Morning Call 3.
Conecte el enchufe del adaptador de corriente a una
toma de pared.
La pantalla de Morning Call 3 se encenderá, lo que indica
que está encendida y en modo de espera.
PARA ENCENDER
CONEXIÓN A LA CORRIENTE
Adaptador CA
7

1
BACKUP SYSTEM
Morning Call 3 is equipped with a backup system. It requires a 3 V
lithium battery (type: CR2032). Insert the battery into the battery
compartment and make sure the positive and negative (+ or -) sides of
the battery are in contact with the corresponding terminals in the
battery compartment.
Serial No.:1FE000001
Jumbo LED Projection Alarm Clock
Model : MORCAL3ULBK
Power : DC 5V 1.2A
Backup Battery : CR2032
jWIN Electronics Corp., USA
Designed in New York
Morning Call 3
Made in China
Morning Call
CR2032
2In the event of power failure or disconnection of the power cord, the power supply is
automatically switched to the backup battery, keeping the time and alarm settings.
SISTEMA DE RESPALDO
Morning Call 3 está equipado con un sistema de respaldo. Requiere una batería de litio de 3 V (tipo: CR2032).
Introduzca la batería en el compartimento de esta y asegúrese de que los polos positivos y negativos (+ o -) de la
batería estén en contacto con los terminales correspondientes en el compartimento de la batería.
En el caso de haya un fallo eléctrico o se desconecte el cable de alimentación, la fuente de alimentación se traslada automáticamente a la batería de
respaldo, manteniendo así los ajustes de hora y alarma.
8

3To open the battery compartment, use a screwdriver to detach the
screw on the compartment door.
4When replacing the battery, do not disconnect the power adapter.
Otherwise, all clock and alarm settings will be lost.
Serial No.:1FE000001
Jumbo LED Projection Alarm Clock
Model : MORCAL3ULBK
Power : DC 5V 1.2A
Backup Battery : CR2032
jWIN Electronics Corp., USA
Designed in New York
Morning Call 3
Made in China
Morning Call
Para abrir el compartimento de la batería, use un destornillador para separar el tornillo de la tapa del
compartimento.
Cuando sustituya la batería, no desconecte el adaptador de corriente. De lo contrario, se perderán todos
los ajustes de reloj y alarma.
9

SETTING TIME
1In standby mode, press and hold the [TIME/PRESET]
button to enter the clock setting mode.
2
3
Press the [TIME/PRESET]button repeatedly to cycle
through the setting options: Year > Month/Day >
Time
Setting year: Press [TUN-/HOUR]or [TUN+/MIN]
button. Press [TIME/PRESET]button to conrm.
ON-OFF / FLIP
PROJECTION
RADIO / AL OFF
AL 2 / VOLAL 1 / VOL
PM
BUZZER
RADIO
AL 1
BUZZER
RADIO
AL 2
Morning Call
TUN / HOUR TUN / MINTIME / PRESET
ON-OFF / FLIP
PROJECTION
PM
BUZZER
RADIO
AL 1
Morning Call
TUN / HOUR TUN / MINTIME / PRESET
AJUSTAR LA HORA
En el modo de espera, mantenga pulsado el botón [TIME/PRESET] para ir al modo
de configuración del reloj.
Pulse el botón [TIME/PRESET] varias veces para ver las opciones de configuración:
Año > Mes/Día > Hora
Ajustar año: pulsar el botón [TUN-/HOUR] o [TUN+/MIN]. Pulse el botón [TIME/PRESET]
para confirmar.
10
Table of contents
Other Iluv Alarm Clock manuals

Iluv
Iluv IMM153 User manual

Iluv
Iluv TimeShaker 5Q Wow User manual

Iluv
Iluv TimeShaker Super User manual

Iluv
Iluv iMM183 User manual

Iluv
Iluv TimeShaker WOW User manual

Iluv
Iluv TimeShaker Boom User manual

Iluv
Iluv TimeShaker WOW User manual

Iluv
Iluv IMM153 User manual

Iluv
Iluv TimeShaker Boom User manual

Iluv
Iluv iMM178 User manual


