IKEA LUFTIG HW400 User manual

FRAMTID
HW400
GB
FR
DE
IT


ENGLISH 4
DEUTSCH 14
FRANÇAIS 24
ITALIANO 40
ENGLISH 4
Beforerstuse
Your safety and that of others is paramount.
Remove cardboard protection pieces,
protective lm and adhesive labels from
accessories.
Check the appliance for any transport
damage.
To avoid any damage do not place any
weights on the appliance. Do not expose
the appliance to atmospheric agents.
This manual and the appliance itself provide
important safety warnings, to be read and
observed at all times.
This is the attention symbol, pertaining
to safety, which alerts users to potential
risks to themselves and others.
All safety warnings are preceded by the
attention symbol and the following terms:
DANGER: indicates a hazardous
situation which, if not avoided, will
cause serious injury.
WARNING: Indicates a hazardous
situation which, if not avoided, could
cause serious injury.
All safety warnings give specic details
of the potential danger/warning present
and indicate how to reduce risk of injury,
damage and electric shock resulting from
improper use of the appliance. Carefully
observe the following instructions.
Precautionsandgeneral
recommendations
• The electrical installation and the
electrical connection must be carried
out by a qualied technician according
to the manufacturer’s instructions and
in compliance with the local safety
regulations. Do not repair or replace any
part of the appliance unless specically
stated in the user manual.
• The appliance must be disconnected
from the power supply before carrying
out any installation work.
• Earthing of the appliance is compulsory.
(required only for class I).
• The power cable must be long enough
for connecting the appliance, once
tted in its housing, to the power supply
socket.
• Do not pull the power supply cable in
order to unplug the appliance.
• The electrical components must not be
accessible to the user after installation.
• Do not touch the appliance with any wet
part of the body and do not operate it
when barefoot.
• The appliance is not intended for use
by persons (including children) with any
physical, sensory or mental impairment,
or without experience and knowledge
of the appliance, unless supervised or
previously instructed in its use by those
responsible for their safety.
• Do not repair or replace any part of the
appliance unless specically indicated
in the manual. All other maintenance
services must be carried out by a
specialised technician.
• Children must be supervised to ensure
they do not play with the appliance.
• When drilling through the wall pay
attention not to damage electric
connections and/or pipes.
• Air vents must always discharge to the
outside.
Safetyinformation 4
Productdescription 7
Controlpanel 7
Cleaningandmaintenance 7
Whattodoif... 9
Technicaldata 10
Environmentalconcerns 11
IKEAGUARANTEE 11
SafetyInformation
Contents
ENGLISH 5
• The manufacturer rejects all
responsibilities for any damage caused
by improper use or wrong settings.
• Appropriate maintenance and cleaning
ensure the good working order and
the best performance of the appliance.
Regularly clean all stubborn surface dirt
to avoid grease build up. Remove and
clean or change the lter regularly.
• Never ame cook food (ambé) under
the appliance. Using free ames might
cause re.
• Failure to observe the instructions for
cleaning the hood and replacing the
lters may result in a re.
• Exhaust air must not be vented through
a ue used for removal of fumes
produced by gas combustion appliances
or other combustible materials, but must
have a separate outlet. All national
regulations governing extraction of
fumes must be observed.
• There shall be adequate ventilation if
the hood is being used at the same time
as other appliances using gas or other
combustible materials. The negative
pressure of the room must not exceed 4
Pa (4x 10⁻⁵ bars). For this reason ensure
that the room is well ventilated.
• Do not leave frying pans unattended
when frying, as the frying oil may catch
re.
• Before touching the light bulbs, ensure
that they are cold.
• Do not use or leave the hood without
the light bulb correctly tted, as this may
cause electric shock.
• The hood is not a work surface, therefore
do not place any objects on top of it or
overload it.
• During all installation and maintenance
operations wear appropriate working
gloves.
• This appliance is not suitable for outdoor
use.
WARNING: when the hob is in use,
accessible parts of the hood may
become hot.
Installationandconnection
After unpacking the appliance, check for
any transport damage. In the event of
problems, contact the After-sales Service.
To prevent any damage, only remove
the appliance from its polystyrene foam
packaging at the time of installation.
Preparingforinstallation
WARNING: this is a heavy product; the
hood should only be lifted and
installed by two or more people.
The minimum distance between the hob and
the bottom part of the hood must not be less
than 65 cm for gas cookers and 50cm for
electric cookers.
Before installation also check the minimum
distances stated in the manual of the cooker.
If the installation instructions for the cooker
specify a greater distance between cooker
and hood, this distance must be observed.
Electricalconnection
Make sure the power voltage specied on
the appliance rating plate is the same as
the mains voltage.
This information can be found on the inside
of the hood, under the grease lter.
Power cable replacement (type H05
VV-F) must be carried out by a qualied
electrician. Contact an authorized service
centre. If the hood is tted with an electric
plug, connect the plug to a socket complying
with current regulations, located in an
accessible place.
If no plug is tted (direct wiring to the
mains), or if the socket is not located in an
accessible place, a qualied electrician
should install a standardised double pole
power switch that will enable complete
isolation from the mains in case of category
III overvoltage conditions, in accordance
with wiring rules.

ENGLISH 6
Use
The hood has been designed to be installed
and used either as a “Exhausted model”, or
as a “Recirculation model”.
Exhaustedmodel(seesymbol in
installationbooklet)
Cooking steam is sucked and channelled
outside the house through a discharge duct
(not supplied), tted to the hood steam
outlet.
Ensure that the discharge duct is correctly
tted to the air outlet, unit using an
appropriate connection system.
Important:If already installed, remove the
charcoal lter/s.
Recirculationmodel(seesymbol in
installationbooklet)
The air is ltered through one or more the
charcoal lters, and then resent into room.
Important:Ensure appropriate air
circulation around the hood.
Important:If the hood is supplied without
charcoal lters, these must be ordered and
tted before the hood can be used.
The hood should be installed away from
particularly dirty areas, windows, doors and
heat sources.
The hood is sold with all necessary
components for installation on most types of
walls or ceilings. However, ask a qualied
technician to check that the items supplied
are suitable for the type of wall/ceiling.
Keep this booklet for future consultation.
ENGLISH 7
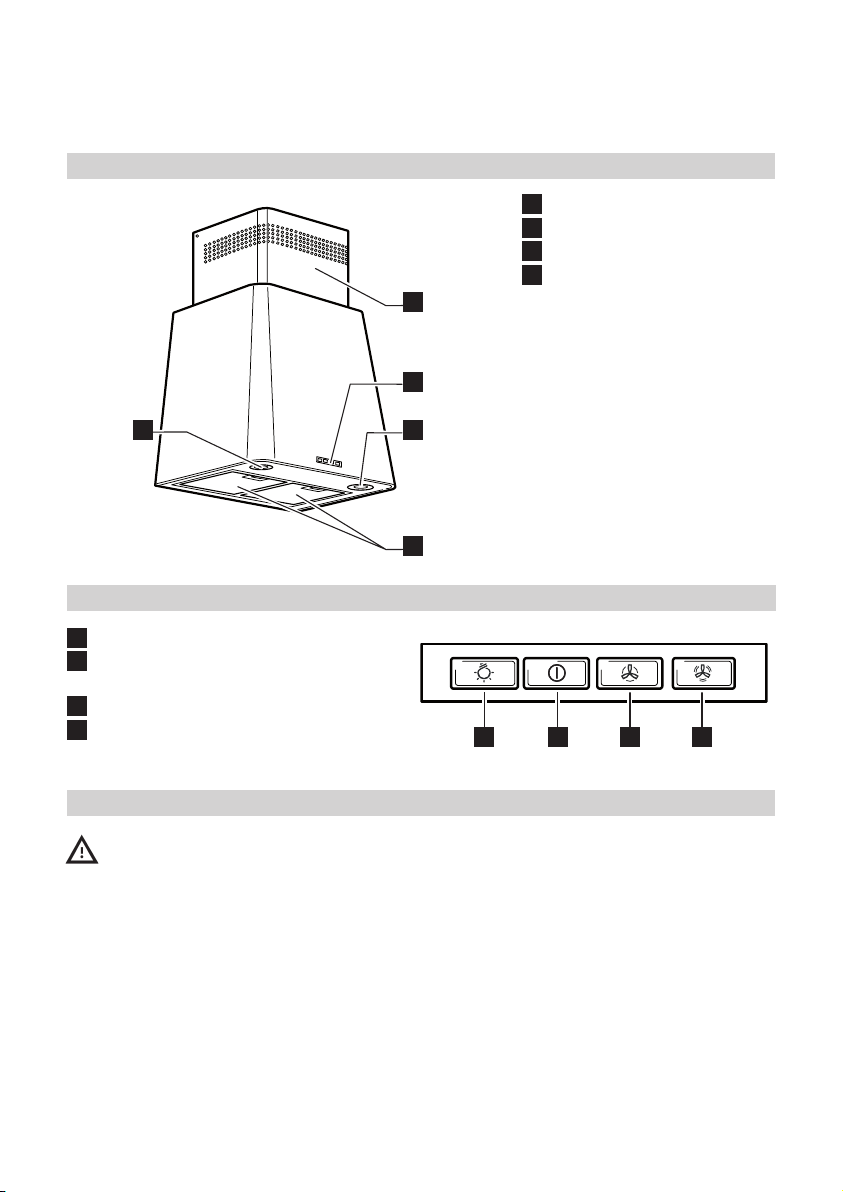
Productdescription
1 Control panel
2 Grease lter
3 Light
4 Chimney
4
1
Controlpanel
A ON/OFF light switch
B ON-OFF switch and suction level 1
activation
C Suction power 2 selection switch
D Suction power 3 selection switch
33
2
A B C D
WARNING:- Never use steam
cleaning equipment.
- Disconnect the appliance from the power
supply.
- Use safety gloves.
IMPORTANT: do not use corrosive or
abrasive detergents. If any of these products
accidentally comes into contact with the
appliance, clean immediately with a damp
cloth.
• Clean the surfaces with a damp cloth.
If it is very dirty, add a few drops of
washing up detergent to the water.
Finish off with a dry cloth.
IMPORTANT: do not use abrasive sponges
or metallic scrapers or scourers. Over time,
these can ruin the surface.
• Use detergents specically designed for
cleaning the appliance and follow the
manufacturer instructions.
IMPORTANT: clean the lters at least
monthly to remove any oil or grease
residuals.
Cleaningandmaintenance
ENGLISH 8
Greaselter
The metal grease lter has unlimited
duration. It should be washed at least
once a month, either by hand, or in the
dishwasher (use a short cycle and low
temperature).
If washed in the dishwasher, the grease lter
surface may become matt. This will not have
any effect on performance.
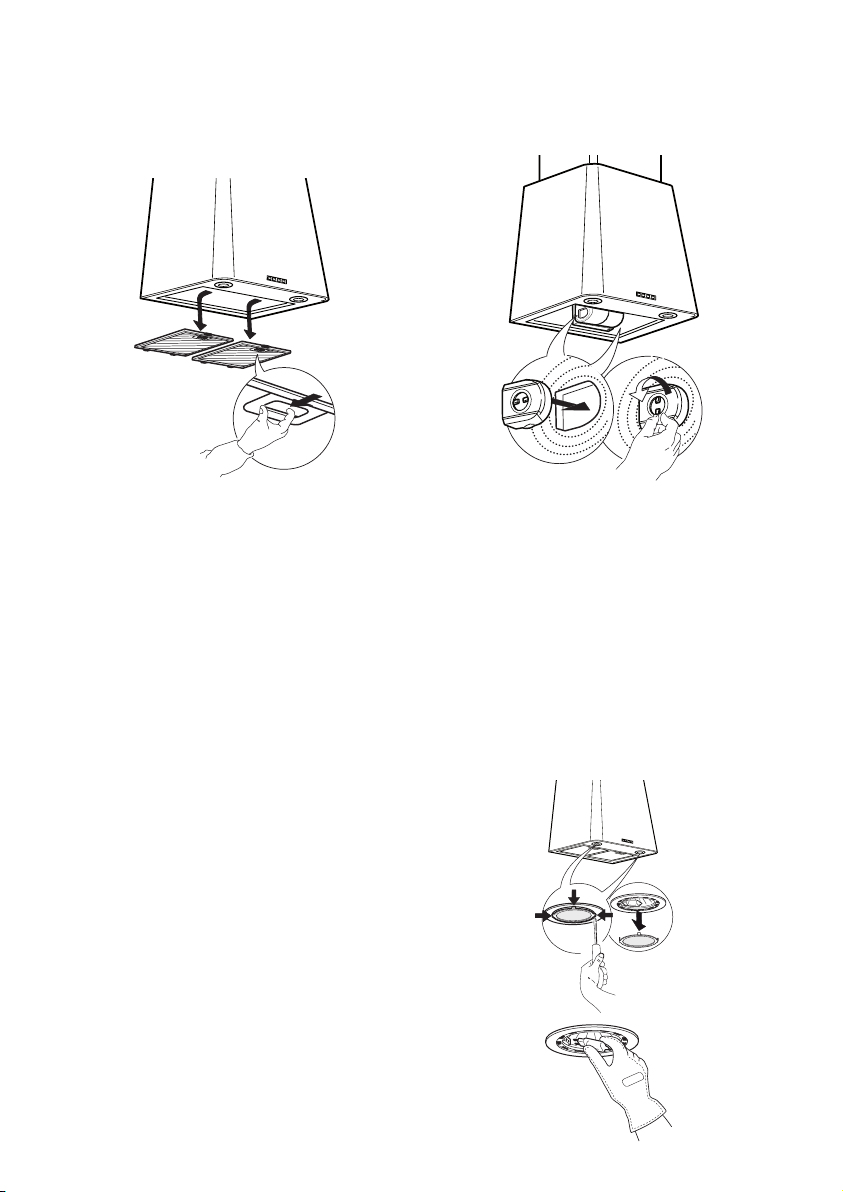
To remove the lter, pull out the handle.
After the lter has been washed and dried,
replace following the inverse procedure.
Fittingorreplacingcharcoallter
Charcoal lter is neither lavable nor
regenerable.
Replace the charcoal lter every 4 months
1. Disconnect the hood from the electric
power supply.
2. Remove the grease lters.
3. If charcoal lters are already present
(two lters tted, covering the protection
grids of the motorimpeller) and must
be replaced, turn the central handle
anticlockwise to unlock them.
Replacingthelamps
1. Disconnect the hood from the electric
power supply.
2. Insert the blade of a small at
screwdriver where indicated by the
three points, and with a gentlepressure
remove the light cover from its position.
3. Remove the faulty lamp and replace
with a new one.
4. Replace the cover (spring lock system).
Important: Only use 20W MAX - G4
halogen lamps.

ENGLISH 9
Problem Possiblecause Solution
The appliance does not work There is no mains
electrical power
Check for the presence of
mains electrical power.
Turn off the appliance and
restart it to see if the faults
persists.
The appliance is not
connected to the
electrical supply
Check if the appliance is
connected to the electrical
supply.
Turn off the appliance and
restart it to see if the faults
persists.
The hood’s suction level is not
enough
The suction speed is too
low
Check the suction speed and
adjust as necessary
The metal lters are
dirty
Check that the lters are clean
If not, clean the lters in the
dishwasher.
The air vents are
obstructed
Check the air vents for any
obstructions and remove as
necessary.
The light does not work The light bulb is broken Check the light bulb and
replace it if necessary.
The light bulb is not
correctly tted
Check that the light bulb has
been correctly tted.
If not, t the light bulb in right
way.
Whattodoif...
BeforecontactingtheAfter-salesservice:
Switch the appliance on again to see if the
problem has disappeared. If not, switch it
off again and repeat the operation after an
hour.
If your appliance still does not work properly
after carrying out the checks listed in the
troubleshooting guide and switching the
appliance on again, contact the After-sales
service, clearly explaining the problem and
specifying:
• the type of fault;
• the model;
• the type and serial number of the
appliance (given on the rating plate);
• the Service number (the number after the
word SERVICE on the rating plate inside the
appliance).

ENGLISH 10
Technicaldata
Dimensions - Internal (mm) Width 598
Height min 700 - max 1030
Depth 440
Airow max - Exhaust (m3/h) 395
Noise max - Exhaust (dBa) 61
Airow max - Recirculating (m3/h) 246
Noise max - Recirculating (dBa) 67
Total Power (W) 200
Lamps 2 x 20
Installation minimun height dimensions
(cm)
gas or
combi
cookers
65
electric
cookers
50
The technical information are situated in
the rating plate on the internal side of the
appliance and in the energy label.
Other manuals for LUFTIG HW400
3
This manual suits for next models
1
Table of contents
Languages:
Other IKEA Microwave Oven manuals

IKEA
IKEA NUTID MWC 6 User manual

IKEA
IKEA FRAMTID MW 3 User manual

IKEA
IKEA BEJUBLAD User manual

IKEA
IKEA MATÄLSKARE User manual

IKEA
IKEA FRAMTID MW6 User manual

IKEA
IKEA TILLREDA User manual

IKEA
IKEA IBMS1450WM0 User manual

IKEA
IKEA TILLREDA 504.867.92 User manual

IKEA
IKEA FINSMAKARE User manual

IKEA
IKEA TILLREDA User manual

IKEA
IKEA FRAMTID MW 3 User manual

IKEA
IKEA Anratta User manual

IKEA
IKEA VARMA User manual

IKEA
IKEA VALSKAPT User manual

IKEA
IKEA HUSHALLAFRAMTID MW3 User manual

IKEA
IKEA IBMS1450 User manual

IKEA
IKEA NUTID MWC 6 User manual

IKEA
IKEA IMH16 User manual

IKEA
IKEA TILLREDA User manual

IKEA
IKEA IMH16XSQ3 User manual