HQ Avante QM30239 User manual

©2015Handi Quilter, Inc. All rights reserved. Printed in the U.S.A.
HANDI QUILTER 18-INCH LONGARM
Designed by a Quilter, for Quilters.
®
USER MANUAL
QM30239 • VERSION 3.1
PRINTED 03 /20 /2015
Handi Quilter, Inc
501 N 400 W
North Salt Lake, UT 84054
1-877-MY-QUILT (697-8458) • www.HandiQuilter.com
HQ Avanté
®
is part of the family of innovative quilting products from Handi Quilter
®

Page 2 HQ Avanté User Manual
Congratulaons on your purchase of the HQ Avanté from Handi Quilter!
You haven’t just purchased a quilng machine, you’ve
joined the Handi Quilter family and we welcome you.
Handi Quilter is commied to innovaon, reliability,
customer service and educaon. Our machines are
“Designed by a Quilter, for Quilters®” and we are
commied to your quilng success.
With that in mind, we invite you to bookmark our
website: www.HandiQuilter.com and invite you to
visit to learn more about the art of quilng. We’ve
posted ps, tricks and tutorials on subjects as di-
verse as “Oiling Your Machine” to “Loading a Quilt”
to “Making Perfect Feathers”. We’ve got videos to
watch, pdf les to print out for reference and forums
for asking quesons.
Remember, if you ever have quesons, your local Rep
can help you. If the Rep is not available, contact
Handi Quilter directly at techsupport@HandiQuilter.
com or by calling us at 1-877-697-8458,
Monday- Friday, 8-5 MST.
Package Contents
Please keep your original box and packaging
Contents of Package
1. Bobbins (5 pieces, one in machine)
2. Needle (135x5) size 16 (pack of 10)
3. Needle (135x5) size 18 (pack of 10)
4. Bobbin Case
5. Thread Mast
6. Pin Oiler
7. Lint Brush
8. Screwdriver
9. Power Cord
10. 2.5 mm L Allen tool
11. 3 mm L Allen tool
12. 5 mm L Allen tool
13. Laser Stylus and Clamp
14. Laser Stylus Post
15. Open-toe Handi Foot
16. Extra encoder O-ring
17. HQ Quilng Machines “Geng Started” DVD
18. User Manual
19. HQ Avanté Quilng Machine
Oponal Accessories
1. Micro Handles
2. Ruler Base
3. Horizontal Spool Pin
4. Groovy Board Stylus and Adaptor
5. HQ Pro-Stcher

Note: A set of Handi Quilter Geng Started DVDs is included with your HQ Avanté machine. Review the DVDs and
these instrucons to beer understand how to set up and use the HQ Avanté.
Table of Contents
Safety ....................................................................................4
Components (Front Side View) ................................................................7
Components (Back Side, Rear and Front Views) .................................................8
Installaon (Frames) ........................................................................9
Installaon (Handlebars) .....................................................................9
Installaon (Power Cord). . . . . . . . . . . . . . . . . . . . . . . . . . . . . . . . . . . . . . . . . . . . . . . . . . . . . . . . . . . . . . . . . . . . 10
Inserng Needle ..........................................................................11
Changing the Handi Feet ....................................................................12
Laser Stylus ...............................................................................13
Installaon (Thread Mast) ...................................................................14
Threading the Machine .....................................................................15
Horizontal Spool Pin .......................................................................17
Bobbin and Thread Tension Adjustments ......................................................19
Easy-Set Tension™ Adjustment ...............................................................19
Maintenance (Oiling and Lubricang) .........................................................20
Touch Screen Displays ......................................................................18
System Informaon ........................................................................27
Diagnoscs Tests ..........................................................................28
HQ Stch Regulator Operaon ...............................................................31
Geng Started Quilng ....................................................................32
Troubleshoong ...........................................................................33
Warranty Informaon ......................................................................37
Warranty Registraon Card ..................................................................39
Installaon and Training Checklist ............................................................41
Page

Page 4 HQ Avanté User Manual
Safety Secon
This device complies with Part 15 of the FCC Rules.
Operaon is subject to the following two condions:
(1) This device may not cause harmful interference,
and (2) this device must accept any interference
received, including interference that may cause
undesired operaon.
Please note: Do not operate your HQ Avanté®
quilng machine unl you have completely read the
informaon contained in this manual. Please keep
all packaging and order informaon for warranty
purposes.
IMPORTANT SAFETY INSTRUCTIONS
Read all instrucons before using this machine.
When using this machine, basic safety precauons
should always be followed, including the following:
DANGER — To reduce the risk of electric
shock:
• A quilng machine should never be le
unaended when plugged in. Always unplug the
machine from the electrical outlet immediately
aer using and before cleaning.
WARNING — To reduce the risk of burns,
re, electric shock, or injury to persons:
• The HQ Avanté® is heavy. Never aempt to li it
alone. Always use two people when liing. Always
li from the throat of the machine, not from the
handlebars.
• Always unplug the HQ Avanté® from the electrical
outlet when performing any maintenance,
changing the needle, removing thread locks, or
when le unaended.
• Do not unplug by pulling on cord. To unplug, grasp
the plug, not the cord.
• Keep ngers away from all moving parts. Use
cauon around the needle or sharp external
components.
• Change the needle oen. Do not use bent or dull
needles. “Every quilt deserves a new needle”.
• Switch the machine to the symbol o, or
0, posion to turn it o when making any
adjustments in the needle area, such as threading
needle, changing needle, threading bobbin,
changing hopping foot, and so forth.
• Never drop or insert foreign objects into any
opening.
• The HQ Avanté® should only be used indoors away
from moisture.
• The HQ Avanté® should not be stored or used in
extreme temperatures.
• Use the HQ Avanté® only for its intended use as
described in this manual.
• To disconnect from the wall outlet, push the
switch to the o posion, then remove the plug
from outlet pulling from the plug, not the cord.
Never operate the HQ Avanté® if the cord is
damaged or not working correctly. If a mechanical
or electrical problem is encountered, return the
HQ Avanté® to the nearest authorized service
center or the manufacturer for examinaon,
repair, electrical, or mechanical adjustment.
• It is not recommended that the HQ Avanté®
quilng machine be used with any machine
quilng frame other than those recommended by
Handi Quilter.
• Use this quilng machine only for its intended use
as described in this manual. Use only aachments
recommended by the manufacturer as contained
in this manual.
• Never operate the machine with any air openings
blocked. Keep venlaon openings of the machine
free from the accumulaon of lint, dust, and loose
cloth.
• Do not operate where aerosol (spray) products
are being used or where oxygen is being
administered.
• Do not pull or push the machine across the fabric
excessively while stching. It may deect the
needle enough to cause it to break.
• Use only needles designed for free moon quilng
and recommended by Handi Quilter for this
machine. Other types of needles may be break
during normal quilng.
• Children shall not play with the machine. Close
aenon is necessary when this machine is used
by or near children.
• This sewing machine may be used by children
age 8 years and above and persons with reduced
physical, sensory, or mental capabilies or lack of

HandiQuilter.com Page 5
experience and knowledge if they have been given
supervision or instrucon concerning use of the
machine in a safe way and understand the hazards
involved.
• Cleaning and user maintenance shall not be made
by children without supervision.
Save these instrucons.
This machine is intended for household use.
Disclaimer
Handi Quilter and its Representaves are in no way
legally responsible or liable for damage to the HQ
Avanté when used improperly or not in accordance
with the guidelines stated in this manual or when
used on machine quilng frames not recommended
by Handi Quilter.
To use the machine safely
1. Carefully watch the needle when sewing. Do not
touch the hand wheel, take up lever, needle, or
other moving parts.
2. Turn the machine o and unplug the cord in the
following cases:
• when you have stopped using the machine
• when you replace or remove the needle or any
other part
• when you check or clean the machine
• when you leave the machine unaended
3. Connect the machine directly to the wall outlet or
to a surge protector that connects directly to the
wall outlet. Do not use extension cords.
To increase the life of your machine
1. Do not store this machine in areas exposed
to direct sunlight or high humidity. Never use
or store the machine near a heater, an iron, a
halogen lamp or other hot things.
2. Use only neutral soaps or detergents to clean
the machine. Benzene, solvents and scouring
powders can damage the case and the
machine and therefore should never be used.
General Specicaons
The HQ Avanté ulizes high-tech electronics and an
innovave touch-pad user interface to oer greater
funconality and ease of operaon to home quilters
than ever before conceived in the quilng industry.
The HQ Avanté quilng machine is a high quality
machine that incorporates very robust design
features and is very easy to service.
Disclaimer
Handi Quilter and its Representaves are in no
way legally responsible or liable for damage to the
HQ Avanté when used improperly or not in
accordance with the guidelines stated in this manual
or when used on Machine Quilng Frames not
recommended by Handi Quilter.
Sewing Opening Dimensions:
Sewing Speed:
Stches-Per-Inch:
Needle System:
Needle Sizes, (recommended):
Hook System:
Bobbin Type:
Bobbin Case:
Motor Type:
Needle Posioning:
Electrical Power:
US and Canada*:
Rest of world:
*Complies with internaonal
cercaons
LED Power Consumpon:
Sew Foot Stroke/Li:
Needle Bar Stroke:
Take-Up Stroke:
Lubricaon, main components:
Lubricaon of hook:
(245 mm X 610 mm)
8.25” X 18”
Manual Mode:
Min 90spm, Max 2,200spm
Regulated Mode:
Min 0spm, Max full speed
4spi – 22spi
134 (135 X 7)
12/80 - 20/125
Rotary, Horizontal axis, M-class bobbin
Aluminum, Class M
Type MF
Brushless DC
Up and down, walking stch
105 – 120 VAC, 47 - 63Hz, 300W peak
100 – 250 VAC, 47 - 63Hz, 300W peak
8 W
5 mm
35.3 mm
73 mm
Kluber Lube, permanent
Velocite 10, Texaco 22
3. Do not drop or bump the machine.
4. Always consult the manual to replace or x the
hopping foot, needle or any other part of the
machine. If necessary contact an authorized
Page 6 HQ Avanté User Manual
Handi Quilter representave or Handi Quilter technical support.
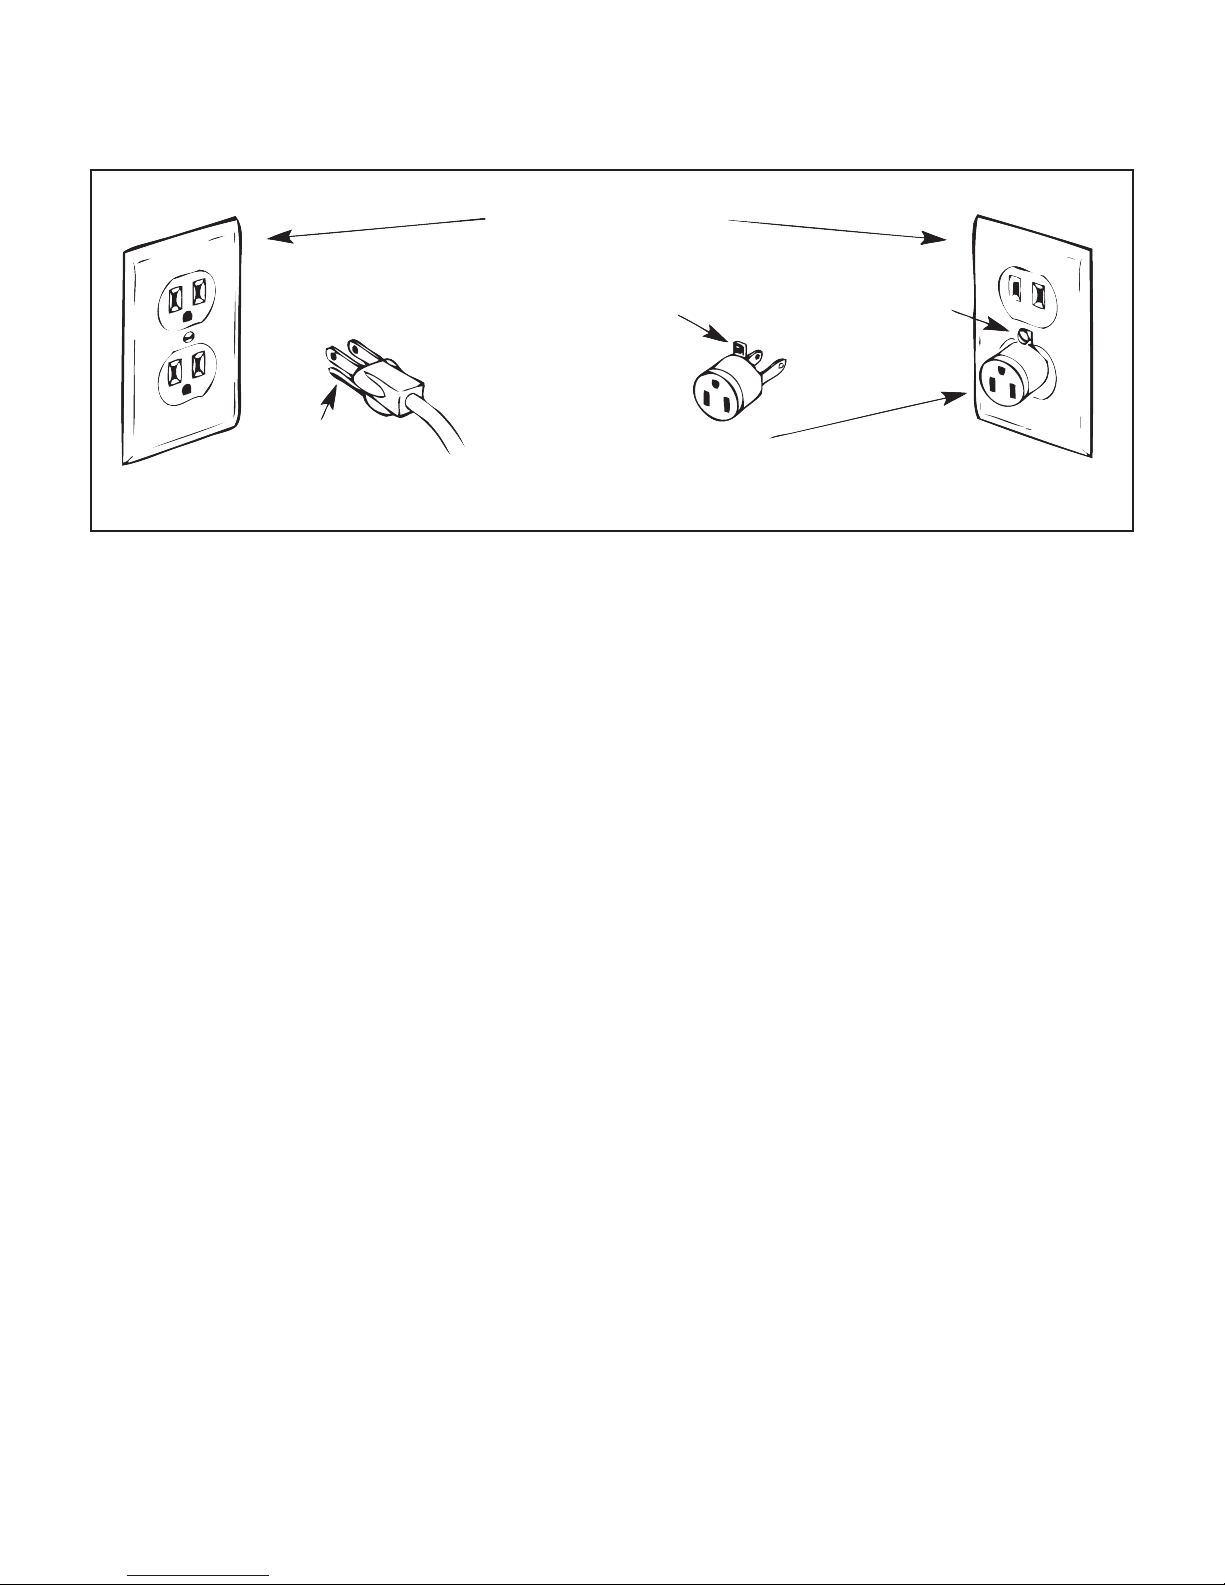
Oponal U.S. Grounding for Customers with 120 VAC Connecons
GROUNDED OUTLET BOXES
METAL
SCREW
ADAPTER
(B) (C)
TAB FOR
GROUNDING
SCREW
(A)
GROUNDING PIN
This product is for use on a nominal 120 V or nominal 220 V circuit, and has a grounding plug that looks like
the plug illustrated in sketch A above. A temporary adapter, which looks like the adapter illustrated in sketches
B and C, may be used to connect this plug to a 2-pole receptacle as shown in sketch B if a properly grounded
outlet is not available. The temporary adapter should be used only unl a properly grounded outlet can be
installed by a qualied electrician. The green colored rigid ear, lug, and the like, extending from the adapter,
must be connected to a permanent ground such as a properly grounded outlet box cover. Whenever the
adapter is used, it must be held in place by the metal screw.
ÂIMPORTANT: In Canada, the use of a temporary adapter is not permied by the Canadian Electric Code.
To repair or adjust the machine
If the machine breaks down or needs adjustment, rst check the troubleshoong chart in the appendix to
inspect and adjust the machine yourself.
For more product informaon and updates, visit our website at www.HandiQuilter.com.
The contents of this manual and product specicaons are subject to change without prior noce.
Check for updated manuals at www.handiquilter.com/manuals/.
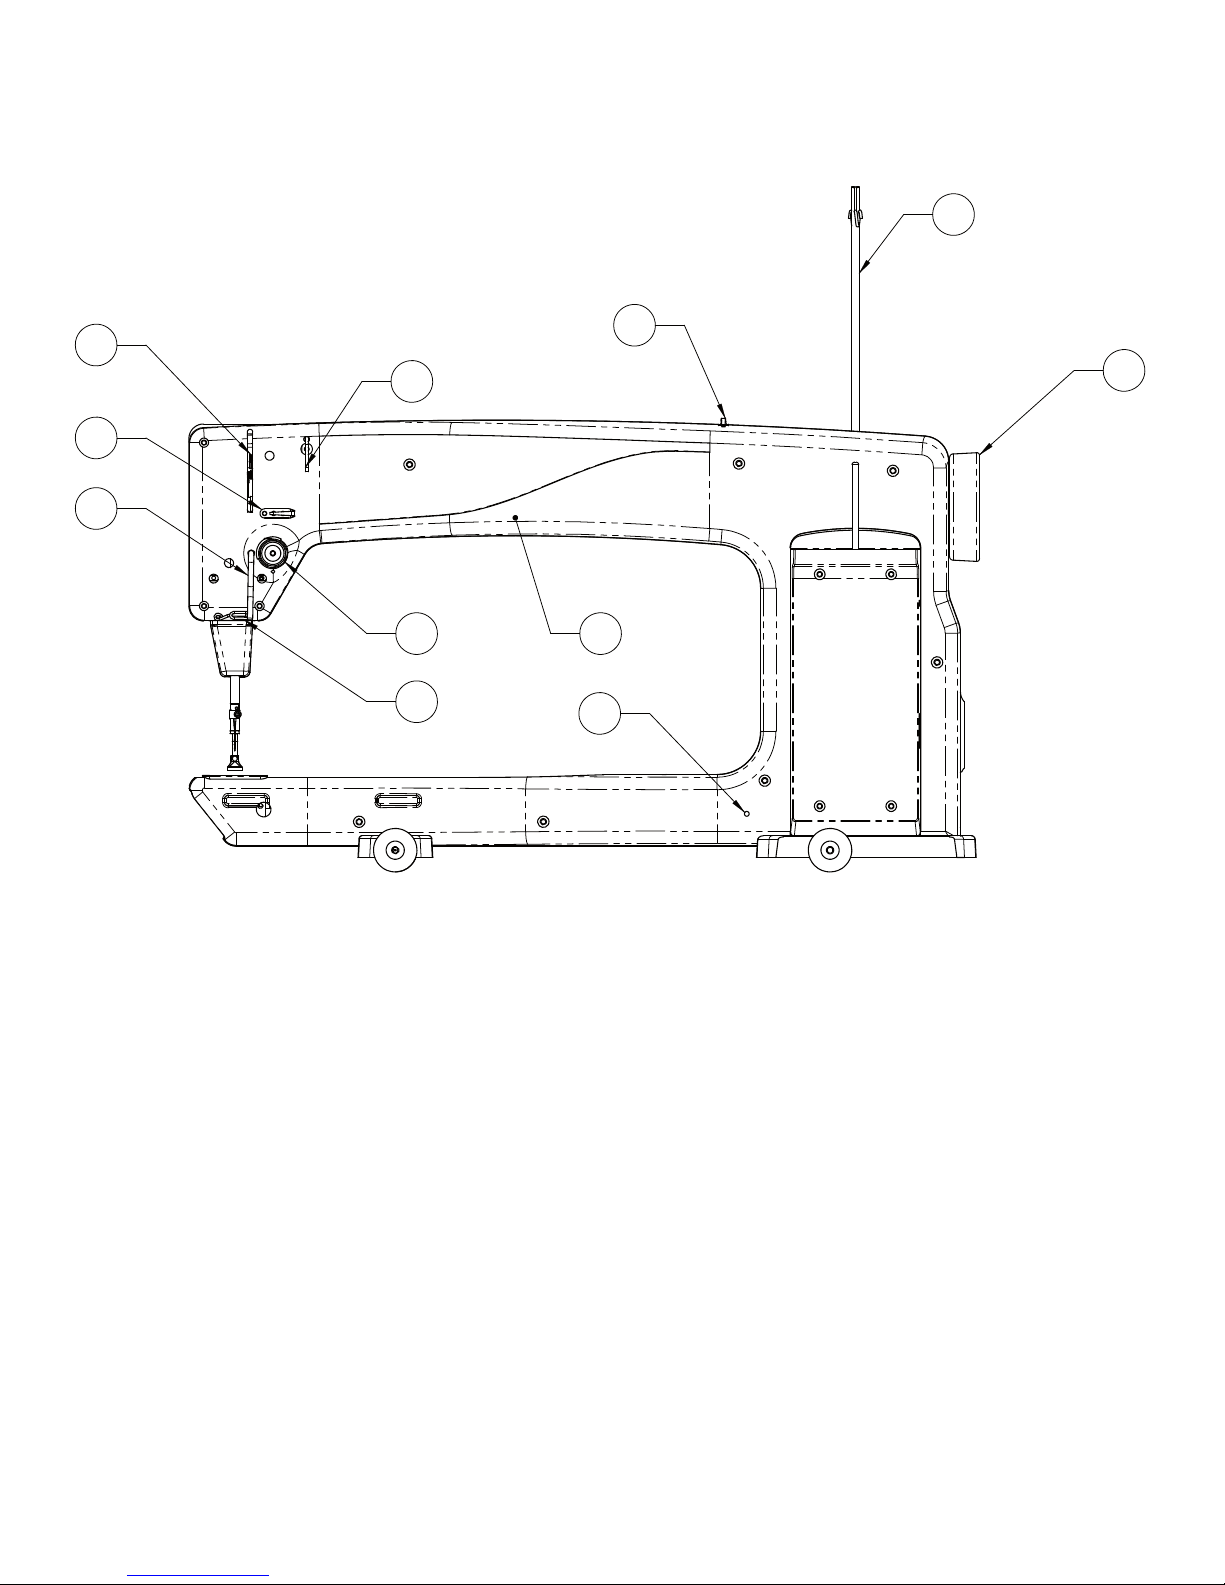
HandiQuilter.com Page 7
1. Thread Mast
2. Thread Guide A
3. Three Hole Thread Guide B
4. Thread Guide C
5. Tension Assembly
6. Srrup Thread Guide E
7. Take-Up Lever
8. Thread Guide F
9. Front Casing/Frame
10. Handwheel
11. Side Laser Stylus Post Hole
HQ Avanté Components
Front Side View
3
1
2
10
4
5
6
7
8
9
11
3
1
2
10
4
5
6
7
8
9
11
3
1
2
10
4
5
6
7
8
9
11
3
1
2
10
4
5
6
7
8
9
11
3
1
2
10
4
5
6
7
8
9
11
Figure 1

Page 8 HQ Avanté User Manual
12. Ruler Foot
13. Needle
14. Needle Bar Thread Guide
15. Needle Bar
16. Presser Bar
17. Handi Feet Mount
18. Needle Plate
19. LED Light Ring
20. Front Handlebar Connector
21. Ruler Base Posion Guides
22. Front Wheel Base
23. Wheels (4)
24. Back Casing/Frame
25. Rear Wheel Base
26. Front Threaded Handle Holes
27. Top Laser Stylus Post Hole
Back Side View
28. Spool Pin 1
29. Electronic Control Pod (C-Pod)
30. Laser Stylus Power Connector
31. Serial Port for Stch Regulator
32. Rear Handle Bar Serial Port
33. Rear Threaded Handle Holes
34. Accessory Power Outlet
35. Power Cord Connector
36. On/O Switch
37. Power Pod (P-Pod)
38. Spool Pin 2
39. Bobbin Assembly
Rear and Front Views
35
37
36 26
27
33
28
29
30
31
32
34
35
37
36 26
27
33
28
29
30
31
32
34
Rear Front
Figure 2
Figure 3
25
24
23 22 21
27
26 16
17 12
13
14
15
18
30
31
32
33
34
35
36
37
38 28
29
39
20
19

HandiQuilter.com Page 9
1. Place the carriage on the table rails, ensuring that
the Carriage Encoder Assembly will be toward the
back of the machine (the power cord side of the
machine). The back side of the carriage has an
encoder assembly aached to the rear cross-piece.
Be sure to place the carriage on the frame correctly
(see Figure 4).
2. Place the machine on the carriage.
3. Plug the Ribbon cable into the Carriage Encoder
Assembly. The connector is keyed to assure correct
alignment. Make sure the keyed poron of the
cable connector aligns with the keyed poron of
the encoder connector. Do not force.
4. The remaining length of cable comes back under
the Power Pod from the Rear Encoder Assembly,
behind the machine, and into the 9 pin serial port
of the machine.
5. REMEMBER that if the machine is to be removed
from the carriage, the cable must be disconnected
from the Carriage Encoder Assembly. The other
two connectors on the cable should remain in
place. Failure to unplug the cable when removing
the machine from the carriage could result in
damage to the cable, encoders, and carriage.
Installaon (Studio Frame)
Figure 4
Installing Front Handlebars
Cauon: Unplug the HQ Avanté from the electrical outlet. All power to the machine must be turned o when
installing the front handles. Failure to do so can result in damage to the machine.
Locate the three long bolts and the 5mm Hex wrench. To install the handlebar,line up the holes on top of the
handles with the pre-drilled holes on top of the machine. Slide a single bolt into one of the holes unl it stops.
Hand-ghten the bolt enough to secure the handles to the top of the machine. Insert and hand-ghten the
remaining two handlebar bolts.
Use the included 5 mm Hex wrench to securely fasten the handles to the front of the machine.
Once the bolts are in place, plug the 9-pin connector into the serial port located on the le-hand side of the
machine (see Figure 2, #18, page 6). Ensure the pins are lined up so they are not damaged when the plug is
pushed in. Push the plug securely in place.
Page 10 HQ Avanté User Manual
Note: Aer the handles have been completely installed
and plugged in, test them by turning the HQ Avanté
on/o switch to “on”. You will not be able to turn on
the machine unl the front handlebars are installed.
If nothing is displayed, check that the handlebar cable
on the side of the machine is plugged in securely, that
your machine is turned on, and that the power cord is
plugged into the machine as well as a power source.
Check that the HQ Avanté is unplugged from the
electrical outlet. All power to the machine must be
turned o when installing the back handlebar. Failure
to do so can result in damage to the machine.
The rear handle bar comes mounted with three
screws to the “L” bracket. Line up the two holes in
the “L” bracket with those on the rear of the machine.
Slide the short bolts into holes unl they stop. Hand
ghten, and then use the 5mm wrench to securely
fasten the handles to the back of the machine.
Once the two bolts are in place, plug the 9-pin
connector into the serial port underneath the rear
handles. Ensure the pins are lined up so they are not
damaged when the plug is pushed in. Push the plug
securely in place.
Installing Rear Handlebars
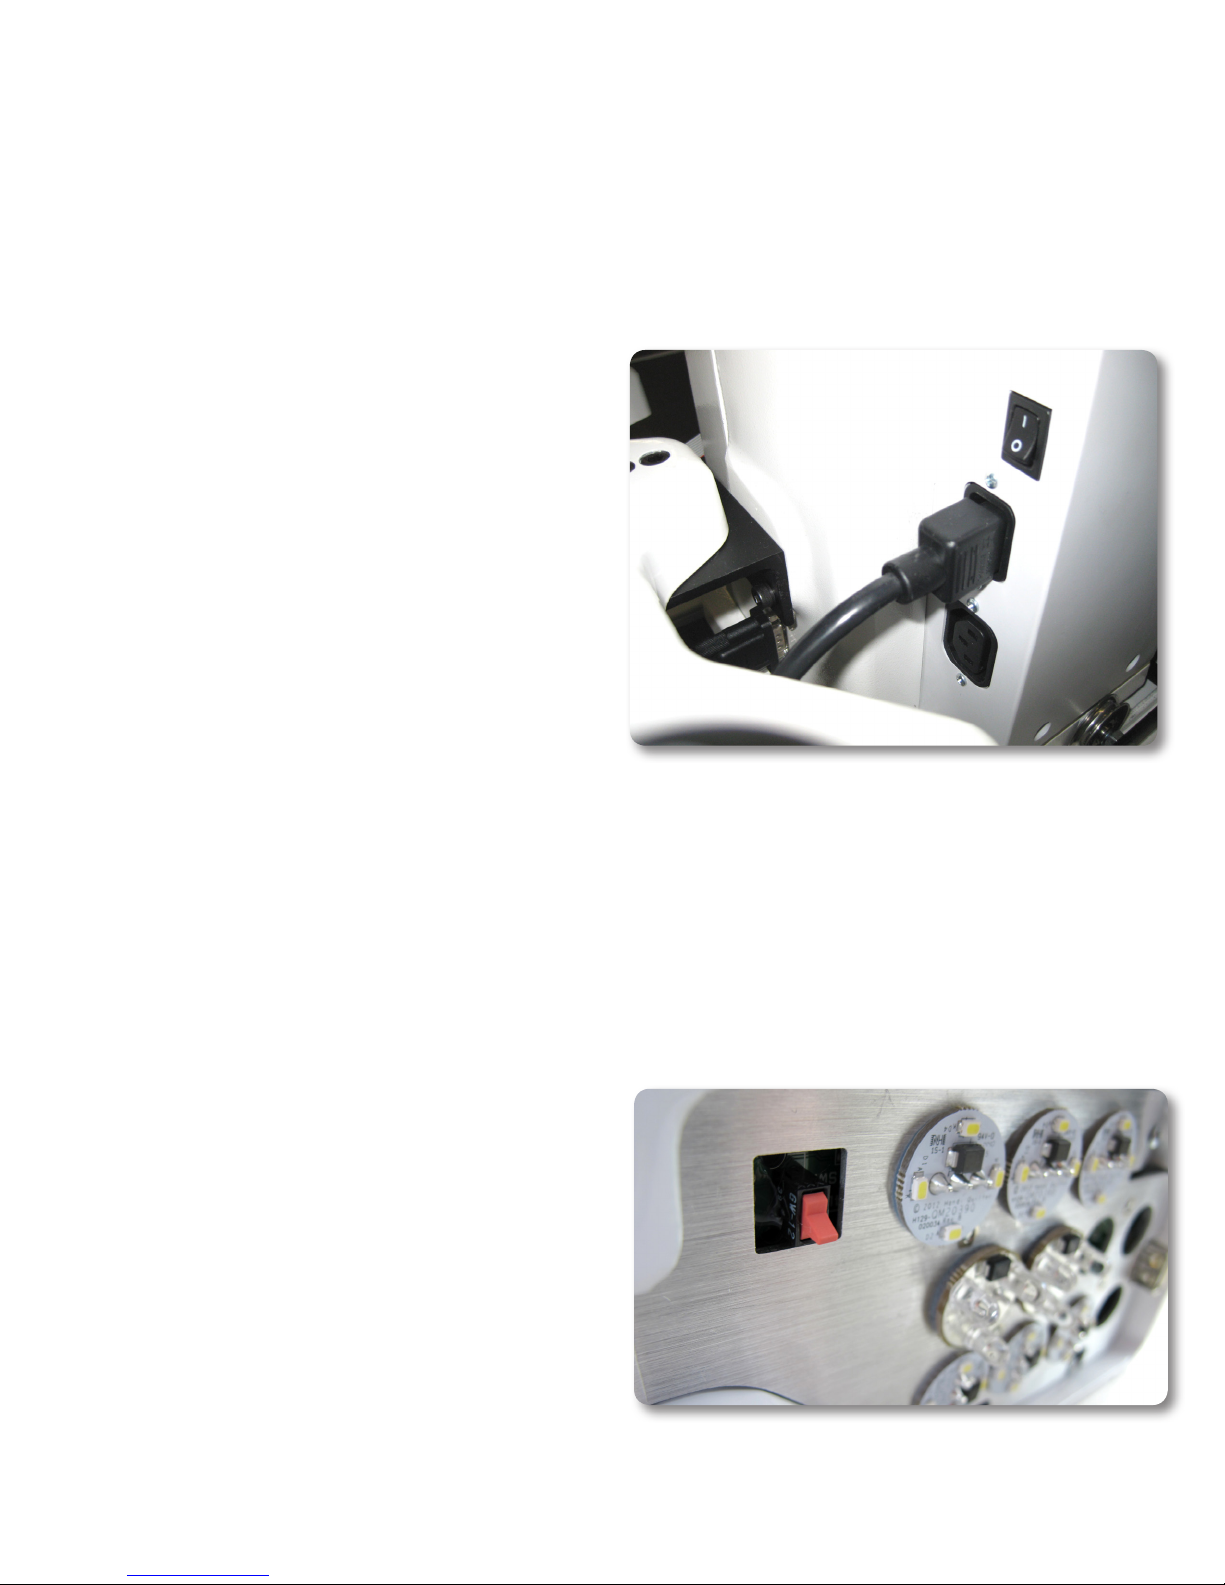
Insert the cord into top power connector on the
rear of the machine. Plug the three-prong end into a
power source (see Figure 5).
The lower power connector is for powering other
aachments developed by Handi Quilter. (Not
yet available)
Turning on the HQ Avanté
There are two power switches for your machine. The
main power switch is at the rear of the machine and a
red power switch is under the right handlebar at the
front of the machine for your added convenience
(see Figure 6).
The machine is turned on when both switches are
turned on. The machine is turned o when both
switches are o. However, you may turn o the
machine funcons by turning o only the front switch
if you will be returning to quilt within a day.
Turn on the back switch rst by toggling the switch
from the 0 posion to the 1 posion. Then turn on
the front switch by toggling it as well. The front switch
will not turn on the machine unless the back switch is
already on.
Installing the Power Cord
Figure 5
IMPORTANT: If you will not be using the machine
for more than a day, we recommend you turn o
both switches and unplug the power cord from the
power source.
IMPORTANT: Refer to the safety instrucons.
Figure 6
Table of contents


