HP Photosmart D5065 User manual

18.1 -inch LCD Color Monitor
18.1-inch Viewable Image
User’s Guide
18,1-Zoll-LCD-Farbbildschirm
18,1 Zoll Bildanzeige
Benutzerhandbuch
Moniteur LCD couleur 18,1 pouces
Affichage 18,1 pouces
Guide de l’utilisateur
Monitor LCD en color de 18,1 pulgadas
18,1 pulgadas de imagen visualizada
Manual del Usuario Léase esto primero
Video a colori LCD da 18,1 pollici
18.1 effettivi per l’immagine
Manuale utente
HP D5065 Series
L1800
ladoga.bk : ladga-fc.fb4 Page i Wednesday, June 30, 1999 1:51 PM

Francais
Notice
The information contained in this document is subject to change without notice.
Hewlett-Packard makes no warranty of any kind with regard to this material, including, but not limited to, the implied warranties of merchantability and fitness for a
particular purpose.
Hewlett-Packard shall not be liable for errors contained herein or for incidental or consequential damages in connection with the furnishing, performance, or use of this
material.
Hewlett-Packard assumes no responsibility for the use or reliability of its software on equipment that is not furnished by Hewlett-Packard.
This document contains proprietary information that is protected by copyright. All rights are reserved. No part of this document may be photocopied, reproduced, or
translated to another language without the prior written consent of Hewlett-Packard Company.
Hinweis
Inhaltliche Änderungen vorbehalten.
Hewlett-Packard übernimmt keine Garantie welcher Art auch immer für diese Ausrüstung, einschließlich der (doch nicht begrenzt auf die) Qualitätsgarantie und die
Garantie bezüglich Eignung für einen bestimmten Zweck.
Hewlett-Packard haftet nicht für in dieser Dokumentation enthaltene Fehler oder für unbeabsichtigte oder indirekte Schäden in Verbindung mit der Lieferung, der
Leistung oder der Benutzung der Ausrüstung.
Hewlett-Packard übernimmt keine Haftung fur den Betrieb oder die Zuverlässigkeit seiner Software, wenn diese auf Hardware benutzt wird, die nicht von Hewlett-
Packard geliefert wurde.
Dieses Dokument enthalt proprietäre Informationen, die durch das Copyright geschützt sind. Alle Rechte vorbehalten. Dieses Dokument darf ohne vorherige schriftliche
Genehmigung der Hewlett-Packard Company weder ganz noch teilweise fotokopiert, reproduziert oder übersetzt werden.
Avertissement
Les informations contenues dans ce document peuvent être modifiées sans préavis.
Hewlett-Packard ne donne aucune garantie de quelque sorte que ce soit concernant, sans que ce soit limitatif, les garanties implicites de qualité commerciale de ce
matériel, ou la bonne adaptation de celui-ci à un usage particulier.
Hewlett-Packard n’est pas responsable des erreurs pouvant apparaître dans ce manuel et n’est pas non plus responsable des dommages directs ou indirects résultant de
l’équipement, des performances et de l’utilisation de ce matériel.
Hewlett-Packard ne saurait être tenu pour responsable de l’utilisation et de la fiabilité de son logiciel sur des matériels non fournis par Hewlett-Packard.
Les informations contenues dans ce document sont originales et protégées par copyright. Tous droits réservés. L’acheteur s’interdit en conséquence de les photocopier,
de les reproduire ou de les traduire dans toute autre langue, sauf accord préalable et écrit de Hewlett-Packard.
Aviso
La información contenida en este documento está sujeta a cambios sin previo aviso.
Hewlett-Packard no ofrece ningún tipo de garantía con respecto a este material, incluyendo, pero sin limitarse a, las garantías implícitas de comerciabilidad e idoneidad
para un fin determinado.
Hewlett-Packard no asume responsabilidad alguna por los posibles errores contenidos o por los daños casuales o emergentes relacionados con el suministro,
funcionamiento o uso de este material.
Hewlett-Packard no asume responsabilidad alguna por el uso o fiabilidad de su software en equipos que no hayan sido fabricados por Hewlett-Packard.
Este documento contiene información patentada, protegida por las leyes del copyright. Reservados todos los derechos. Ninguna parte de este documento puede ser
fotocopiada, reproducida o traducida a otro idioma sin la autorización previa y por escrito de Hewlett-Packard Company.
Avviso
Le informazioni contenute in questo documento sono soggette a cambiamento senza preavviso.
Hewlett-Packard non rilascia garanzie di alcun tipo riguardo a questo materiale, comprese le garanzie implicite di commerciabilità e di idoneità per uno scopo particolare.
Hewlett-Packard non sarà ritenuta responsabile per errori contenuti in questo documento, né per danni accidentali o conseguenti alla fornitura, alle prestazioni o all’uso
di questo materiale.
Hewlett-Packard non si assume alcuna responsabilità riguardo all’uso o all’affidabilità del proprio software su apparecchiature di altri produttori.
Questo documento contiene informazioni di proprietà protette da copyright. Tutti i diritti sono riservati. Nessuna parte di questo documento può essere fotocopiata,
riprodotta o tradotta in un’altra lingua senza un precedente consenso scritto di Hewlett-Packard Company.
Hewlett-Packard France 38053 Grenoble Cedex 9 France1999 Hewlett-Packard Company
ladoga.bk : ladga-fc.fb4 Page ii Wednesday, June 30, 1999 1:51 PM

1
HP D5065 Series
L1800 18.1-inch LCD
Color Monitor
User’s Guide
Full scan TFT screen that gives
an edge to edge image
0.28 mm dot pitch for excellent
graphics
Anti-glare, anti-static screen coating
Multi-function adjustment control and
browser
Auto-configuration button
On/off switch
Status indicator
Button to operate on-screen
menus
Video Input LEDs.
Button to select Video
Input
ladoga.bk : ladga-us.fb4 Page 1 Wednesday, June 30, 1999 2:04 PM

HP 18.1” LCD Color Monitor User’s Guide
Important Safety Instructions
2 English
Important Safety Instructions
Please read these safety instructions and the safety instructions contained in
your Quick Setup Guide before plugging in your new monitor.
WARNING Use only the AC/DC adapter supplied with the product. Connect the monitor
to a grounded power outlet. Use the power cord supplied with this monitor or
one with a properly grounded plug. Ensure that the cable meets your country’s
standards for safety.
To completely disconnect power at the monitor, remove the power cord from
the power outlet. Ensure that the power outlet is easily accessible.
To reduce the risk of electric shock, do not remove cover (or back) and do not
open the AC/DC adaptor. There are no user serviceable parts inside. Refer
servicing to qualified service personnel.
The monitor is quite heavy (the weight is shown in the technical
specifications). We recommend you ask the assistance of a second person
when lifting or moving it.
USA and Canada
If the power cord is not supplied with your monitor, select the proper power
cord according to your national safety codes.
• USA: use a UL Listed type SVT detachable power cord
• Canada: use a CSA certified detachable power cord.
Si le cordon secteur n’est pas livré avec votre moniteur, utiliser un cordon
secteur en accord avec votre code électrique national.
• USA: utiliser un cordon secteur UL Listé de type SVT.
• Canada: utiliser un cordon secteur certifié CSA.
ladoga.bk : ladga-us.fb4 Page 2 Wednesday, June 30, 1999 2:04 PM

English 3
HP 18.1” LCD Color Monitor User’s Guide
What Your New Monitor Offers
Your HP monitor is a 18.1-inch (diagonal and viewable image), high resolution,
liquid crystal multi-synchronous color monitor. Multi-synchronous means that
the monitor supports a large range of video modes (see “Supported Video
Modes“ on page 16). It is optimized to be used with all Hewlett-Packard
computers.
Your HP LCD color monitor has the following features:
• A 18.1-inch Thin Film Transistor (TFT) liquid crystal display. It has a
non-glare, antistatic screen coating.
• Large viewing angle.
• Support of video modes up to 1280 × 1024 at a 75 Hz refresh rate.
• Hot key auto-configuration of display position, clock and phase.
• Power management system (VESA1standard) controlled from suitably
equipped HP computers to automatically reduce the power consumption of
the monitor. Complies with the Energy Star Computers Program initiated
by the US EPA2specification for energy efficient monitors. As an Energy
Star Partner, Hewlett-Packard has determined that this product meets the
Energy Star guidelines for energy efficiency.3
• Plug and Play capability (compliant with VESA DDC1,DDC2B and DDC2Bi
standards) that enables the monitor to identify itself to suitably equipped
HP computers.
• Your HP monitor complies with ISO 9241-3/8 and ZH-1/618 ergonomic
standards.
• Your HP monitor complies with TCO 99 requirements (Some models only).
• USB-Hub (Universal Serial Bus-Hub) integrated in the monitor base (some
models only). Allows you to connect one up- and 4 downstream USB
devices.
• Two signal connectors on the rear panel enabling connection to two
computers.
• Slot for security lock.
• A programmable sleep mode timer which can prolong the life of your
monitor.
1. VESA is the Video Electronics Standards Association
2. The US EPA is the United States Environmental Protection Agency
3. ENERGY STAR is a US registered service mark of the US EPA.
ladoga.bk : ladga-us.fb4 Page 3 Wednesday, June 30, 1999 2:04 PM

HP 18.1” LCD Color Monitor User’s Guide
Securing Your Monitor
4 English
Securing Your Monitor
The monitor can be secured to your desk, or any other fixed object, using a
Kensington lock security cable. The cable can be attached to a slot located on
the rear of the monitor.
1Insert the lock in the slot located on the rear of the monitor.
2Turn the key to lock the cable to the monitor.
3Remove the key and store it in a safe place.
NOTE The Kesington lock is not an HP accessory. It cannot be ordered from HP.
Contact your reseller for more information.
ladoga.bk : ladga-us.fb4 Page 4 Wednesday, June 30, 1999 2:04 PM

English 5
HP 18.1” LCD Color Monitor User’s Guide
Connecting Additional Devices to Your Monitor
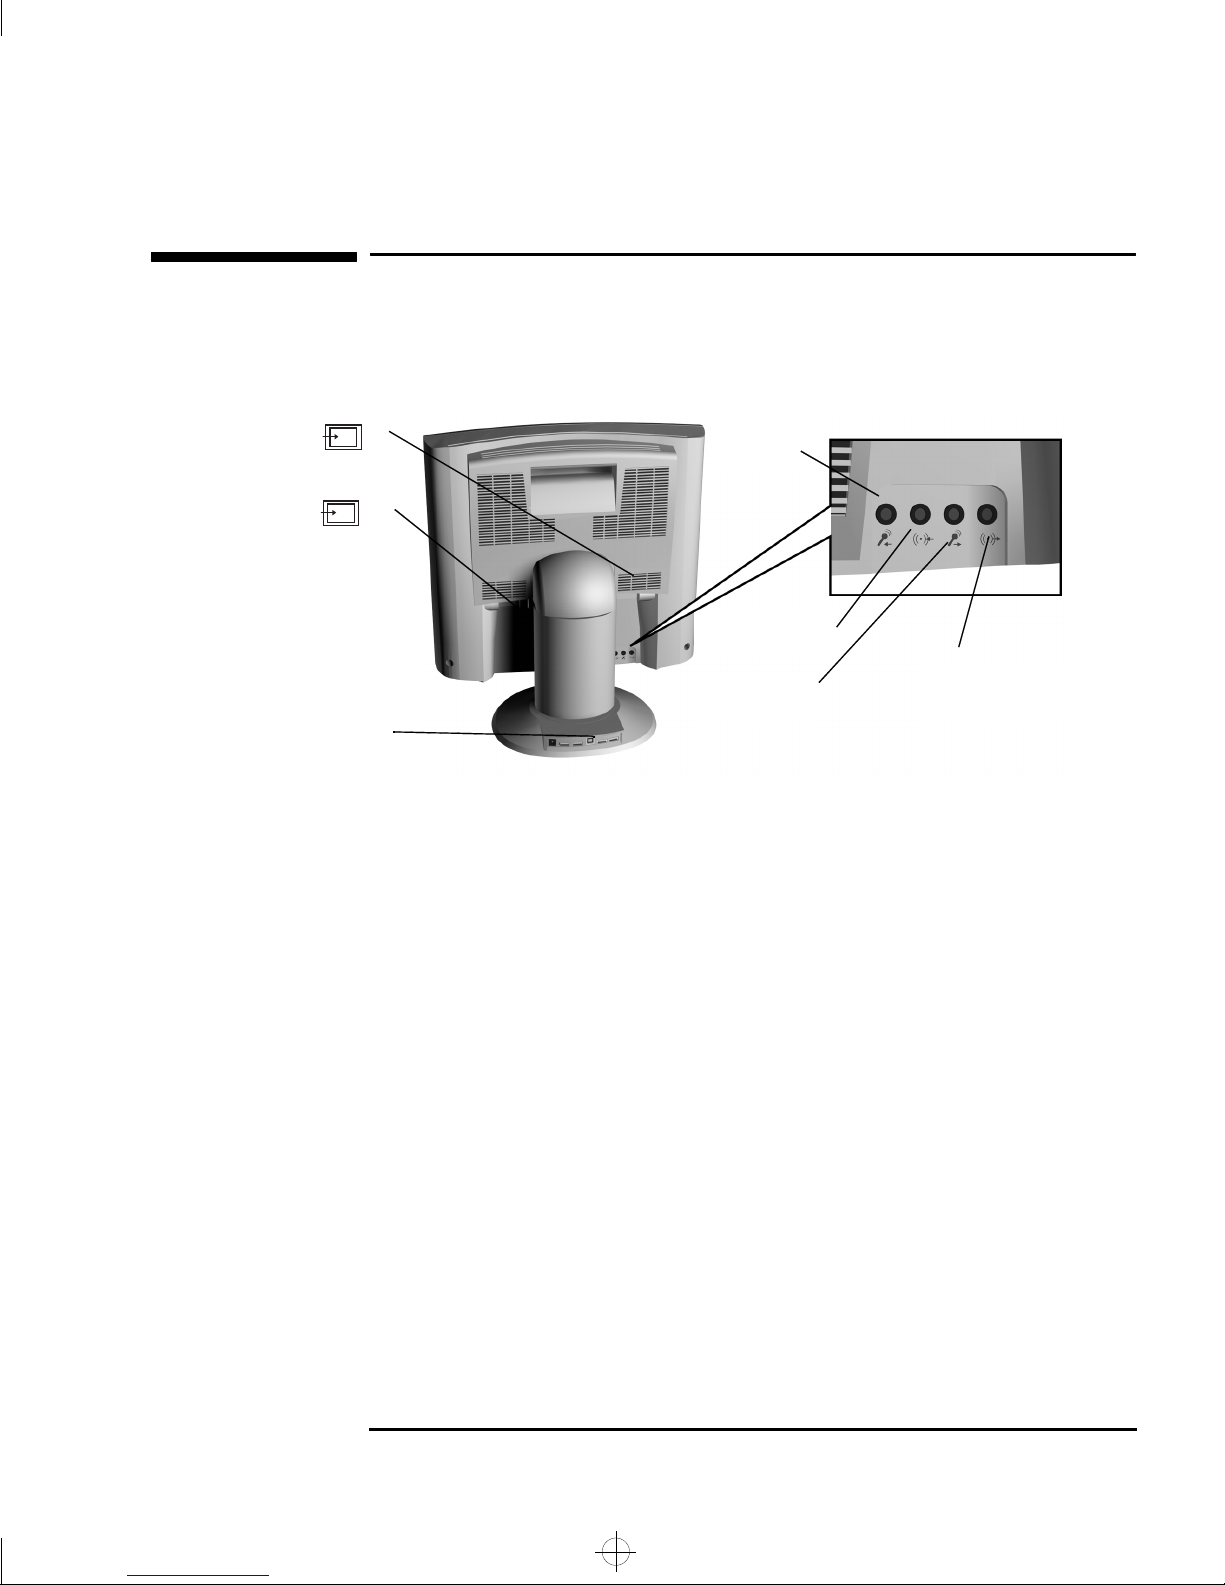
The following diagram indicates additional devices that can be connected.
Please refer to your Quick Setup Guide (Step 3 - Connecting the Cables)
before connecting any additional devices.
Connecting Two Computers
Your LCD monitor has two signal connectors located on the rear panel (see
“Selecting Video Input“ on page 11). This enables you to connect your monitor
to two computers at the same time.
USB Connectors
A USB-Hub is integrated in the base of your monitor stand. USB connectors
automate peripheral connection by using plug and play install procedures.
Connect your USB device to your computer as indicated in the Quick Setup
Guide. Connect USB compatible plug and play devices such as a keyboard,
mouse, joystick or digital USB camera (if supported by your computer) to any
of the four remaining downstream connectors.
Connecting Headphones/Speakers and a Microphone
Your monitor provides headphone/speaker and microphone sockets on the
rear panel.
Microphone In
jack
Headphone/Speaker
In jack
Microphone Out
jack
Headphone/Speaker
Out Jack
Video Input Connector
1
Video Input Connector
2
USB Connectors
(Some Models Only)
ladoga.bk : ladga-us.fb4 Page 5 Wednesday, June 30, 1999 2:04 PM

HP 18.1” LCD Color Monitor User’s Guide
Configuring Your Monitor
6 English
Configuring Your Monitor
You can auto configure your monitor, adjust contrast and brightness and
select a video input channel using the controls located on the front panel of
your monitor.
Adjustments to the LCD monitor’s features are made from the OSD
(on-screen display).
1Press to enter the OSD main menu.
2Select the feature you require using the control, then press to
confirm your selection.
NOTE To exit the main menu select EXIT from the OSD main menu. You can exit all
menus at any time by double clicking the button.
Changing the Language of your OSD
Your OSD operates in several different languages.
To change the language of your OSD main menu:
1Select from the OSD menu, then press to enter the LANGUAGE
submenu.
2Select a language from the list using the control, then press to
confirm your selection and return to the main menu.
On/Off switch
AUTO button
Button to adjust
video input
Control (multi-function control for
adjusting brightness/contrast, menu browser
and adjustment control)
Video Input LEDs
OSD
(On-screen display)
Indicator light
button
ladoga.bk : ladga-us.fb4 Page 6 Wednesday, June 30, 1999 2:04 PM

English 7
HP 18.1” LCD Color Monitor User’s Guide
Configuring Your Monitor
Optimizing Image Quality
Each time you connect your monitor to a different computer you should use
the HP Optimizer Utility, supplied on floppy disk, to optimize the quality of the
image. This utility displays test patterns that help you configure your monitor
correctly. (For installation instructions, see your Quick Setup Guide).
Adjust the following to optimize image quality:
Brightness and Contrast
To adjust brightness and contrast directly:
1Rotate the adjustment control to select or .
2Make your adjustments using the control.
It is recommended that you select a value of around 70% for brightness and
50% for contrast.
3Press to save your adjustments.
NOTE You can also adjust the contrast and brightness by selecting CONTRAST or
BRIGHTNESS from the OSD main menu. Make your adjustments using the
control, then press to return to the OSD main menu.
Auto-Configuration
If you use auto-configuration you can configure your monitor without having
to adjust your monitor’s position, clock frequency and phase manually. To use
auto-configuration, follow the instructions in your HP Optimizer Utility (for
installation instructions, see your Quick Setup Guide).
NOTE With auto-configuration it is not necessary to adjust H POSITION, V
POSITION CLOCK or PHASE. However, if the results are unsatisfactory,
follow the on-screen instructions in the HP Optimizer Utility to adjust these
options manually.
ladoga.bk : ladga-us.fb4 Page 7 Wednesday, June 30, 1999 2:04 PM

HP 18.1” LCD Color Monitor User’s Guide
Configuring Your Monitor
8 English
Color
Your monitor displays a combination of red, blue and green to show a full color
image. To change the proportions of red, blue and green, you need to change
the color temperature:
1Select and press to enter the COLOR sub menu.
2Select the feature you require using the control, then press to
confirm your selection.
3a) If you are selecting a preset color temperature, select EXIT, then press
to return to the main menu.
b) Otherwise, select R, G or Bfrom the USER COLOR submenu that appears and
then press to confirm your selection.
4Adjust the color level using the controls, then press to save your
selection.
5Select SAVE AND EXIT, then press to return to the main menu.
NOTE To reset the color settings when in the USER COLOR submenu, select RESET and
press to confirm your selection, then continue with Step 5.
Restoring the Default Settings
To return to the position, clock and phase default settings:
1Select then press to enter the MODE RECALL sub menu.
2Select YES using the control, then press to confirm your selection.
The monitor image will disappear for a few seconds while the monitor restores
its default settings.
ladoga.bk : ladga-us.fb4 Page 8 Wednesday, June 30, 1999 2:04 PM
Other manuals for Photosmart D5065
1
This manual suits for next models
3
Table of contents
Other HP Monitor manuals

HP
HP P274 Installation instructions

HP
HP 1311B Service manual

HP
HP Pavilion 27 Series Installation instructions

HP
HP LA1905wg - Widescreen LCD Monitor User instructions

HP
HP LD4201 User manual

HP
HP Compaq LA1956x Manual

HP
HP V203hz Installation instructions

HP
HP D2837A User manual

HP
HP VS15 Series User manual

HP
HP MX703 - Pavilion - 17" CRT Display Specification sheet