
Hot Splash HS25 User manual

1
HS25
402-0044-160305
Manual Page1
Handleiding Pagina17
Gebrauchsanweisung Seite32
Mode d’emploi Page47

2
Table of contents
1. Safety information 3
2. Introduction 4
3. Box contents 5
4. Specications 6
4.1. Performance data 6
5. Preparing the heat pump for use 7
5.1. Distance from the pool 7
5.2. Typical conguration 7
5.3. Hose connections 8
5.4. Electrical connection 8
6. Startup and settings 9
6.1. Display 9
6.2. System startup 9
7. Be aware of 12
7.1. Condensation 12
8. Guidelines 13
8.1. Water chemistry 13
8.2. Cold/harsh weather conditions 13
8.3. Restarting the heat pump after
long term storage 13
9. Maintenance and error messages 14
9.1. Maintenance 14
9.2. Alarm and error messages 14
10. Environment 15
11. Service 15
12. Warranty 16
English

3
1. Safety information
Please read these instructions carefully before using the heat pump and keep
them for future reference:
1. Always keep the unit upright. If the unit has been tilted or put on its side, wait 24h
before starting the heat pump.
2. Put the unit on a at, solid base.
3. Do not drop the heat pump.
4. The heat pump must always be installed outdoors.
5. Check if the voltage indicated on the RCD of the heat pump corresponds to the local
mains voltage before you connect the unit.
6. Do not pull the mains plug with unnecessary force. Do not wrap the mains plug
around the heat pump.
7. Do not use the heat pump in combination with a transformer, as this could cause
hazardous situations.
8. If the heat pump is damaged during transportation, it must be replaced, please
contact your service centre or similarly qualied persons in order to avoid a hazard.
9. Always make sure the water connections of the heat pump are properly locked
before you start using the machine.
10. Never insert objects directly into the fan when the heat pump is operating, as this
will cause it to become blocked and damaged.
11. The evaporator ns must not be damaged.
12. This heat pump is not intended for use by persons with reduced physical, sensory
or mental capabilities, or lack of experience and knowledge, unless they have
been given supervision or instruction concerning use of the heat pump by a person
responsible for their safety.
13. Children should always be supervised to ensure that they do not play with the heat
pump.
14. The heat pump doesn’t work at temperatures below 15°C.
15. Disconnect the mains plug from the socket when the heat pump is not in use and
before cleaning.
The heat pump will always perform very well, provided the following elements
are present:
1. Fresh air 2. Electricity 3. Swimming pool water
English

4
2. Introduction
Thank you for purchasing the HOT SPLASH heat pump for above ground
pools.
With the HOT SPLASH plug & play heat pump, you can enjoy a warm water
swim whenever you want. The heat pump heats (dependent on several
factors) the swimming pool water and maintains this temperature, this
increases your swimming season signicantly. The HOT SPLASH combines
a unique anti frost technology with a convenient titanium heat exchanger to
provide durable and efcient operation. All technologies in the HOT SPLASH
ensure that you only get the best in pool water heating.
In order to provide our customers with quality, reliability and versatility, this
product has been made to strict production standards. This manual includes
all necessary information about performance, installation and maintenance.
Please read this manual carefully before you use or maintain the unit. Failure
to comply with these recommendations will void the warranty.
The manufacturer of this product will not be held responsible if someone
is injured or the unit is damaged, as result of improper installation or
maintenance.
Our HOT SPLASH heat pump has the following characteristics:
1. Durable heat pump
The heat exchanger is made of ABS and titanium tubes, which can withstand
prolonged exposure to swimming pool water.
2. Perfectly suited for above ground pools
The HOT SPLASH is designed for use with typical above ground pools. The supplied
hose is suitable for most types of above ground pools.
2. Plug and play installation
Before leaving our factory, the heat pumps are tested thoroughly and made
ready for use. Only water and power needs to be connected during installation.
3. Quiet operation
An efcient rotary compressor and a low noise fan guarantee silent operation of the
HOT SPLASH.
5. Easy to use controller
The electronic control panel permits easy setting of the desired temperature. All
relevant information regarding the heat pump’s operation can be seen on this display.
English

5
3. Box contents
1. Heat pump 2. Hose (x1) 3. Hose clamps (x2)
4. User manual
English

6
4. Specications
4.1. Performance data
Unit HS25
Heating Capacity
Air: 25°C/ Water: 25°C * kW 2,45
Heating capacity
Air: 15°C/ Water: 25°C kW 1,90
Power input kW 0,585
COP at A25/W25 C.O.P 4,05
COP at A15/W25 C.O.P 3,55
Maximum pool volume m³ 10
Running Current A 2,7
Max Running Current A 3,5
Power Supply V/f/Hz 220-240/1/50
Condenser Titanium heat exchanger
Compressor type Rotary
Refrigerant R410A
Refrigerant weight kg 0,28
Fan power input W 45
Fan speed RPM 2500
Noise at 2m dB (A) 58
Water connection mm 32
Nominal water ow m³/h 2
Unit Net Dimensions mm 312/303/368
Shipping Dimensions mm 320/350/380
Net/Shipping weight kg 13
*Measuring conditions: Outdoor air temp: 25°C, Inowing water temp: 25°C,
rel. humidity: 65%.
English

7
Water
pump
Filter
5. Preparing the heat pump for use
5.1. Distance from the pool
The heat pump should be located at least 2m away from the swimming pool.
5.2. Typical conguration
A free area of minimum 0,3 meter around the heat pump has to be kept
clear from any object.
Do not obstruct the fan, leave at least 1.5m free unobstructed space in front
of the fan.
Hot Splash
Water treatment
All feeding of water treatment to the pool water has to be done downstream
of the heat pump(more information about water chemistry in section 8.1).
Put the heat pump on a at, solid base.
English
8
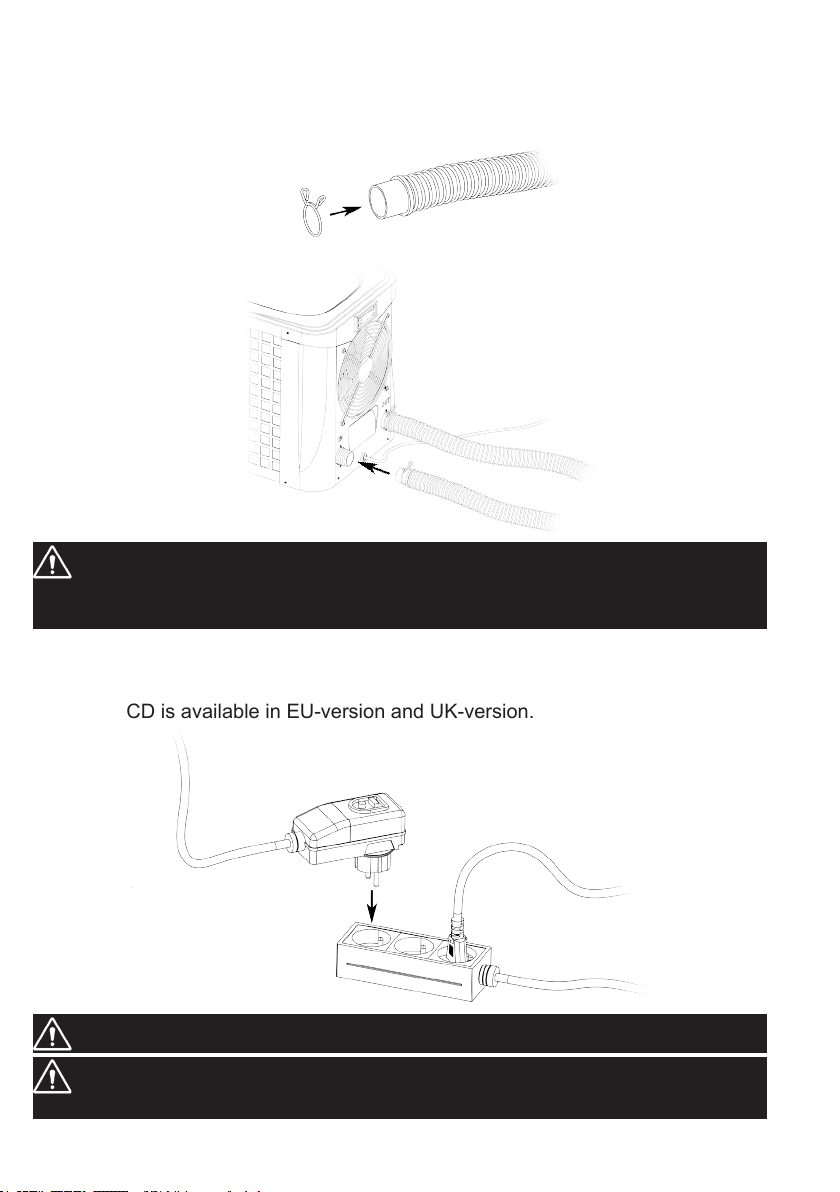
5.3. Hose connection
Step 1
Step 2
5.4. Electrical connection
The RCD is available in EU-version and UK-version.
It is normal for condensation water to come out of the heat pump when it
is operating. This is not a fault or leak! Please check the information about
condensation in section 7.1.
Make sure your outlet is earthed.
The pool circulation pump must operate with the heat pump. Therefore,
connect them to the same circuit used for outdoor.
Hot Splash
Heat pump
Circulation
pump
Outdoor socket
English
9
6. Startup and settings
6.1. Display
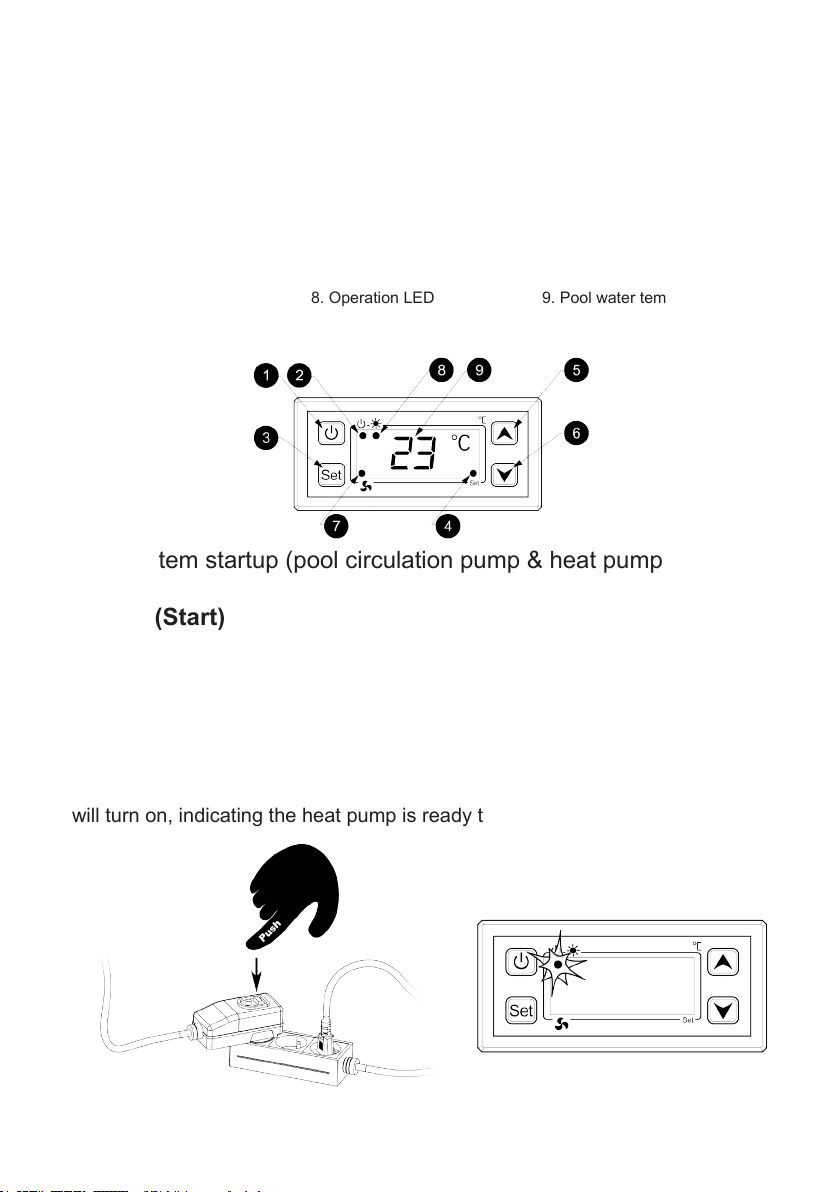
1. ON/OFF 2. Power LED 3. Settings
4. Settings LED 5. Increase set temperature or
current water temperature
6. Decrease set temperature
or current air temperature
inside the heat pump
7. Fan LED 8. Operation LED 9. Pool water temperature
6.2. System startup (pool circulation pump & heat pump).
STEP1 (Start)
Turn on the pool circulation pump (not included). Check for possible water
leaks and for good water ow to and from the swimming pool.
STEP2 (Start)
Push the green reset button on the RCD of the heat pump. The Power LED(2)
will turn on, indicating the heat pump is ready to start.
Outdoor socket
English

10
STEP3 (Start)
Push the ON/OFF button(1) to start the heat pump. The current water
temperature will appear and the heat pump will start automatically. The
operating LED(8) indicates the heat pump is active. The fan LED(7) indicates
the fan is running.
STEP4 (Start)
Verify after a few minutes that the air exhausted by the heat pump is getting
cooler
STEP5 (running)
Allow the heat pump and lter/water pump to initially run 24 hours a day until
the desired water temperature is reached.
The heat pump won’t start when the desired water temperature is reached
(dene set point in step 6). Meanwhile the current water temperature is
shown on the display. The heat pump will start automatically when the water
temperature drops 1°C below set point.
The heat pump is equiped with a 2min30sec built-in compressor delay to
protect control circuit components. Each time the compressor is switched
on the timer starts to count. Operating LED(8) is blinking, indicating the heat
pump isn’t using the compressor at current moment. Operating LED(8) is
active, indicating the heat pump is using the compressor at current moment.
Several days will be needed to bring the temperature of the swimming
pool water to its desired water temperature, depending the initial water
temperature, ambient temperature and pool volume.
The heat pump won’t operate when it’s too cold outside. TCO will blink on
the display. Please check the information about the alarms in section 9.2.
A good pool cover and insulation of the piping to and from the swimming
pool can reduce the warming up time considerably.
English
Table of contents
Languages:
Popular Heat Pump manuals by other brands


Mitsubishi Electric
Mitsubishi Electric PUZ-SWM60VAA Service manual

Dimplex
Dimplex LI 16I-TUR Installation and operating instruction

Carrier
Carrier WSHP Open v3 Integration guide

TGM
TGM CTV14CN018A Technical manual

Carrier
Carrier 38MGQ Series installation instructions

Kokido
Kokido K2O K880BX/EU Owner's manual & installation guide

Viessmann
Viessmann VITOCAL 300-G PRO Type BW 2150 Installation and service instructions

Carrier
Carrier 48EZN installation instructions

Viessmann
Viessmann KWT Vitocal 350-G Pro Series Installation and service instructions for contractors

Ariston
Ariston NIMBUS user manual

Weishaupt
Weishaupt WWP L 7 Installation and operating instruction

GE
GE Zoneline AZ85H09EAC datasheet