Holman DLRGB3003 User manual

User Guide
ø30mm RGB Colour
Deck Lights
30mm DLRGB3003
DOWNLOAD THE
LATEST MANUAL!

2 of 16
Holman RGB Colour Deck Lights use a 4-Pin Plug + Socket connection.
Only other Holman 4-Pin Plug + Socket products are compatible with these
lights. These lights are not compatible with other brands and will void your
warranty if used with other brands.
4-Pin Plug + Socket Connection
Contents
Overview 3
Introduction 3
Package Contents 3
Setup 4
Choosing your controller 4
Mounting your controller 5
Installation 6
Main Lighting Cable (Extension Cable) 6
Connection Tee 7
Deck Light Spacing 8
Drilling Holes 9
Inserting Deck Lights 10
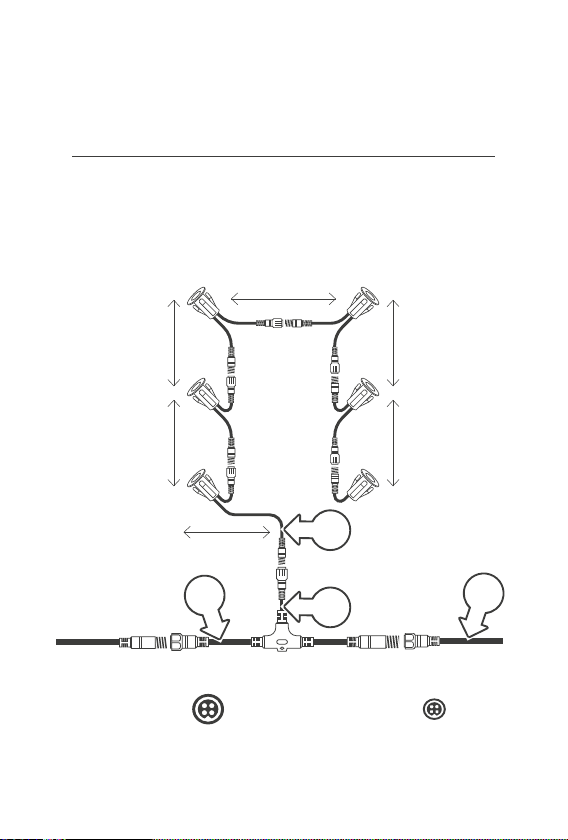
Deck Lights Connection Drawing 11
Inserting Multiple Deck Light Packs 12
Specifications 14
Warranty 15
PRODUCT CODE: DLRGB3003
ÁPlease read these instructions in full before proceeding with setup.
iOS is a trademark of Apple Inc. Android is a trademark of Google LLC. The
Android robot is reproduced or modified from work created and shared by
Google and used according to terms described in the Creative Commons 3.0
Attribution License. All other content is Copyright©HolmanIndustries2023

3 of 16
Overview
Introduction
Thank you for purchasing Holman 30mm RGB Colour DeckLights.
Our system is completely DIY and designed to help illuminate and add
ambience to your outdoor space. These can also be used to light up
wooden steps or create a safety barrier around the edge of your decking.
®This instruction manual contains useful information on the proper use
and care of this product. Please read through all instructions before
attempting assembly. Keep this user guide handy for future use.
Package Contents
1. 5× 30mm DAISY-CHAIN deck lights
2. 1× 30mm END deck light
3. 1× 4-Pin Connection Tee
2
3
1

4 of 16
Setup
Choosing your controller
Holman have a range of lighting controllers to suit all users. Choose the
correct RGB Colour Lighting Controller that suits your requirements.
RGB Colour Wi-Fi Garden Light Controller
Our latest Lighting Controller features Wi-Fi
connectivity, allowing access to your Garden
Lights from anywhere in the world. Smart
automations and custom scene options allow
you to light up your garden, however you want.
RGB Colour Bluetooth®Garden Light
Controller. Our Garden Light Controller
gives you custom scenes and full brightness
control with a Bluetooth®connection
and the iGardener™ app. Connect up
to 4 controllers to one device.
Control your garden from anywhere in the world, day or night, with
Holman Home Wi-Fi control. Enjoy complete control of your irrigation
and garden lighting, wherever internet access is available.
Take full control of your garden watering and lighting with a Bluetooth®
connection and a tap of your iPhone or Android, with the iGardener™
smartphone app!

5 of 16
Setup
Mounting your controller
Before beginning installation of your Deck Lights, you will need to
install your LightingController to determine your starting point.
For ease of use, eye level placement is recommended.
Ideally, your controller location should not be exposed to
rain or areas prone to flooding or heavy water.
1. Install the Lighting Controller [a] near a
240V AC power point ideally located in a
house, garage, or exterior electrical cubicle
®All Holman controllers have a 60w capacity.
Lighting set-ups that include more that 60w of
garden lights will require additional controllers
a

6 of 16
Installation
Main Lighting Cable (Extension Cable)
Once the Lighting Controller is mounted, you can connect
your main lighting cable. This cable is where you will ‘branch’
off your Deck Lights or other Holman lighting products.
1. Connect your first Extension Cable [a]
to the Lighting Controller [b]
2. Secure the Extension Cable by hand tightening the
weather proof end cap [c] on the end of the cable
®Extension Cables are available in 1m, 2m, 5m and
10m. Choose the correct length to reach from your
LightingController to your first lot of Deck Lights
c
a
b

Installation
Connection Tee
Each pack of Deck Lights comes with a ConnectionTee.
This is what connects your DeckLights to the main lighting cable.
1. Join one end of the Connection Tee [a] to the Extension Cable [b]
2. Secure the Connection Tee by hand tightening
the weather proof end cap [c]
3. ConnectionTees come with one mini cable end [d],
this end connects to your lighting product
ÁDo not use more than one (1) pack of Deck Lights per
Connection Tee. Doing so may result in wattage loss
®If you are connecting more than one pack of DeckLights,
refer to the connection diagram on page 12 and 13
c
b
a
d
8 of 16
Installation
Deck Light Spacing
Deck Lights come with 1800mm of space between each light when
connected. Before installation, we suggest marking your decking exactly
where you want to install your lights to ensure the spacing is correct.
1800mm
1800mm
1800mm
1800mm
1800mm
900mm
1. Main cable size ø15mm 2. Mini cable size ø10mm
11
2
2

9 of 16
Installation
Drilling Holes
Deck panels will need to be
removed to hide lighting cables
underneath. For safety, we
also recommend removing
deck panels to ensure no
other cabling is behind.
®Refer to our sizing chart
below to determine the
correct spade drill bit size
1. Remove the deck panels
that you will be drilling into
2. Drill the required holes
into your deck that were
marked previously [a]
18mm
Deck Lights
30mm
Deck Lights
45mm
Deck Lights
SPADE DRILL
BIT SIZE 14mm 22mm 30mm
a
Extend your garden
lighting without any limits.
Our 2m Spacer Cable is
perfect for adding extra
space in-between your
Deck Lights, or branching
out further from the main
garden lighting cable.
2m
Mini
Spacer
Cable
USE WITH MINI
CABLE ONLY
ø10mm

10 of 16
Inserting Deck Lights
1. Insert both cable
ends of one of your
Daisy-Chain Deck Lights
[a] through the first drill hole
2. Push the Deck Light into
your drill hole [b] until it is
flush with your decking.
The metal arms will secure
against the back of your deck
3. Connect this Deck Light to
your Connection Tee [c]
with the mini cable end
4. Insert the rest of your
Daisy-Chain Deck Lights
into your deck using
steps 1 and 2
5. Insert the End Deck Light
into the 6th drilled hole
and connect to the last
Daisy-Chain Deck Light
6. Connect the cabling of all
Deck Lights together
®Refer to the opposing drawing
for correct installation
®Refer to the steps
on page 12 to 13 for
installing multiple packs
of Deck Lights
Installation
a
b
c
Table of contents
Other Holman Lighting Equipment manuals


Popular Lighting Equipment manuals by other brands


Qazqa
Qazqa Suplux SL 3 Black 103062 instruction manual

Commercial Electric
Commercial Electric 54568141 Use and care guide

CREE LIGHTING
CREE LIGHTING 304 Series installation instructions

Goobay
Goobay 49867 user manual

ECOMAN ITALIA
ECOMAN ITALIA LED T8 instruction manual

Alkalite
Alkalite Krypton KT-81 user manual


