hestan KMWR30 User manual

INDOOR COOKING
Drawer Microwave
KMWR30
Installation Manual
IF THE INFORMATION IN THIS MANUAL IS NOT FOLLOWED
EXACTLY, A FIRE OR EXPLOSION MAY RESULT CAUSING
PROPERTY DAMAGE, PERSONAL INJURY, OR DEATH.
READ THESE INSTRUCTIONS CAREFULLY AND COMPLETELY BEFORE
INSTALLING OR USING YOUR APPLIANCE TO REDUCE THE RISK OF
FIRE, BURN HAZARD, OR OTHER INJURY. KEEP THIS MANUAL FOR
FUTURE REFERENCE.
SAFETY DEFINITIONS
THIS INDICATES THAT DEATH OR SERIOUS INJURY MAY OCCUR
AS A RESULT OF NOT OBSERVING THIS WARNING
THIS INDICATES THAT MINOR OR MODERATE INJURY MAY
OCCUR AS A RESULT OF NOT OBSERVING THIS WARNING.
THIS INDICATES THAT DAMAGE TO THE APPLIANCE OR
PROPERTY MAY OCCUR AS A RESULT OF NOT OBSERVING THIS
WARNING.
INSTALLER: LEAVE THIS MANUAL WITH THE OWNER OF THE APPLIANCE.
HOMEOWNER: RETAIN THIS MANUAL FOR FUTURE REFERENCE.
Do not store or use gasoline or other flammable vapors and liquids in the vicinity of this or
any other appliance.
Installation and service must be performed by a qualified installer or service agency.
DO NOT REPAIR, REPLACE OR REMOVE ANY PART OF THE APPLIANCE UNLESS
SPECIFICALLY RECOMMENDED IN THE MANUAL. IMPROPER INSTALLATION,
SERVICE OR MAINTENANCE CAN CAUSE INJURY OR PROPERTY DAMAGE. REFER
TO THIS MANUAL FOR GUIDANCE. ALL OTHER SERVICING SHOULD BE DONE BY
A HESTAN AUTHORIZED SERVICE TECHNICIAN.
INSTALLATION AND SERVICE MUST BE PERFORMED BY A QUALIFIED INSTALLER.
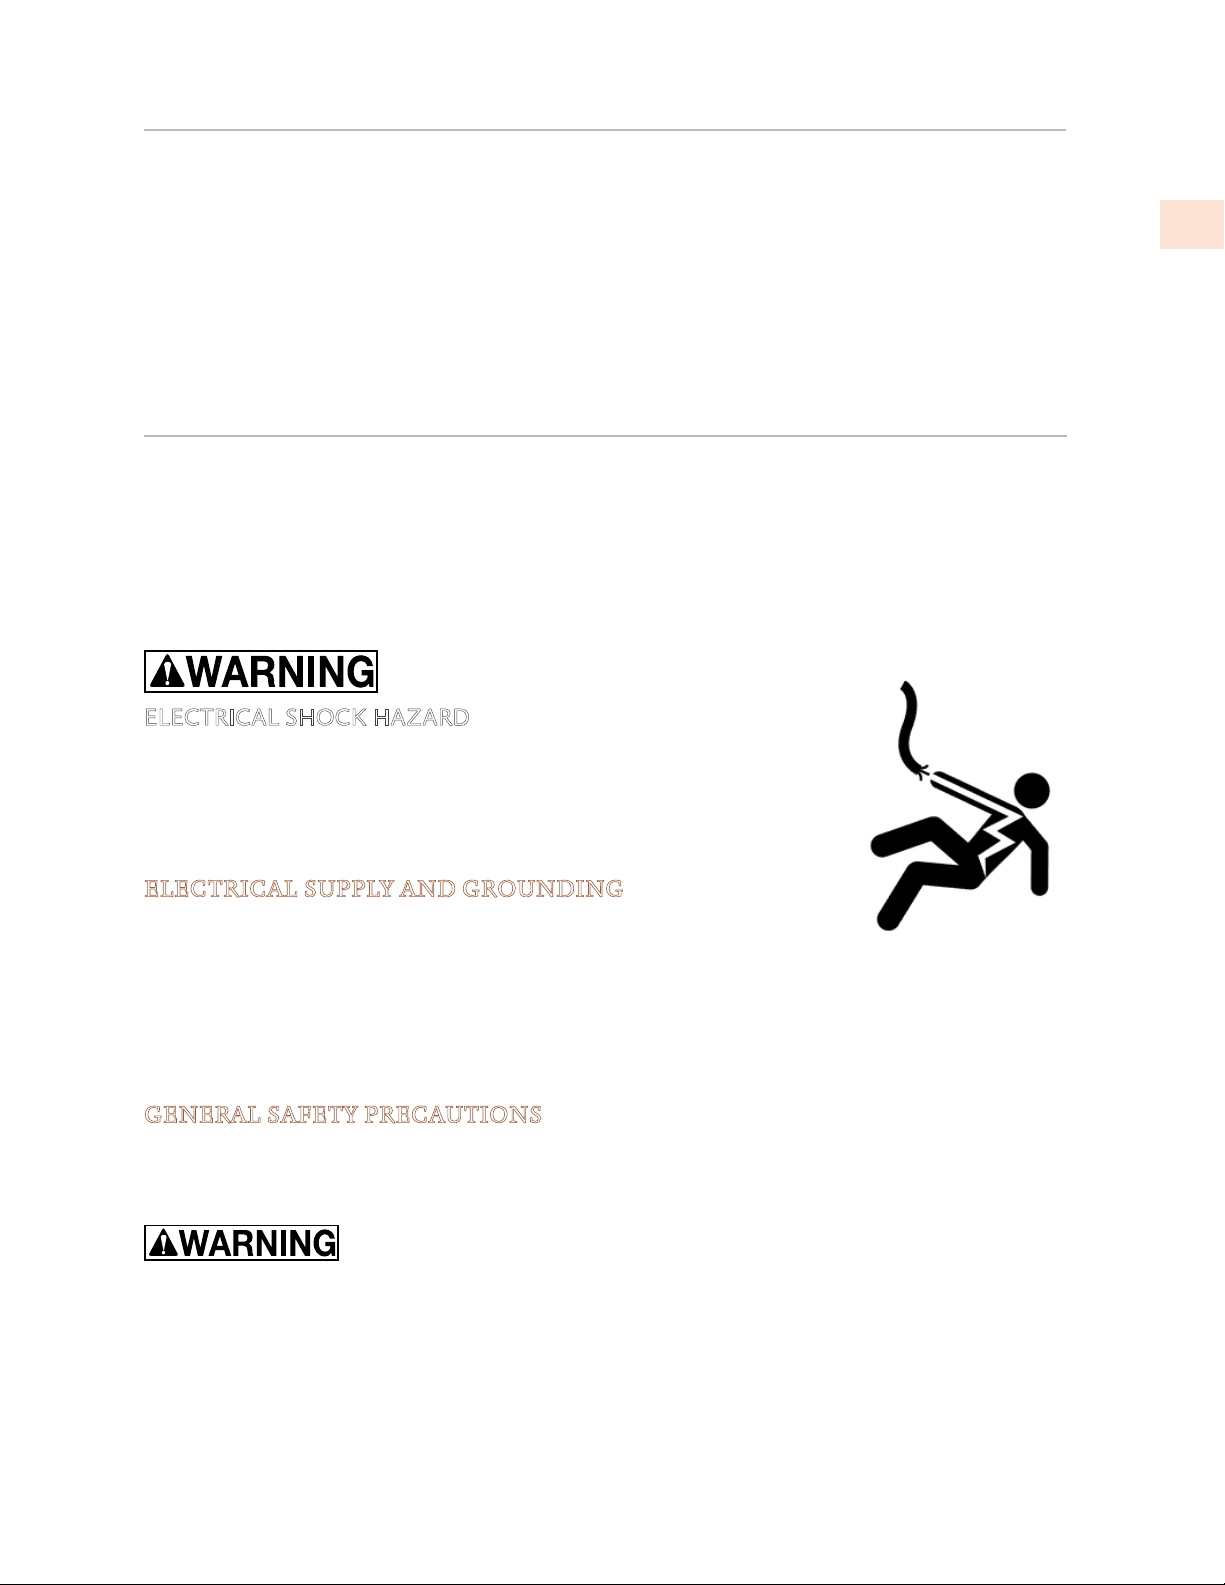
ELECTRICAL SHOCK HAZARD
Disconnect power before installing or servicing appliance. Failure to
do so can result in electrical shock or death. It is the responsibility of
the user to have the appliance connected by a licensed electrician in
accordance with all applicable codes and standards, including fire-related
construction. See "ELECTRICAL CONNECTION" for details.
ELECTRICAL SUPPLY AND GROUNDING
• This appliance must be grounded. Grounding reduces the risk of
electric shock in the event of a short circuit. See "INSTALLATION
STEPS" on page10 for instructions.
• This appliance must be connected to 120 VAC Single Phase, 60 Hz, with a current rating as
shown in the model number listing on page2.
• OWNER: Have the installer show you where the electric circuit breaker is located so you know
how to shut off the power to this appliance.
When properly cared for, your Hestan Drawer Microwave will provide safe, reliable service for
many years. When using this microwave, basic safety practices must be followed as described in the
following pages.
IMPORTANT: Save these instructions for the local Utility Inspector’s use.
INSTALLER: Please leave these Installation Instructions with the owner.
OWNER: Please read these Instructions and save them for future reference
SAFETY PRECAUTIONS - BEFORE YOU BEGIN
TABLE OF CONTENTS
1 SAFETY PRECAUTIONS - BEFORE YOU BEGIN
2 MODEL NUMBERS
2 RATING LABEL
2 REGULATORY / CODE REQUIREMENTS
2 IMPORTANT NOTES
3 CLEARANCES AND DIMENSIONS
10 INSTALLATION STEPS
GENERAL SAFETY PRECAUTIONS
When properly cared for, your new Drawer Microwave has been designed to be a safe, reliable
appliance. Read all instructions carefully before using it. When using kitchen appliances, basic
safety precautions must be followed.
TO REDUCE THE RISK OF FIRE, ELECTRIC SHOCK, OR INJURY TO PERSONS, OBSERVE THE
FOLLOWING:
a) Use this microwave only as intended by the manufacturer. If you have any questions, contact
the manufacturer.
b) Before servicing or cleaning unit, unplug the microwave or switch power off at service panel and
lock the service disconnecting means to prevent power from being switched on accidentally.
If the appliance cannot be unplugged and the service disconnecting means cannot be locked,
securely fasten a prominent warning device, such as a tag, to the service panel.
©2019 Hestan Commercial Corporation
1
EN
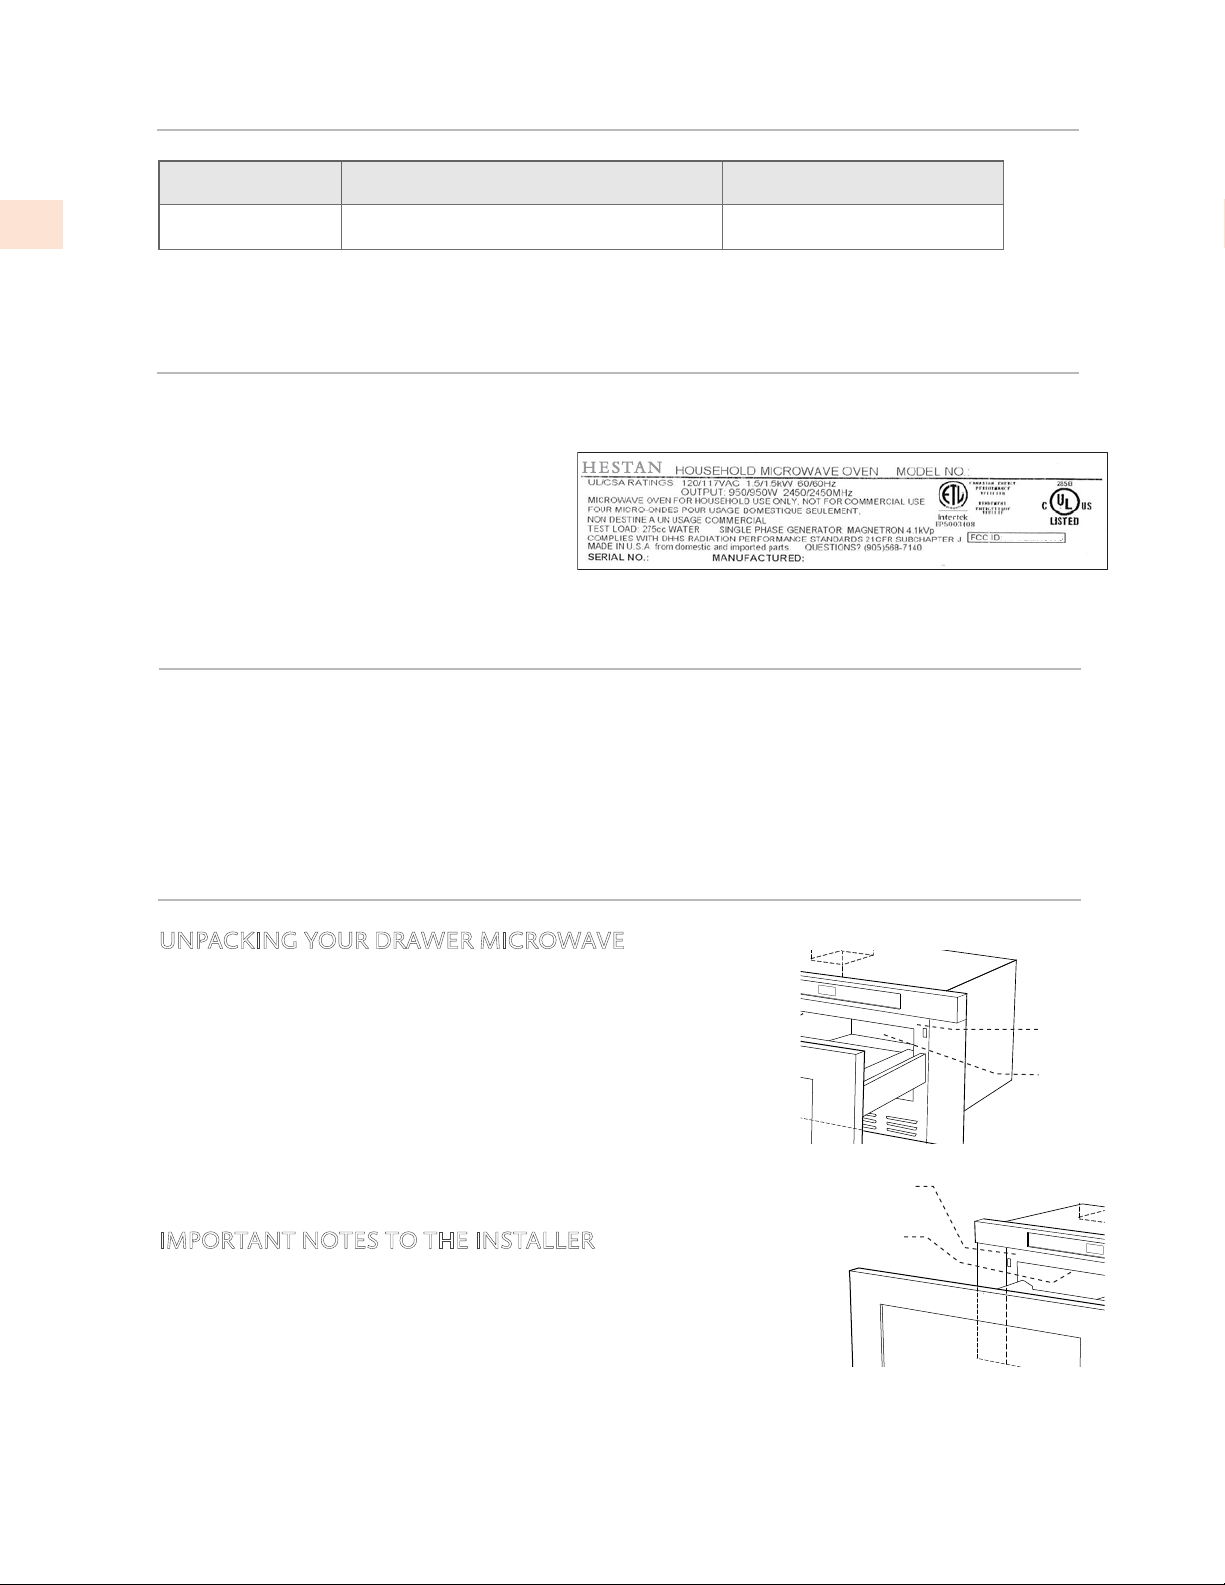
RATING LABEL
The rating plate includes model and serial number. Open the Drawer Microwave fully. The label is
beyond the back wall of the drawer facing up from the bottom surface.
If service is necessary, contact Hestan
Customer Care with the model and serial
number information shown on the label.
MODEL NUMBERS
MODEL NO. DESCRIPTION CIRCUIT BREAKER
KMWR30
30” Drawer Microwave 15 Amps
All units 115 VAC 60 Hz
Hestan Commercial Corporation
3375 E. La Palma Ave
Anaheim, CA 92806
TYPICAL RATING LABEL
Installation of this cooking appliance must be made in accordance with local codes. In the absence
of local codes, this unit should be installed in accordance with the National Electrical Code and
local codes.
This appliance must be electrically grounded in accordance with local codes or in the absence of
local codes with the National Electrical Code ANSI/NFPA 70, or Canadian Electrical code CSA
C22.1.
IMPORTANT NOTES
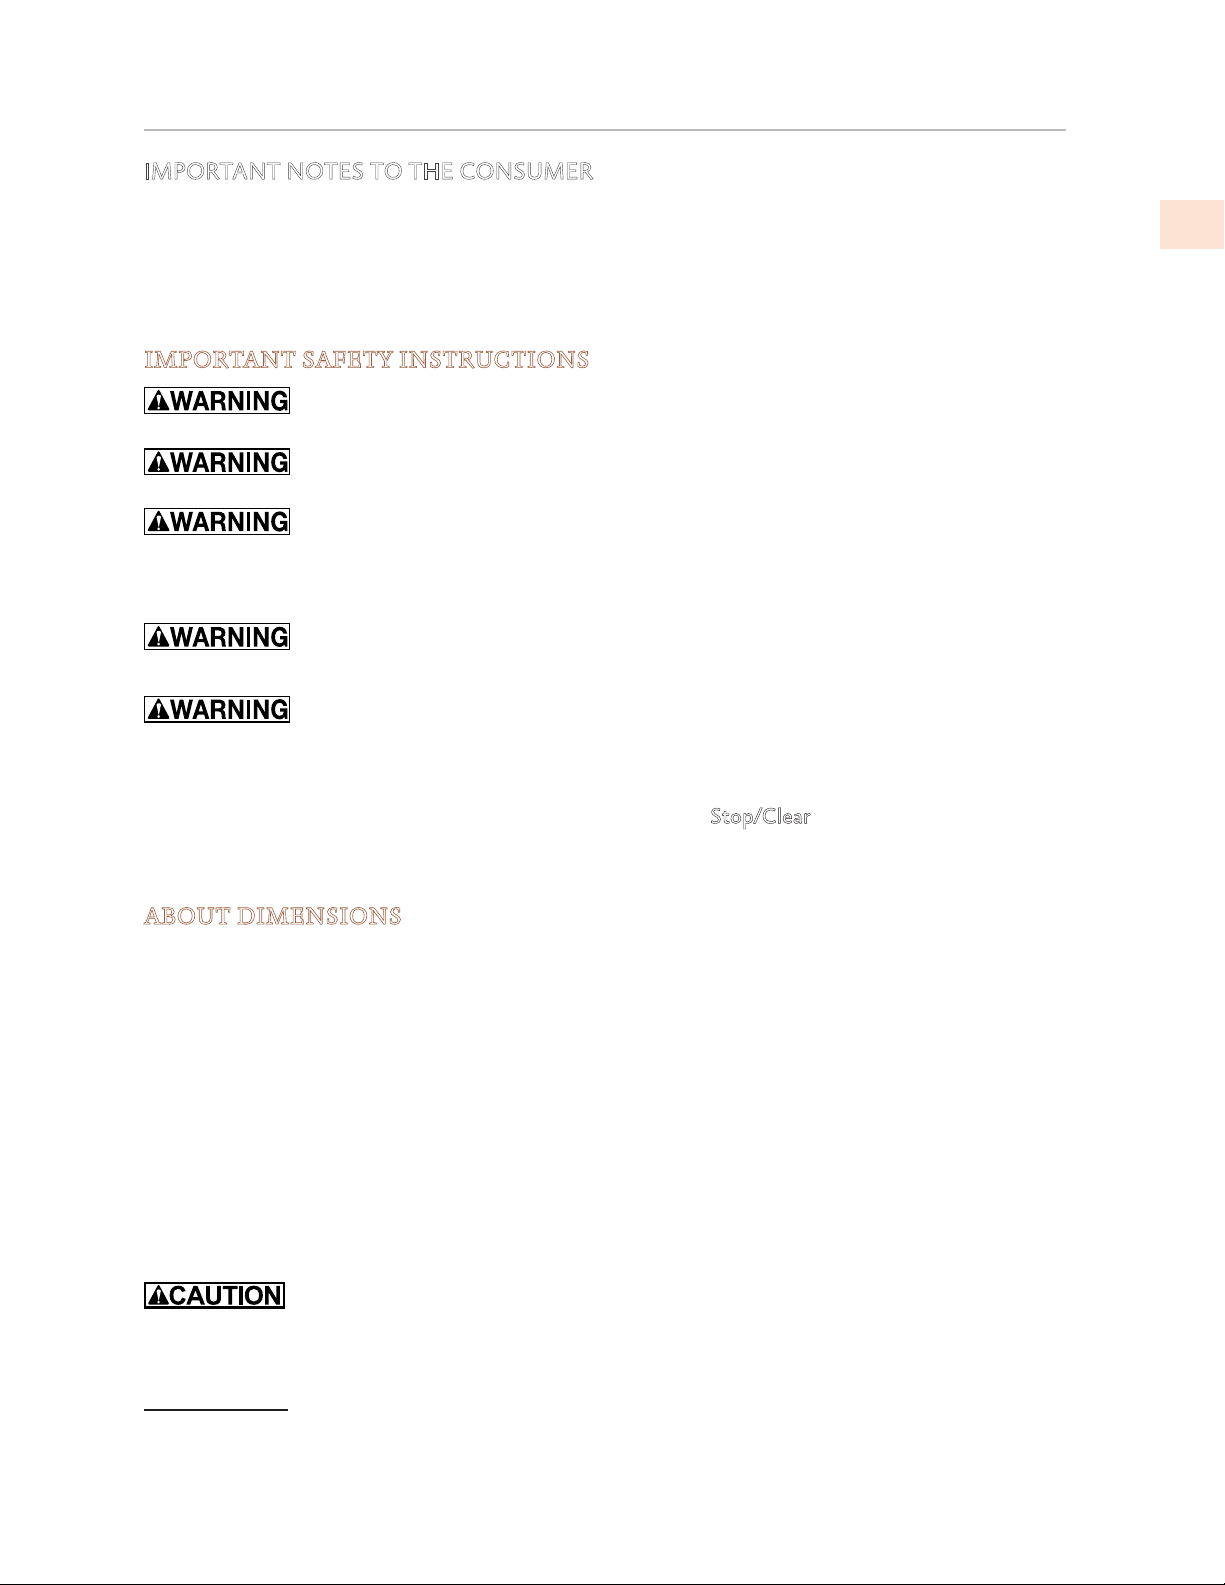
UNPACKING YOUR DRAWER MICROWAVE
• Remove all packing materials from inside the Drawer
Microwave. DO NOT REMOVE THE WAVEGUIDE COVER,
which is located on the top of the Drawer Microwave.
• Remove the feature sticker, if there is one. Check the drawer
for any damage, such as misaligned or bent drawer, damaged
drawer seals and sealing surfaces, broken or loose Drawer
Microwave guides and dents inside the cavity or on the front
side of the drawer. If there is any damage, do not operate
the Drawer Microwave and contact your dealer or a HESTAN
AUTHORIZED SERVICER.
IMPORTANT NOTES TO THE INSTALLER
• Read all of the Installation Manual before installing the Drawer
Microwave.
• Remove all packing material before connecting the electrical
supply.
• Observe all governing codes and ordinances.
BE SURE TO LEAVE THESE INSTRUCTIONS WITH THE CONSUMER.
Waveguide
cover
Sealing
surface
Sealing
surface
Oven
cavity
W
aveguide
cover
Sealing
surface
Sealing
surface
Oven
cavity
REGULATORY / CODE REQUIREMENTS
©2019 Hestan Commercial Corporation
2
EN
IMPORTANT NOTES TO THE CONSUMER
Keep this manual with your Use and Care Manual for future reference.
• As when using any microwave oven generating heat, there are certain safety precautions you
should follow. These are listed in the Use and Care Manual. Read all and follow carefully.
• Be sure your Drawer Microwave is installed and grounded properly, in accordance with local
codes by a qualified installer or service technician.
IMPORTANT SAFETY INSTRUCTIONS
If the information in this manual is not followed exactly, a fire or electrical shock
may result that could cause property damage, personal injury or death.
To reduce the risk of tipping, the Drawer Microwave must be secured by a properly
installed Anti-Tip block.
Do not install drawer in any combustible cabinetry unless it meets the stated
clearances and dimensions on the following pages. See Figure 1, 2 and 3.
• Make sure the wall coverings and the cabinets around the Drawer Microwave can withstand the
heat generated by the appliance.
Never leave children alone or unattended in the area where a Drawer Microwave is
in use. Never leave the drawer open when the microwave is unattended.
Stepping, leaning or sitting on the drawer may result in serious injuries and can also
cause damage to the Drawer Microwave.
• Do not use the Drawer Microwave as a storage space. This creates a potentially hazardous
situation.
• Check that the time of day is in the display. If not, touch Stop/Clear to prevent unintended use.
CLEARANCES AND DIMENSIONS
ABOUT DIMENSIONS
• Figure 1 shows dimensions of the unit. Figures 2 - 3 provide minimum clearance for standard
(non-flush) installation. Figures 4 - 9 show clearances and additional information for flush
installation. Suggested electrical outlet location is shown in figures 2 - 6. 1
• Contact surface must be solid and level. Pay special attention to the floor on which the Drawer
Microwave will sit. The floor of the opening should be constructed of plywood strong enough
to support the weight of the unit–about 100 pounds [45 kg].
• Check location where the Drawer Microwave will be installed for proper electrical supply.
• Your Drawer Microwave can be installed into a cabinet by itself or below any electric or gas wall
oven. Be sure that the clearance of the floor between the wall oven and the Drawer Microwave
is a minimum of 2 inches [5.1 cm].
• Always check electrical codes for requirements.
The Drawer Microwave must be placed close enough to the electrical outlet so that
the cord is not under tension.
See Figures 1 - 6 for required clearances and dimensions when planning the drawer’s location.
1 An electrical outlet in an adjacent cabinet can be used, as long as the provided electrical cord
can reach without pulling tight. Power cord access hole in cabinet should be a minimum 1 1/2" [3.8
cm] diameter hole and deburred of all sharp edges.
©2019 Hestan Commercial Corporation
3
EN
CLEARANCES AND DIMENSIONS
(CONT.)
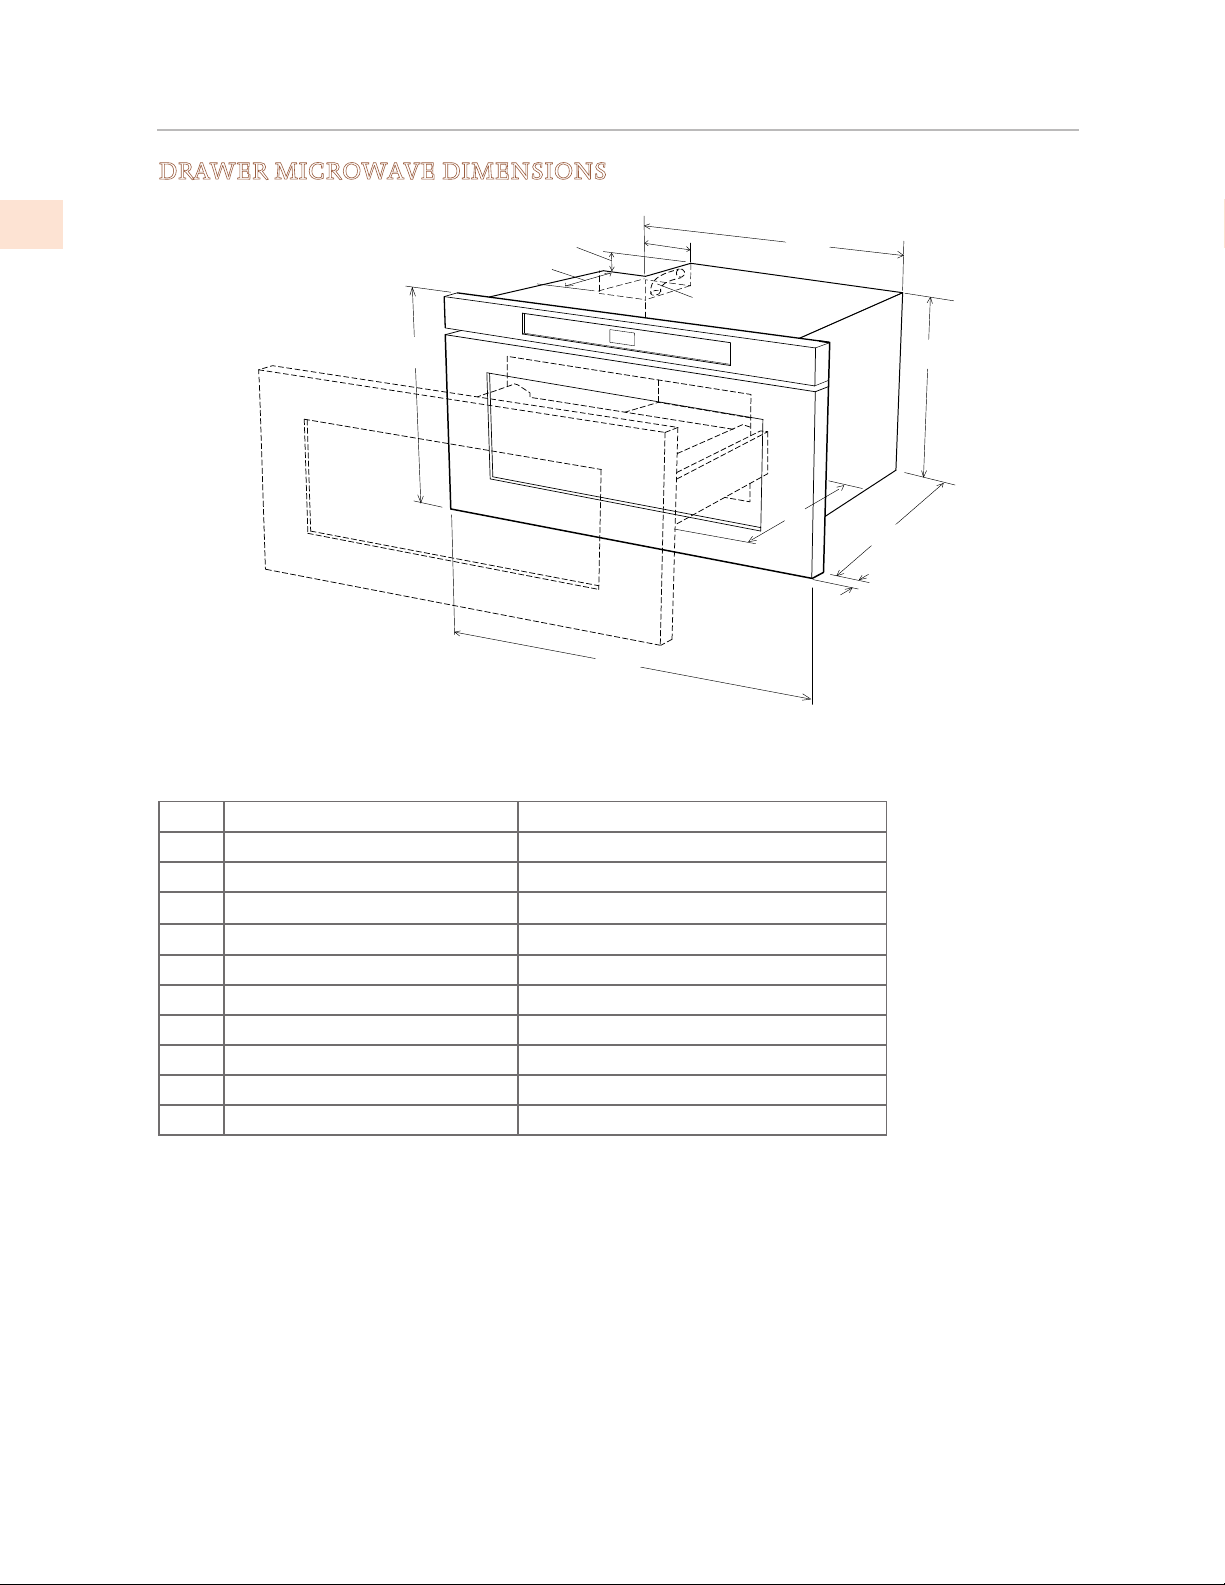
DRAWER MICROWAVE DIMENSIONS
Figure 1. Microwave dimensions
KEY DESCRIPTION DIMENSION
A Unit width 21-5/8 in. [54.9 cm]
B Depth w/out door 21-7/8 in. [55.6 cm]
C Height of body 14-19/32 in. [37.1 cm]
D Width of door face 30 in. [76.2 cm]
E Door thickness 1-11/16 in. [4.3 cm]
F Height of door face 15 in. [38.1 cm]
G Cord recess depth 4 in. [10.2 cm]
H Cord recess width 4-11/16 in. [11.9 cm]
I Cord recess height 1-3/4 in. [4.5 cm]
K Auto drawer opening 15 in. [38.1 cm]
G
F
D
A
K
IH
power cord
D
B
E
©2019 Hestan Commercial Corporation
4
EN
CLEARANCES AND DIMENSIONS
(CONT.)
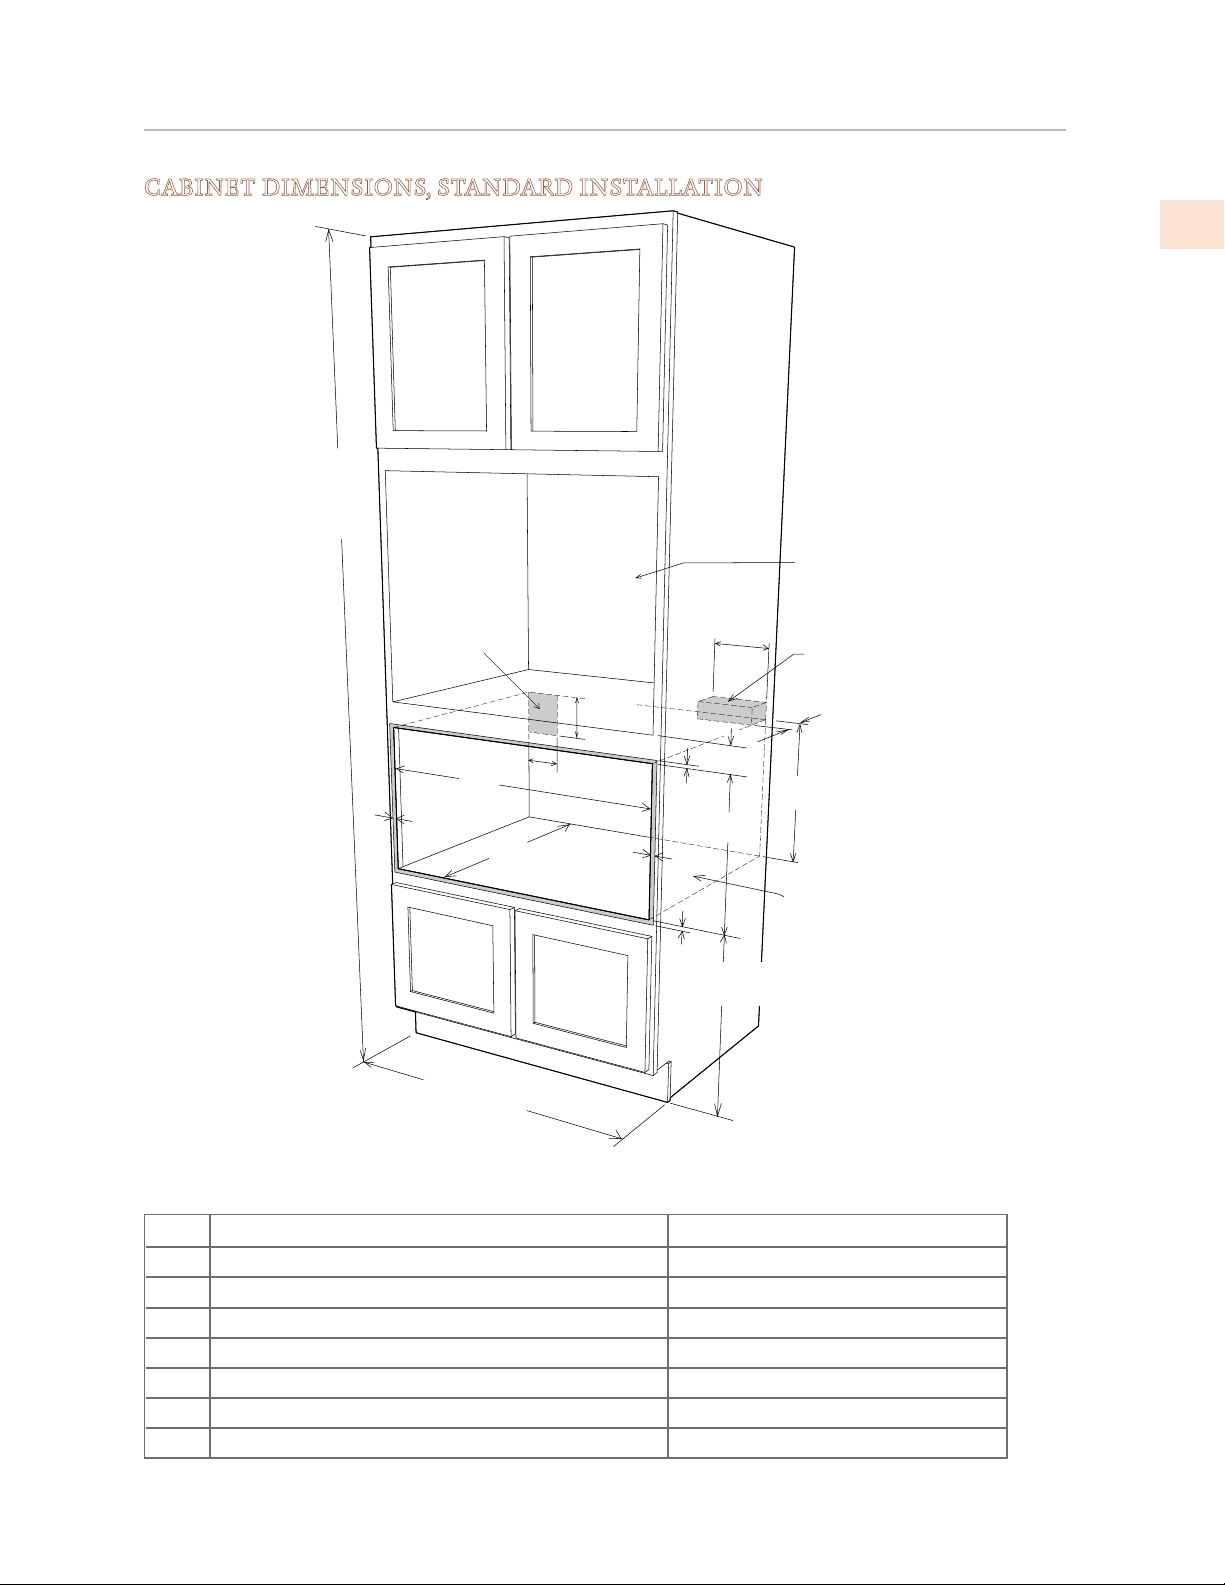
CABINET DIMENSIONS, STANDARD INSTALLATION
Figure 2. Standard mounting under oven
KEY DESCRIPTION DIMENSION
A Cutout width 28-7/16 in. [72.2 cm]
B Cutout depth 23-1/2 in. [59.7 cm]
C Height of opening 14-13/16 in. [37.6 cm]
D Sides overlap 3/4 in. [1.9 cm]
E Top edge overlap 3/16 in. [0.5 cm]
F Bottom edge overlap 7/16 in. [1.1 cm]
G Bottom of opening to bottom of anti-tip block 14-13/16 in. [37.6 cm]
84 in.
[213.4 cm]
wall
cabinet
30" [76.2 cm]
cabinet min.
4 in.
[10.2 cm]
5 in.
[12.7 cm]
Suggested
electrical
outlet location* Anti-Tip
block
Optional wall oven
cutout illustrated
in sketch
Floor must
support 100 lbs.
[45 kg]
3 1/2 in.
[8.9 cm]
6 in.
[15.2 cm]
19 in. [48.3 cm] to
top of floor
(recommended)
D
D
E
H
C
B
G
F
A
©2019 Hestan Commercial Corporation
5
EN
CLEARANCES AND DIMENSIONS
(CONT.)
Figure 3. Standard mounting under counter
36 in.
[91.4 cm]
countertop
height
30 in. [76.2 cm]
cabinet min.
Suggested electrical
outlet location*
Anti-Tip block
Floor must
support
100 lbs.
[45 kg]
19 in. [48.3 cm] to
top of floor
(recommended)
D
D
E
C
B
G
F
A4 in.
[10.2 cm]
5 in.
[12.7 cm] 3 1/2 in.
[8.9 cm]
6 in. [15.2 cm]
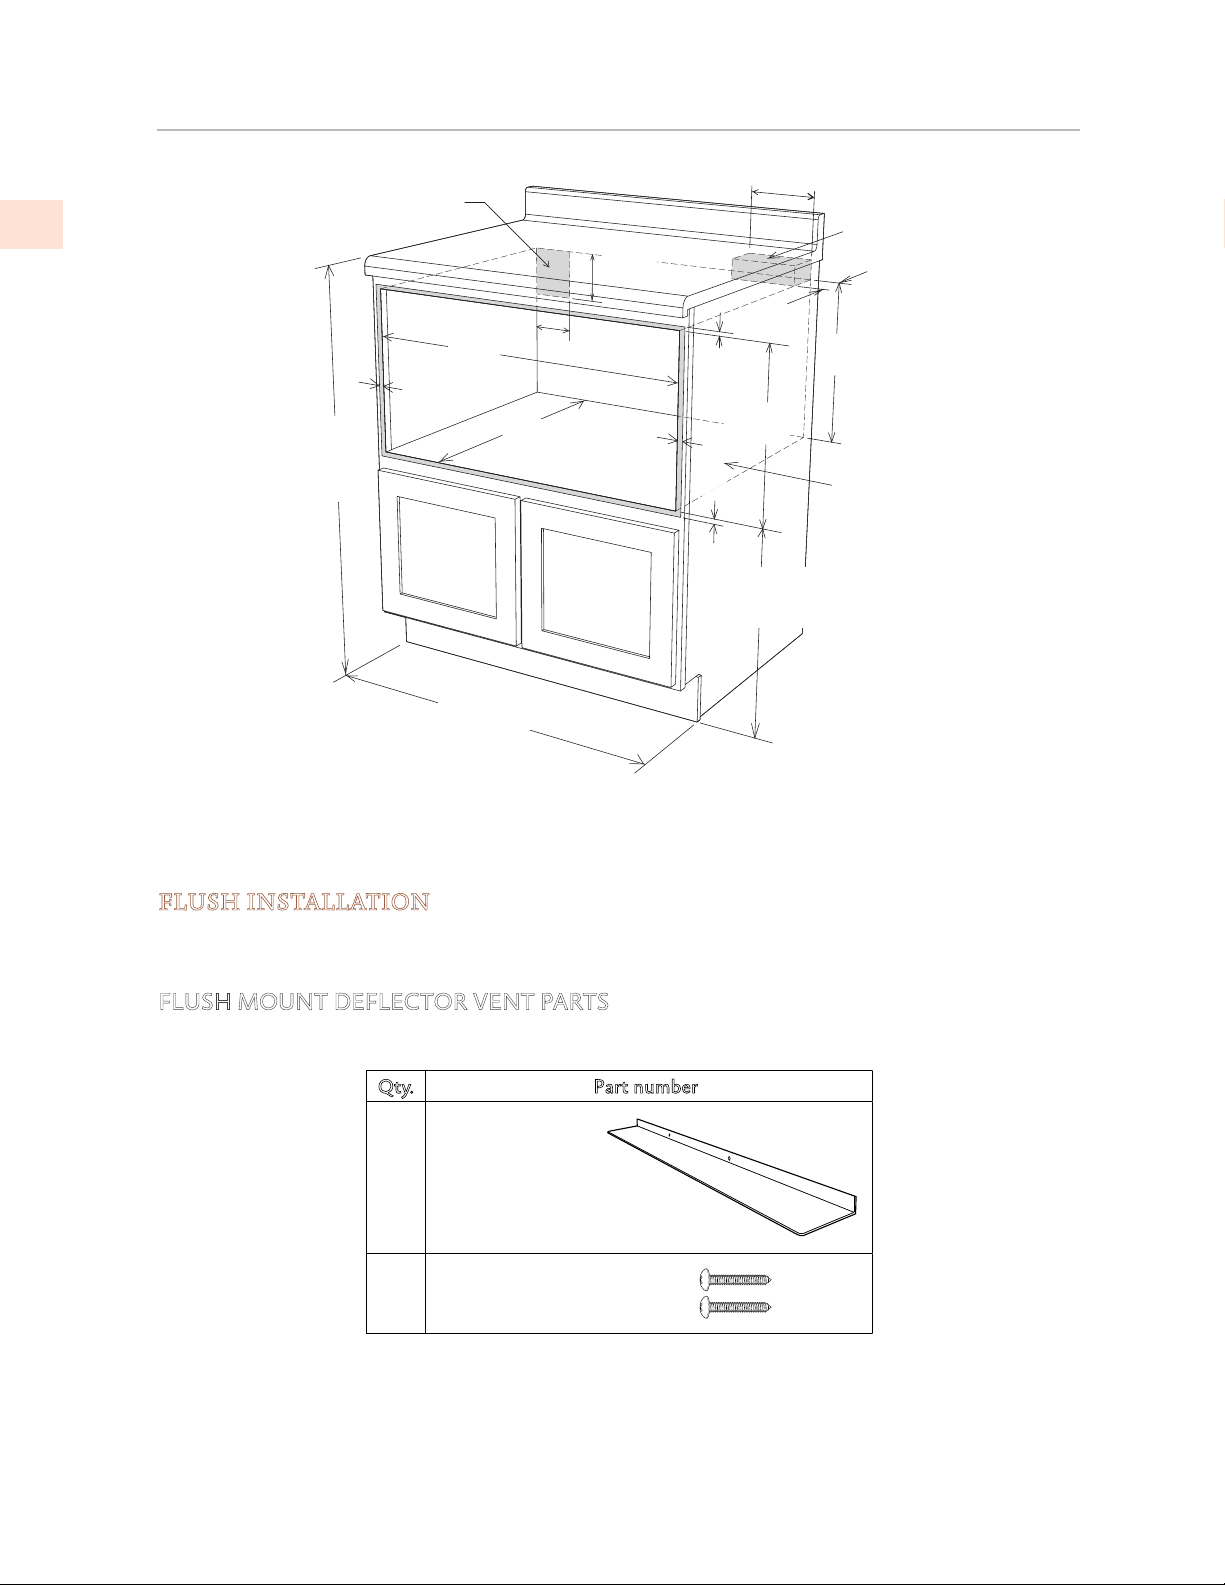
FLUSH INSTALLATION
If installing flush to the cabinet, the provided deflector vent must be installed. Observe the
following cabinet dimensions.
FLUSH MOUNT DEFLECTOR VENT PARTS
Parts included:
Part numberQty.
1
Flush Mount
Deflector Vent
2Mounting screws
©2019 Hestan Commercial Corporation
6
EN
CLEARANCES AND DIMENSIONS
(CONT.)
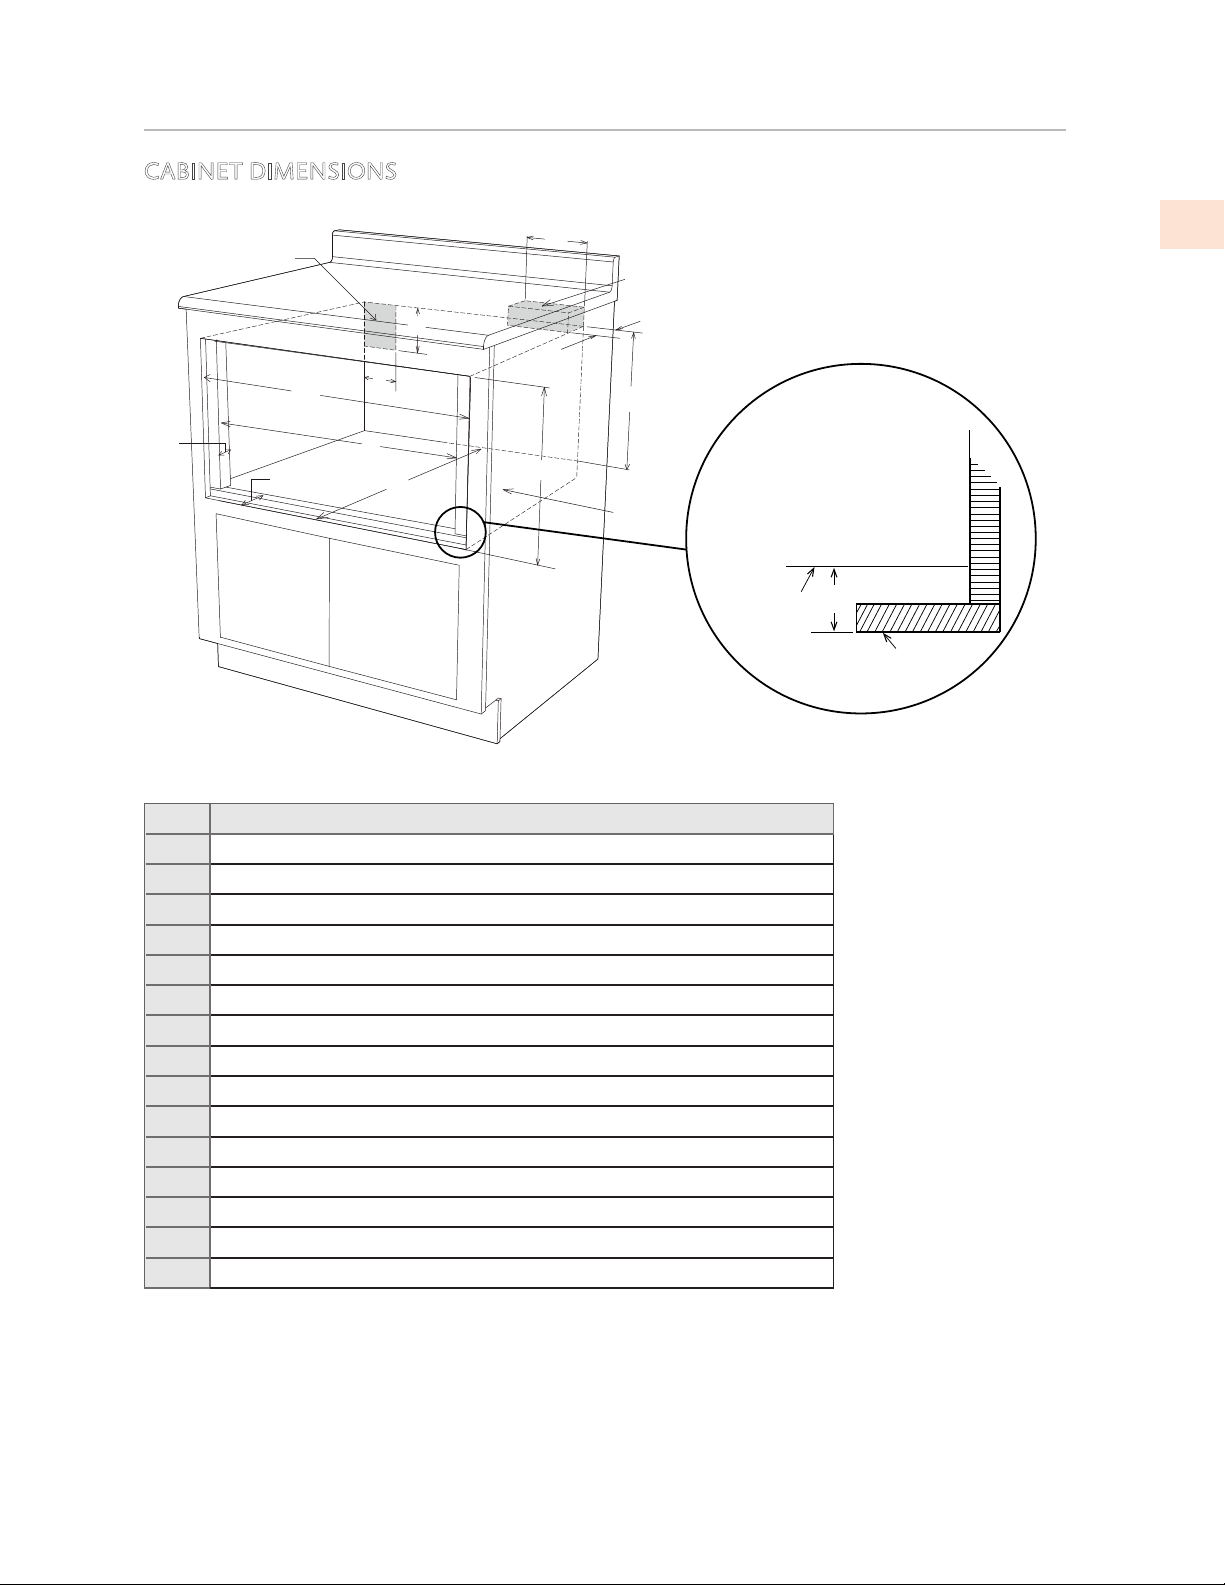
CABINET DIMENSIONS
Figure 4. Mounting flush under counter
Key Dimension
A. 6" [152.40 mm]
B. Suggested electrical outlet location
C. Anti-Tip block
D. 5" [127 mm]
E. 3-1/2" [88.90 mm]
F. 4" [101.60 mm]
G. 30-5/16" [769.92 mm] minimum 30-5/8" [777.87 mm] maximum
H. 14-13/16" [376.24 mm] to bottom of Anti-Tip block
I. 1-1/16" [26.97 mm]
J. 23-1/2" [596.90 mm] minimum depth
K. 28-7/16" [722.3 mm]
L. 1-3/4" [44.45 mm]
M. 16-7/8" [428.62 mm] opening
NFloor must support 100 lb [45.4 kg]
O1-3/4" [44.45 mm]
C
N
H
E
F
D
B
A
J
L
I
G
K
M
cabinet face
shelf face O
Note: the face of the shelf
must sit 1 3/4"[44.45 mm] back
from the face of the cabinet.
©2019 Hestan Commercial Corporation
7
EN
CLEARANCES AND DIMENSIONS
(CONT.)
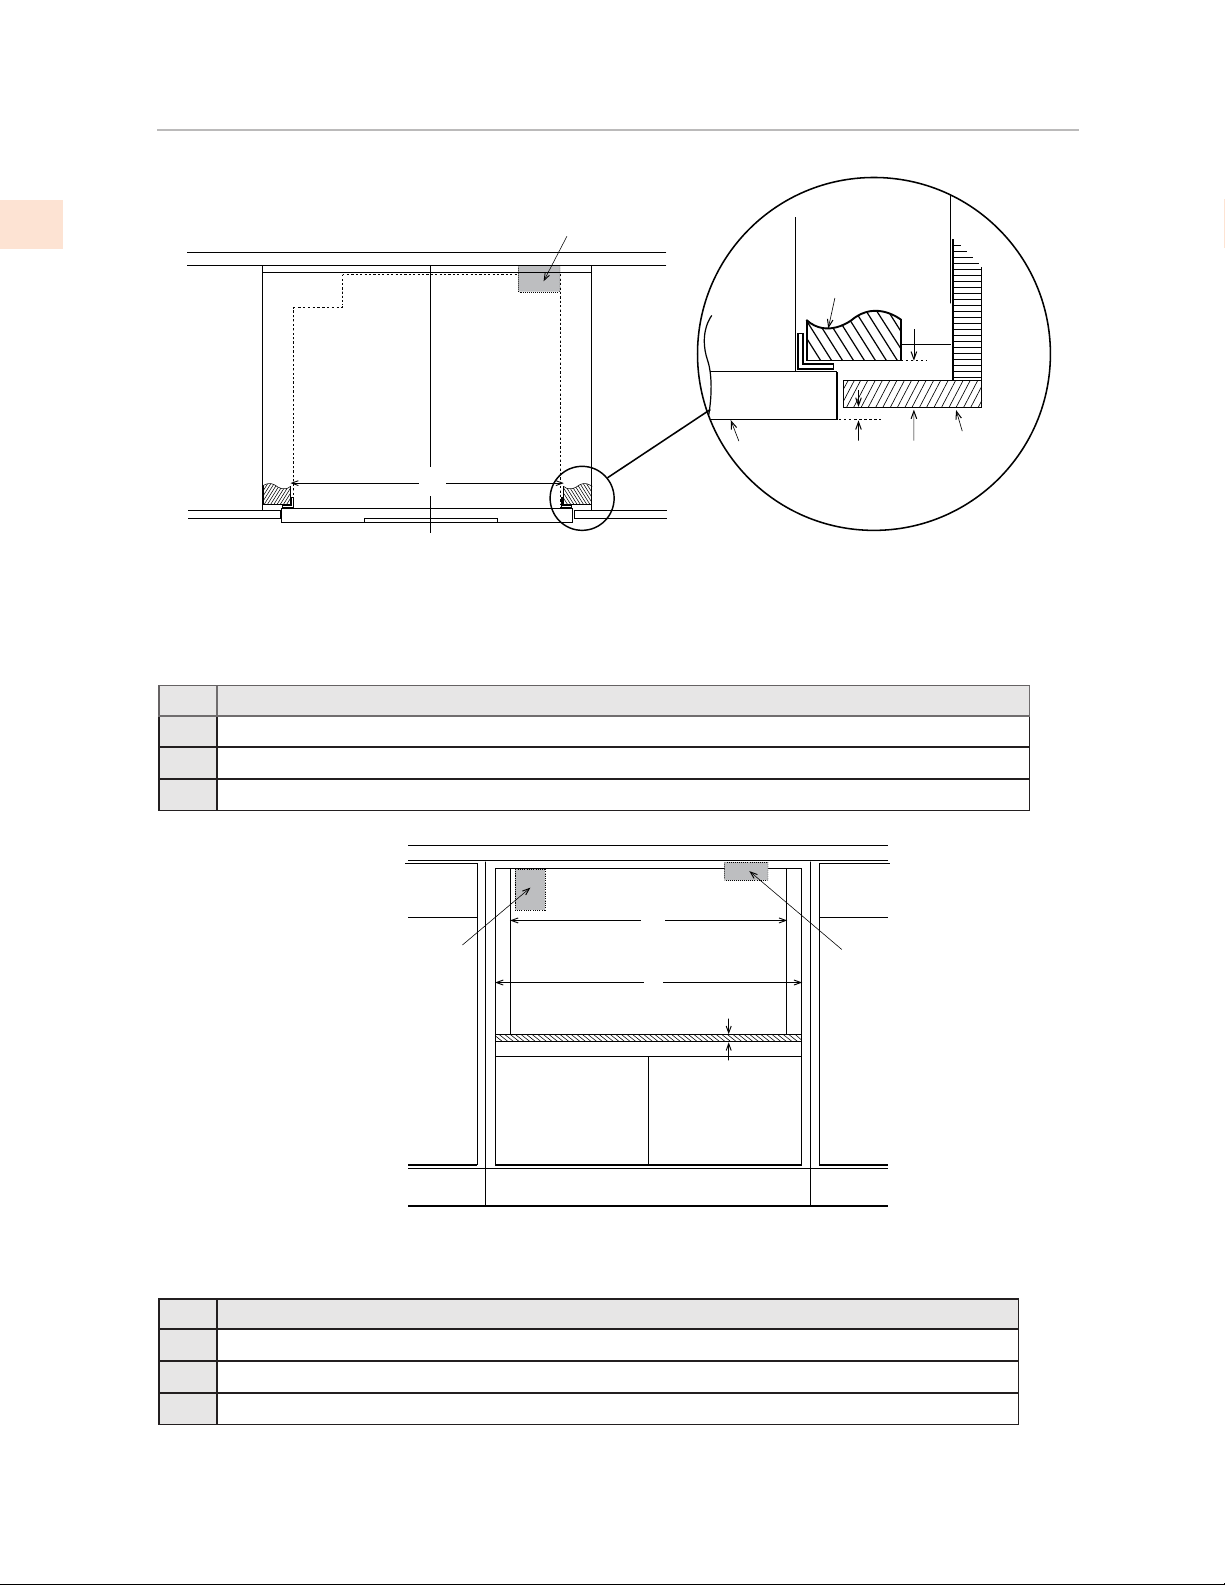
Figure 5. Flush mount, top view
Note: the mounting surface of the finished cleat must sit 1 1/16" [26.97 mm] back from the face of
the cabinet (pushing the face of the drawer out 1/4" [6.35 mm].)
Key Dimension
A. 28-1/2" [723.9 mm] mounting cleat opening width
B. 1/4" [6.35 mm]
C. 1-1/16" [26.97 mm]
Figure 6. Flush mount, front view
Key Dimension
A. 28-7/16" [722.3 mm] mounting cleat opening width
B. 30-5/16" [769.92 mm] minimum, 30-5/8" [777.87 mm] maximum flush opening width
C. 3/4" [19.05 mm] shelf
A
B C
Anti-Tip block
Mounting cleat
Drawer face Cabinet
face
TOP VIEW
C
L
Oven not
shown
C
B
A
Suggested electrical
outlet location
Anti-Tip block
FRONT VIEW
©2019 Hestan Commercial Corporation
8
EN
Other manuals for KMWR30
1
Table of contents
Languages:
Other hestan Microwave Oven manuals


M Service manual")


