
Hernik IPAI-LGT User manual

Herni
USER MANUAL
Version: 04-2020

Herni
I. General information Page
1.1 Introduction 2
1.2 Purpose and indication 2
1.3 Relevant information 3
1.4 Warranty 3
1.5 Service and repair 3
1.6 Practical instructions 3
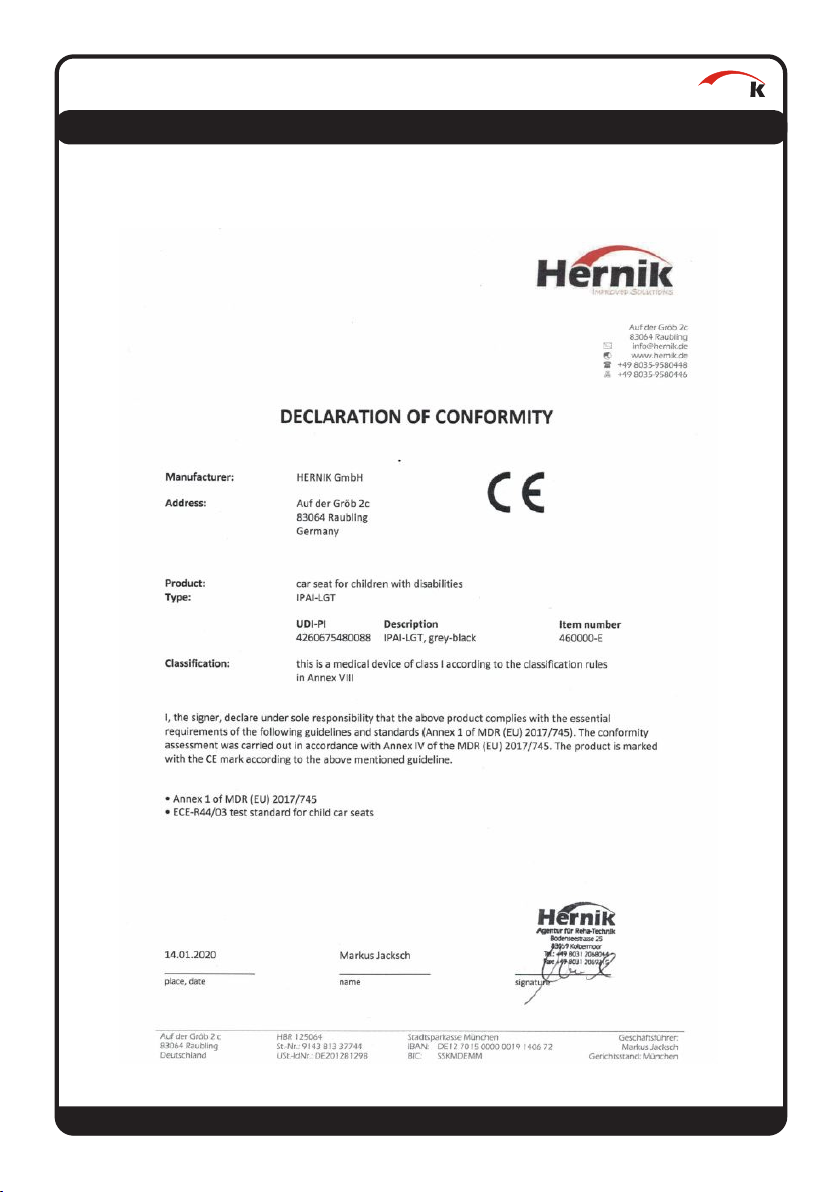
1.7 Declaration of conformity 4
1.8 Installation in the car - with ISOFIX 5
1.9 Adjusting the head rest 6
1.10 Using the 3-point-harness 7
II. Safety instructions
2.1 Safety instructions 9
III. Handling and functions of the basic seat
3.1 Adjusting the internal 5-point-belt 10
3.2 Positioning of side supports 10
3.3 Adjusting the back angle 11
IV. Using the optional accessories
4.1 Wedge pillow 12
4.2 Abduction block 13
4.3 Security tray 14
4.4 Protection mat 14
4.5 Belt to connect the chest straps 15
V. Guarantee 16
VI. Labeling 16
VII. Maintenance & product care
7.1 Pulling off the cover 17
VIII. Technical characteristics 18
• Page 1 •
Table of contents

Herni
I. General information
1.1 Introduction
You have chosen the car seat "IPAI-LGT" and get hereby a high quality product
from our house. We would like to thank you for your trust in us.
To make sure you find joy with this product and to ensure it helps you to make
everyday life easier, we present you this manual. It shows you the correct and
simple usage and the necessary care and maintenance. To avoid damage due to
operator error and to ensure best use, please read the following instructions
carefully. If you have any questions or problems, please contact your dealer.
We wish you a trouble-free use and hope that our products meet your
expectations.
We reserve the right to make technical changes to the version described in this
manual.
Before installing in your car and using it for the first time, please read and follow
the installation instructions on pages 5 - 8. Please ensure that the instructions for
use remain with the product and are therefore available to everyone who uses the
seat.
Your HERNIK GmbH
1.2 Purpose and indication
The IPAI-LGT was developed for the transport of children with special needs in
cars. Children with poor head or trunk control (e.g. infantile cerebral palsy,
muscular dystrophy, hypotension) can be supported in their posture by means of
individually positioned side supports and special upholstery which ensures a safe
transportation.
Important optional accessories can be used to address specific needs such as: the
seat angle or the installation of a stable abduction block. More in chapter IV.
• Page 2 •

Herni
I. General information
1.3 Relevant information
The IPAI-LGT car seat for disabled children consists of two modules:
1. A standard child car seat from Römer-Britax (please refer to the manufacturer's
manual for use).
2. Adaptation module with accessories, which offers the possibility to equip the car
seat according to individual needs. Please refer to the instructions for use from
HERNIK GmbH.
1.4 Warranty
A warranty can only be accepted if the product is used under the specified
conditions and for the intended purposes. The manufacturer is not liable for
damage caused by components and spare parts which were not approved by the
manufacturer.
1.5 Service and repair
Service and repairs on the IPAI-LGT may only be carried out by specialized dealers.
If you have any problems, contact your local dealer. For repairs you will only
receive original spare parts.
1.6 Practical instructions
The car seat will be delivered fully assembled. Upon delivery, the dealer will instruct
the user how to use the device by using the manual. The specialist dealer should
install together with the user the car seat in the car and, if available, adjust the
Isofix strap or the clamp.
When installing the car seat, it is best to hold it with one hand in the center of the
front and the other at the top. In order to achieve an optimal sitting position, it is
necessary to adjust the car seat individually to the circumstances of the child. This
should always be done by the dealer.
• Page 3 •
1.7 Declaration of conformity
Herni
• Page 4 •
1.3 Relevant informationI. General information
1.8 Installation in the car - with ISOFIX
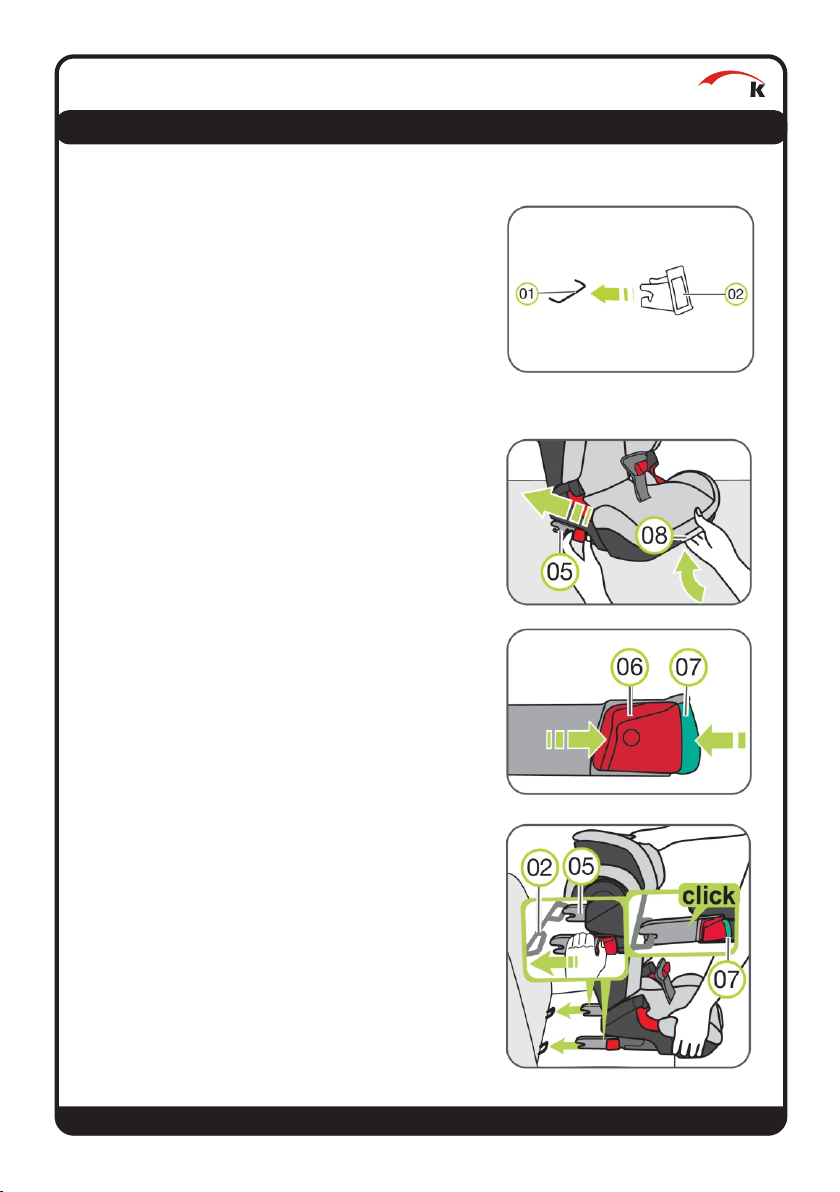
The IPAI-LGT will be installed tightly with the
ISOFIX-locking arms (05) in your car. Your child
will then be buckled up with the vehicle‘s 3-
point belt.
1. If your vehicle is not equipped with ISOFIX
insertion aids as standard, clamp the two
insertion aids (02), which are included in the
delivery of the seat, with the cutout facing
upwards, onto the two ISOFIX fastening
points (01) of your vehicle.
TIP! Die ISOFIX fixation points are located
between the seat and the back of the vehicle
seat.
2. Move the vehicle seat headrest to it‘s
uppermost position.
3. Keep pushing the ISOFIX setting button (08)
and slide the ISOFIX locking arms (05) fully
out.
4. Press the green safety button (07) and the
red release button (06) against each other
on both sides of the seat. This ensures that
both hooks on the ISOFIX locking arms (05)
are open and ready for use.
5. Place the child seat in the direction of travel
on a vehicle seat approved for use. Make
sure that the backrest (12) lies flat against
the backrest of the vehicle seat.
6. Position the two ISOFIX locking arms (05)
directly in front of the two insertion aids (02).
Herni
I. General information
• Page 5 •
Herni
I. General information
• Page 6 •
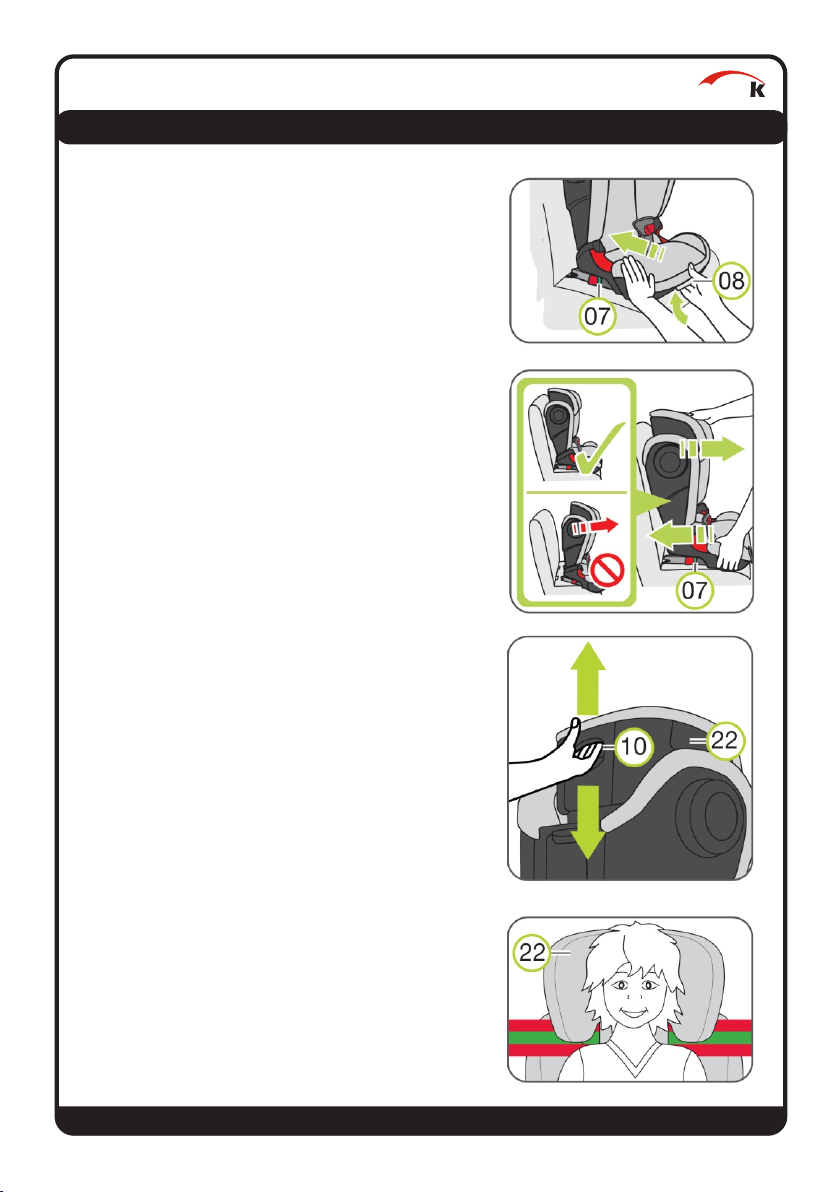
7. Push both ISOFIX locking arms (05) into the
insertion aids (02) until the ISOFIX locking
arms (05) snap into place on both sides with
a „click“ sound.
ATTENTION! The green safety button (07)
must be visible on both sides so that the child
seat is properly attached.
8. Keep pushing the ISOFIX adjustment button
(08) and push the child seat back as far as
possible.
9. Wiggle the child seat to ensure that it is
securely attached and check the safety
buttons (07) again to ensure that both are
completely green.
1.9 Adjusting the head rest
A correctly adjusted headrest (22) ensures the
optimal course of the car‘s diagonal belt (16)
and offers your child maximum protection. The
headrest (22) must be adjusted so that there is
still room for two fingers between the shoul-
ders of your child and the headrest (22).
1. Grasp the adjustment handle (10) on the
back of the headrest (22) and pull it up. Now
the headrest is unlocked.
2. Now you can push the unlocked headrest
(22) to the required height. As soon as you
release the adjustment handle (10), the
headrest (22) locks.
3. Place the child seat on the vehicle seat.
4. Let your child sit down in the child seat and
check the height. Repeat this process until
the headrest (22) is at the correct height.
1.10 Using the 3-point-harness
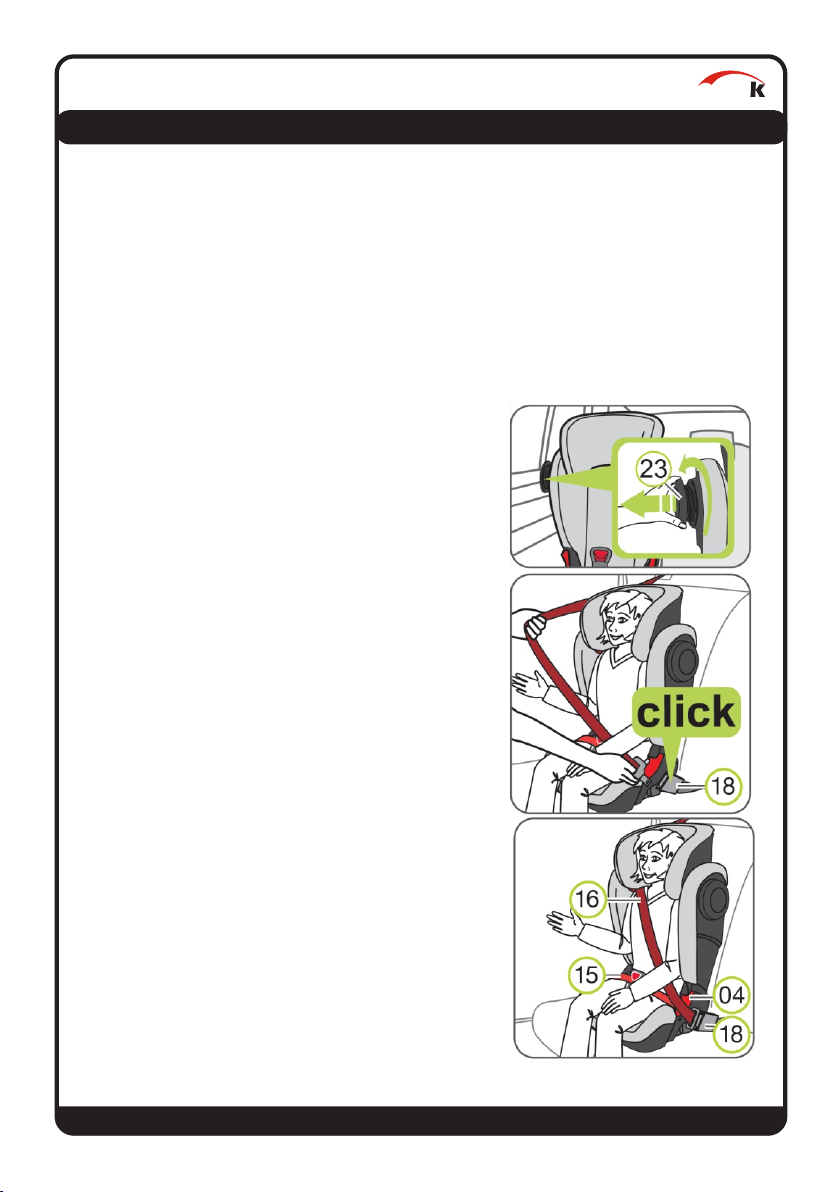
1. Unscrew the SICT (23) counter-clockwise (on
the side closer to the vehicle door) until it is
5 mm away from the vehicle door or it is
unscrewed to the maximum.
Pull out the vehicle belt and guide it in front
of your child to the vehicle belt buckle (18) .
ATTENTION! Make sure that the vehicle belt is
not twisted, otherwise the full protective effect
of the restraint system is not given.
2. Snap the buckle into the vehicle seat belt
buckle (18) with a CLICK.
3. Place the diagonal belt (16) and the lap belt
(15) on the side of the vehicle belt buckle
(18) in the light red belt guide (04) of the
seat cushion.
ATTENTION! The vehicle belt buckle (18) must
not lie between the light red belt guide (04)
and the armrest.
Herni
I. General information
• Page 7 •
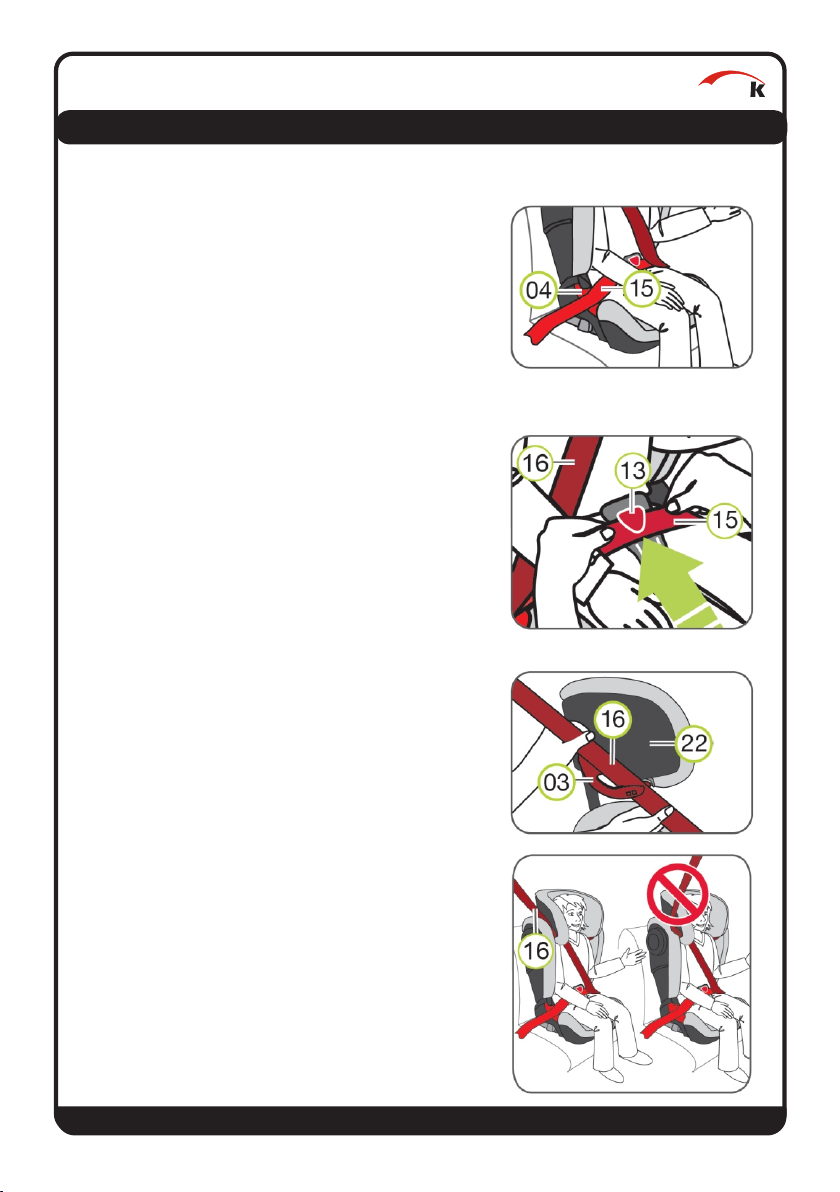
4. Place the lap belt (15) also on the other side
of the seat cushion in the light red belt guide
(04).
ATTENTION! The lap belt (15) must run as low
as possible over your child‘s hips on both sides.
5. Insert the diagonal belt (16) into the dark red
belt holder (03) of the headrest (22) until it is
completely and untwisted in the belt holder
(03).
TIP! If the backrest covers the belt holder
(03), you can adjust the headrest (22)
upwards. The diagonal belt (16) can now be
easily inserted. Now put the headrest (22)
back to the correct height. Make sure that
the button on the belt holder (03) is
completely closed.
7. Make sure that the diagonal belt (16) runs
over your child‘s collarbone and not against
the neck.
TIP! You can also adjust the height of the
headrest (22) in the vehicle.
ATTENTION! The diagonal belt (16) must run
diagonally to the rear. You can regulate the
course of the belt with the adjustable belt
deflector of your vehicle.
ATTENTION! The diagonal belt (16) must
never lead to the belt deflector on the car. If
this is the case, then only use the child seat in
the back seat.
8. Tighten the vehicle belt by pulling the
diaginal belt (16).
Herni
I. General information
• Page 8 •

Herni
II. Safety instructions
· Before use, the components must be checked for perfect function and
condition.
· The user manual must always be carried with the child car seat.
· The safety of your child is only guaranteed if the seat is installed correctly and
if the child is fixed exactly.
· The straps must be laid tight and without twisting.
· The 3-point safety belt is to be guided through the provided belt guides and
is supposed to surround the seat tightly.
Please check:
A) whether the seat belt is securely placed in the belt guide
B) whether the belt buckles are locked correctly
C) that no textiles are clamped
· Make sure that no solid objects like pens, belt buckles, etc. are placed
between the child and the seat belt. This could lead to injuries in the
event of an accident.
· Explain to your child how important it is to be well-secured and that the
course of the straps should not be changed. It shouldn't pull on the
straps, nor open the belt buckles.
· Do not make any changes to the car seat, otherwise you risk your child's
safety.
· The car seat must not be damaged by moving parts in the car or by doors.
· Never leave your child alone in the child car seat.
· Inform your passengers how your child can be taken out of the seat after an
accident.
· After an accident, the entire child car seat has to be renewed.
• Page 9 •
Table of contents
Other Hernik Car Seat manuals


