haupa AC25-12 User manual
… convincing solutions
Electro-hydraulic cri ping tools
INSTRUCTION MANUALBattery powered crimping tool
„AC25-12“
Art. 216601-1
„AC42-12“
Art. 216622-1
4 Ah

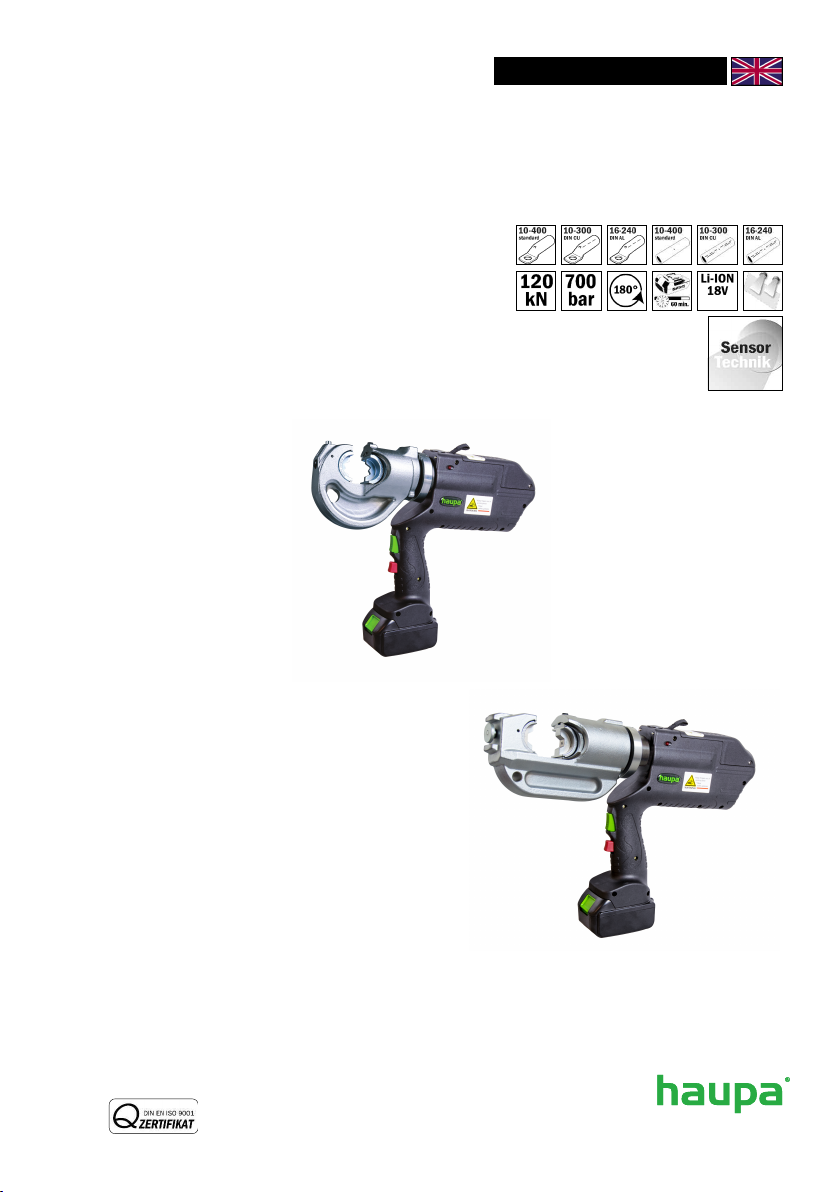
1. Technical data
Area of application: For the creation of an electrical connection by means of compression
Scope of delivery: 1 crimping tool, 1 charger, 1 battery, 1 carry strap, in a plastic case,
without dies.
Pressing force: 120 kN
Feed rate: 2 speeds: Closing (fast) feed to bring the pressing dies to the conductor
and working feed for compression.
Switching between the two speeds is carried out automatically.
Safety: The tool is fitted with a safety value that has been set at the factory.
Structure: The working head can be rotated by 180° to make it easier to adapt to
the operation to be carried out. The hydraulic crimping tool does not
protect the operator when working on cables that carry power.
Guarantee: 2 year guarantee if used for the purpose it is intended
2. Area of work
3. Operating instructions
CAUTI N! T LS MAY NEVER BE USED WITH UT FIRST INSERTING THE PRESSING DIES.
Ensure that the pressing dies fit precisely to the appropriate area and are seated perfectly in
the holders.
THERWISE THIS MAY CAUSE SERI US DAMAGES R BREAKAGES AND THE GUARANTEE
WILL BE V IDED.
• Pressing force in kN: 120 kN
• Working pressure in bar: 700
• pening / Hub: 216601-1: 25 mm – 216622-1: 42 mm
• Pressing width: wide
• Motorstop: yes
• Art. 216601-1:
Crimping range cable lugs: Cu 10-400 / DIN Cu 10-300 / DIN Al 16-240
Crimping range cable lugs: Cu 10-185 / DIN Cu 10-150 / DIN Al 16-120
• Art. 216622-1:
Crimping range cable lugs: Cu 10-400 / DIN Cu 10-300 / DIN Al 16-240
Crimping range connectors: Cu 10-400 / DIN Cu 10-300 / DIN Al 16-240
• Battery charging time in min.: 120
• Battery type: Li-Ion, 18 V, 4 Ah
• Dual-piston pump
• Weight in kg: 216601-1: 7 / 216622-1: 8,5
• Weight of set in kg: 216601-1: 12 / 216622-1: 13
Germany: HAUPA GmbH & Co. G, önigstraße 165-169, D -42853 Remscheid.
Phone: +49 (0)2191 8418-0, Fax: +49 (0)2191 8418-840, [email protected] • Errors and technical changes reserved.
english
Preparation:
Before starting up the tool, read the operating instructions first.
All current-carrying elements in the area you are working in should be disconnected.
therwise the protective procedures for working in the vicinity of
components under current must be implemented. (DIN EN 50110)
Do not use the tool if you are tired or under the influence of medication, drugs or alcohol.
Take into account the valid accident prevention and safety regulations and use the tool exclu-
sively for the purpose for which it is intended.
nly electro-technically trained persons over 16 years of age may process connecting materi-
als using the tool.
The operating instructions must always be carried with the tool.
The instructions must have been read and understood by the user.
The operator must ensure that this is the case.
Operating:
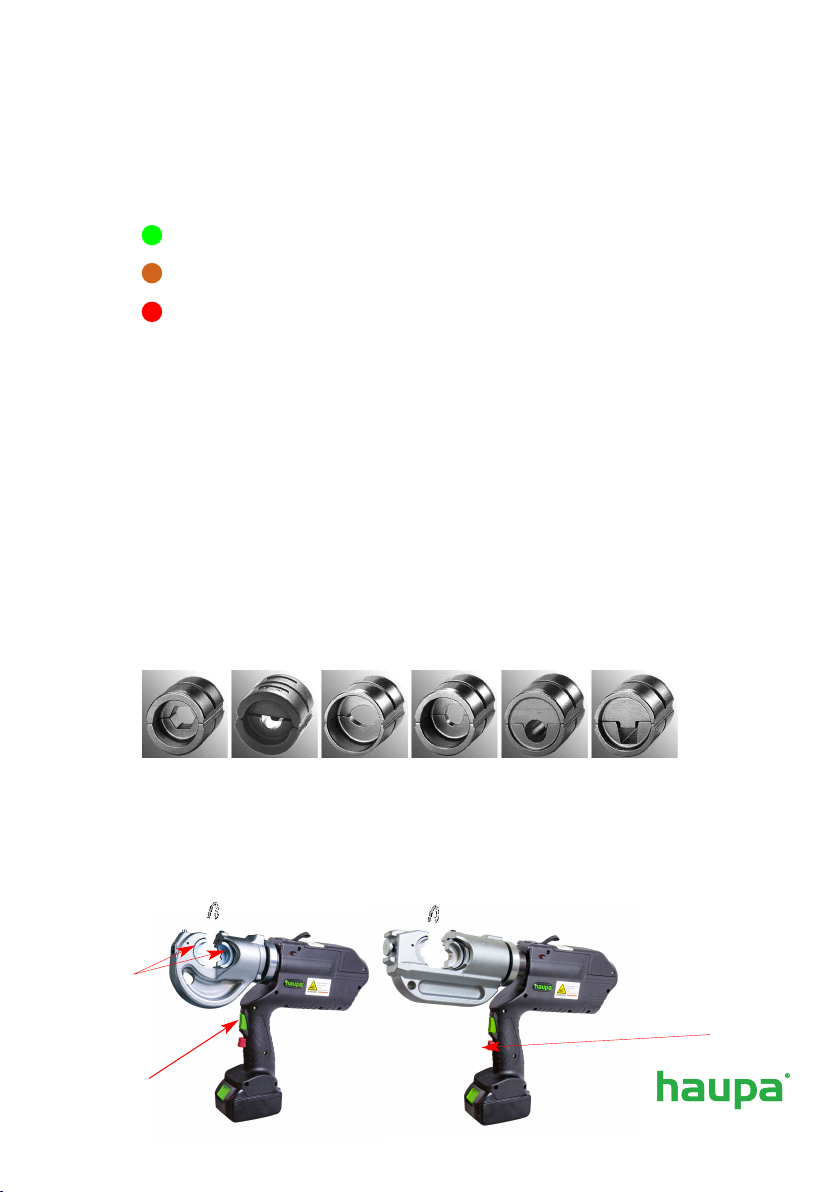
• Select the appropriate pressing dies for the connection to be pressed.
• Insert the pressing dies in the tool head. All of the pressing dies that can be used in these
models are half-circles, regardless of the type of crimping or pressing being carried out.
They are made up of two parts with identical external measurements, so that they both can
be inserted at will into the piston or the head.
Pushbutton
to advance
Die holder
3.1. Sensortechnology
With the different colours of the sensor LED, it shows whether the pressing has
been completed successfully or which errors have occurred:
Light is green: Pressing completed as standard, motor stopped
Light is orange: Battery voltage not sufficient
Light is red: Pressing interrupted before completed
The device also has 2 white LED designed to illuminate the working area.
Pushbutton for
return movement
… convincing solutions

• The procedure for inserting pressing dies is identical for mounting to both piston and head.
• The dies are inserted via the guides until they come to a stop at the blocking pin.
• When inserting into the piston, you must only ensure that this is pushed far enough forward
for the release button to be visible and accessible.
• To remove the dies, in both instances, the relevant release button must be activated.
Then allow the dies to slide out. Please note that in order to remove the inserts at the
piston, the steps listed above must be carried out in reverse order.
Start:
- Bring the tool to the working position.
- Select the appropriate pressing dies for the connection to be pressed.
- Insert the pressing dies in the tool head.
- Feed the conductor into the connector.
- Place the connector between the two pressing dies.
- Approach of the pressing dies (closing feed rate)
- Hold the tool securely and press the operating button to move the piston quickly
forwards until the pressing dies meet the connector to be compressed.
- As soon as the pressing dies start to compress the connectors, the system
automatically switches from closing feed to working feed.
- Press until the pressure limiter can be heard or the pressing dies meet.
- Pressing the front operating button takes the pressure off the system and piston travels
back (fully or partially, to directly carry out a compression action).
IMPORTANT Art. 216601-1:
If connection sleeves with braided wires with cross-section in excess of 185 mm2 are to be
compressed, the cable must be stripped approximately 50 mm further than the amount that
will be inserted into the sleeve in order to enable removal from the device head after pres-
sing. If this is not done, the device must later be pushed to the end of the cable or the cable
be stripped after crimping.
HAUPA GmbH & Co. KG, Königstraße 165-169, D-42853 Remscheid,
Tel.: +49 (0) 2191 8418-0. Fax: +49 (0) 2191 8418840, E-Mail: sales@haupa.com. Subject to technical changes and printing errors.
... convincing solutions
english
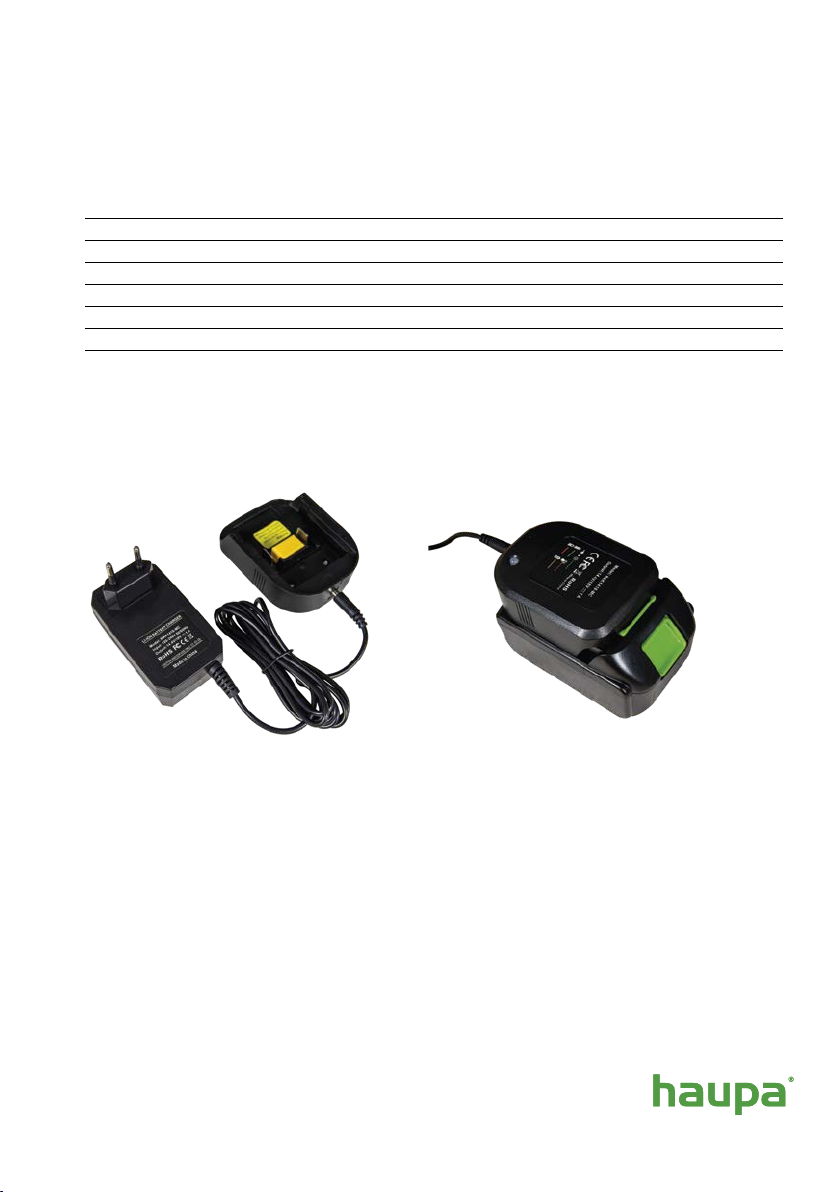
Mounting and unmounting the battery
Charger specifications
Model Nr.: 215527
Input: 100 – 240 V AC
Frequency: 50 / 60 Hz
Output V: 21 V
Output A: 1 A
Weight: 0,164 kg
Measurements: 92 mm (L) x 47 mm (B) x 45 mm (H)
Charger: Connecting battery to charger:
215523 (2 Ah) 215525 (4 Ah)
Please remove the battery after use and keep it removed when storing the
tool!
HAUPA is not liable for wrong or unintended use
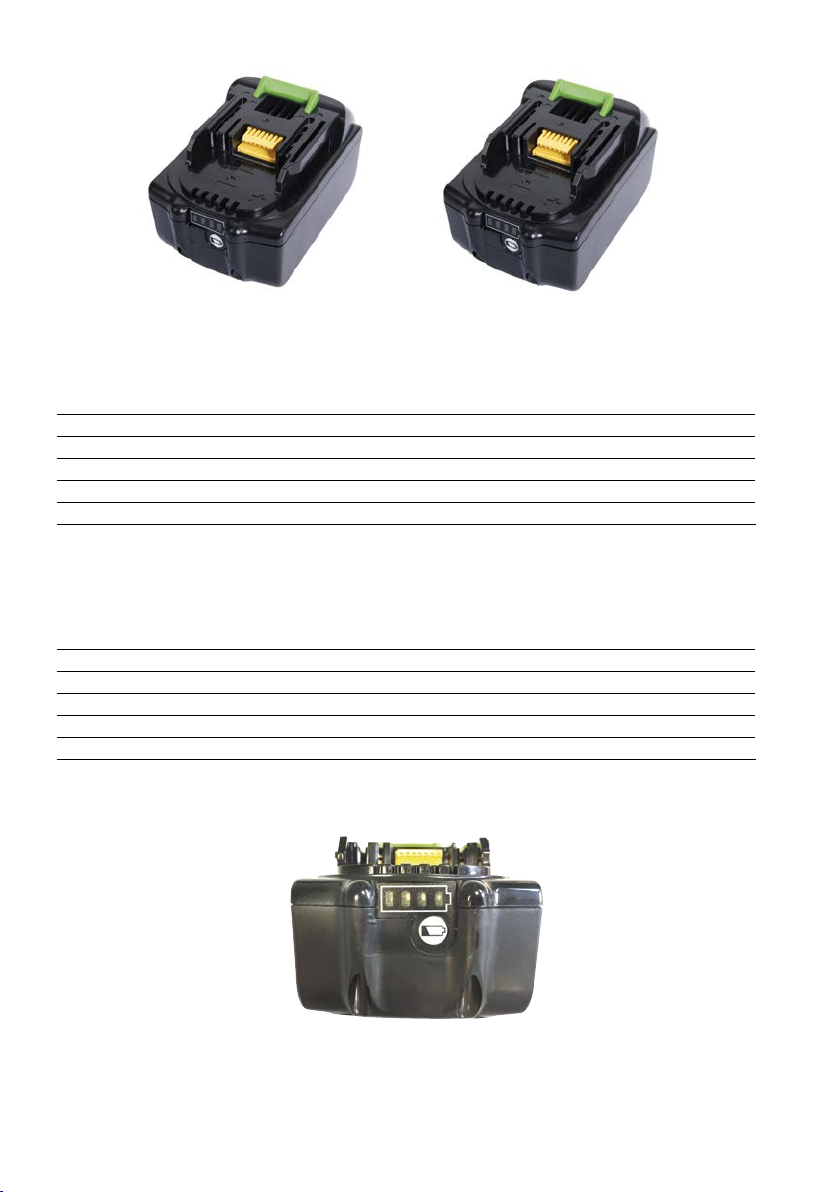
2 Ah Battery Specifications
Model Nr.: 215523
Voltage: 18 V
Weight: 0,35 kg
Measurements: 114 mm (L) x 73,5 mm (B) x 67 mm (H)
est. Charging Time: approx. 30 Min
Capacity: 2 Ah
4 Ah Battery Specifications
Model Nr.: 215525
Voltage: 18 V
Weight: 0,58 kg
Measurements: 114 mm (L) x 73,5 mm (B) x 67 mm (H)
est. Charging Time: approx. 60 Min
Capacity: 4 Ah
LED charge indicator: (Pressing the button will light up LEDs)

5. Care and ma ntenance
Clean ng
• Careful cleaning of the tool, in particular, the moving parts contributes towards a longer
useful life. Remember that dust, sand, environmental influences, in particular a high salt
index, and dirt in general are extremely damaging to hydraulic tools.
• Particular care should be taken when cleaning the pump drive piston and the piston.
The tiniest of contaminations may scratch the walls of the cylinder and damage the
leak-proof seals. For the correct cleaning of the piston, we recommend extending the
piston and then cleaning it with a high-quality, non-corrosive solution.
Power sw tch
Check to see whether the switch on the machine automatically pops out again when you release it.
Storage
To prevent damage to the tool as a result of bumps, dust etc. you should if possible store the tools
in the original packaging.
Guarantee:
2 year guarantee when used for the purpose it is intended when the annual maintenance intervals
are maintained by an authorised HAUPA service centre. We reserve the right to rework the product.
Faults:
Loss of oil:
Send to the HAUPA service centre. Do not open!
D sposal:
…in accordance with the scope of validity of the European WEEE (2002/96/EU) and RoHS directi-
ves (2002/95/EU). Batteries must be disposed off separating according to the battery directive.
WITH EVERY REPLACEMENT PART ORDER, INCLUDE THE FOLLOWING INFORMATION:
1) Article number.
2) Article description.
3) Reference to the operating instructions and/or date.
4) Tool type.
5) Serial number of the tool.
The guarantee is voided if you use parts that are not original replacement parts from HAUPA.
Germany: HAUPA GmbH & Co. G, önigstraße 165-169, D -42853 Remscheid.
Phone: +49 (0)2191 8418-0, Fax: +49 (0)2191 8418-840, [email protected] • Errors and technical changes reserved.
… convincing solutions
HAUPA GmbH & Co.KG, Königstr. 165-169, 42853 Remscheid, Germany
EC declaration of conformity
HAUPA factory certificate
Remscheid, 15.03.2012
Product:
Product range:
Art.-no.:
Battery hydraulic crimping tool
Around the cable
215880; 216601-1; 216620; 216622-1; 216624;
216503; 216662, 215881, 216800, 216801, 215200;
215700; 217200; 217500; 216662; 216664
Note: A correct connection according VDE 0220 Part 2 is only
guaranteed if the user work with Haupa cable lugs and also
adequate HAUPA pressing tools.
The tools are not isolated and it is forbidden to work under
tension.
HAUPA GmbH & Co.KG, Königstr. 169, 42853 Remscheid, Germany
Phone +49 21 91 84 18 – 0, Fax +49 21 91 84 18 – 840
Herewith we declare that the above mentioned tools are manufactured according the
following guidelines:
CE guidelines 98/37/EEC, 89/336/EEC
Jens-Ole Paas Jochen Husli
Qualitätsmanagement Produktmanagement
Other manuals for AC25-12
1
This manual suits for next models
3
Table of contents
Other haupa Crimping Tools manuals

haupa
haupa KH-12 User manual

haupa
haupa AO-6 User manual

haupa
haupa SDE240-6M User manual

haupa
haupa SMART-LINE 216801-1 User manual

haupa
haupa AC25-12 User manual

haupa
haupa SMART-LINE SH-6 User manual

haupa
haupa 21 67 50 User manual

haupa
haupa SDE240-6 User manual

haupa
haupa 21 66 01 User manual

haupa
haupa SHs-6M User manual


