
Hakki Pilke OH 27 Installation instructions

Hakki Pilke
OH 27
LOG SPLITTER
–Instructions for assembly, operation and maintenance
–EU Declaration of Conformity
–Safety instructions
–Warranty terms
MAASELÄN KONE OY
Valimotie 1, 85800 Haapajärvi
tel.08-7727300, fax.08-7727320
info@maaselankone.fi
www.maaselankone.fi
The operator must read and understand these
instructions before operating the log splitter!
English

2 (39)
Hakki Pilke 27 Original Version 5-2014
TABLE OF CONTENTS
GENERAL SAFETY INSTRUCTIONS.............................................................................................4
WARNING SYMBOLS ......................................................................................................................5
Commissioning a New Machine..........................................................................................................8
Conveyor Work Position......................................................................................................................9
Conveyor Transport Position.............................................................................................................11
The Machine from the Front..............................................................................................................12
The Machine from the Rear...............................................................................................................12
Filling cap of the oil tank...................................................................................................................12
Connecting the Machine to a Tractor.................................................................................................13
Electrically Driven Firewood Processor............................................................................................14
Start and Stop Buttons........................................................................................................................15
Operation and Control of a Hydraulic Splitting System....................................................................16
Starting the Splitting Movement........................................................................................................17
Splitting Blade Adjustment, Dismounting and Reassembly..............................................................17
Wood Length Adjustment..................................................................................................................18
Emergency Stop.................................................................................................................................18
Test Run.............................................................................................................................................20
Before Processing Firewood..............................................................................................................20
Processing the Firewood....................................................................................................................21
Safety Precautions for Cutting Trees:................................................................................................22
Splitting the Last Cut Piece of Wood.................................................................................................24
Splitting a Split Piece of Wood..........................................................................................................24
Removing Wood Caught in the Splitting Blade.................................................................................24
Using the Conveyor ...........................................................................................................................25
Finishing the Work.............................................................................................................................26
Transferring the Machine...................................................................................................................26
Cutting Blade .....................................................................................................................................27
Sharpening .........................................................................................................................................27
The setting must be approx. 0.7 mm..................................................................................................27
Installing the Conveyor Drive Belt....................................................................................................30
Tightening Angular Gear Drive Belts in Model TR60......................................................................31
Belt tightness:.....................................................................................................................................31
Tightening Angular Gear Drive Belts in Model TRS60....................................................................31

3 (39)
Hakki Pilke 27 Original Version 5-2014
Machine Lubrication..........................................................................................................................32
Hydraulic Oil......................................................................................................................................32
Angular Gear......................................................................................................................................32
Splitting Mechanism..........................................................................................................................32
Operation............................................................................................................................................33
Adjustments .......................................................................................................................................34
Adjusting the Travel of the Splitting Beam.......................................................................................34
Towards the initial position................................................................................................................34
The stroke is shortened ......................................................................................................................34
Splitting beam ....................................................................................................................................34
Disturbances in the Splitting Mechanism, Their Reparation and Prevention....................................35
Hydraulic System Pressure Adjustment.............................................................................................36
Storing the Machine...........................................................................................................................36
Technical Specifications:...................................................................................................................37
EU DECLARATION OF CONFORMITY OF MACHINE..............................................................38
Manufacturer: Maaselän Kone Oy.....................................................................................................38
Guarantee terms .................................................................................................................................38
The guarantee covers............................................................................................39
The guarantee does not cover...............................................................................39

4 (39)
Hakki Pilke 27 Original Version 5-2014
GENERAL SAFETY INSTRUCTIONS
Great care must be taken in the operation of this machine as well as its connection to
a power source, such as a tractor, so that neither the person connecting it nor other
persons nearby are subjected to injury.
In order to avoid accidents, the machine must not be operated by persons who are
tired, intoxicated or under the influence of drugs or not sufficiently capable of
controlling their actions.
The connection of the machine to the power source must be carried out by only one
person at any one time.
The risk zone around the machine is 10 metres. Except for the operator, no other
person is allowed within this area during connection and operation.
If persons other than the operator remain within the risk zone, the operator must make
them aware of the dangers related to the operation of the machine.
The work site and its surroundings must be prepared prior to operating the machine to
ensure safe working conditions. The area must be sufficiently lit for operation. If the
light is scarce, the machine must not be used without sufficient and appropriate
additional lighting.
The Hakki Pilke Firewood Processor is designed for making firewood of lopped trees
and other lopped and pre-processed wood, such as pre-cut logs. Do not process wood
material that has been processed in any other way, such as construction waste. The
manufacturer of the machine is not responsible for any damages or injuries that
processing such wood may cause to the machine or operator.
The work capacity of the machine, i.e. the maximum wood diameter of 25 cm and the
maximum wood length of 55 cm, must not be exceeded.
The machine must not be operated, if the operator is not:
- familiar with these instructions;
- familiar with risk situations that may occur during the operation of the machine;
- able to act, should a dangerous situation occur during operation.
If the machine is faulty or contains a broken part that the operator is not able to repair
or replace, the operator must contact the seller, manufacturer or importer of the
machine.
The operator must always check all components before connecting the machine
to the tractor or operating it. Under no circumstances should the machine be
used if even a small amount of wear and tear is detected in its structure or
components! The faulty parts must be repaired or replaced with new ones!

5 (39)
Hakki Pilke 27 Original Version 5-2014
WARNING SYMBOLS
DANGER ZONE
BEWARE OF THE CUTTING
BLADE
ONLY ONE PERSON AT A
TIME IN THE WORK AREA
SHUT DOWN BEFORE
MAINTENANCE
BEWARE OF MOVING
PARTS
RISK OF ENTANGLEMENT
WITH THE CARDAN
SHAFT
RISK OF CRUSHING
DO NOT GO UNDER THE
CONVEYOR
MAX CONVEYOR TILT
ANGLE
BEWARE OF THE
SPLITTING BLADE

6 (39)
Hakki Pilke 27 Original Version 5-2014
READ THE MANUAL BEFORE
USE
USE PROTECTIVE
EQUIPMENT
USE PROTECTIVE
EQUIPMENT
ALWAYS GRAB A LOG BY
THE SIDES
MAX RPM
Scale
HYDRAULIC OIL
LEFT ROTATION
RIGHT ROTATION
LIFTING POINT FOR
FORKLIFT
LIFTING POINT FOR HOOK
EMERGENCY STOP
7 (39)
Hakki Pilke 27 Original Version 5-2014
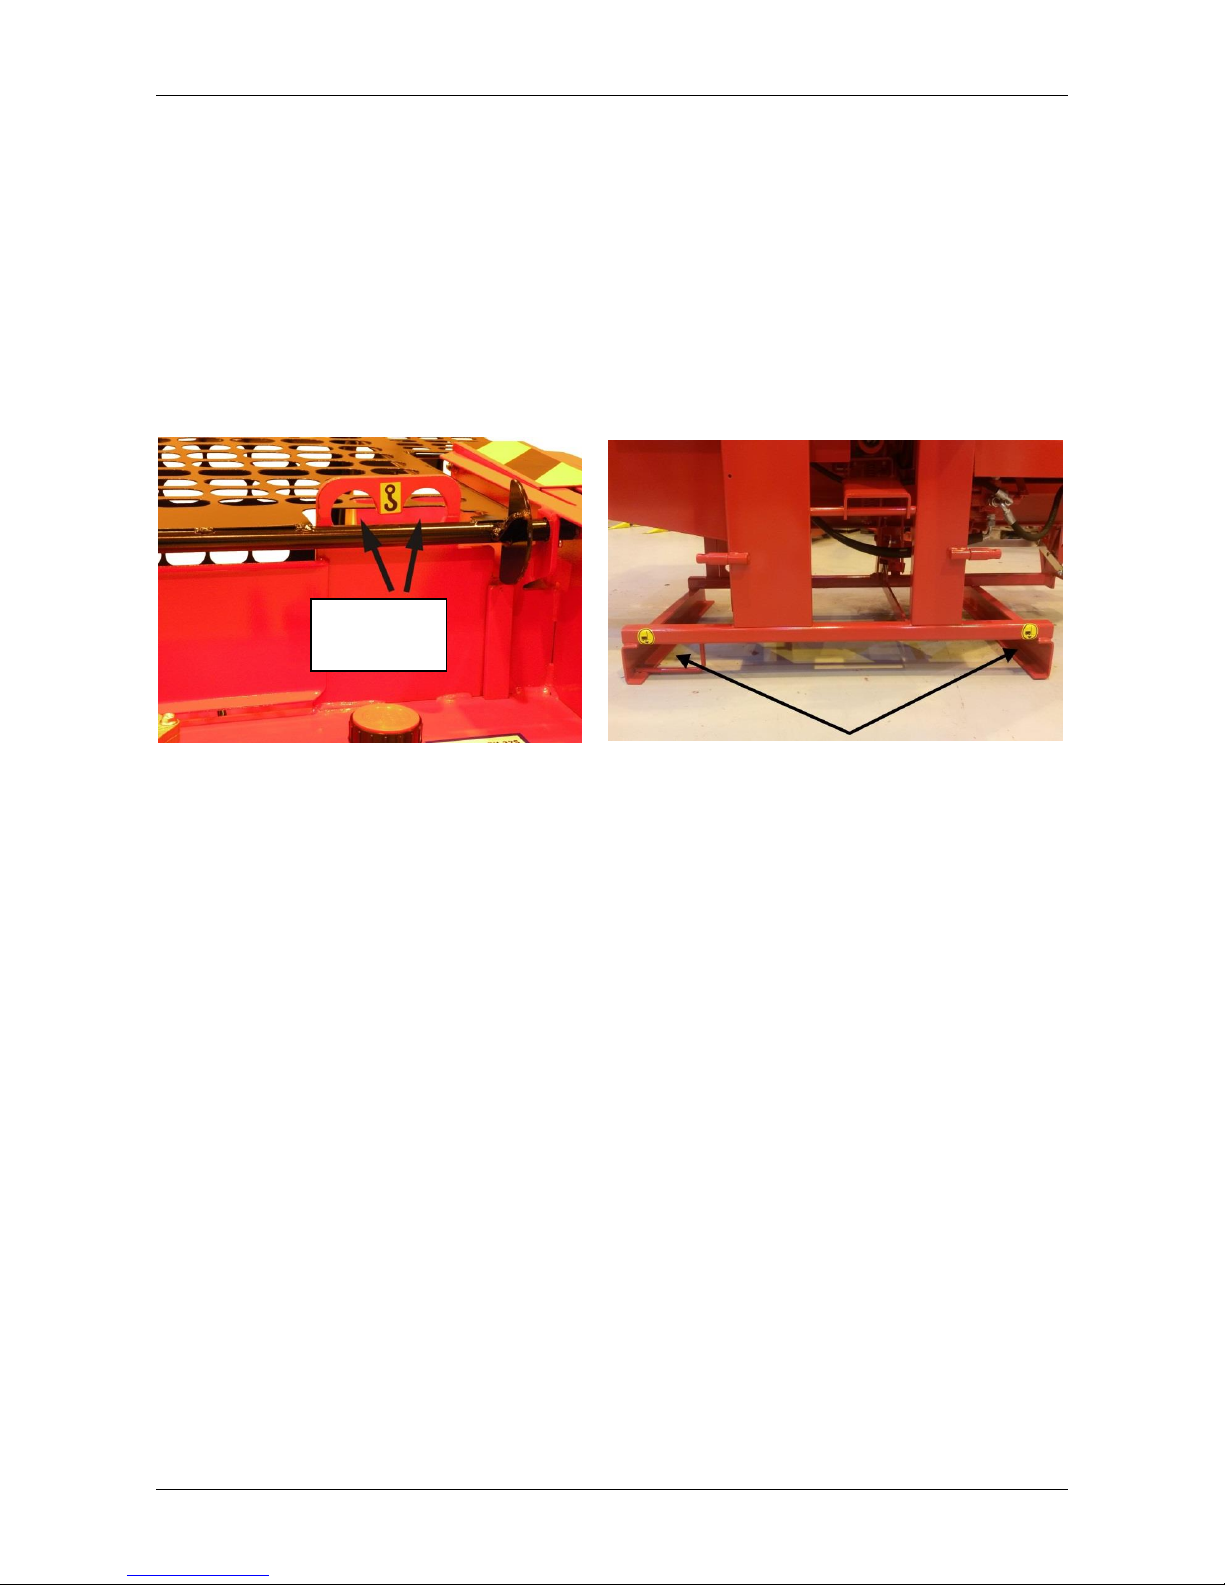
Machine Lifting Points
The machine includes lifting points designed for a forklift fork and a line or chain.
The following figure on the left shows the lifting points for a line or chain.
The figure on the right shows the lifting points for a forklift fork. Always insert one
of fork prongs through the frame preventing sideslip.
Lifting
points.

8 (39)
Hakki Pilke 27 Original Version 5-2014
Commissioning a New Machine
After unpacking the machine, dispose of the packaging material in an
environmentally friendly way.
Install the loose parts supplied with the machine:
1. Place the cross-cut cradle extension into the square pipe in the cradle frame.
2. Adjust the extension to
the desired length and lock
it in place with a locking
nut.
3. Adjust the
extreme position of
the cradle (towards
the user) with the
two nuts in the
lower part of the
cradle. There
should be approx.
3 mm between the
cradle cover and
the rocking cover.
4. Install the adjustment lever of the splitting blade
onto the joint pin on the machine frame. Add the
washer and lock the parts in place with a split
cotter.
Cradle
cover
Rocking cover

9 (39)
Hakki Pilke 27 Original Version 5-2014
5. Install the winch handle by screwing the handle on the root of the shaft.
Screw the locking nut of the handle on the shaft.
Conveyor Work Position
1. Make sure that the winch is locked to the removal conveyor and that hook latch
is intact as shown below.
Tighten the nut evenly
with the winch shaft.
There should be approx. 5 mm
between the nut and the handle
frame.
Winch operation:
When the handle is turned clockwise,
the brake loosens and the strap
tightens on the spool. When the
handle is turned counter-clockwise,
the brake engages and the strap
loosens from the spool.
Hook latch

10 (39)
Hakki Pilke 27 Original Version 5-2014
8. Turn the belt holder to the side of the conveyor.
2. Unwind some line from
the winch.
3. Push the conveyor towards the machine and release
its lock by lifting the locking handle.
4. Pull the conveyor until
the winch line tightens.
5. Lower the conveyor with
the winch.
6. Extend the conveyor to its
full length.
7. Adjust the conveyor to the desired inclination with
the winch and lock the extension with the lock at the
bottom of the conveyor.
Table of contents
Other Hakki Pilke Log Splitter manuals


Popular Log Splitter manuals by other brands


Scheppach
Scheppach OX 3-1000 Translation from the original instruction manual

Swisher
Swisher 21200 owner's manual

Elem Garden Technic
Elem Garden Technic FBHT65-22TCH instructions

Champion Power Equipment
Champion Power Equipment 90720 Owner's Manual and Operating Instructions

Boss Industrial
Boss Industrial ES5T20 owner's manual

Villager
Villager LSP 12 T Original Operator's Manual


