
Gymstick GX6.0 User manual

GX6.0 CROSSTRAINER
USER MANUAL
IMPORTANT: Read all instructions carefully before using this product. Retain this owner’s manual for future
reference. The specications of this product may vary from this photo, subject to change without notice.

2GX6.0 CROSSTRAINER
BEFORE YOU BEGIN
Thank you for choosing the Gymstick GX6.0 Crosstrainer. We take great pride in producing this
quality product and hope it will provide many hours of eective exercise to make you feel better,
look better and enjoy life to its fullest.
TABLE OF CONTENT
1. SAFETY INSTRUCTIONS ................................................................................................ 3
2. EXPLODED DRAWING...................................................................................................... 4
3. HARDWARE PACKAGE..................................................................................................... 6
4. ASSEMBLY INSTRUCTION................................................................................................ 7
5. ADJUSTMENTS GUIDE..................................................................................................... 13
6. COMPUTER OPERATION INSTRUCTIONS...................................................................... 14
7. WARM UP AND COOL DOWN ROUTINE.......................................................................... 20
8. IMPLIED WARRANTY......................................................................................................... 23
READ AND FOLLOW THE SAFETY INSTRUCTIONS. FAILURE TO FOLLOW THESE INSTRUCTIONS
CAN RESULT IN SERIOUS INJURY.
!
NOTIFICATION!

3GX6.0 CROSSTRAINER
!
WARNING!
SAFETY INSTRUCTIONS
Basic precautions should always be followed, including the following safety instructions when using
this equipment: Read all instructions before using this equipment.
1. Keep children and pets away from the machine at all times. DO NOT leave unattended children in the
same room with the machine.
2. Handicapped or disabled persons should not use the machine without the presence of a qualied health
professional or physician.
3. If the user experiences dizziness, nausea, chest pain, or any other abnormal symptoms, STOP the
workout at once. CONSULT A PHYSICIAN IMMEDIATELY.
4. Before beginning training, remove all within a radius of 2 meters from the machine. DO NOT place any
sharp objects around the device.
5. Position the machine on a clear, level surface away from water and moisture. Place mat under the unit to
help keep the machine stable and to protect the oor.
6. Use the machine only for its intended use as described in this manual. DO NOT use any other
accessories not recommended by the manufacturer.
7. Assemble the machine exactly as the descriptions in the instruction manual.
8. Check all bolts and other connections before using the machine for the rst time and ensure that the
trainer is in the safe condition.
9. Hold a routine inspection of the equipment. Pay special attention to components which are the most
susceptible to wear o, i.e. connecting points and wheels. The defective components should be replaced
immediately. The safety level of this equipment can only be maintained by doing so.
10. NEVER operate the machine if it is not functioning properly.
11. This machine can be used for only one person’s training at a time.
12. Do not use abrasive cleaning articles to clean the machine. Remove drops of sweat from the machine
immediately after nishing training.
13. Always wear appropriate workout clothing when exercising. Running or aerobic shoes are also required.
14. Before exercising, always do warm-up and stretching rst.
15. Maximum user weight 120kg.
BEFORE BEGINNING THIS OR ANY EXERCISE PROGRAM, CONSULT YOUR PHYSICIAN FIRST.
THIS IS ESPECIALLY IMPORTANT FOR INDIVIDUALS OVER THE AGE OF 35 OR PERSONS WITH
PRE-EXISTING HEALTH PROBLEMS.
4GX6.0 CROSSTRAINER
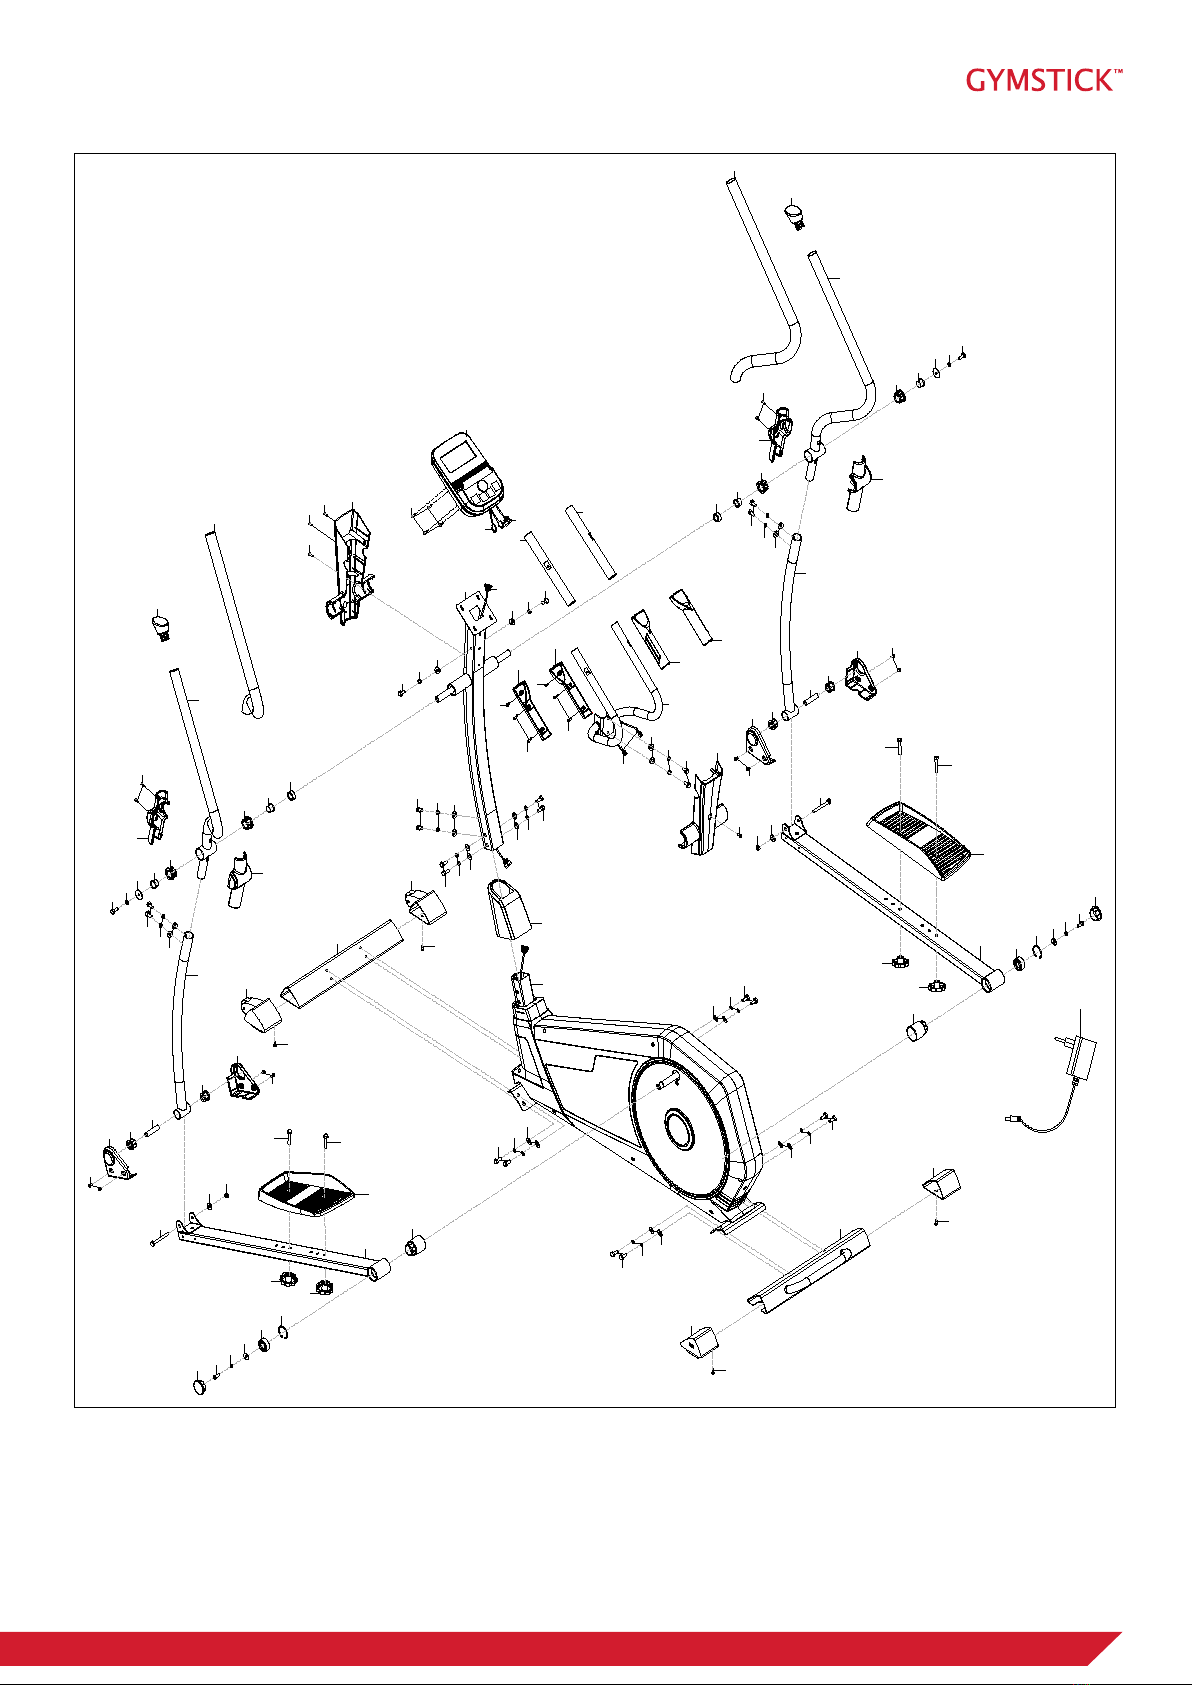
EXPLODED DRAWING
1
2
3
5
6
6
6
7
7
7
8
8
8
9
15
1a 1b
10
11
11
16
20
20
19
19
21L
21R
4
4
2
2
17
17
17 7
7
78
8
18
22
22
23
24
17
17
17
7
725
25
26
27
26
27
27
27
26
26
7
29
29
7
17
30
31
32
32
28
28
33
33
34
34
34
34
35
35
36
36
38 39
39
37
37
38
40 40
40
40
41L
41R
42
42
42
42
43
43
44
2
2
2
2
44
46
48
38
38
45
45
7
7
46
47
47
48
49
50
51
52
52
52
52
7
7
38
38
38
7
38
7
17
17
17
17
53
54
55
56
57
14
4
4
14
12R
12L
13R
13L
111
5GX6.0 CROSSTRAINER
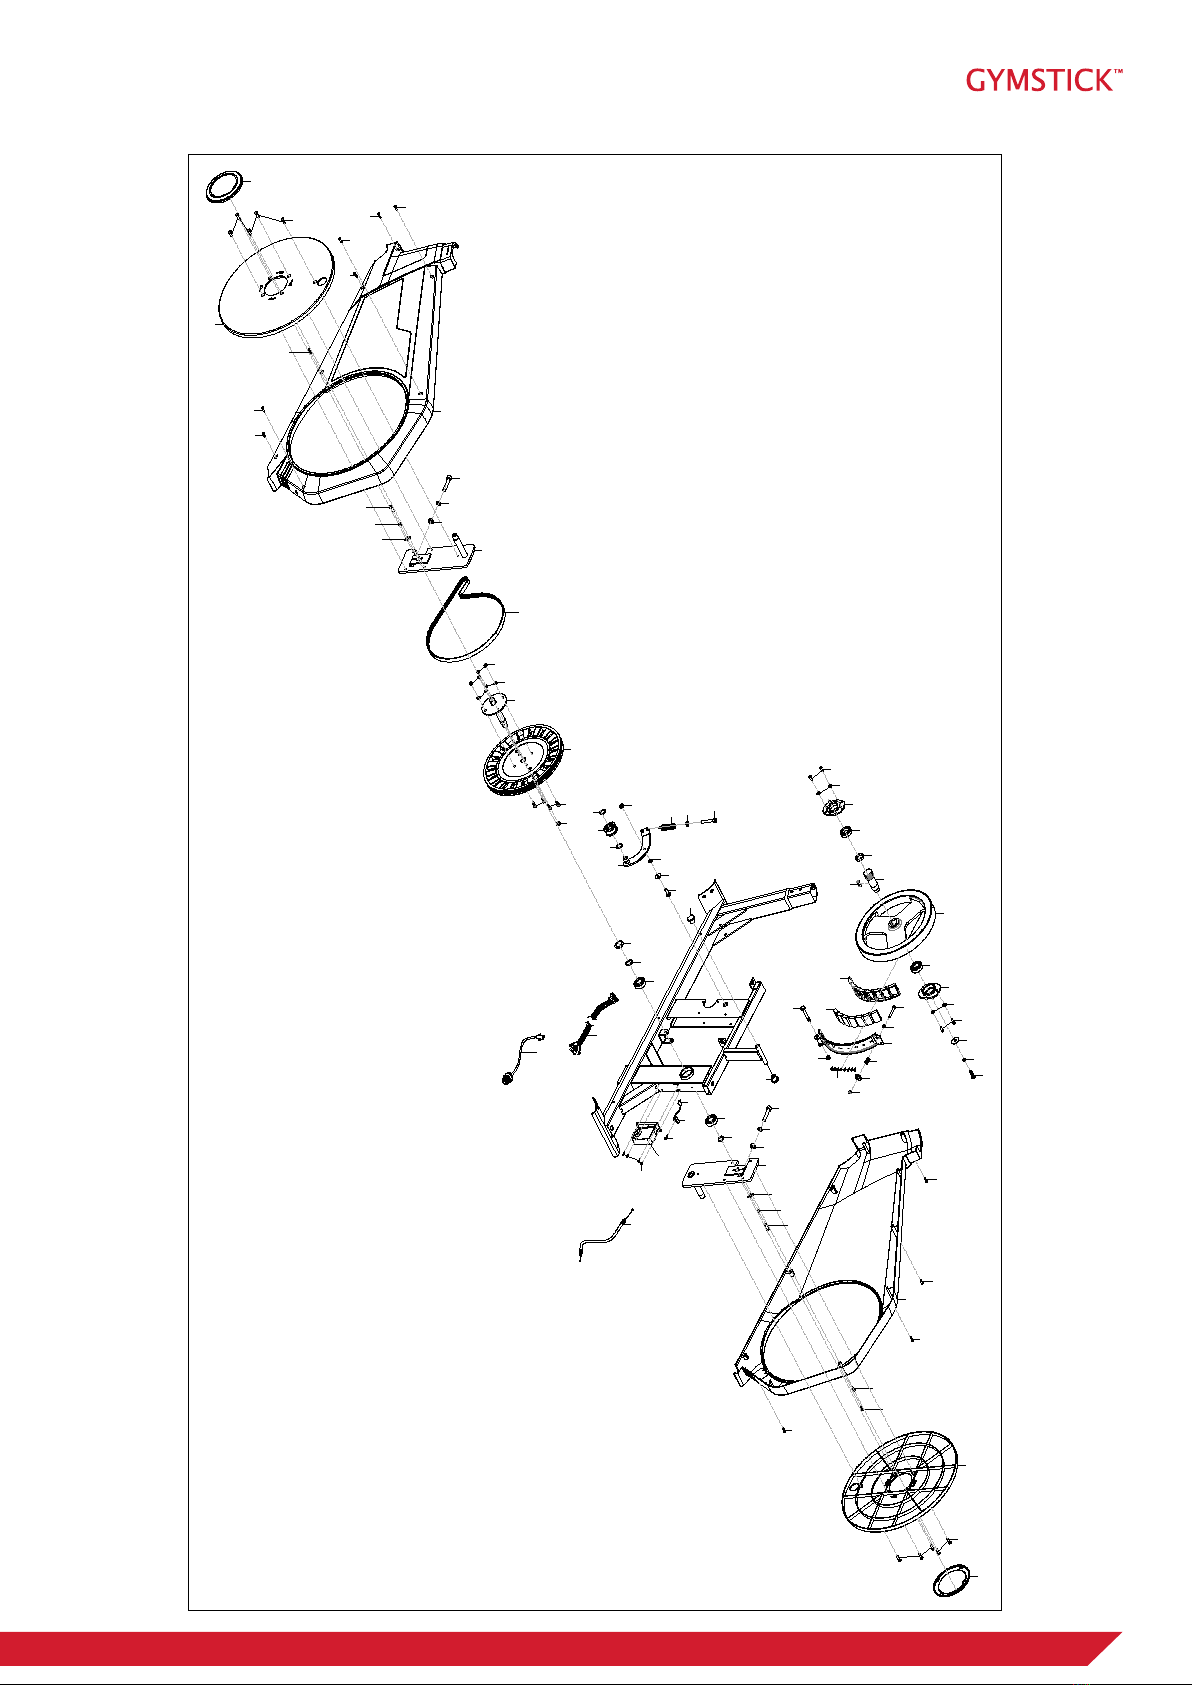
58
58
60
59
59
63L
63R
64
64
65
66 67
65 66 67
45
45
7
7
38
71
69
70
72 73
61
61
61
61
62
62
62
68
75
77
77 78
22
79
80
81
81
82
83
39
84
85
86
87
88
39
89
9899
9998
100
7
90
69
91
92
93
94
95
96
97
100
101
102
103
104
105
106
17
107
108
61
61
61 62
60
62
3817
62
88
76
38
74
22
109
110
112
EXPLODED DRAWING
6GX6.0 CROSSTRAINER
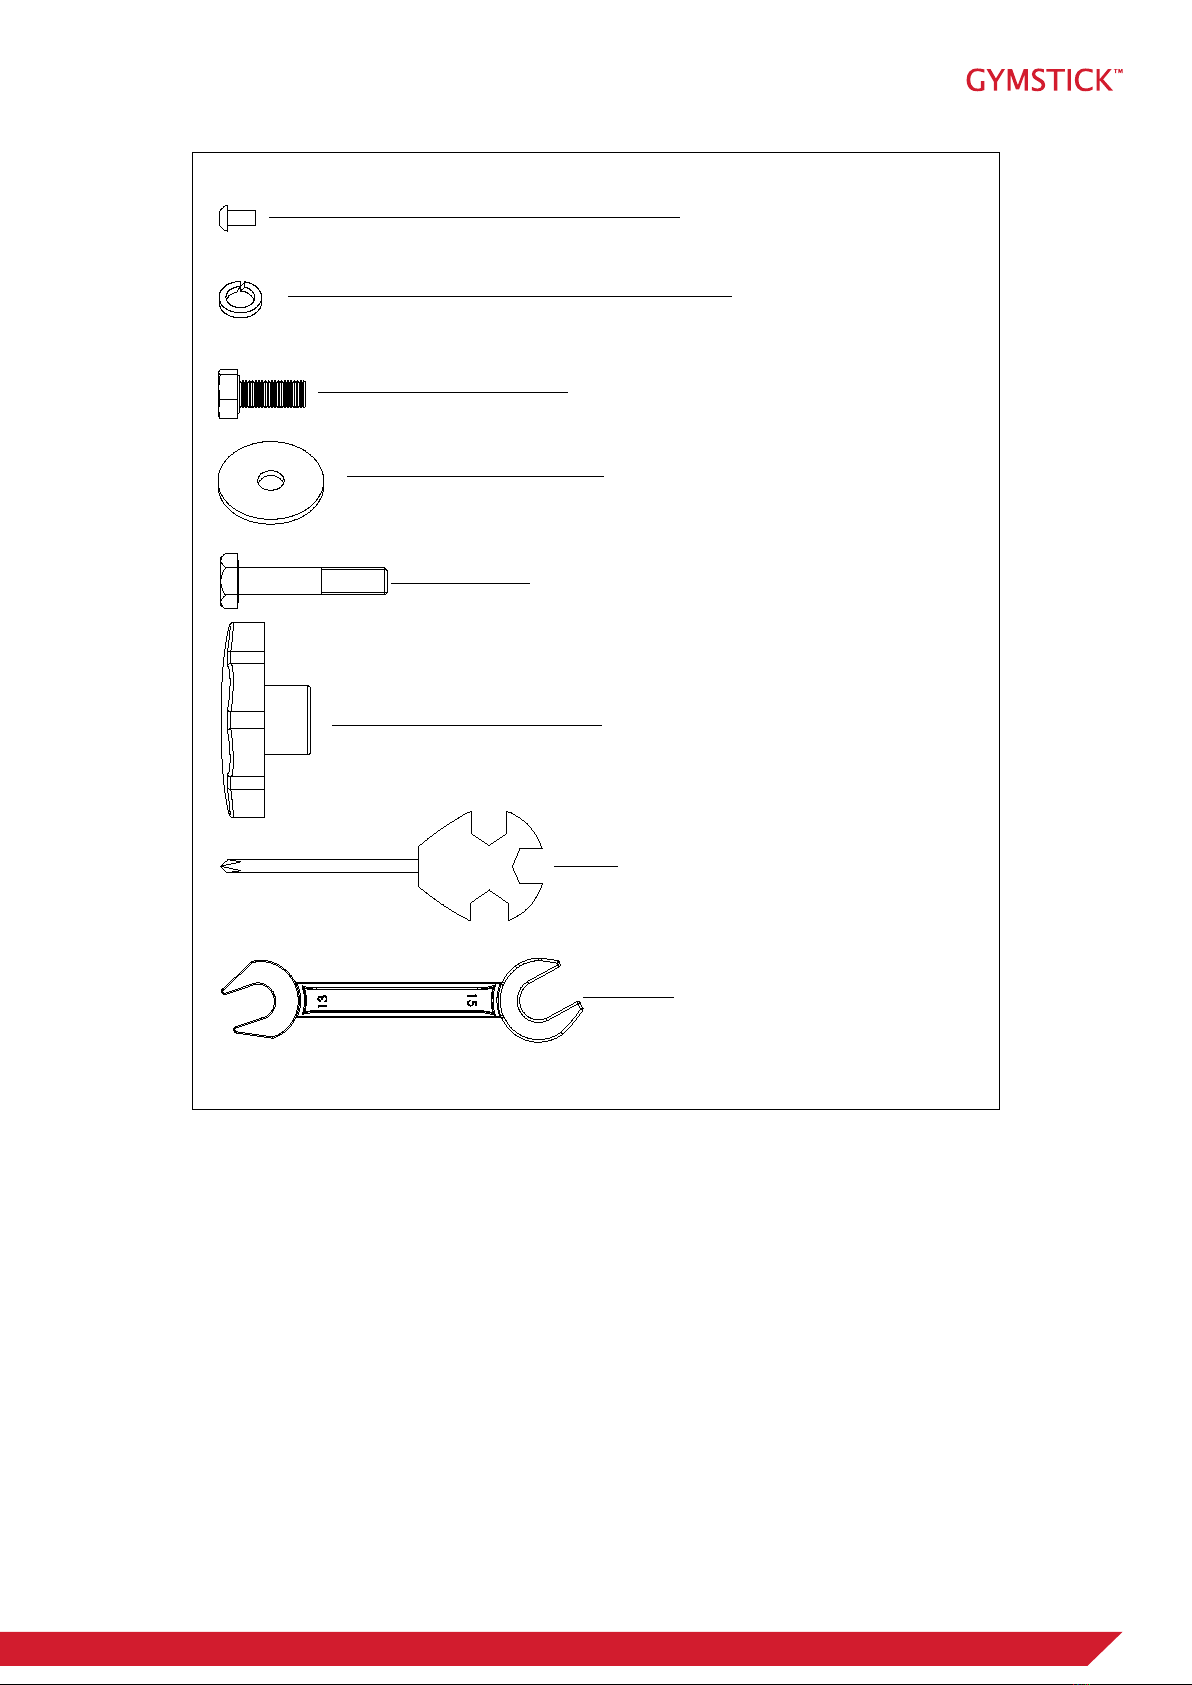
HARDWARE PACKAGE
#17 M8*20*S13 2PCS
#7 d8 2PCS
#25 d8*¦µ32*2 2PCS
#A S13-14-15 1PC
#40 M8*45*20*S14 4PCS
#42 M8*60*30 4PCS
#2 M5*10 4PCS
#B S13-15 1PC
7GX6.0 CROSSTRAINER
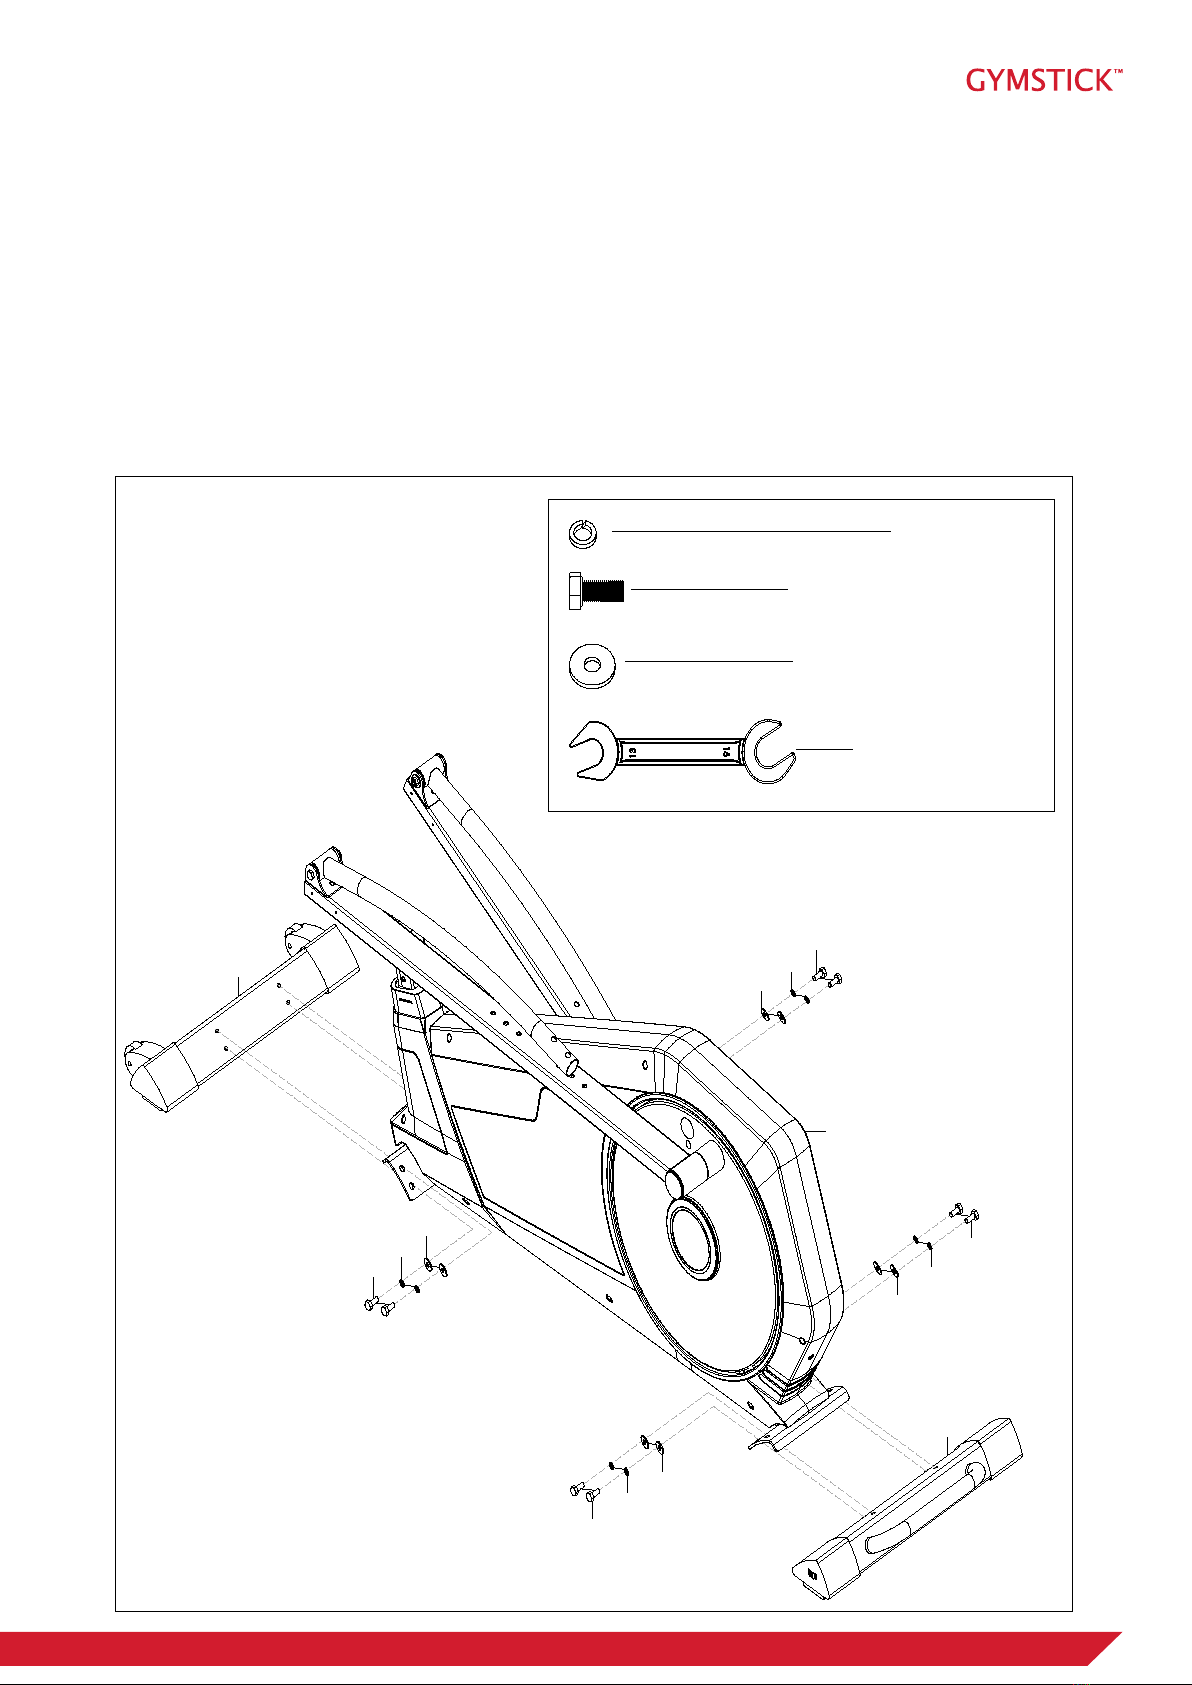
ASSEMBLY INSTRUCTION
38
7
38
7
17
17
7
7
38
38
17
17
#17 M8*20*S13 8PCS
#7 d8 8PCS
#38 d8*Φ22*2 8PCS
51
57
54
#B S13-15 1PC
STEP 1.
Remove Bolts (17), Spring Washers (7) and washers(38) from Front stabilizer (51) and rear stabilizer (57).
Attach Front stabilizer (51) and rear stabilizer (57). to Main Frame (54) with Bolts (17), Spring Washers (7)
and washers(38) that were removed by Wrench(B).
8GX6.0 CROSSTRAINER
ASSEMBLY INSTRUCTION
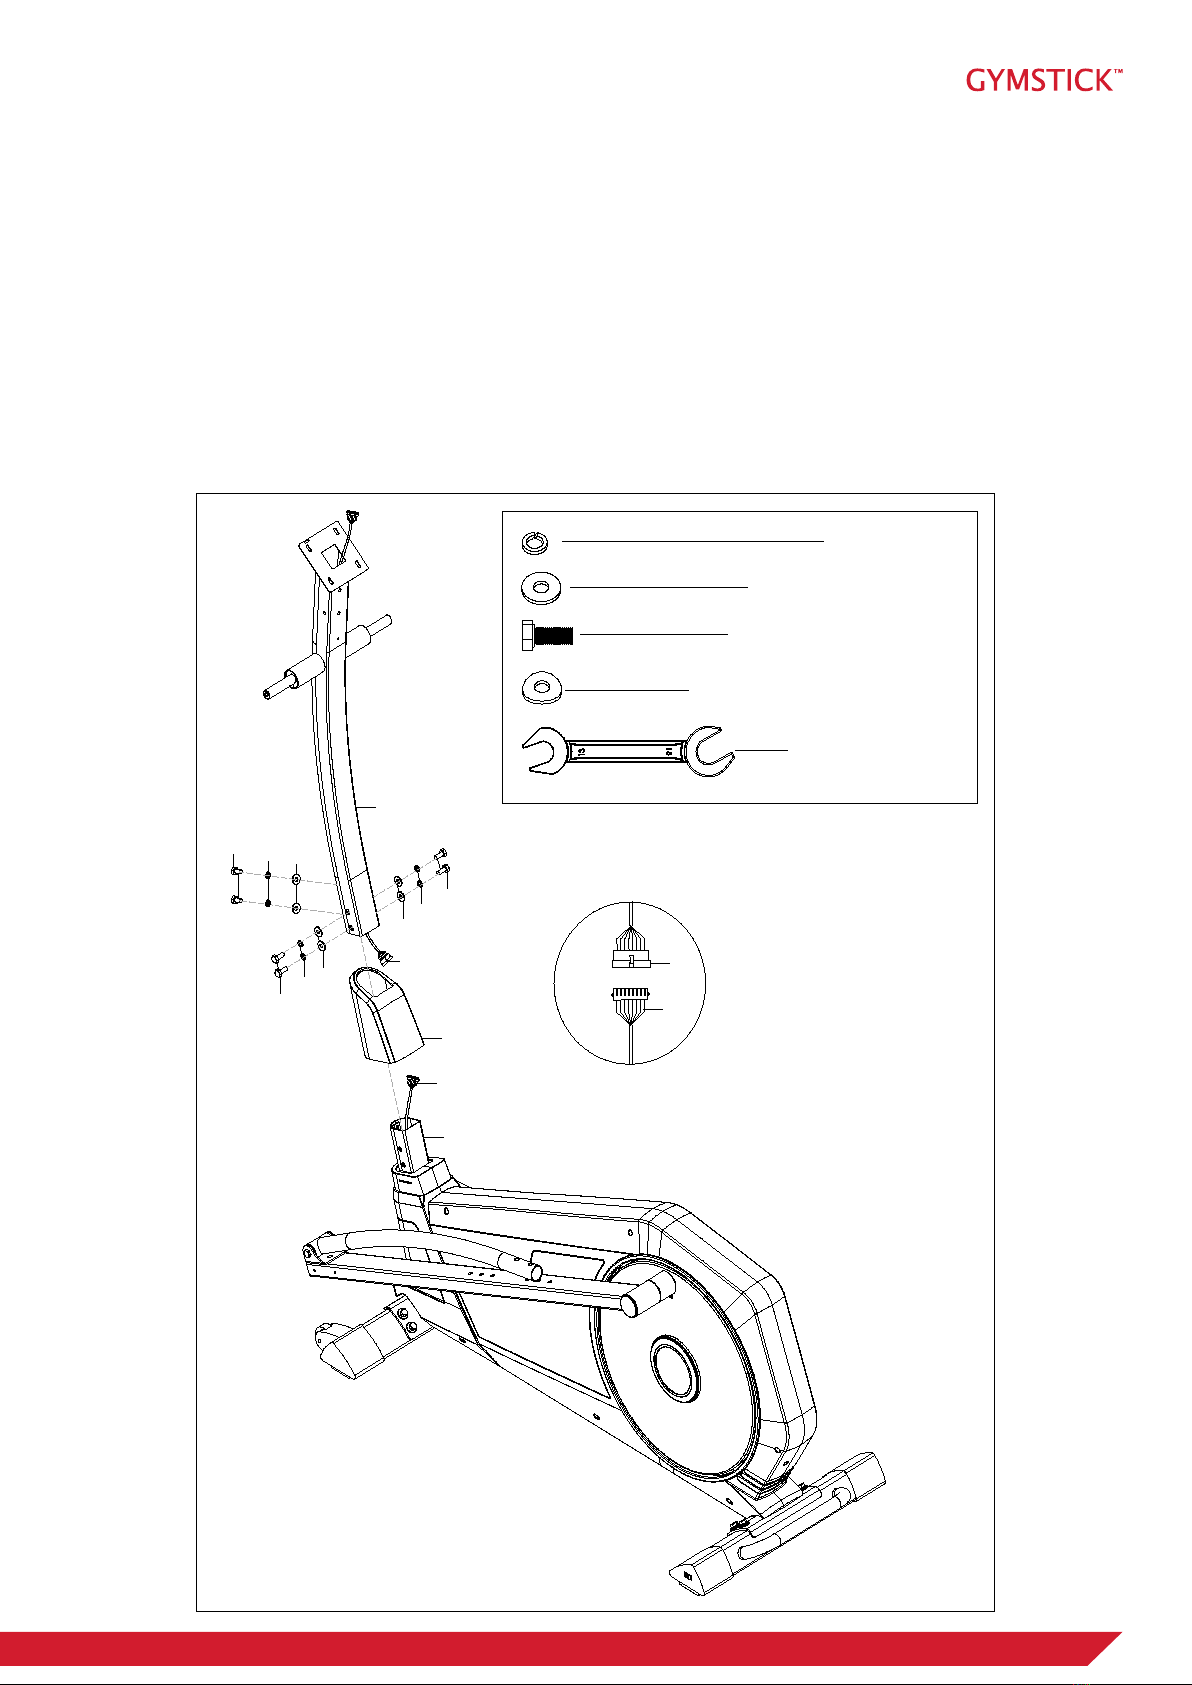
STEP 2.
Remove Bolts (17), Spring Washers (7), Arc washer(18) and Washers (8) from Main Frame (54) by
Wrench(B).
Insert front cover(53) to handlebar post(9).
Connect trunk wire 1 (10) with trunk wire 2(109) well.
Fix handlebar post(9) to Main Frame (54) with Bolts (17), Spring Washers (7), Arc washer(18) and Washers
(8) by Wrench(B).
17
17
17 7
7
78
8
18
53
54
9
#17 M8*20*S13 6PCS
#7 d8 6PCS
#8 d8*
Φ
20*2 4PCS
#18 d8*
Φ
20*2*R30 2PCS
10
109
109
10
#B S13-15 1PC
9GX6.0 CROSSTRAINER
ASSEMBLY INSTRUCTION
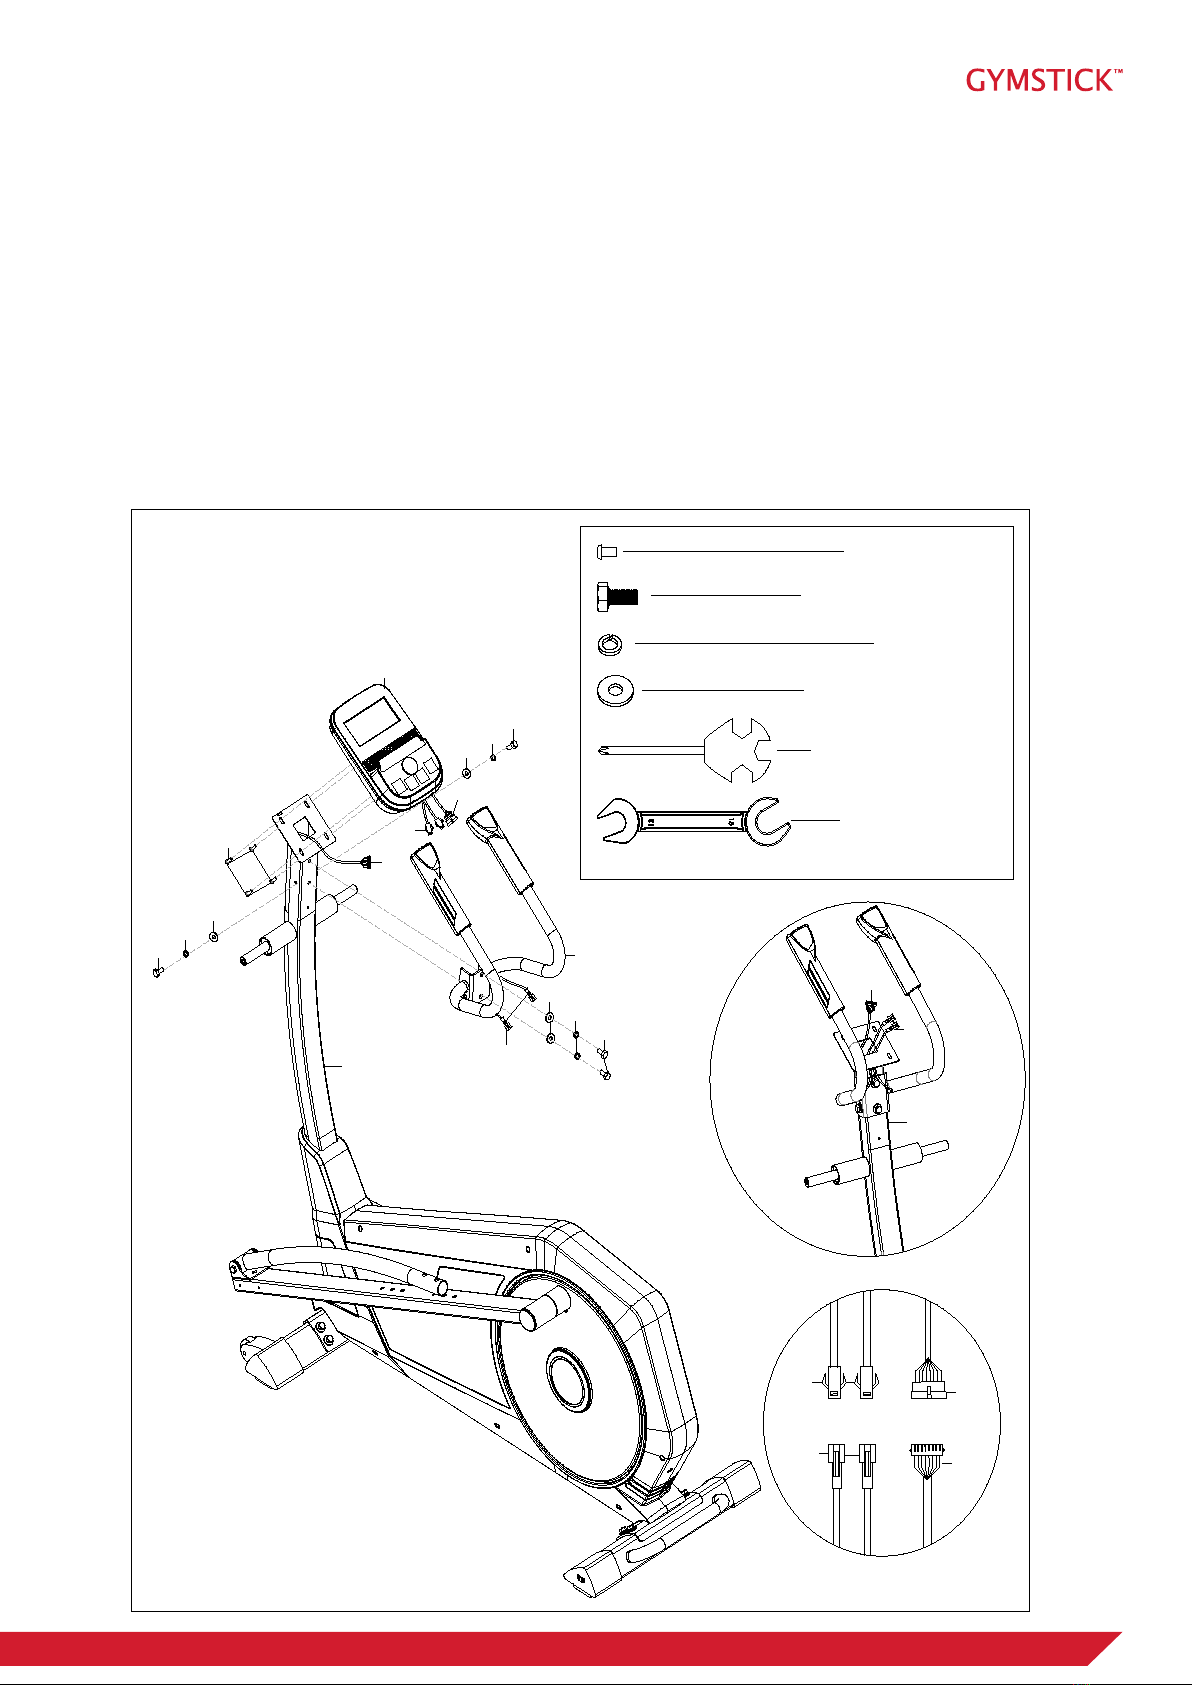
STEP 3.
Remove Bolts (6), spring Washers (7) and Washers (8) from handlebar post(9) by Wrench(B).
Fix Middle handlebar (15) to handlebar post(9) with Bolts (6), spring Washers (7) and Washers (8) by
Wrench(B). Remove Bolts (2) from computer(1) by Spanner(A).
Draw the handle pulse wire (16) through the hole of the handlebar post (9) and then connect it with
computer wire(1a) well, Connect trunk wire 1(10) with computer wire(1b) well.
Attach computer (1) to handlebar post(9) with bolts(2) by wrench(B).
#7 d8 4PCS
#A S13-14-15 1PC
6
7
8
15
#8 d8*
Φ
20*2 4PCS
#6 M8*16*S13 4PCS
1
21a
1b
10
16
9
#2 M5*10 4PCS
16
1a
10
1b
6
6
7
7
8
8
16
10
9
¢ñ
¢ò
#B S13-15 1PC
10GX6.0 CROSSTRAINER
ASSEMBLY INSTRUCTION
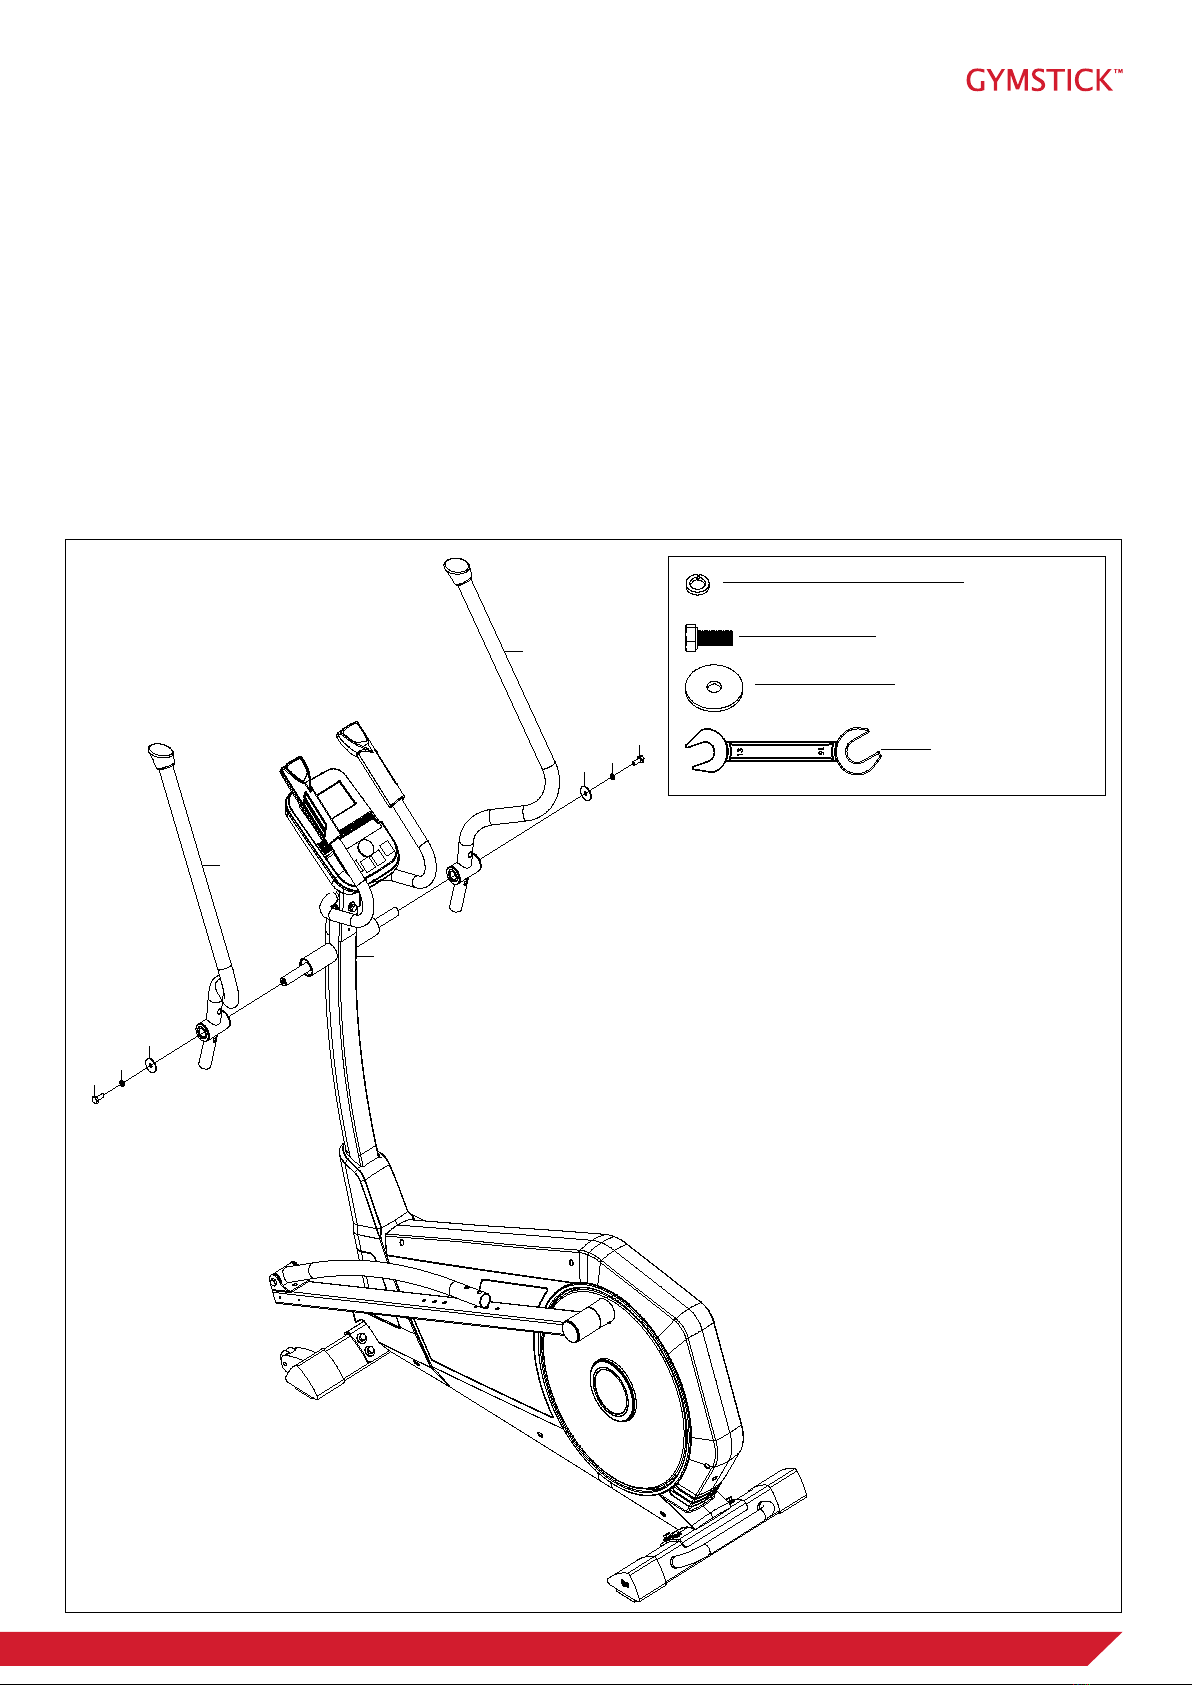
STEP 4.
Attach Handlebar(21L/R) to handlebar post(9) with Bolts (17), Spring Washers (7) and Washers (25) by
wrench(B).
Attach computer (1) to handlebar post(9) with bolts(2) by wrench(B).
17
17
7
7
25
25
21L
21R #17 M8*20*S13 2PCS
#7 d8 2PCS
#25 d8*
¦µ
32*2 2PCS
9
#B S13-15 1PC
Table of contents
Other Gymstick Elliptical Trainer manuals


Popular Elliptical Trainer manuals by other brands


Bonn Germany
Bonn Germany Concept 2.2 user manual

Precor
Precor Resolute RSL 620 Assembly guide

NordicTrack
NordicTrack E 9.2 Elliptical HASZNALATI UTASITAS

Vision Fitness
Vision Fitness X6600iNetTV Assembly guide

Matrix
Matrix MX-A5x owner's manual

SportsArt Fitness
SportsArt Fitness ECO-NATURAL Elite E874 owner's manual


