GLEELITE GL350BSWT User manual

GL350BSWT Moving Head Lighting
User manual
Thanks for choosing our goods please read this manual carefully before your operating

2
Contents
Introduction........................................................3
Dimensions.........................................................4
Safety Information..............................................5
Using for the first time........................................7
AC power............................................................8
Data link..............................................................8
Setup....................................................................9
Menu chart..........................................................10
DMX Protocol&Channel Function.....................14
Service and maintenance.....................................19
Cleaning..............................................................20

3
Introduction
350W Beam Spot Wash 3 in 1 Moving head light with CMY
Model:GL350BSWT
Moving Head Lighting
Voltage:AC100V-240V
50/60Hz Power
Consumption:500W Light
source:YODN R17 350W
Color Temperature:8000K
Beam Angle:1.5°- 35° linear fast zooming.
Focus:High precision optical lens,electronic linear control
Linear Dimmer:Mechanical dimmer 0-100%
CMY Color Wheel:Cyan+Magenta+Yellow color wheel with total 15 colors
Rotating Gobo Wheel:12 rotating gobos+White/,bi-directional rotatable and gobo
shaking at variable speeds
Static Gobo Wheel: 13 interchangeable gobos + effect gobo+ white, and
bi-directionally rotatable and gobo shaking at variable speeds
Prism:12+36facet circular prism rotating in both directions at variable speeds
Dimmer:0-100% linear dimmer
Strobe:1-18/second,double lens strobe with adjustable speed
Pan and Tilt: Smoothly,automatic Pan/Tilt position correction,speed adjustable
Range:Pan540°,Tilt 280°
Effect:Color+Gobo+Prism+Strobe automatic operation function
Cooling:Fan Cooling
Control mode:Standard DMX 512, 3 pin,5 pin connector
Channel mode:21/23/28 Channels
Display Interface:LCD screen both in Chinese and English
IP rate:IP20,Built-in overheat protection,triggered high voltage protection.
Net Weight:19KG
Gross Weight:23.5KG(Carton)
4
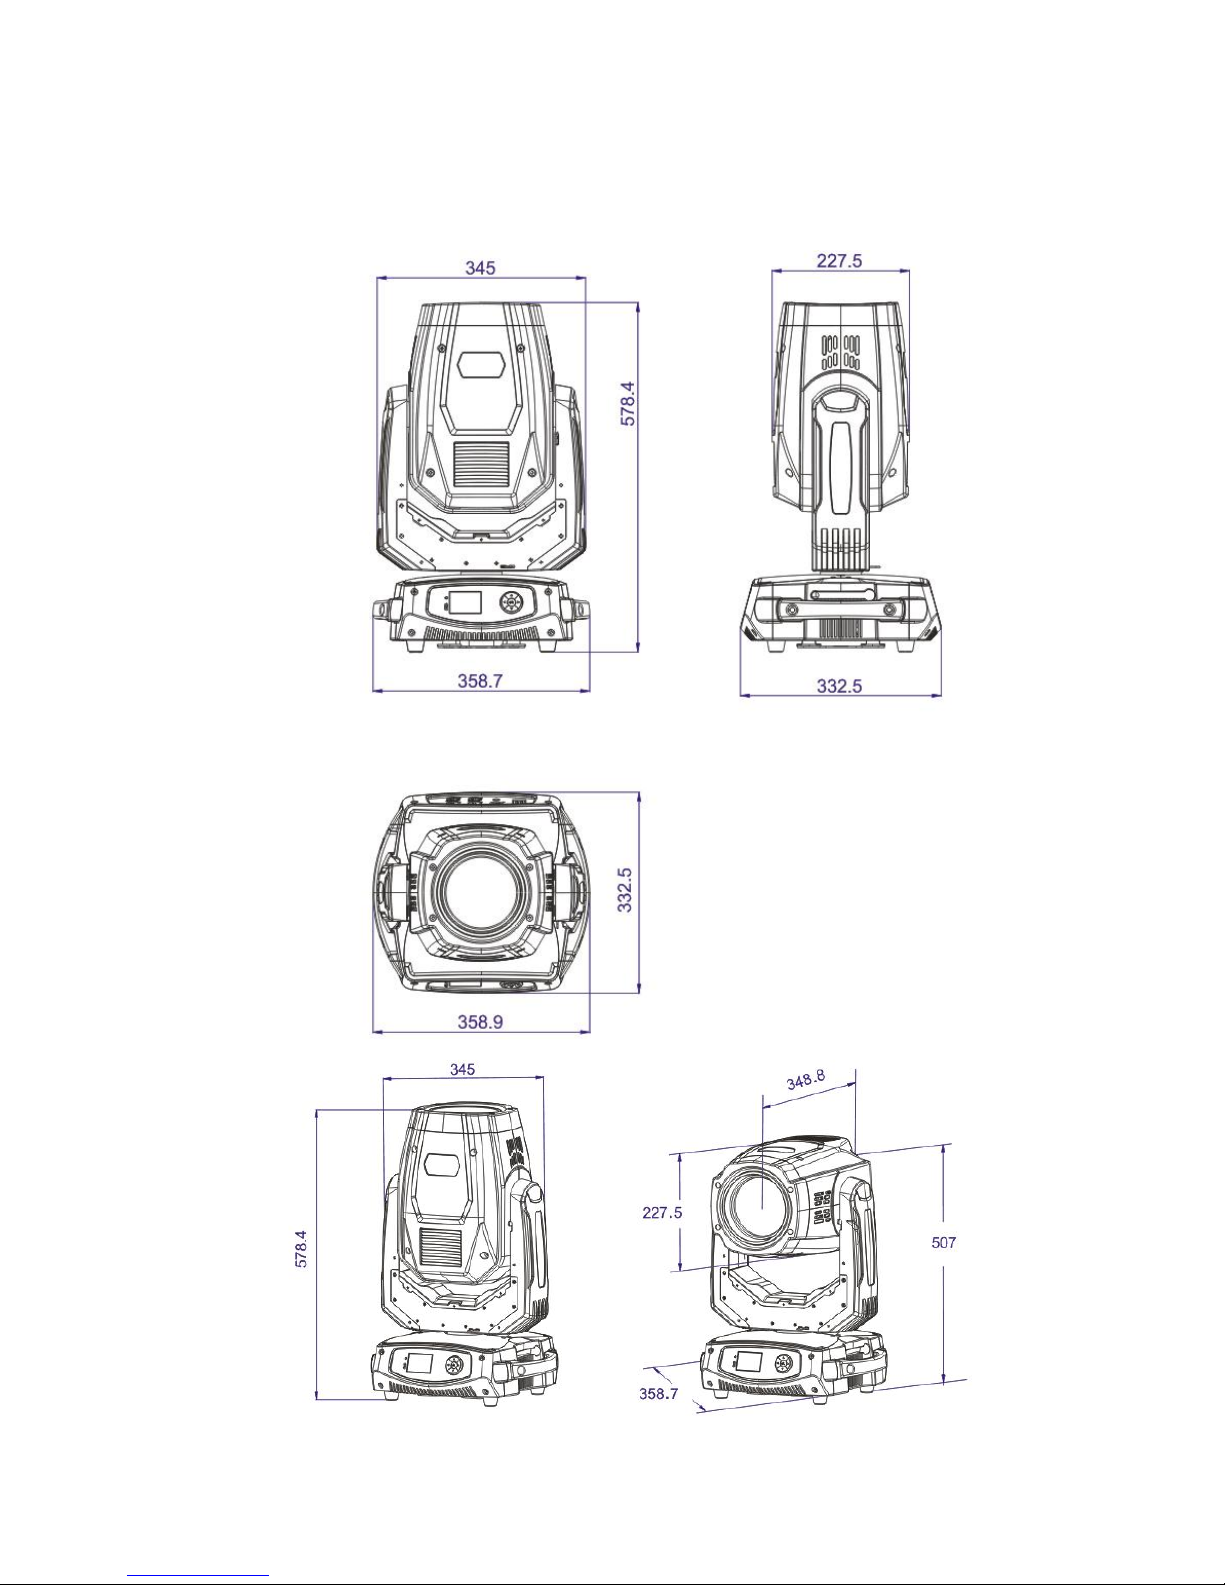
Dimensions

5
Safety Information
The following symbols are used to identify important safety information on the product and in this manual:
WARNING!
Read the safety precautions in this section before
installing, powering, operating or servicing this
product.
This product is for professional use only. It is not for household use.
!
DANGER!
Hazardous
voltage. Risk
of lethal or
severe electric
shock.
WARNING!
Burn hazard.
Hot surface.
Do not touch.
WARNING!
Refer to user
manual.
WARNING!
High brightness
light source,
With risk of
burned eyes.
Protection
from burn
and fire.
DANGER!
Safety hazard.
Risk of severe
injury or death.
WARNING!
Wear
protective
Eye wear.
Warning!
High brightness light source,don’t look at the light directly so that keep the risk of burned eyes
away.
This product is for professional use only. It is not for household use.
This product presents risks of severe injury or death due to fire and burn hazards, electric shock
and falls.
Read this manual before installing, powering or servicing the fixture, follow the safety precautions
listed below and observe all warnings in this manual and printed on the fixture.
If have any problem,please contact the supplier.

6
PROTECTION FROM ELECTRIC SHOCK
• Disconnect the fixture from AC power before removing or installing any cover or part and when not in
use.
• Always ground (earth) the fixture electrically.
• Use only a source of AC power that complies with local building and electrical codes and has both
overload and ground-fault (earth-fault) protection.
• Before using the fixture, check that all power distribution equipment and cables are in perfect condition
and rated for the current requirements of all connected devices.
• Power input and throughput cables must be rated 20 A minimum, have three conductors 1.5 mm²
(16 AWG) minimum conductor size and an outer cable diameter of 5 - 15 mm (0.2 - 0.6 in.). Cables must
be hard usage type (SJT or equivalent) and heat-resistant to 90° C (194° F) minimum. In the EU the cable
must be HAR approved or equivalent.
• Use only Neutrik Powercon NAC3FCA cable connectors to connect to power input sockets. Use only
Neutrik Powercon NAC3FCB cable connectors to connect to power throughput sockets.
• Isolate the fixture from power immediately if the power plug or any seal, cover, cable, or other
Component is damaged, defective, deformed, wet or showing signs of overheating. Do not reapply
power until repairs have been completed.
• Do not expose the fixture to rain or moisture.
PROTECTION FROM BURNS AND FIRE
• Do not operate the fixture if the ambient temperature (Ta) exceeds 40° C (104° F).
• The exterior of the fixture becomes hot during use. Avoid contact by persons and materials. Allow
the fixture to cool for at least 10 minutes before handling.
• Keep all combustible materials (e.g. fabric, wood, paper) at least 100 mm (3.9 in.) away from the
fixture.
• Keep flammable materials well away from the fixture.
• Ensure that there is free and unobstructed airflow around the fixture.
• Do not expose the front glass to sunlight or other strong light sources from any angle.
• Do not illuminate surfaces within 200 mm (7.9 ins.) of the GL350BSWT
• Do not attempt to bypass thermostatic switches or fuses.
• Do not stick filters, masks or other materials onto any optical component.
• Do not modify the fixture in any way not described in this manual

7
Using for the first time
PROTECTION FROM INJURY
•When light up the fixture,please don’t look at the optical lens with eyes directly.Besides, don’t use the
camera light to point at the optical lens.
• Fasten the fixture securely to a fixed surface or structure when in use. The fixture is not portable when
installed.
• Ensure that any supporting structure and/or hardware used can hold at least 10 times the weight of all
the devices they support.
• Allow enough clearance around the head to ensure that it cannot collide with an object or another
fixture when it moves.
• Check that all external covers and rigging hardware are securely fastened.
• Block access below the work area and work from a stable platform whenever installing, servicing or
moving the fixture.
• Do not operate the fixture with missing or damaged covers, shields or any optical component.
Important!
After unpacking,please check the goods damage or not,which due to the transportation. If you
find damage, please do not use this item, then contact the dealer or manufacturer as soon as
possible.
•Please read the “Safety Information”before using the fixture.
• Check that the local AC mains power source is within the fixture’s power voltage and
frequency ranges.
•Please make sure the fixture use in “Safety Information” term.

8
AC power
Power voltage
Data link
Warning! Read “Safety Information” starting on page 5 before connecting the GL350BSWT
to AC mains power.
Warning! For protection from electric shock, the GL350BSWT must be grounded (earthed).
The power distribution circuit must be equipped with a fuse or circuit breaker and
ground-fault (earth-fault) protection.
Warning! Socket outlets or external power switches used to supply the GL350BSWT with
power must be located near the fixture and easily accessible so that the fixtures can easily
be disconnected from power.
Important! Do not insert or remove live Neutrik PowerCon connectors to apply or cut
power, as this may cause arcing at the terminals and damage the connectors.
Important! Do not use an external dimming system to supply power to the GL350BSWT as
this may cause damage to the fixture that is not covered by the product warranty.
Warning! Check that the voltage range specified on the fixture’s serial number label matches the
local AC mains power voltage before applying power to the fixture.
GL350BSWT fixtures accept AC mains power at 100-240 V nominal, 50/60 Hz. Do not apply AC mains
power to the fixture at any other voltage than that specified on the fixture’s serial number label.
A DMX 512 data link is required in order to control a GL350BSWT via DMX.
The GL350BSWT has 5-pin XLR connectors for DMX data input and output. The pin-out on all connectors is
pin 1 = shield, pin 2 = cold (-), and pin 3 = hot (+). Pins 4 and 5 in the 5-pin XLR connectors are not used in
the GL350BSWT but are available for possible additional data signals as required by the DMX512-A
standard.
Standard pin-out is pin 4 = data 2 cold (-) and pin 5 = data 2 hot (+).
The number of fixtures is either limited to 256 or limited by the number of DMX channels required by the
fixtures in relation to the maximum 512 channels available in one DMX universe, whichever limit is lower.
Note that if independent control of a fixture is required, it must have its own DMX channels.
Fixtures that are required to behave identically can share the same DMX channels.
To add more fixtures or groups

9
Connecting the data link
When the GL350BSWT turned on , the display screen and key
button get flash in every second once the fixture without the DMX
signal.When insert DMX signal,the display screen and key button
stop flashing, it stand for run into the DMX control mode. 20 seconds
later,the display will be in power save mode and the the key button
indicator turn off.
Setup
Control panel and menu navigation
350W 17R BSW+CMY control center to set the DMX.
When you choose a menu press OK , or view menus.
After finding your menu, Press to enter OK ,quit
After out of menu,press to see the working condition.
Connecting the data link
To connect the GL350BSWT to data:
1. Connect the DMX data output from the controller to the closest
GL350BSWT male 5/3-pin XLR DMX input connector.
2. Connect the DMX output of the fixture closest to the controller to the DMX
input of the next fixture and
continue connecting fixtures output to input.
3. Terminate the last fixture on the link with a 120 Ohm resistor.
10
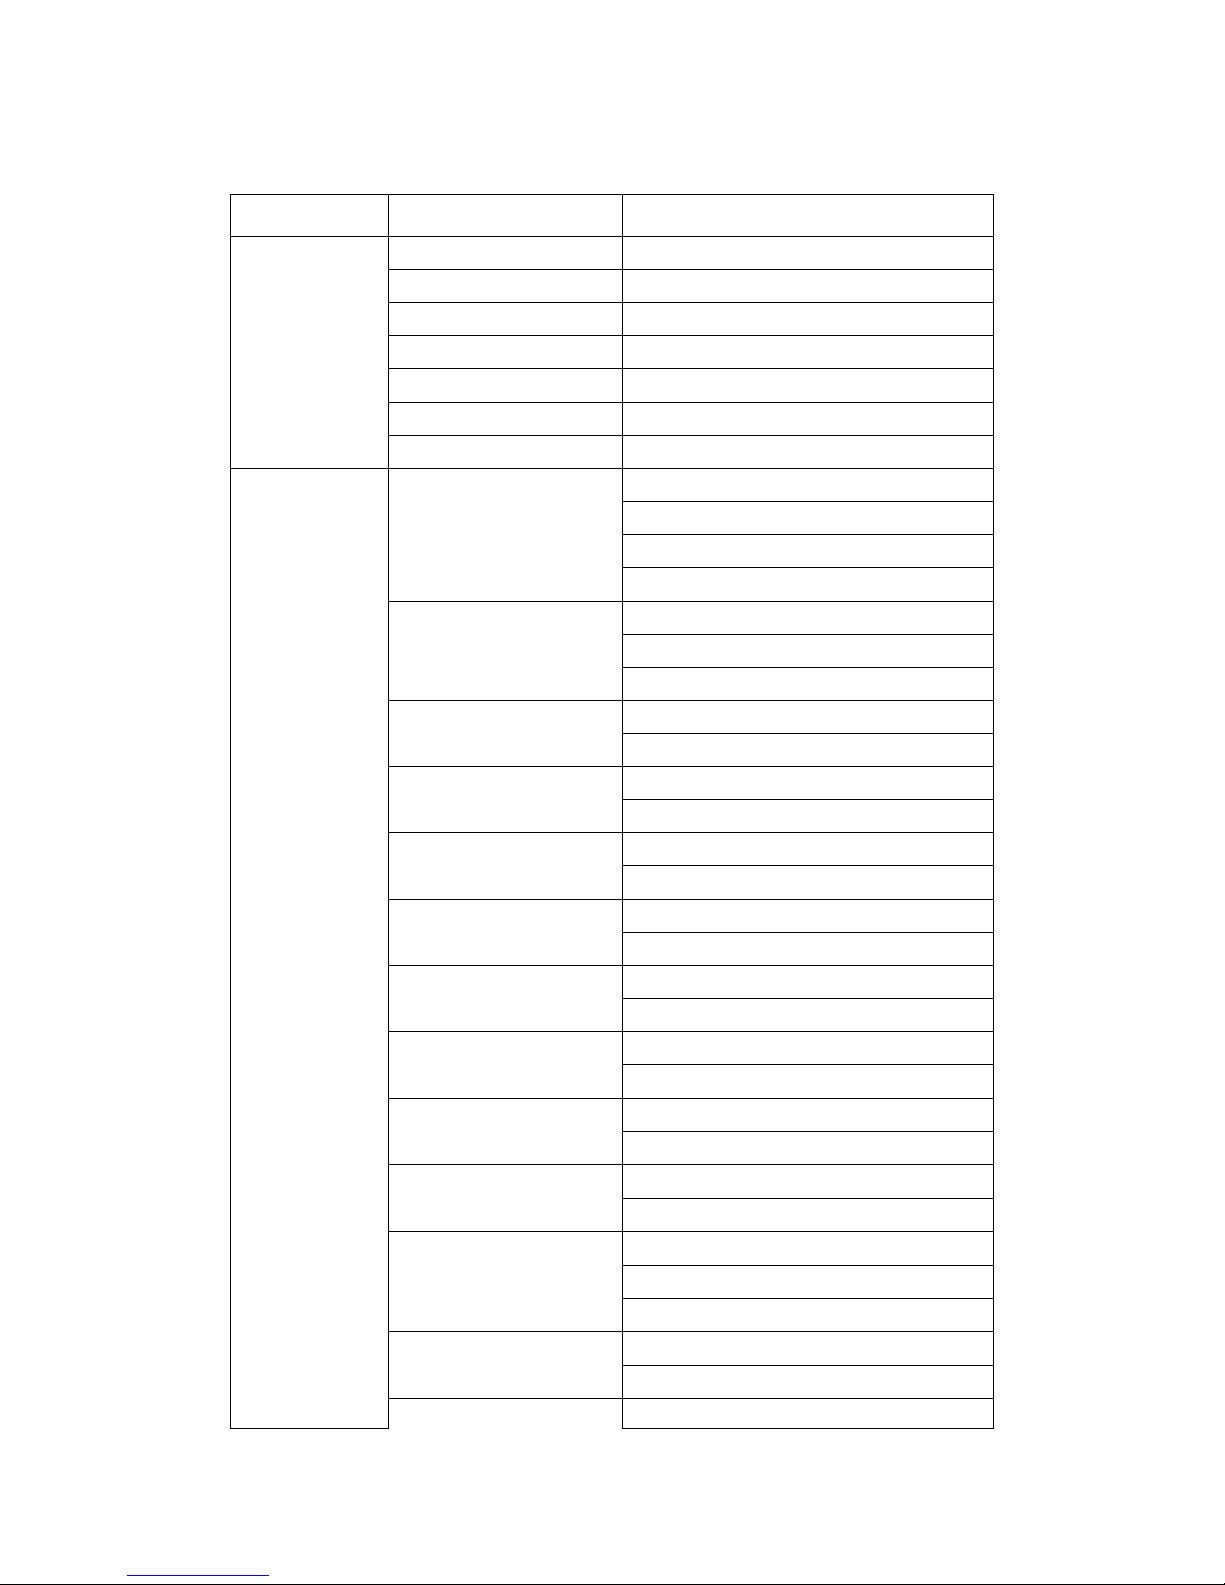
Menu chart:
Main Menu
Sub Menu
Setting
Signal
Add
re
ss
000-512
Velocity
000-255
Data Pack
000-512
Quality
000% - 100%
Start Up
000-255
Static ID
0000-9999
Return
►
Special
Channel Mode
21C
H
23C
H
28C
H
definition
Run
M
od
e
DMX
Sound
Auto
Dmx
L
amp
Off
O
p
e
n
Lamp Default
Off
O
p
e
n
Lamp Control
Off
O
p
e
n
Signal Clear
Off
O
p
e
n
DMX R
e
set
Off
O
p
e
n
Execute Reset
Cancel
E
x
ecute
X reverse
Off
O
p
e
n
Y reverse
Off
O
p
e
n
XY Sp
ee
d
F
ast
Normal
Slow
XY Fback
Off
O
p
e
n
DMX Set up
off
Table of contents
Other GLEELITE Dj Equipment manuals


