GILMAN PC900BTNL User manual

USER MANUAL
用戶手冊
PC900BTNL

2

3
Dear Customer
Thank you for buying our range hood. Please read the user manual
carefully and store in a handy place for later reference.
This hood is designed for install on walls.
Read the following carefully to avoid damage or injury.
SAFETY AND WARNINGS
●Where applicable, this appliance is supplied with fixings. Please
ensure you use the correct fixings suitable for the substrate where
the appliance will be installed and that they are able to support
the weight of the appliance.
●Before connecting the hood, check that the supplied voltage and
frequency match with that indicated on the appliance rating plate.
If in doubt, ask for advice instore or from a qualified installer..
●If the supply cord is damaged, it must be replaced by the
manufacturer, its service agent or similarly qualified persons in
order to avoid a safety hazard.
●Use only the same size of fittings and mounting screws as
recommended in this instruction manual. Failure to follow these
instructions may result in electrical hazards.
●Means for full disconnection must be incorporated in the fixed
wiring in accordance with the local wiring installation rules for
your country. An all-pole disconnection switch having a contact
separation of at least 3mm in all poles should be connected
during installation.
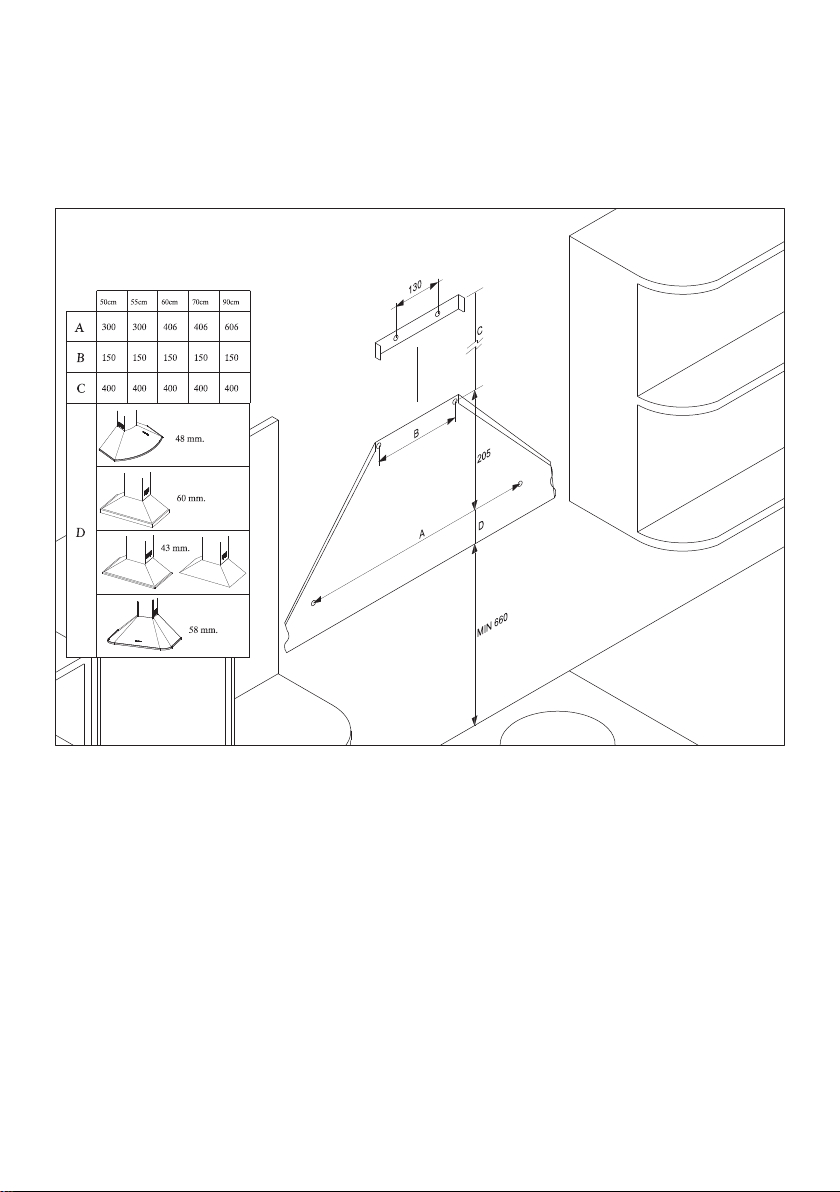
●When the cooker hood is located above an appliance, the
minimum distance between the supporting surface for the cooking
vessels on the hob and the lowest part of the hood shall be at
least 660mm.
●Consult local regulations regarding extraction outlets and ensure
these are complied with. Do not connect the hood to a ventilation
EN

4
or hot air duct containing combustion fumes from burning gas or
other fuels. Confirm that room ventilation is appropriate with the
local authorities.
●The air must not be discharged into a flue that is used for
exhausting fumes from appliances burning gas or other fuels
●The hood may stop working during an electrostatic discharge
(e.g. lightning). This involves no risk of damage. Switch off the
electricity supply to the hood and reconnect after one minute.
●This appliance can be used by children aged from 8 years and
above and persons with reduced physical, sensory or mental
capabilities or lack of experience and knowledge if they have
been given supervision or instruction concerning use of the
appliance in a safe way and understand the hazards involved.
Children shall not play with the appliance. Cleaning and user
maintenance shall not be made by children without supervision.
●This appliance is not intended for use by persons (including
children) with reduced physical, sensory or mental capabilities, or
lack of experience and knowledge, unless they have been given
supervision or instruction concerning use of the appliance by a
person responsible for their safety.
●Children should be supervised to ensure that they do not play
with the appliance.
●Do not install the appliance outdoors in a damp place or in an
area which may be prone to water leaks such as under or near a
sink unit. In the event of a water leak affecting the appliance, do
not use and contact customer services to arrange for inspection.
Do not use flammable sprays in close vicinity to the appliance.●
●Please dispose of the packing material carefully. There is a
fire risk if cleaning is not carried out in accordance with the
instructions. Refer to the Care and Maintenance sections carefully
for details on how to clean and replace the aluminium and carbon
filters (if fitted).
●Refer to the Care and Maintenance section for details on the type
of lamps that can be used and how to replace them.
●Do not use a steam cleaner for care and maintenance.
●The appliance is not intended to be operated by means of an

5
external timer or separate remote control system.
●There shall be adequate ventilation of the room when the hood is
used at the same time as appliances burning gas or other fuels.
Ensure that the negative pressure of the installation site does not
exceed 4 Pa (0.04 mbar) to ensure combustion fumes are not
drawn back into the room.
●Do not use the hood if it shows signs of damage or imperfection.
Contact customer services for assistance.
Switch off the appliance at the mains supply before carrying out●
any maintenance work or cleaning.
●CAUTION: Accessible parts may become hot when used with
cooking appliances.
●Do not flambe under the hood. To avoid the risk of fire, clean
or replace the grease filter regularly and closely monitor pans
containing hot oil.
●The manufacturer declines all liability for personal or material
damage as a result of misuse or incorrect installation of this
appliance.
●The appliance is for domestic use only as an extractor hood.
INSTALLATION INSTRUCTIONS
All installation must be carried out by a competent person or
qualified electrician. Before connecting the mains supply ensure that
the mains voltage corresponds to the voltage on the rating plate.
The appliance must be connected directly to the mains using an
omnipolar circuit breaker with a minimum opening of 3mm between
the contacts.
The installer must ensure that the correct electrical connection has
been made and that it complies with the wiring diagram.
Regularly check the power plug and power cord for damage. If the
supply cord is damaged, it must be replaced by a special cord or
assembly available from the manufacturer or its service agent.
WARNING: This is a Class II appliance and MUST NOT be
earthed.

6
Contents of packaging
Rangehood
(1)
Ø120mm
Ducting adapter
(1)
Chimney (Upper+lower)
(1)
Upper chimney bracket
(1)
Chimney bracket
(1)
Ø6 x 30mm
Expansion plug
(8)
ST3.9 x 32mm
Screws
(8)
ST3.9 x 13mm
Screws
(4)

7
INSTALLATION
Positioning
660mm
top of cooking
surface
Fixing dimensions
WARNING!
these instructions may result in electrical hazards.
222
167
23
600/700/900
235
450
Min. 725 \ Max. 1025

8
●Mark the location for flue cover wall mounting brackets, rangehood
mounting points and anti-tilt fixing points above the rangehood
using the base as the reference point (Fig. 1).
Drilling holes
Fig.1
●Attach the upper hood mounting screws in the locations shown
in Fig.2. Use the ST3.9 x 32 screws and expansion plugs if
attaching to masonry.
Attach chimney brackets and hood mounting screws

9
●Remove the aluminium filters from the rangehood body and hang
it on the ST3.9 x 32mm screws then secure at the anti-tilt locations
as indicated in Fig. 3.
Attached hood on wall
2mm
Fig.2
Fig.3
Screws
ST3.9 x 32mm

10
●Connect Ø120mm ducting adapter to the blower outlet and use
ST3.9 x 13mm screws to fix it to the range hood (Fig. 4).
Connect ducting adapter
Fig.4
●If need exhaust air to the outside.
Connect Ø125 mm flexible duct to
the adapter and fix it (Fig. 5).
Fixing flexible duct
Fig.5
Screws ST3.9 x 13mm
Ø120mm
Ducting adapter
Table of contents