
GEM equinox User manual

Operating instructions
English
Vocal Processor

○○○○○○○○○○○○○○○○○○○○○○
Contents
VOCAL PROCESSOR
About the Vocal Processor 1
The new features offered by the Vocal Processor 1
Loading the Operating System 2
Connections 3
Activate the Mic interface and the Vocal Processor 4
Adjust the Gain 5
Understanding the Vocal Processor 6
Example 6
The Vocal Processor settings 7
Setting the Voices 7
Setting the Harmony Master Volume 8
Lock (F1) 9
The EDIT button, F4 9
Vocoder, (F1) 9
Unison (F2) 9
The Edit parameters 10
The Microphone Equalizer 11
Singing or playing through the Mic/Line inputs 12
V.P. functions assignable to the Pedals 13
Special Midi Controllers associated to the V.P. 13
Loading MIDI Files containing a Vocoder track 13

○○ ○○○○○○○○○○○○○○○○○○○○○○○○○○○○
Introduction 1
VocalProcessor
AbouttheVocalProcessor
Installing the Vocal Processor kit activates Equinox’s Mic/
Line interface, allowing you to sing and play instruments
through the instrument’s pre-amp, process the mic or line
signals with the internal Digital Effects Processors and di-
rect the processed signals to the stereo and mono out-
puts. In addition, the Vocal Processor feature allows you
to add vocal harmonies to your live singing, so that you
can play and record songs with your own harmonized vo-
cal backings.
You can easily upgrade your Equinox with the Mic/Line
and Vocal Processor features by installing the optional Vo-
cal Processor card and loading the new Operating System
software from disk.
Thenewfeaturesofferedbythe VocalProcessor
1. Vocal harmonies can be added to your voice according
to various preset configurations.
2. The signals input at the Mic/Line 1 and 2 jacks can be
independently processed by Equinox’s internal Digital
Effects Processors and directed to the outputs.
3. A microphone Equalizer is available to process the mi-
crophone signal at the Mic/Line 1 input.
4. New functions assignable to the Pedals are available
to control the Mic/Line and Vocal Processor. New MIDI
Controllers have also been implemented to control the
additional features via MIDI.
IMPORTANT: The new Op-
erating System updates the
instrument’s Flash Rom with
the new Vocal Processor
function, but it is indispensa-
ble that you install the Vocal
Processor card into your
Equinox to render the Vocal
Processor operative.

○○ ○○○○○○○○○○○○
2 Vocal Processor
LoadingtheOperatingSystem
The new Operating System upgrade rewrites the instru-
ment’sFlashROMmemory, therefore, before updating the
instrument, be sure to save all user-programmed data
(Songs, Performances, Grooves, Drawbars, etc.) to disk
or hard disk. If your instrument is installed with a SCSI
interface, you can save any user programmed data to an
external SCSI device.
STEP 1
With the instrument turned OFF, insert the Generalmusic
Operating System disk into the disk drive. After you have
inserted the disk, turn the instrument ON.
STEP 2
You will see a message in the instrument display screen
that says:
Loading OS-DISK clears ALL MEMORY!!
<Enter to Load/Escape to abort>
Press ENTER and wait about 3 minutes for the new Oper-
ating System to load. When the new system has finished
loading, you will see the following message in the instru-
ment display screen:
Loading Successful!! <Enter to continue>
At this time, Press ENTER again and the instrument will
proceedthroughthenormaloperatingdisplayscreens. You
can now Turn OFF the instrument in preparation for the
final step explained below.
IMPORTANT: REMOVE THE OPERATING SYSTEM DISK
BEFORE PROCEEDING TO THE FINAL STEP!
FINAL STEP
As you turn the instrument ON, KEEP ROTATING THE
DIAL until the following message appears in your dis-
play screen:
!!WARNING!! Dial on Power-Up Requests
Memory Clear!! <Enter to clear/Escape to abort>
Press ENTER. You have now completed the update proc-
ess, and your Equinox has been permanently upgraded.

○○ ○○○○○○○○○○○○○○○○○○○○○○○○○○○○
Introduction 3
Connections
To work with the Vocal Processor, the minimum amount of
equipment you will need is:
1. A low impedance microphone with a standard jack
connector on the other end of the cable.
2. An amplification system (domestic hi-fi unit, ampli-
fied speakers, mixer, etc.).
3.Although not essential, you can also use one or both
types of optional control pedals to control the Mic/Line
andVocal Processorfeatures:aswitch-actionpedaland
a Continous control pedal.
Microphone: to add vocal harmonies to our voice, con-
nect the Microphone to the MIC/LINE 1 jack.
Note: The Mic/Line 2 jack can also accept a microphone,
but this jack is not enabled for the Vocal Processor fea-
tures. You can sing (or play an instrument) through the
Mic/Line 2 input, process the signals with Equinox’s inter-
nalDigital EffectsProcessors anddirect theprocessed sig-
nals to the outputs.
Switch and/or Continuous Pedals: plug the pedals into
the PEDAL 1 or 2 or DAMPER jacks, program the jacks
appropriately for a Continuous or Switch action pedal and
assign the new Vocal Processor functions to the pedal(s)
accordingly (Vocal Volume, Vocal On/Off).

○○ ○○○○○○○○○○○○
4 Vocal Processor
ActivatetheMicinterfaceandtheVocalProcessor
Afterloadingthenewoperatingsystemandconnectingyour
microphone to the Mic/Line 1 jack, the first thing to do is to
activate the Mic/Line interface and the Vocal Processor.
PresstheSYSTEMbutton then go intotheMASTER menu,
(F3).
Nowpressthe MIC/LINE button, (F2)to open the MIC/LINE
INPUTS screen.
Here,you can enable both the Mic/Line interface (Mic/Line
= ON) and the Vocal Processor (Vocal Proc. = ON):
Mic/Line=On VocalProcessor=On
WiththeMic/LineinterfaceOn, you can sing orplaythrough
the instrument’s pre-amp, process the mic or line signal
with Equinox’s internal effects processors and send the
processed signal to the audio outputs.
With the Vocal Processor On, you can sing into a micro-
phone and add vocal harmonies to your playing.

○○ ○○○○○○○○○○○○○○○○○○○○○○○○○○○○
Vocal Processor 5
Adjustthe Gain
The next step is to regulate the level of the microphone (or
line) signal. With the front panel INPUT slider set to about
the half-way mark, speak into the microphone and adjust
the signal gain (impedance) with the rear-panel GAIN 1
control by turning in a clockwise rotation.
The GAIN 1 level is monitored by the In1 bar graph at the
top of the display.
Settinga too high Gain produces “clipping”, a signal distor-
tion which appears in the bar graph as shown below.
Clipping can be eliminated by adjusting the Gain to obtain
a “clean” mic signal without distortion. The screen should
show something like this, even if you shout into the mic:
Once you have set your Gain to the correct level, you’re
ready to sing or play through the Equinox and/or use the
Vocal Processor features.
If you’re going to sing or play through the Equinox, you
can regulate some of the parameters which intervene on
theMic/Linesignalsontheir way to the internaleffectsproc-
essors and main mix (functions In1 and In2). You can also
adjust some EQ settings for the Mic signal (EQUAL func-
tion). The parameters associated to the IN1, IN2 and
EQUAL functions are discussed further ahead.
Let’s first examine the Vocal Processor feature.
INPUT 2
If you insert your mic into the
Mic/Line 2 jack, you will not
be able to use the Vocal
Processor features.

○○ ○○○○○○○○○○○○
6 Vocal Processor
UnderstandingtheVocalProcessor
Thefirst thing to be sure about is what theVocal Processor
actually does. Quite simply, it harmonizes the mic signal
(your voice) up to 4 times, depending on how many notes
youplayon the keyboard;one note, oneharmonized voice.
Thereare also two modes of operation; Vocoder mode and
Unison mode. In Vocoder mode, the pitch of the harmo-
nized voices depend on the pitch of the notes played on
the keyboard. In Unison mode, the mic signal is doubled
up to 4 times at the same pitch, without having to play on
the keyboard.
Each voice has an independent Volume and Pan control
and an on/off switch. There’s also a general Voice Edit
with LFO, Pitch envelope and Transpose controls.
The easiest way to learn about how to use the Vocal Proc-
essor is to try an example. Let’s try and listen to our voice
harmonized 4 times without other background sounds. In
Performance mode, the track whose note data is used by
the Vocal Processor to duplicate the voices (the Vocoder
track) corresponds to track 1, but you can assign this track
to any Performance part (syn 1-16). If you want to use the
Sequencer, you can assign the Vocoder Track to one of the
16 sequencer tracks (seq 1-16).
Example
1. Make sure you have a Performance selected.
2. Turn off all parts of the Performance except Part 1.
3. Play on the keyboard and turn down the volume of Part 1
until you hear no sound.
LEDON

○○ ○○○○○○○○○○○○○○○○○○○○○○○○○○○○
Vocal Processor 7
4. Speak into the microphone and turn down the mic volume
with the INPUT panel slider. You should not hear your
voice over the amp system.
5. Now play a note or chord (of up to 4 notes) on the key-
board and at the same time sing into the mic.
You’ll hear a vocal harmony consisting of as many voices
as the number of notes pressed (up to 4).
You don’tnecessarily have to sing -you can speak(or even
grumble)- the pitch of the vocal harmony will take the pitch
of the notes played, therefore, even if you sing out of tune,
the pitch of the duplicated voices will be exactly the same
pitch as the corresponding notes.
If you want to hear your voice as well as the vocal har-
mony, adjust the INPUT panel slider to balance your voice
with the vocal harmony.
Let’s now examine the parameters that you can set.
TheVocalProcessorsettings
You can change the default settings of the Vocal Proces-
soras required and store them to the Performances. Each
Performance can memorize a different Vocal Processor
setting.
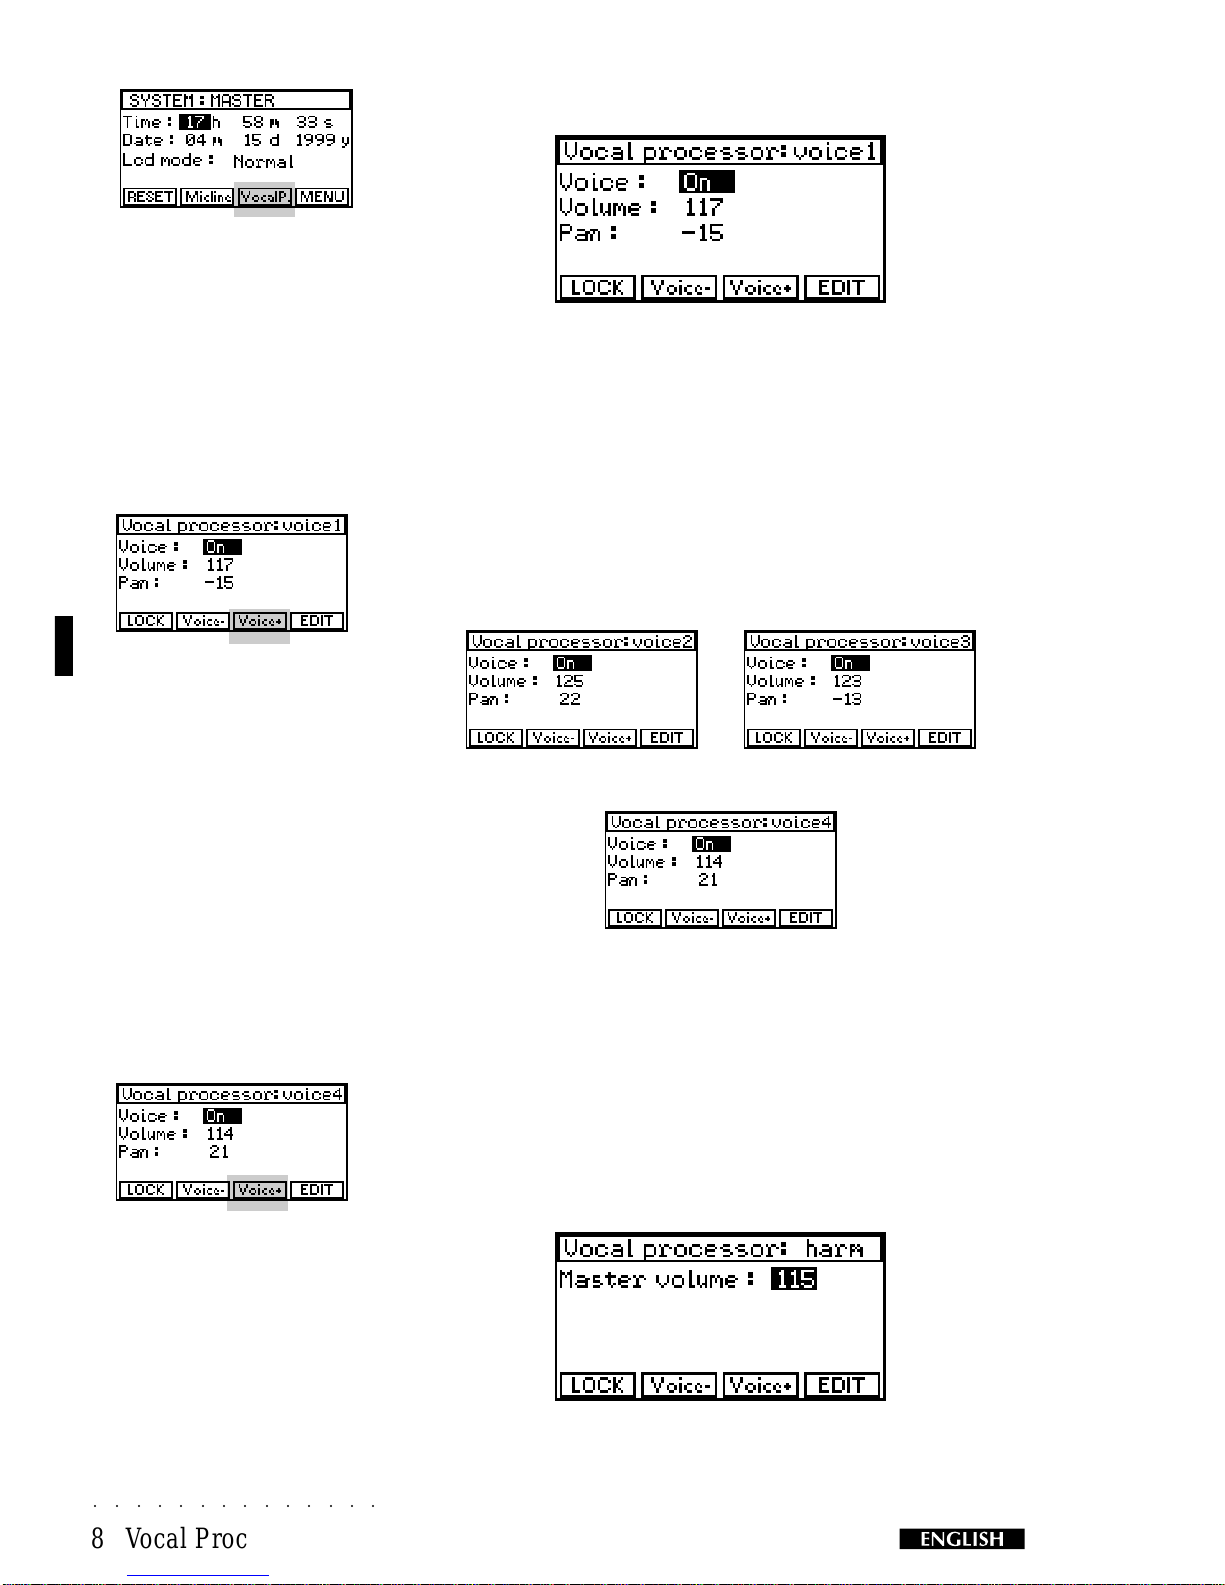
Settingthe Voices
After enabling the Mic/Line interface and the Vocal Proc-
essor (see page 4), press ESCAPE to close the Mic/Line
Inputsscreen and return to the SYSTEM MASTERscreen.
○○ ○○○○○○○○○○○○
8 Vocal Processor
SelecttheVocalP.button,(F3)toentertheVOICE 1 screen:
Here you have the Voice parameter to turn the voice off or
on, the Volume parameter to adjust the Volume and the
Pan parameter to change the position of the voice within
the stereo panorama.
Using the VOICE + button, F3, you can select the other 3
voices and program the corresponding parameters inde-
pendently.
Voice2 Voice3
Voice4
The default settings of all 4 voices is ON.
Settingthe Harmony Master Volume
After the Voice 4 screen, pressing the VOICE + button,
(F3), again opens the Vocal Processor Harmony screen
whereyou can adjust the overall volume of the VocalProc-
essor.
Use the VOICE – button, F2, to step backwards.
NOTE: At any moment, you
may want to store the set-
tings to the current Perform-
ance. Use the Store Per-
formance procedure ex-
plained in the Performance
Mode chapter of your Equi-
nox owner’s manual.
Other manuals for equinox
1
This manual suits for next models
1
Table of contents



