Geemarc Extra Earpiece CLA 1 User manual

CLA 1
User guide index p.2
Sommaire de la notice d’utilisation p.2
GB
F
E X T R A E A R P I E C E

INDEX
DESCRIPTION 3
SETTING UP
-ConnectingtheCLA 1 5
-Select your phone 5
-Select theworking mode(Handset /headset) 5
-How tousethe handset 6
- How to use the earpiece 6
-How touse theheadset (option) 6
TROUBLE SHOOTING 7
GUARANTEE 8
SOMMAIRE
DESCRIPTION 9
REGLAGES
- Connecter le CLA 1 11
-Selectionner letypede téléphone 11
- Selectionner le mode de fonctionnement (combiné /casque) 11
-Utilisation ducombiné 12
-Utilisation del’écouteur 12
-Utilisation ducasque (option) 12
PROBLEMES DE FONCTIONNEMENT 13
GARANTIE 14
GB
F
2

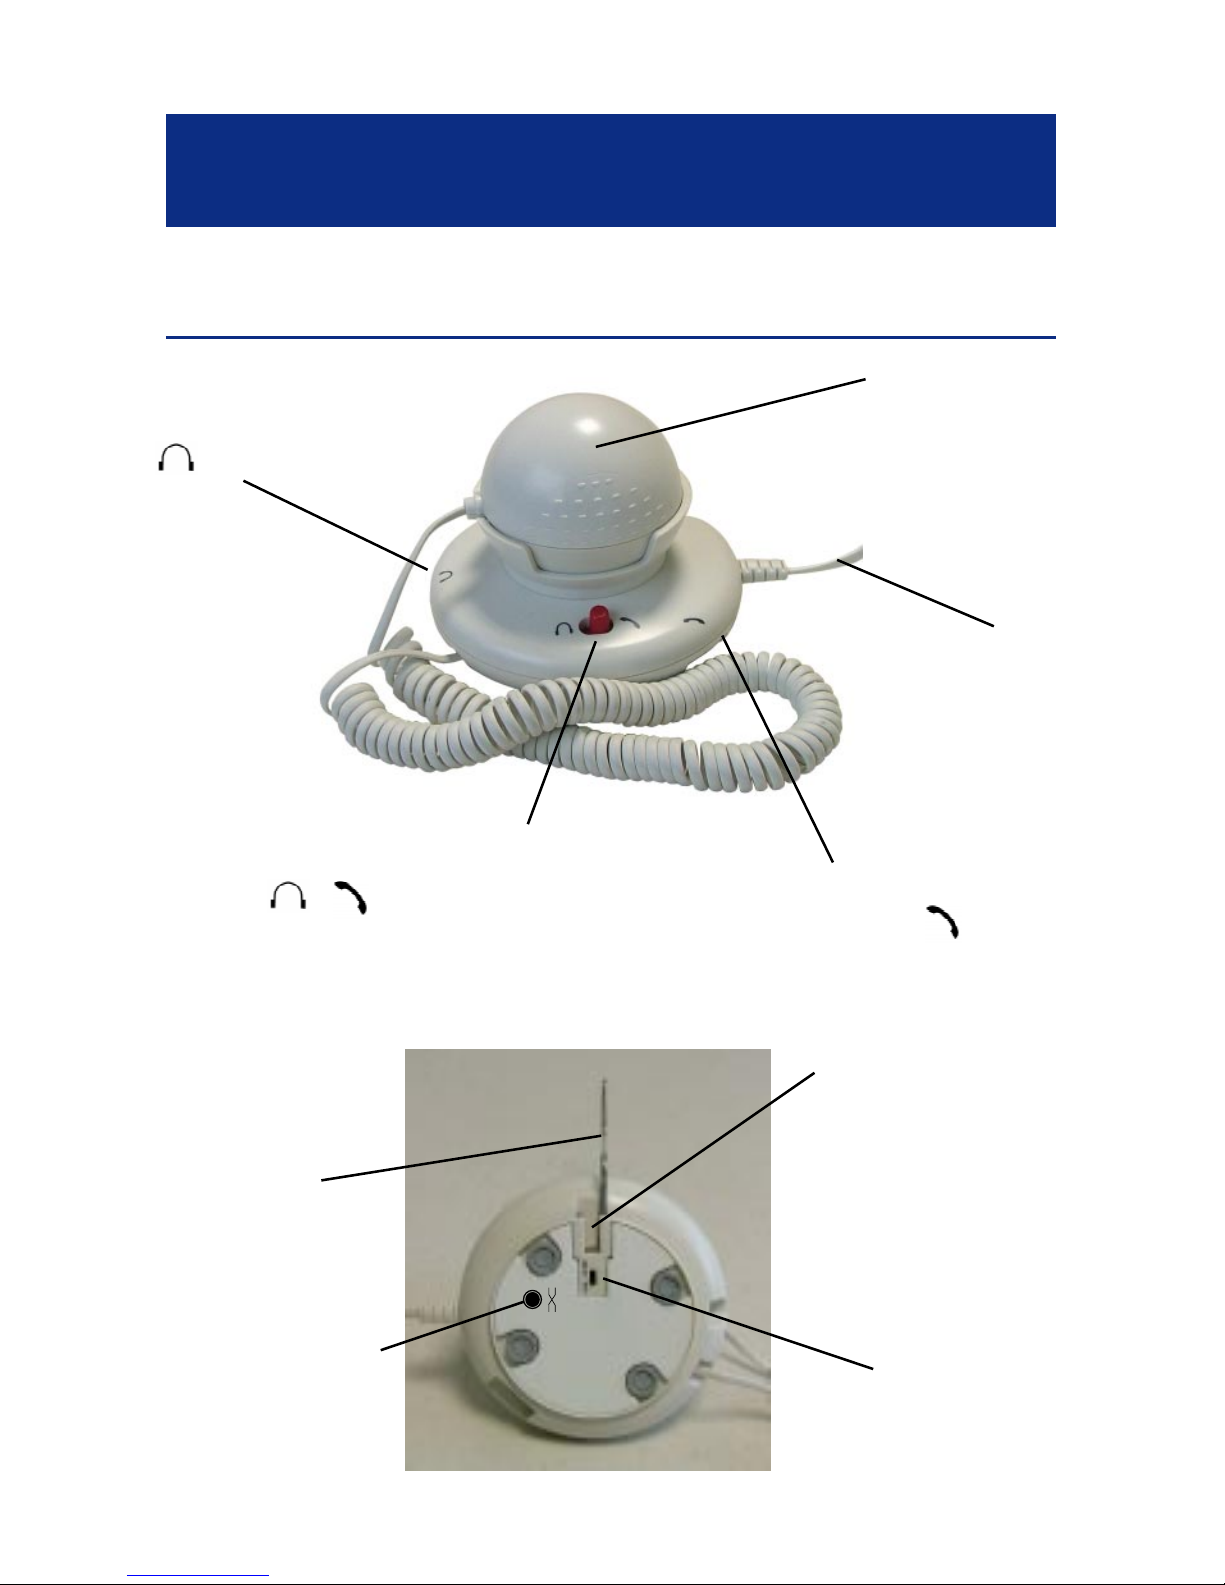
DESCRIPTION
Headset hook/Rack mounting
DESCRIPTION
CLB/CL
switch(6)
Earpiece polarity
switch(7)
Headsetsocket(1)
(*)
Headset/Handset select switch(2)
/
Basecord connection
(4)(*)
Handsetsocket (3)
(*)
Earpiece (5)
Hook/Rack
Hook/Rackslide for
mounting
(insertup tolisten «clic»)
3
(*) Classified TNV-3 according to EN60950 standard.

DESCRIPTION
Viewof theCLA 1after Hook/Rackmounted:
View of the CLA 1 with a headset on Hook/Rack:
Note: Headset is an option and is not supplied with the CLA 1.
Geemarc headset reference : HEADSCL_BLK
4

SETTING
Connecting the CLA 1
ToconnecttheCLA1 toyourphonepleasefollowtheinstructions
carefully. Seepictures onpage3 tolocate theplugs andsocket.
1-Disconnectyourhandset fromyourphone base.
2 - Connect the CLA 1 short curly cord (4) to the handset phone
socket.
3-ConnectthehandsetcurlycordtotheCLA1handsetsocket
(3) .
4 - Connect the headset (option) to the headset socket (1) .
Select your phone
TohavethebestreceivinglevelsettheswitchCL-B/CL(6)located
under the CLA 1 to the desired position, the CL-B position must
be used for phones with handset boost feature (like CL 200,CL
400, CL 500) and CL position for normal phone (like CL 50, CL
100).
Select the function mode (Handset / headset)
Youcanselect thefunction modebyusingtheswitch (2) located
onthe CLA 1 toptoselect thehandset bysettingtheswitchtothe
position and the headset by setting the switch to the .
TheCLA 1isnow readytouse.
Note: TheCLA 1 functionality areonlyguaranted withGeemarc
telephones CL 50 to CL 500 range.
SETTINGS
5

How to use the handset
Makesurethattheswitch(2)issetto .Whenyoureceiveacall
lift the handset from the cradle and speak, at the end of the call
replacethehandsetinthe phonecradle.
How to use the earpiece
Whenyoureceiveacall,liftthehandsetfromthecradleandspeak.
A second person can lift the earpiece and use it as a handset to
listentotheconversation.Oryoucanputtheearpiecetoyourother
eartoimprove yourreception.Attheend ofthecallsimplyreplace
thehandset andthe earpiecein theirrespective cradles.
Note: Inthiscase, earpieceandhandsetcanbeusedat thesame
time.
How to use the headset (headset is not supplied)
Whenyoureceiveacall,liftyourhandsetandplaceitnearthephone
base,makesurethattheswitch(2) isset to .Thenspeakand
listenyourcorrespondentwithyourheadset(Geemarcheadsetref:
HEADSCL_BLK).Attheendofthecallreplacethehandsetinthe
phonecradle.
Note: Inthiscase,earpieceandheadsetcanbeusedatthesame
time.
SETTINGS
6

IMPORTANT NOTICE:
The CLA 1 will work with all CLEARSOUND 50 to 500 series. It
mayhappendthatCLA1doesnotworkwith telephonesfromothers
suppliers, we cannot guarantee the functionality of the
CLA 1 in this case.
Note:ifyougetaloudnoiseoscillationorcracklingwhenconnecting
the headset simply press the switch (7) located under the
CLA 1 toavoidthe problem(earpiece polarity).
TROUBLE SHOOTING
- No dial tone: Make sure everythings is connected in the correct
plugs.
- The receiving level is too low or too high: Check the CL-B/CL
switchlocatedunder yourCLA 1.
-Cracklingintotheheadsetorearpiece:checkthe switch(7)
located underthe CLA 1.
-Nothinghappensafterfollowingtheinstructionsabove:checkyour
telephoneandthenetworkconnection.
For product support and help visit our website at www.geemarc.com
telephone 01707 384438
or fax 01707 372529
TROUBLE SHOOTING
7

GUARANTEE
Fromthe momentyourGeemarc productispurchased,Geemarc
guaranteeitfor theperiodofoneyear. Duringthistime,all repairs
or replacements (at our option) are free of charge.Should you
experienceaproblemthencontactourhelplineorvisitourwebsite
at www.geemarc.com.The guarantee does not cover accidents,
negligence or breakages to any parts. The product must not be
tamperedwith ortakenapartbyanyone whois notan authorised
Geemarcrepresentative.TheGeemarcguarantee innowaylimits
yourlegalrights.
IMPORTANT: YOUR RECEIPT IS PART OF YOUR
GUARANTEE AND MUST BE RETAINED AND PRODUCED
IN THE EVENT OF A WARRANTY CLAIM
Please note: Theguaranteeappliestothe UnitedKingdom only.
DECLARATION: Geemarc Telecom SA Hereby declares that
thisproduct isincompliancewiththe essentialrequirements and
other relevant provisions of the Radio and Telecommunications
Terminal Equipment Directive 1999/5/EEC and in particular
article 3 section 1a, 1b and section 3.
For product support and help visit our website at www.geemarc.com
telephone 01707 384438
or fax 01707 372529
GUARANTEE
8
DESCRIPTION
DESCRIPTION
Montage du support casque
Prise casque (1)
(*)
InterrupteurdesélectionCasque/Combiné(2)
/
Cordonde connection
à la base (4) (*)
Prise combiné (3)
(*)
Ecouteur(5)
Support
casque
Glissière de montage
dusupport
(insérerjusqu’au«clic»)
Interrupteur
CLB/CL
(6)
Interrupteur polarité
casque(7)
9
(*) Classée TRT-3 selon la norme EN60950

Vue duCLA1avecson supportcasque:
Vuedu CLA1avec uncasquesursonsupport:
Note: Le casqueest uneoption etn’est pasfourni avecle CLA 1.
Référence casque Geemarc : HEADSCL_BLK
DESCRIPTION
10
This manual suits for next models
1
Table of contents
Languages:


