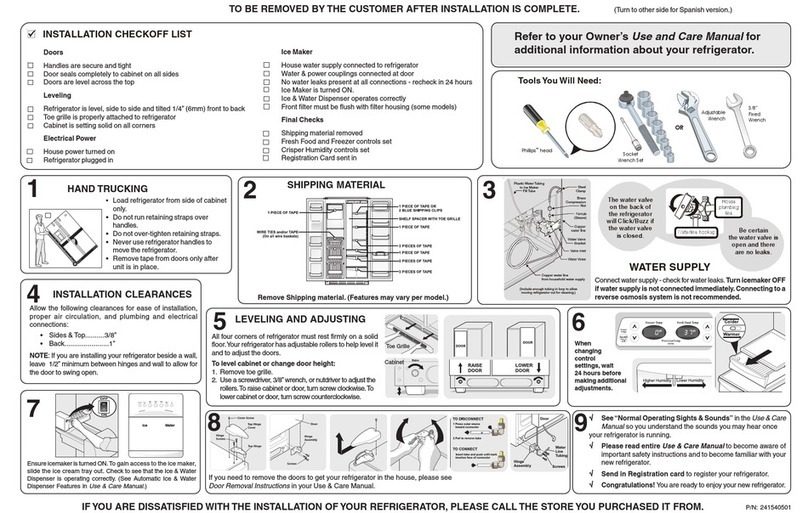
GE 14 User manual

Models
14, 16, 17, 18
Refrigerators
Owner’s Manual
Par t No. 162D6736P004 Pub. No.39-6424-1 9-99 JR
TOP-MOUNT NO-FROST

2
Congratulations!
Welcome to our family. We’re proud of our
quality products and we are committed to
providing dependable service. You’ll see it in
this easy-to-use Owner’s Manual and you’ll
hear it in the friendly voices of our customer
service department.
Best of all, you’ll experience these values
each time you use your refrigerator. That’s
important, because your new refrigerator will
be part of your family for many years. And we
hope you will be part of ours for a long time
to come.
We appreciate your purchase, and hope you
will continue to rely on us whenever you
need quality appliances for your home.
Important!
Fill out and return the Consumer Product
Registration Card that is packed with this
product. If you cannot find it, please send
in the duplicate card printed in the back of
this manual.
Write the model and serial
numbers here.
#
#
You can find them on a label on the
upper left side of the fresh food
compartment.
Staple sales slip or cancelled
check here.
Proof of the original purchase date
is needed to obtain service under
the warranty.

A Service Partnership.
Inside you will find many
helpful hints on how to use and
maintain your refrigerator
properly. Just a little preventive
care on your part can save you a
great deal of time and money
over the life of your refrigerator.
Read this Manual
We stand behind our products with
unmatched quality service. However, did
you know that most questions result from
simple problems that you can easily
fix yourself in just a few minutes? This
Owner’s Manual can tell you how.
You’ll find many answers to
common problems here.
If you review our chart of
Troubleshooting Tips first,
you may not need to call for
service at all.
Review the Section on
Troubleshooting Tips
If you do need service, you can
relax knowing help is only a
phone call away. A list of toll-free
customer service numbers is
included in the back section.
Or you can always call the
GE Answer Center®at
800.626.2000, 24 hours a day,
7 days a week.
If You Need Service
Safety Information
Safety Precautions . . . . . . . . . .4
Proper Disposal . . . . . . . . . . . . .5
How to Connect Electricity . . . .6
Use of Adapter Plugs . . . . . .6, 7
Use of Extension Cords . . . . . .7
Operating Instructions
Temperature Control Dial . . . . .8
Shelves . . . . . . . . . . . . . . . .9, 10
Storage Drawers . . . . . . . .11, 12
Automatic Icemaker . . . . . . . .13
Care and Cleaning . . . . . .14–16
Installation Instructions
Preparing to
Install the Refrigerator . . .17, 18
Water Line Installation . . .19–23
Reversing the
Door Swing . . . . . . . . . . . .24–29
Troubleshooting Tips
Normal Operating Sounds . . .30
Before You
Call For Service . . . . . . . . .31–33
Customer Service
Product Registration . . . . . . . .37
Warranty . . . . . . . . . . . . . . . . .39
Service Telephone
Numbers . . . . . . . . . .Back Cover
3
Troubleshooting TipsInstallation Instructions Customer ServiceOperating InstructionsSafety Information

IMPORTANT SAFETY INFORMATION.
READ ALL INSTRUCTIONS BEFORE USING.
4
Use this appliance only for its intended purpose as
described in this Owner’s Manual.
■This refrigerator must be
properly installed and
located in accordance with
the Installation Instructions
before it is used.
■Do not allow children to
climb, stand or hang on the
shelves in the refrigerator.
They could damage the
refrigerator and seriously
injure themselves.
■Do not touch the cold
surfaces in the freezer
compartment, particularly
when hands are damp or wet.
Skin may stick to these
extremely cold surfaces.
■Do not store or use gasoline
or other flammable vapors
and liquids in the vicinity of
this or any other appliance.
■In refrigerators with
automatic icemakers, avoid
contact with the moving parts
of the ejector mechanism, or
with the heating element that
releases the cubes. Do not
place fingers or hands on the
automatic icemaking
mechanism while the
refrigerator is plugged in.
■Keep fingers out of the
“pinch point” areas;
clearances between the
doors and between the doors
and cabinet are necessarily
small. Be careful closing
doors when children are in
the area.
■Unplug the refrigerator
before cleaning and making
repairs.
NOTE: We strongly recommend
that any servicing be performed
by a qualified individual.
■Turning the control to the
OFF
position does not remove
power to the light circuit.
■Do not refreeze frozen foods
which have thawed
completely.
SAFETY PRECAUTIONS
Operating Instructions
Installation Instructions Safety InformationTroubleshooting TipsCustomer Service
When using electrical appliances, basic safety precautions
should be followed, including the following:
WARNING!

DANGER! RISK OF CHILD
ENTRAPMENT
PROPER DISPOSAL OF THE REFRIGERATOR
5
Troubleshooting TipsInstallation Instructions Customer ServiceOperating InstructionsSafety Information
Child entrapment and suffocation are not problems of
the past. Junked or abandoned refrigerators are still
dangerous…even if they will sit for “just a few days.”
If you are getting rid of your old refrigerator, please
follow the instructions below to help prevent accidents.
Before You Throw Away Your Old Refrigerator
or Freezer:
■Take off the doors.
■Leave the shelves in place so that children may not
easily climb inside.
CFC Disposal
Your old refrigerator has a cooling system that used
CFCs (chlorofluorocarbons). CFCs are believed to harm
stratospheric ozone.
If you are throwing away your old refrigerator, make
sure the CFC refrigerant is removed for proper disposal
by a qualified servicer. If you intentionally release this
CFC refrigerant you can be subject to fines and
imprisonment under provisions of the Federal Clean
Air Act.

IMPORTANT SAFETY INFORMATION.
READ ALL INSTRUCTIONS BEFORE USING.
6
Operating Instructions
Installation Instructions Safety InformationTroubleshooting TipsCustomer Service
HOW TO CONNECT ELECTRICITY
Do not, under any circumstances, cut or remove the third
(ground) prong from the power cord. For personal safety,
this appliance must be properly grounded.
The power cord of this appliance is equipped with a 3-prong
(grounding) plug which mates with a standard 3-prong
(grounding) wall outlet to minimize the possibility of electric
shock hazard from this appliance.
Have the wall outlet and circuit checked by a qualified electrician
to make sure the outlet is properly grounded.
Where a standard 2-prong wall outlet is encountered, it is your
personal responsibility and obligation to have it replaced with a
properly grounded 3-prong wall outlet.
The refrigerator should always be plugged into its own individual
electrical outlet which has a voltage rating that matches the rating
plate.
This provides the best performance and also prevents overloading
house wiring circuits which could cause a fire hazard from
overheated wires.
Never unplug your refrigerator by pulling on the power cord.
Always grip plug firmly and pull straight out from the outlet.
Repair or replace immediately all power cords that have become
frayed or otherwise damaged. Do not use a cord that shows cracks or
abrasion damage along its length or at either end.
When moving the refrigerator away from the wall, be careful not to
roll over or damage the power cord.
USE OF ADAPTER PLUGS
Because of potential safety hazards under certain
conditions, we strongly recommend against the use of an
adapter plug.
However, if you must use an adapter, where local codes permit, a
temporary connection
may be made to a properly grounded 2-prong
wall outlet by use of a UL-listed adapter available at most local
hardware stores.
WARNING!

7
The larger slot in the adapter must be aligned with the larger slot in
the wall outlet to provide proper polarity in the connection of the
power cord.
When disconnecting the power cord from the adapter, always hold
the adapter in place with one hand while pulling the power cord
plug with the other hand. If this is not done, the adapter ground
terminal is very likely to break with repeated use.
If the adapter ground terminal breaks,
DO NOT USE
the refrigerator
until a proper ground has been established.
Attaching the adapter ground terminal to a wall outlet cover screw does not
ground the appliance unless the cover screw is metal, and not insulated, and the
wall outlet is grounded through the house wiring. You should have the circuit
checked by a qualified electrician to make sure the outlet is properly grounded.
Troubleshooting TipsInstallation Instructions Customer ServiceOperating InstructionsSafety Information
USE OF EXTENSION CORDS
Because of potential safety hazards under certain
conditions, we strongly recommend against the use of an
extension cord.
However, if you must use an extension cord, it is absolutely
necessary that it be a UL-listed, 3-wire grounding type appliance
extension cord having a grounding type plug and outlet and that
the electrical rating of the cord be 15 amperes (minimum) and
120 volts.
REMEMBER…
Your continued health and safety are important to us.
Please read and follow this Safety Information carefully.
We want you to remain a happy and healthy part of our
family.
SAVE THESE INSTRUCTIONS

Temperature Control Dial
The temperature control dial has nine settings plus
OFF
.
1
is the warmest.
9
is the coldest. At first, set the dial at
5
.
After using the refrigerator, adjust the dial if necessary.
Insert a coin into the slot in the middle of the dial and you can turn
the dial to the setting that’s best suited to your needs.
Allow 24 hours for the refrigerator to get cold.
8
Operating Instructions
Installation Instructions Safety InformationTroubleshooting TipsCustomer Service
About the temperature control dial.
Turning the dial to OFF stops cooling in both compartments—
fresh food and freezer.
5
1
7
9
3
OFF
Control Settings

About the fresh food compartment shelves.
Shelf supports at various levels allow you to custom-space your shelves.
Not all features are on all models.
Troubleshooting TipsInstallation Instructions Customer ServiceOperating InstructionsSafety Information
Half-Width Shelves
One end of the shelf rests on a molded side-wall
support; a bracket on the other end hooks into a track
on the rear cabinet wall.
To remove,
lift the shelf up at front, then off the support
and out of the track.
To replace,
select desired shelf height. With shelf front
raised slightly, hook the bracket’s top lug into the track,
then lower the shelf onto the support.
NOTE:
The shelf to the right of the track is designed to
hook into the right-hand slot; the shelf to the left is
designed to hook into the left-hand slot.
2Lift up and out
1Tilt up
Full-Width Shelves
Some models have a steel wire sliding shelf, a stationary
tempered glass shelf or two steel wire stationary shelves.
These shelves can be moved to another place in the
fresh food compartment.
The full-width sliding shelf has stop-locks. When placed
correctly on the shelf supports, the shelf will stop before
coming completely out of the refrigerator and will not
tilt when you place food on it or remove food from it.
To remove the full-width shelves,
lift the rear of the shelf
and pull forward.
To remove a full-width shelf when the fresh food
compartment door cannot be opened fully,
lift the rear of
the shelf, pull forward and down, tilt the shelf and take it
out.
9

10
Operating Instructions
Installation Instructions Safety InformationTroubleshooting TipsCustomer Service
About the freezer compartment shelves.
Some models have an ice-tray shelf and some have a full-width step shelf.
Ice-Tray Shelf
To remove the ice-tray shelf:
Lift the left side of the shelf
off its supports, then pull the shelf to the left to free it of
the plug supports. Pull the shelf to the right to free the
pins from the holes in the cabinet wall.
Step Shelf
To remove the step shelf:
Lift left side of shelf slightly.
Move shelf to the left to free its right ends from holes
in the cabinet wall.
Lower right side of shelf, move shelf to the right and
take it out.
To replace the step shelf:
With shelf tilted as shown, fit left ends of shelf into
holes in cabinet wall.
Lift left side of shelf slightly, swing shelf up, fit right
ends of shelf into holes in cabinet wall, and lower
shelf into place.
2
1
3
2
1
1
2
Plug Supports
Other manuals for 14
5
This manual suits for next models
3
Table of contents
Other GE Refrigerator manuals

GE
GE Monogram ZDOD240 User manual

GE
GE Profile PSB42LSRBV User manual

GE
GE Profile PFSF5NFX Manual

GE
GE Profile Operating instructions

GE
GE GSC22QGTBB Assembly instructions

GE
GE PFSS5NFZSS Assembly instructions

GE
GE 6 Cubic Foot Operating instructions

GE
GE SIDE BY SIDE 25 Service manual

GE
GE GFSL6KKY Manual

GE
GE TBX14SABAA User instructions